Retrieve a Large Data Set with the Bulk Query Operation

Bulk query refers to the Bulk API's ability to retrieve large volumes of data efficiently and asynchronously. Bulk query supports an SOQL query to fetch millions of records for analysis or integration with other systems. You can also use bulk query for data migrations and regular backups of Salesforce records. Bulk query improves performance by requiring only a single API call to fetch all data.

This use case describes how to configure the Salesforce REST Adapter to query a large number of account records from Salesforce Cloud using the Bulk Query operation.

In this use case, you perform the following tasks:
  • Query the records to fetch using the Create a Job operation.
  • Obtain the runtime status of the bulk query process using the Get Info for a Job operation.
  • Use the Get Result for a Job operation to write the result into a file.

Follow these steps for more details:
  1. Create an application integration.
  2. Drag the REST Adapter into the integration canvas.
  3. Configure the REST Adapter.
  4. Drag the Salesforce REST Adapter and configure it with the required bulk operation.
    1. On the Basic Info page, provide a name.
    2. On the Action page, select Perform Bulk Data Operations.
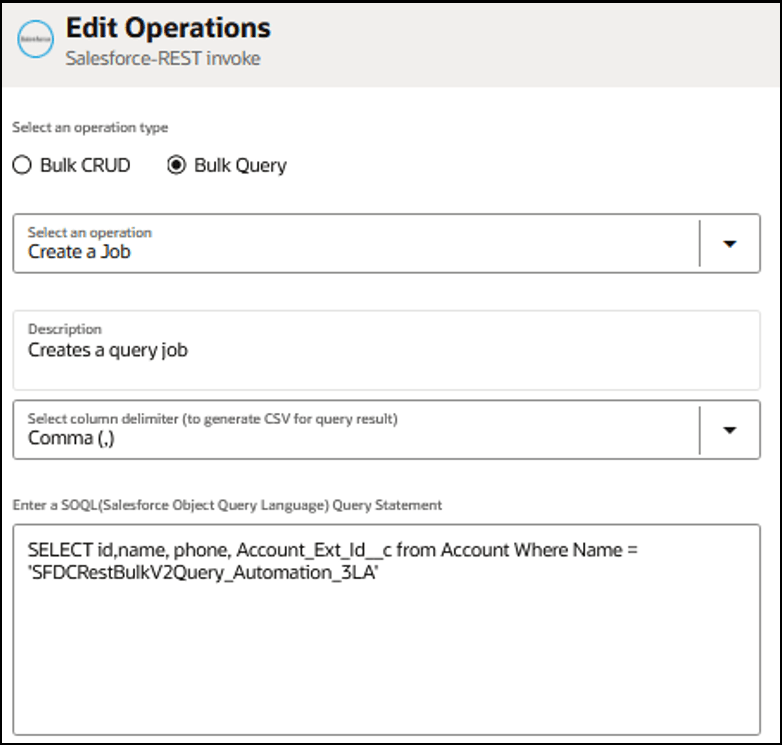
    3. On the Operations page, select Bulk Query as the Operation Type, Create a Job as the operation, and a suitable delimiter in the Select column delimiter field.
    4. Enter a valid SOQL query, then click Refresh and Test My Query.

      The Edit Operations dialog is shown. The Bulk Query option is selected. Below this, the Create a Job option is selected. The Description field provides a description. Comma (,) is selected as the column delimiter. Below this an SOQL query is provided.

    5. On the Summary page, review your selections.
  5. In the integration canvas, drag a data stitch action and add three variables:
    1. Set Loop1Variable to true.
    2. Set Loop2Variable to true.
    3. Set QueryLocator to ‘’.
  6. Drag a while action and set the Loop1Variable condition to true.
  7. Drag the Salesforce REST Adapter invoke connection inside the loop.
    1. Select Perform Bulk Data Operations.
    2. Select the Bulk Query operation type and the Get Info for a Job operation.
    3. Review your selections on the summary page.
  8. In the mapper, map the source Id element under Create_job Response to the target Query Job Id element.

    The Sources, Mapping canvas, and Target sections are shown. The source id is mapped to the Query Job id field.

  9. Drag a switch action into the integration canvas and add two routes.
    • In the first route:
      1. Set condition state = InProgress.
      2. Add a data stitch action and assign Loop1Variable to true.
      3. Add a wait action and set it to ten seconds.
    • In the second route:
      1. Set condition state = JobComplete.
      2. Add a data stitch inside the route.
      3. Assign Loop1Variable to false.
  10. Exit the first while action.
  11. Add a second while action and set the condition Loop2Variable to true.
  12. Inside the second while action, add another Salesforce REST Adapter connection.
    1. Select the Perform Bulk Data operation.
    2. On the Operations page, select the Bulk Query operation type and the Get Result for a Job operation.
    3. On the Summary page, review your selections.
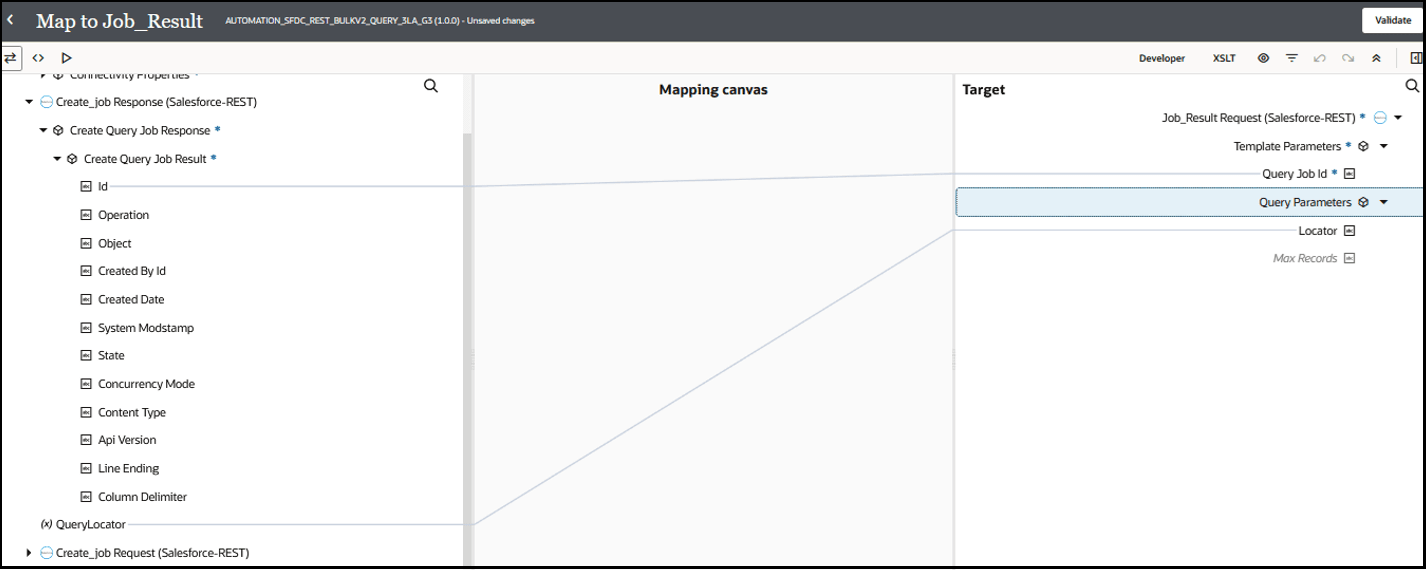
  13. In the mapper, map the source Id element under Create Query Job Result to the target Query Job Id element and the source QueryLocator variable to the target Locator element under Query Parameters.

    The Sources, Mapping canvas, and Target sections are shown. The source id element is mapped to the target Query Job id element. The source QueryLocator is mapped to the target Query Parameters field.

  14. Drag an FTP Adapter into the integration canvas.
  15. Configure the FTP Adapter as follows:
    1. On the Basic Info page, provide a name.
    2. On the Operations page, select Write File from the Select Operation list.
    3. Select Binary from the Select a Transfer Mode list.
    4. Provide the output directory and file name pattern, then select No from the Do you want to specify the structure for the contents of the file? list.
    5. On the Summary page, review your selections.
  16. In the mapper, map the source Stream Reference element under Get Result for Query Job Response to the target File Reference element under Request (FTP).

    The Sources, Mapping canvas, and Target sections are shown. The source Stream Reference element is mapped to the target File Reference field.

  17. Add a switch action inside the loop and configure one Route path and the Otherwise path.
    • In the Route path:
      1. Set the condition QueryLocator to !=’null’.
      2. Add a data stitch action and assign QueryLocator = queryLocator and Loop2Variable = true.
    • In the Otherwise path:
      1. Add a data stitch action.
      2. Assign Loop2Variable = false.
  18. Click Business Identifiers Business identifiers icon and specify the tracking variable.
  19. Activate and run the integration.
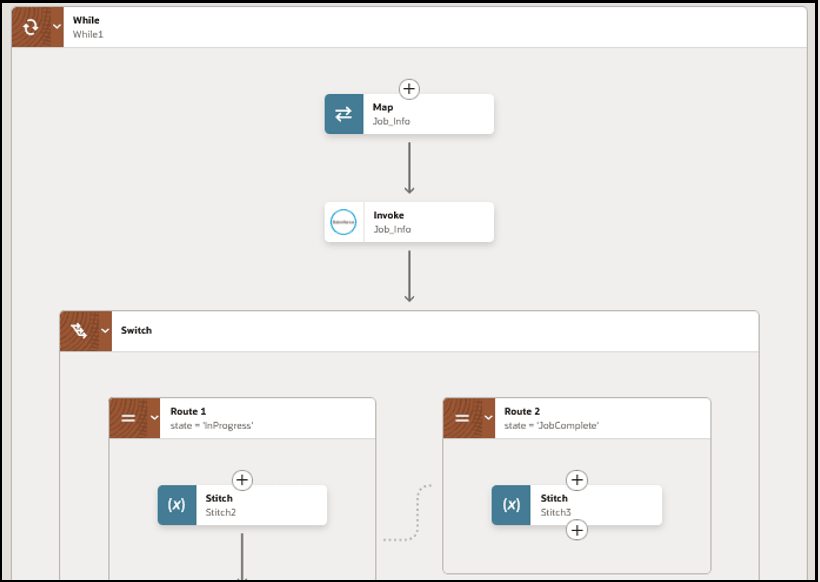
    When complete, this part of the integration looks as follows.


    The while action is shown, which includes a map and invoke and then a switch action. The switch action shows route 1 with a data stitch action and route 2 with a data stitch action.