1 Prerequisites

The following sections provide information about the tasks that you need to perform before connecting your Java applications to Oracle Autonomous Database using Oracle JDBC driver and Universal Connection Pool.

1.1 Prerequisites (one-way TLS)

This section lists prerequisites for one-way TLS authentication.

1.1.1 Provisioning an Oracle Autonomous Database Instance

This section describes how to provision an Oracle Autonomous Database Instance if you have not provisioned it already.

Click these links to walk through the steps to provision an Oracle Autonomous Database Instance.

Remember the password that you set while provisioning the Autonomous Database for the ADMIN user. For demonstration purposes, the ADMIN user is used, but it is recommended to create other database users either using Oracle SQL Developer or Database Actions.

1.1.2 Disabling Mutual TLS (mTLS) Requirement

This section lists the steps to disable the mutual TLS (mTLS) requirement and to enable both mTLS and one-way TLS connections.

After the creation of Oracle Autonomous Database, mutual TLS is enabled as a default option.
Follow these instructions to enable both mTLS and one-way TLS connections. After TLS is enabled, you can use both TLS and mTLS to connect to Oracle Autonomous Database.

See Also:

Using Oracle Autonomous Database Serverless for more information.
  1. From the Oracle Cloud Infrastructure left navigation menu, click Oracle Database, and then click Autonomous Database.
  2. On the Autonomous Databases page, select your Autonomous Database from the links under the Display name column.
  3. On the Autonomous Database details page, find the section titled Network and click Edit next to the Access control list.

    Network

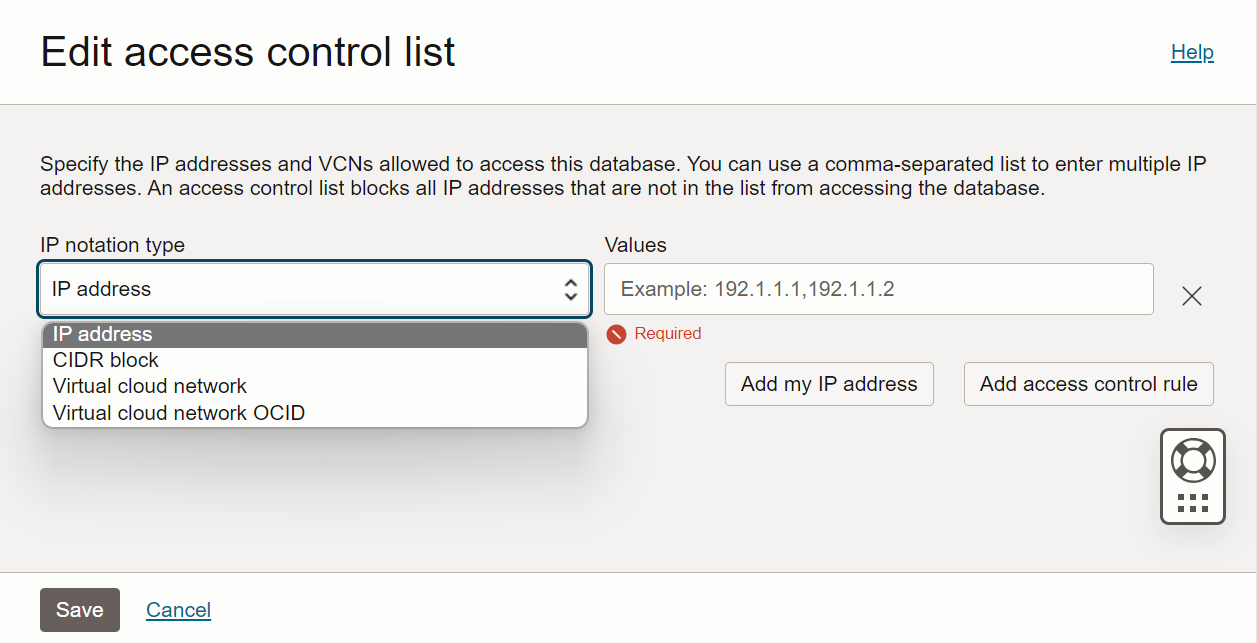
  4. In the Edit access control list dialog box, select the value for the type of entry that you want to make and enter the value.
    You can add entries by IP address (your local IP), CIDR block, and VCN (by name or OCID). Add as many as necessary.
    Edit access control list

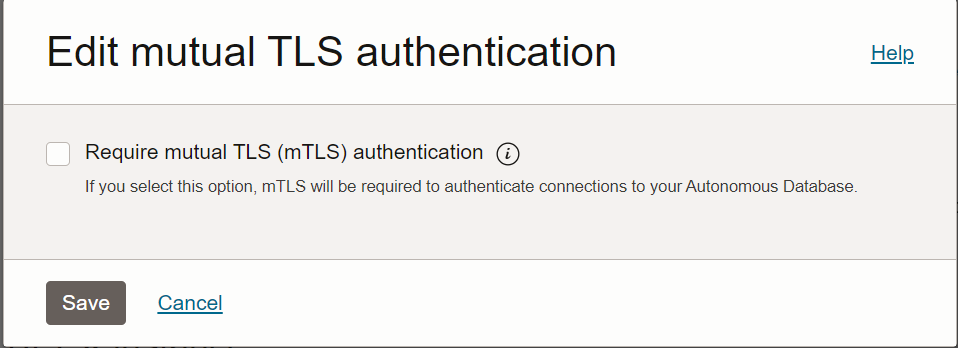
  5. Click Edit in the Mutual TLS (mTLS) authentication field, deselect the Require mutual TLS (mTLS) authentication check box, and then click Save.

    Edit Mutual TLS Authentication

    After some time the status will change to Available. Your network settings should look as shown in the following screenshot:


    Network

1.1.3 Installing JDK 8

This section lists the step to install JDK 8.

Download latest JDK 8 or a higher JDK versions.

Note:

Ensure that you use JDK8u162 or a later version. Use java -version to check the JDK version that you have installed. To check the JDBC driver version, type java -jar ojdbc8.jar.

1.1.4 Downloading a Sample Program from Github

This section lists the steps to download a sample program from Github.

  1. Download the ADBQuickStart.java file from Github. This sample application uses the Sales History (SH) sample schema and displays 20 records from the SH.CUSTOMERS table.
  2. Modify the ADBQuickStart.java file to include your Oracle Autonomous Database connection information:
    • DB_USER: You can use ADMIN, the user created by default when the Oracle Autonomous Database is created (if you create another Oracle Autonomous Database user, you can use that user instead).
    • DB_PASSWORD: Use the database user's password. If connecting as the ADMIN user, set this to the password you chose during the Create Autonomous Database step while provisioning Oracle Autonomous Database. For security reasons, you need to enter the password through the console when you run the sample.
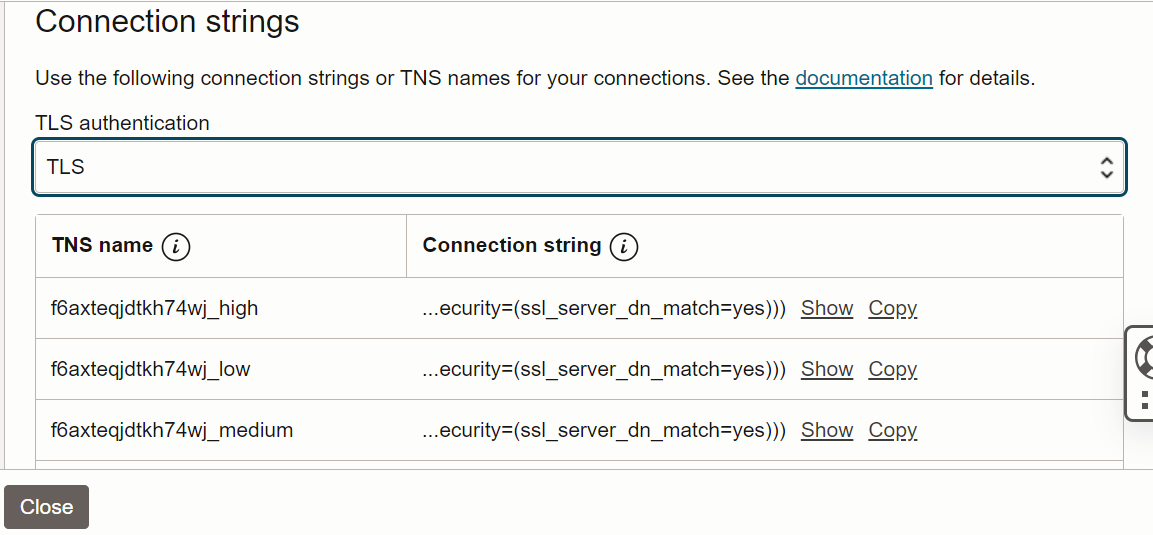
    • DB_URL: Click Database connection on the Oracle Cloud Infrastructure Console. In the Connection strings section, choose TLS from the TLS authentication drop-down list and copy the appropriate connection string based on your requirements. If you are directly using in the Java program, you need to escape " in the connection string with \"


      Connection Strings for your connections

    Example:
    DB_URL = "jdbc:oracle:thin:@jdbc:oracle:thin:@(description=
          (retry_count=20)(retry_delay=3)(address=(protocol=tcps)(port=1521)(host=adb.us-sanjose-1.oraclecloud.com))(connect_data=(service_name=mydemo.adb.oraclecloud.com))(security=(ssl_server_cert_dn=\"CN=adb.us-sanjose-1.oraclecloud.com,
          OU=Oracle ADB SANJOSE, O=Oracle Corporation, L=Redwood City, ST=California,
          C=US\")))" 
    DB_USER="ADMIN" and DB_PASSWORD="enter_it_from_console"
  3. Save changes to the ADBQuickStart.java file.
    Troubleshooting and Debugging: If you encounter any error, refer the Troubleshooting Tips page for some helpful hints.

1.1.5 Recent Changes to Database Connectivity

This section lists different versions of JDBC-thin that support host name-based matching.

DigiCert retired the Organizational Unit (OU) field for all public TLS/SSL certificates to comply with industry standards as of August 2022 per their announcement. This means that the public TLS/SSL certificates issued by DigiCert will no longer have an OU field.

See Also:

MOS Note 2911553.1

To avoid disruption to applications connecting to Oracle Autonomous Database Serverless during the server side certificate change while preserving security, you must use host name-based matching (Domain Name (DN) matching) of the server certificate (for TLS server-authentication).

The following versions of JDBC-thin support host name-based matching:
  • 21.6 (or later) or 19.15 (or later). These are the recommended versions that support (security=(ssl_server_dn_match=yes)) in the TNS connection string.
  • Other versions that require turning on host name-based matching explicitly are:
    • 21.5 (or before) and 19.14 (or before)
    • 18.21.0.0-patched-for-bug-28492769 and 12.2.0.1-Patched-for-bug-28492769
    • 12.1.0.2 and 11.2.0.4 with patch for bugs 28492769 and 19030178 (for host name-based matching and TLS v1.2 support)
    • You must also explicitly turn on DN matching using one of the following methods:
      • Using a program: prop.setProperty("oracle.net.ssl_server_dn_match", "true")
      • Setting a Java system property: -Doracle.net.ssl_server_dn_match=true

1.2 Prerequisites (mutual TLS)

This section lists prerequisites for mutual TLS authentication.

1.2.1 Provisioning an Oracle Autonomous Database Instance

This section describes how to provision an Oracle Autonomous Database Instance if you have not provisioned it already.

Click these links to walk through the steps to provision an Oracle Autonomous Database Instance.

Remember the password that you set while provisioning the Autonomous Database for the ADMIN user. For demonstration purposes, the ADMIN user is used, but it is recommended to create other database users either using Oracle SQL Developer or Database Actions.

1.2.2 Obtaining Client Credentials

This section lists the steps to obtain client credentials.

After the creation of Oracle Autonomous Database, follow these instructions to download client credentials from the Oracle Cloud Infrastructure Console. The client credentials (wallet_[dbname].zip) contain the required wallet files and the tnsnames.ora file that allows you to connect using a mTLS connection, providing enhanced security for authentication and encryption.
  1. From the Oracle Cloud Infrastructure Console, open the navigation menu, select Oracle Database, and then select Autonomous Database.
  2. Go to the Autonomous Database details page of your Oracle Autonomous Database Instance.
  3. Click Database connection.

    Obtain Client Credentials

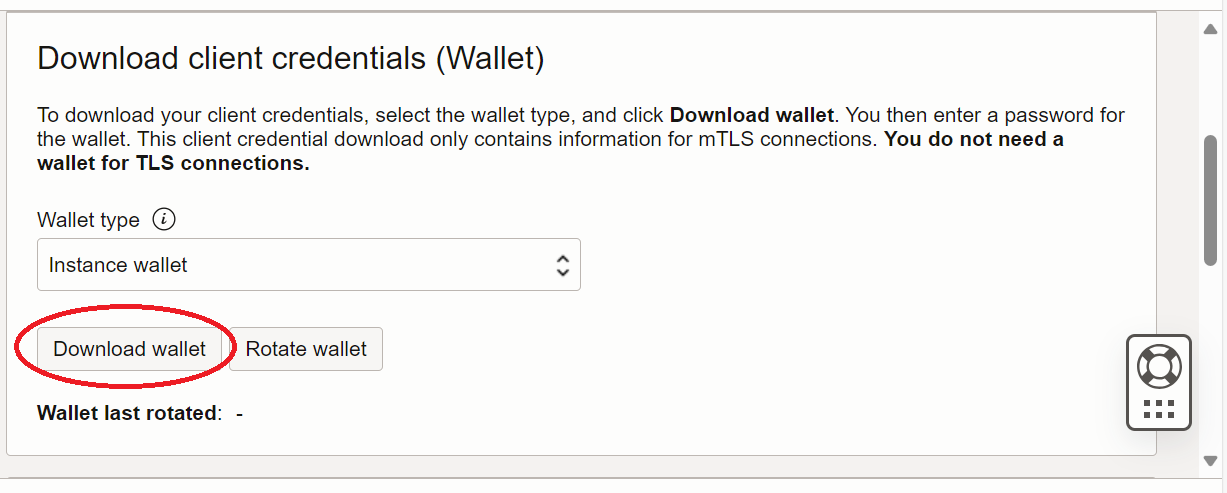
  4. Click Download wallet. Leave the Wallet type to be Instance wallet.

    Download client credentials (Wallet)

  5. Enter a wallet password in the Password field and confirm the password in the Confirm password field. Then, click Download.
    The password must be at least eight characters long and must include at least one letter, and either one numeric character or one special character.
  6. Save and unzip the client credentials zip (wallet_[dbname].zip) file to a secure directory. You will need this directory location later on.

1.2.3 Installing JDK 8

This section lists the step to install JDK 8.

Download latest JDK 8 or a higher JDK versions.

Note:

Ensure that you use JDK8u162 or a later version. Use java -version to check the JDK version that you have installed. To check the JDBC driver version, type java -jar ojdbc8.jar.

1.2.4 Downloading a Sample Program from Github

This section lists the steps to download a sample program from Github.

  1. Download the ADBQuickStart.java file from Github. This sample application uses the Sales History (SH) sample schema and displays 20 records from the SH.CUSTOMERS table.
  2. Modify the ADBQuickStart.java file to include the Oracle Autonomous Database connection information:
    • DB_USER: You can use ADMIN, the user created by default when the Oracle Autonomous Database is created (if you create another Oracle Autonomous Database user, you can use that user instead).
    • DB_PASSWORD: Use the database user's password. If connecting as the ADMIN user, set this to the password you chose during the Create Autonomous Database step while provisioning Oracle Autonomous Database. For security reasons, you need to enter the password through the console when you run the sample.
    • DB_URL: Enter the net service name (TNS Alias) DBName_medium where DBName is the Oracle Autonomous Database Name entered during the Create Autonomous Database step while provisioning Oracle Autonomous Database. The available net service names can be seen in the tnsnames.ora file, which is a part of the client credentials zip file.

      TNS_ADMIN should point to the location where you have unzipped the client credentials of Oracle Autonomous Database.

    Example:
    DB_URL = "jdbc:oracle:thin:@DBName_medium?TNS_ADMIN=/Users/test/wallet_DBName" DB_USER="ADMIN" and DB_PASSWORD="enter_it_from_console"
  3. Save changes to the ADBQuickStart.java file.

1.3 Additional Step for Changed Connection String

This section includes an additional step that is required to be performed when you change the Autonomous Database Serverless connection string.

Autonomous Database Serverless connect strings contain the host name ...(HOST=xyz)..., which depends on the region. For example, in the Chicago region, the host name would be adb.us-chicago-1.oraclecloud.com. If you have replaced the default host name with an IP address or a custom host name, then host name-based DN matching will fail.

The solution is to add a new entry to your /etc/hosts file using the original Autonomous Database Serverless domain suffix. Your connection string should then use this new name. For example, add an entry localtunnel.adb.us-chicago-1.oraclecloud.com that resolves to your custom IP address and use that name in the JDBC connection string.