Loading Data from Cloud Storage
You can load data from a cloud store to a table in your Autonomous AI Database.
You can load files in these file formats: AVRO, CSV, JSON, GeoJSON, ORC, Delimited TXT, XLSX, PRQ, GZ, GNU ZIP, Tab-Separated Values and Oracle Business Intelligence Cloud Connector (BICC) extracts. The main output of a BICC extract is one or more CSV files that contain the extracted business data in a tabular format. Alongside the CSV files, there may be metadata or manifest files used internally by BICC or downstream processes to track the extract details, but the primary deliverables are the CSV data files. For information on supported file formats, see Format Specifications for JSON, AVRO, and XML Files. The Data Load tool supports loading tables from multiple worksheets XLSX files when the file is in a cloud store.
You can set filters on the data for a table to load only the specified data. For example, to limit the files to only those that are CSV files, enter *.CSV in the file extension filter.
Configure and run a data load job from the Load Cloud Object page. To open that page:
-
Open the Database Actions and select Data Load.
-
Select LOAD DATA and Cloud Store .
On the left side of the page is a navigator pane, where you choose a cloud store connection and the folders or files containing the data. On the right of the page is the data load cart, where you stage the files and folders for the data load job. You can set options for the data load job before running it. The Autonomous AI Database comes with predefined CPU/IO shares assigned to different consumer groups. You can set the consumer group to either low, medium or high while executing a data load job depending on your workload.
To load files from a cloud store into your database, do the following:
Manage Cloud Storage Links for Data Load Jobs
Before you can load data from a cloud store, you must establish a connection to the cloud store you want to use. You can select cloud store location from the cloud store locations field.
On the Load Data page when you select Cloud Store:
- Click the Create Cloud Store locations menu besides the cloud store locations text field. This opens an Add Cloud Store Location dialog box. See Managing Connections to add cloud store location.
To return to the Load Cloud Object page, click Data Load in the breadcrumbs at the top of the page and then navigate back to the page.
Prepare the Data Load Job
As you’ll see below in Enter Details for the Data Load Job, the first decision you’ll make when configuring a data load job is how to load the source data into a new or existing table in the database. The choices are:
-
Create a table and insert data loaded from the source into the new table.
-
Insert data loaded from the source into an existing table.
-
Delete all data in an existing table and then insert new data from the source into the table.
-
Drop a table, create a new table, and then insert data loaded from the source into the new table.
-
Merge data from the source into a table by updating existing rows in the table and inserting new rows into the table.
You may have to adjust your source data or your target table so that the source data loads correctly into the external target table. The number, order, and data types of columns in the source must match those in the target. Consider:
-
If you’re creating a new table or if the columns in your source exactly match the columns in an existing target, you don’t have to do any special preparation.
-
If the columns in your source don’t match the columns in an existing target, you must edit your source files or target table so they do match.
-
If you’re loading multiple files, you must make sure that:
-
All the source files are of the same type, for example, CSV, JSON, etc.
-
The number, order, and data types of the columns in all the source files match (and that they match the target, if you’re loading into an existing table).
-
-
If you want to partition by date:
-
The source file must contain data where the data type is date or timestamp.
-
You must load a folder containing two or more data sources.
-
The names of the files in the folder must indicate a date or dates, for example,
MAR-1999.csvor2017-04-21.xlsx.
-
Add Files or Folders for the Data Load Job
Add files from the cloud store to the data load cart, where you can edit the details of the data load job. To add the files:
-
From the list at the top of the navigator pane on the left, select the bucket from the drop-down with your source data.
The list shows links that were established on the Manage Cloud Storage page. If you haven’t yet registered the cloud store you want to use, click the Create Cloud Store Location button at the top of the page and register a connection. See Manage Cloud Storage Links for Data Load Jobs, above.
-
Drag one or more items from the file navigator on the left and drop them into the cart on the right.
-
You can add files, folders, or both. A card is added to the cart for each file or folder you drag into it. The card lists the name of the source file or folder and a proposed name for the target table.
-
If you add a folder that contains multiple files, all the files must be of the same type, that is, CSV, TXT, etc.
When you add the folder to the cart, a prompt is displayed that asks if you want to load all the objects from the multiple source files into a single target table. Click Yes to continue or No to cancel.
-
When you add multiple individual files or multiple folders to the cart, the data represented by each card will be loaded into a separate table, but all the items in the cart will be processed as part of the same data load job. The multiple files you load must have same file extension.
-
You can add files or folders from a different bucket, but if you do that, you’re prompted to remove all files that are already in the cart before proceeding. To select files from a different bucket, select the bucket from the drop-down list in the navigator pane on the left and then add the file(s), as described above.
-
You can drop files or folders into the data load cart and then navigate away from the Data Load Object page. When you return to the page, those items remain on the page.
-
You can remove items from the cart before running the data load job:
-
To remove an item from the cart, click the Remove icon on the card for the item.
-
To remove all items from the cart, click Remove All in the data link cart menu bar at the top of the pane besides the Start and Stop icon.
Enter Details for the Data Load Job
Enter the details about the data load job in the Load Data from Cloud Storage pane.
On the card in the data link cart, click the Actions icon and select the Settings to open the Load Data from Cloud Storage pane for that job. The pane contains:
Settings Tab - Table Section
Set details about the target table in the Table section.
-
Option: Select an item from the Option list to specify how the data should be loaded into a new or existing table. The processing options are:
-
Create Table: Creates a table and inserts the data into the new table. When you select this option, the Name field on the Settings tab is filled with a default name, based on the name of the source file or folder. You can change it if you want.
-
Insert into Table: Inserts data loaded from the source into an existing table. When you select this option, the Name field on the Settings tab presents a list of the tables in the current schema. Select the table into which you want to insert the data.
-
Replace Data: Deletes all data in the existing table and then inserts new data from the source into the table. When you select this option, the Name field on the Settings tab presents a list of the tables in the current schema. Select the table you want to use.
-
Drop Table and Create New Table: Drops the table (if it already exists), creates a new table, and then inserts the new data into the table. When you select this option, the Name field on the Settings tab presents a list of the tables in the current schema. Select the table you want to use.
-
Merge into Table: Updates existing rows and inserts new rows in the table. When you select this option, the Name field on the Settings tab presents a list of the tables in the current schema. Select the table you want to use.
-
-
Select a different schema from the Schema drop-down to create your target table in another schema.
Note: The Schema drop-down is available only if you have
PDB_DBArole grant to you.To grant yourself a
PDB_DBArole, you must log into your Database Actions instance and enter the following command in the SQL worksheet area displayed in the SQL tab under Development tools present in the Launchpad:Grant PDB_DBA to USER;You can now view the Schema drop-down. It is only available for Create Table and Drop Table and Create New Table options.
-
Name: The name of the target table.
-
Partition Column:
List Partitions and Date-based partitions are the different types of partitions available in data loading.
List partitioning is required when you specifically want to map rows to partitions based on discrete values.
To partition according to a specific column, click the Partition Column drop-down list and select the column you want to use for the partitioning.
You will have N files per partition value, all partitioned by the partition column you select.
Note:
-
For linked files (from external tables) there is also a requirement that for each file, the list partitioning column can contain only a single distinct value across all of the rows.
-
If a file is list partitioned, the partitioning key can only consist of a single column of the table.
Date-based partitioning is available when you load a folder containing two or more data sources that contain date or timestamp data.
To partition according to date, click the Partition Column drop-down list and select the DATE or TIMESTAMP column you want to use for the partitioning.
-
Settings Tab - Properties Section
Specify options to control how the source data is interpreted, previewed, and processed. These options vary, depending on the type of source data.
-
Encoding: Select a character encoding type from the list. This option is available when the loaded file is in plain text format (CSV, TSV, or TXT). The default encoding type is UTF-8.
-
Text enclosure: Select the character for enclosing text: “ (double-quote character), ‘ (single-quote character) or None. This option is visible only when the selected file is in plain text format (CSV, TSV, or TXT).
-
Field delimiter: Select the delimiter character used to separate columns in the source. For example, if the source file uses semicolons to delimit the columns, select Semicolon from this list. The default is Comma. This option is visible only when the selected file is in plain text format (CSV, TSV, or TXT).
-
Column header row: Select the Column header row checkbox to use the column names form the source table in the target table.
-
By selecting this option you can indicate what row in the file contains column names. The rows in the Mapping section, below, are filled with those names (and with the existing data types, unless you change them).
-
If you deselect this option, the first row is processed as data. To specify column names manually, enter a name for each target column in the Mapping section. (You will also have to enter data types.)
-
-
Start processing data at row: Specifies the number of rows to skip when loading the source data into the target:
-
If you select the Column header row option under Source column name (see below) and if you enter a number greater than 0 in the Start processing data at row field, then that number of rows after the first row are not loaded into the target.
-
If you deselect the Column header row option under Source column name, and if you enter a number greater than 0 in the Start processing data at row field, then that number of rows including the first row are not loaded into the target.
-
-
Numeric column: Select the Convert invalid data to null checkbox to convert an invalid numeric column value into a null value.
-
Newlines included in data values: Select this option if there are newline characters or returns to the beginning of the current line without advancing downward in the data fields. Selecting this option will increase the time taken to process the load. If you do not select this option when loading the data, the rows with newlines in the fields will be rejected. You can view the rejected row in the Job Report panel.
Settings Template
The save settings feature saves the configuration set in the Cart settings in the form of a JSON file. When opening the Settings template, you have the following options:
-
Load Settings Template: Loads a settings template from your local system.
-
Save Settings Template: Saves the current existing settings template.
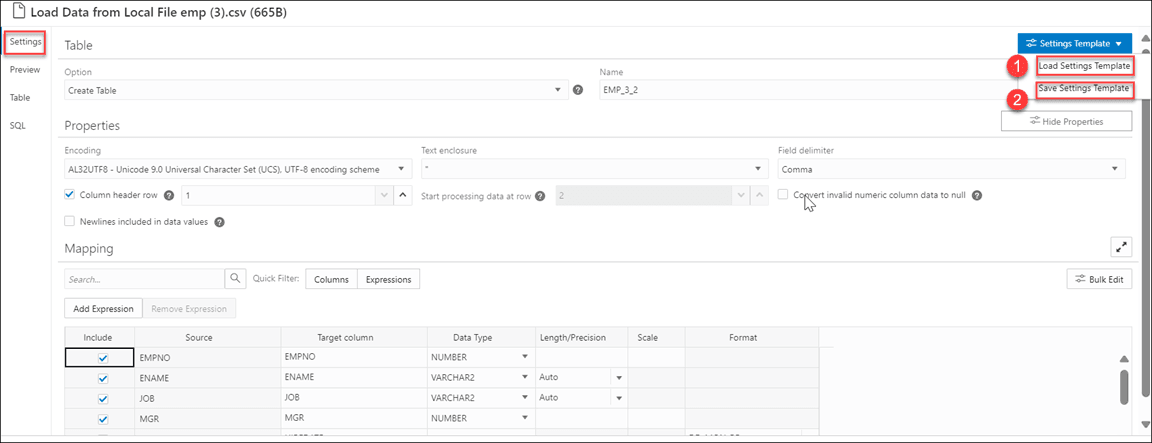
You can use the Load Settings Template if you want to use an existing customized template present in your local.
-
From the Settings Template in the Settings tab of the Load Data page, select Load Settings Template.
-
You will see a Load Settings Template wizard, click the Settings Template JSON to load a JSON file from your system.
-
Clicking the Settings template JSON will open your local system. Click OK to load the JSON file.
-
After you load the JSON file, you can view the updates applied automatically to the settings tab which matches the JSON settings template you load from your local.
You can use the Save Settings Template to save the existing current Settings template.
-
From the Settings Template in the Settings tab of the Load Data page, select Save Settings Template.
-
The Template file editor appears. Click the Template File name and name the new template.
-
Click OK to finish saving the new name of the existing template.
-
You can test the configuration of the new template.
Bulk Edit Settings
You can use the Bulk edit settings to update all the columns at once from the mapping table. Use it to apply changes to the selection currently displayed in the results pane. You can search for the values of the column you want to edit in the search field and click the magnifier icon. The mapping table will display the results of the search. Select the Bulk Edit setting to update the column. The Bulk Edit setting allows you to:
-
Update values of all the fields in a group.
-
Find and replace, Add Prefix and Add suffix to target column name.
-
Include the column(s) for loading data to the target table.
-
Exclude the column(s) for loading data to the target table.
Searching the Column
The Bulk Edit setting updates the columns returned by the search field. The search box below the Available Columns on the Bulk Edit Mapping wizard filters the list of columns you wish to update in a bulk. You can also click the column you wish to select from the list of Available Columns. Choose any of the available options:
-
>: This option enables you to move the column to Selected Columns.
-
<: To remove the selected table from Selected Columns, select this option.
-
>>: This option allows you to move all the tables to the Selected Columns screen.
-
<<: To remove all the selected tables from Selected Columns select this option.
The Bulk Edit Mapping enables you to update the values of the following columns for all the searches returned by the search field:
-
Data Type
-
Target Column name
-
Include Columns for loading
-
Exclude columns for loading
Consider changing the Data Type of first five rows from VARCHAR2 to CHAR in the mapping table.
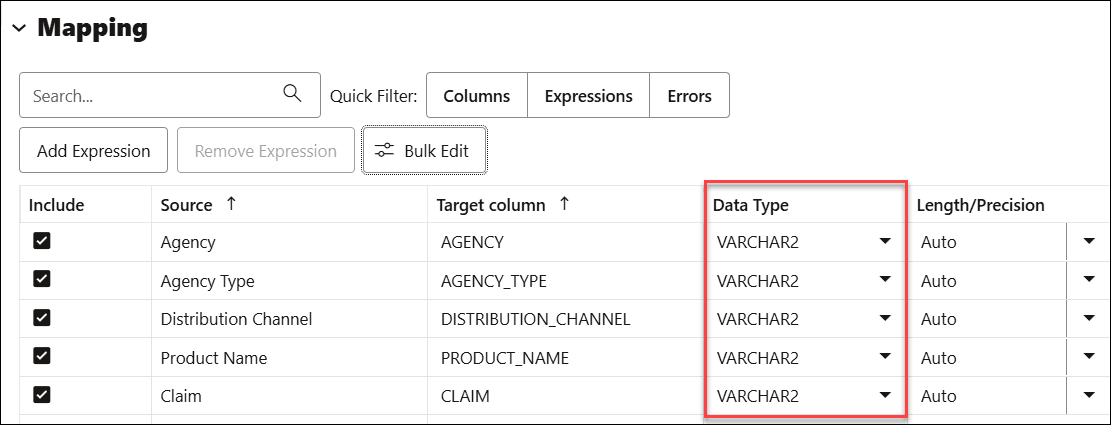
Description of the illustration bulk-edit1.png
-
Select
CHARfrom the Data Type drop-down field.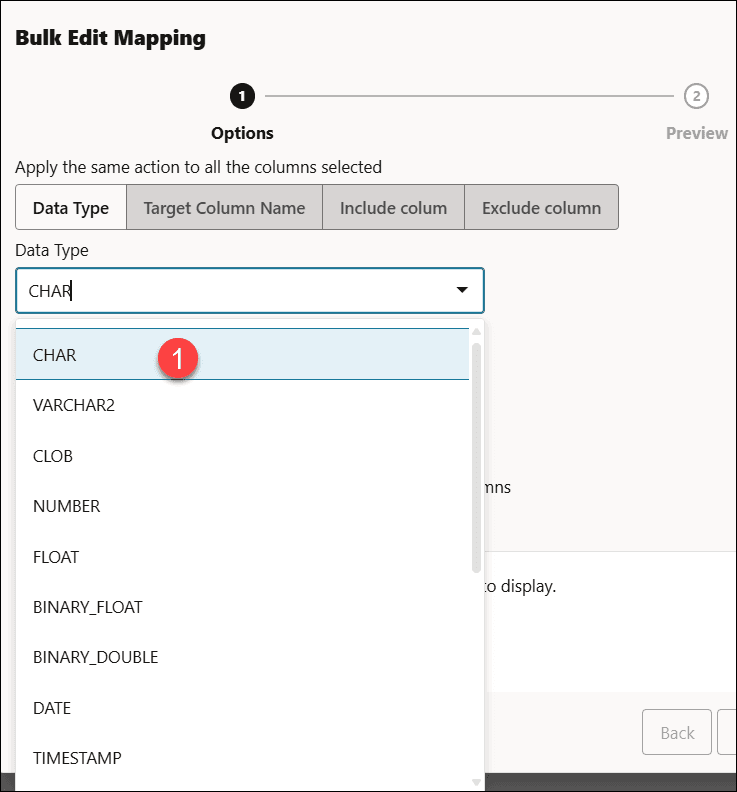
Description of the illustration bulk-edit2.png
-
On the Available Columns list, click the columns you want to select.
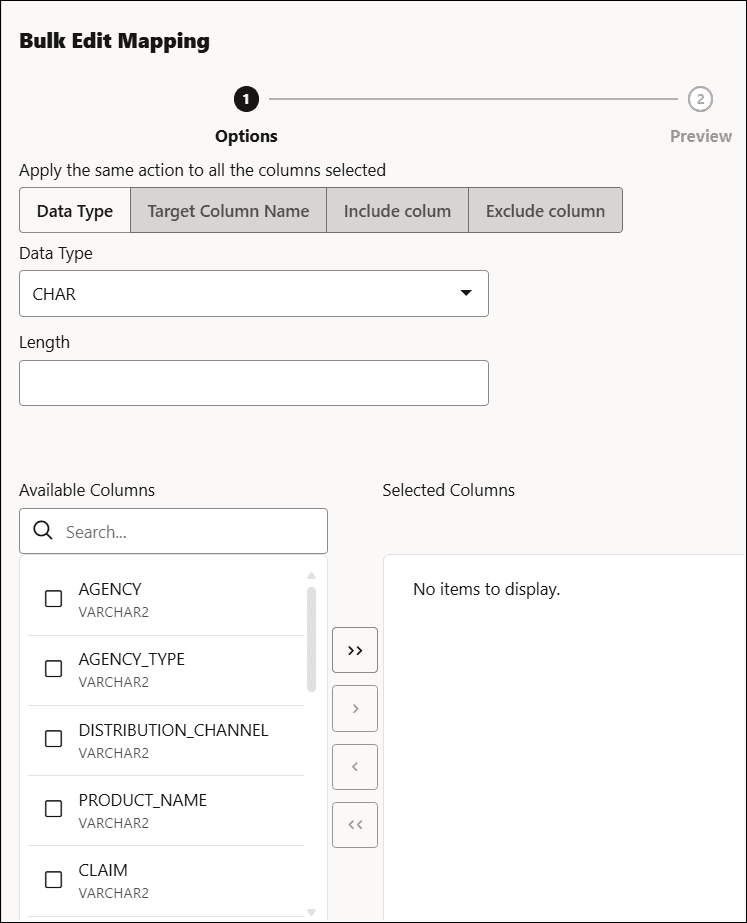
-
You can view the columns you want to edit on the Selected Columns list.
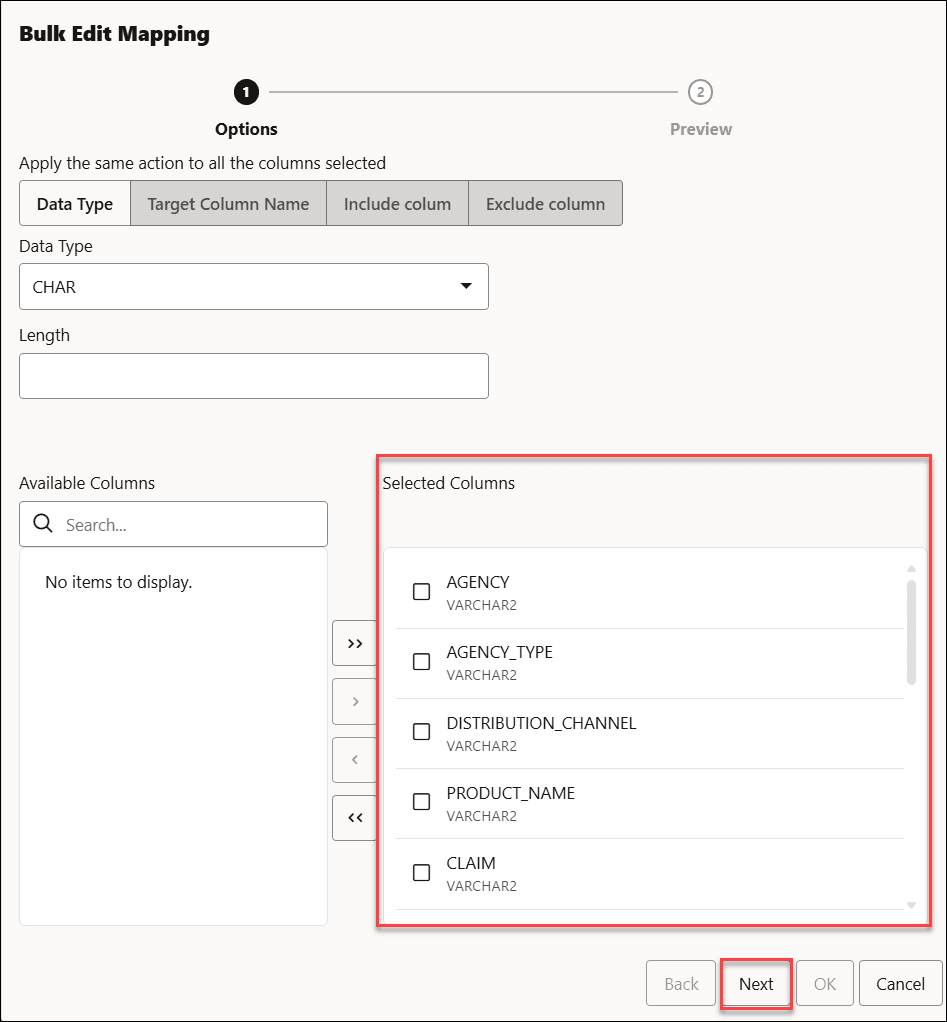
Click Next to progress to the Preview tab.
-
-
You can view the updated table in the Table Preview.
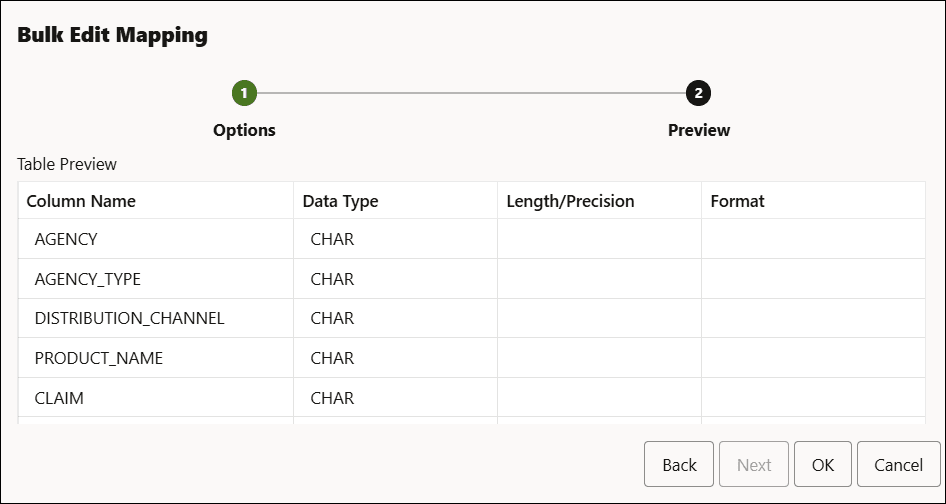
Description of the illustration bulk-edit5.png
Click OK.
-
The Mapping table displays that the Data Type of the selected rows has changed from
VARCHAR2toCHAR.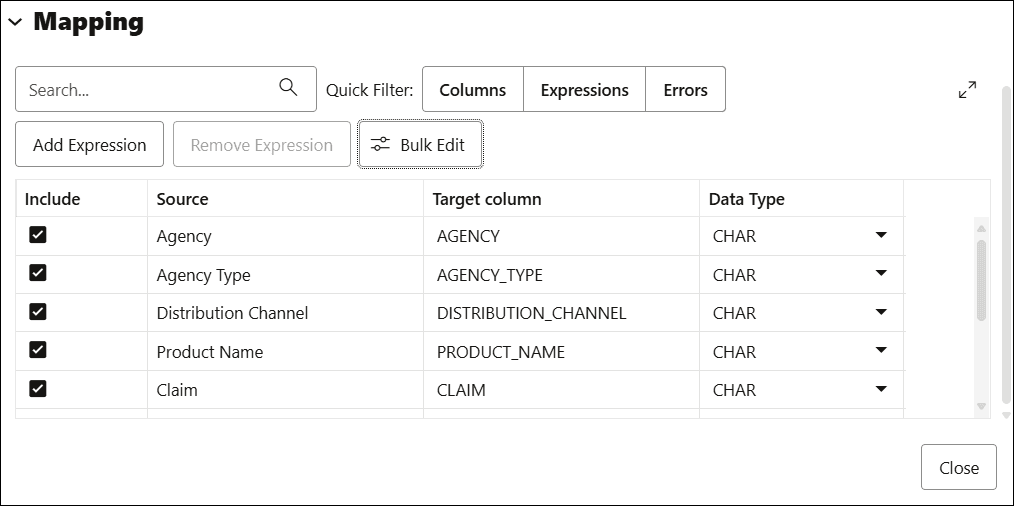
Settings Tab - Mapping Section
The settings in the Mapping section control how data from the source files are loaded into the rows of the target database table. For each row, the data from the column listed under Source column will be loaded into the column listed under Target column.
As mentioned above, the contents of the Mapping table change according to what processing option you chose in the Table section and which properties you set in the Properties section.
You can filter the results in the mapping table with Quick Filter field that enables you to filter out Columns or Expressions.
Select Add Expression to perform Sentiment Analysis or Key Phrase extraction with the source data. See Use OCI Language Service Capabilities in Data Studio for more details.
-
Include: This check box ensures that the row you select is loaded from the source column to the target column.
-
Source column: Lists the columns from the source file.
If the Column header row option under Properties is selected, Source column shows the names of the columns in the source file. If the Column header row option is not selected, generic names like COLUMN_1, COLUMN_2, etc., are used. This field is always read only.
You can view two source columns
FILE$NAMEandSYSTIMESTAMP. TheFILE$NAMEcolumn enables you to locate the source file containing a particular data record. For example, you load a source file that contains a list of files. The file names in the file list refer to the department names across the organization. For instance, a finance.txt file contains data from the Finance department. In the mapping, you can use string data types to extract the department name from the output of the file name column. You can use the extracted department name to process data differently for each department.The
SYSTIMESTAMPcolumn allows us to view the current timestamp in the database.Note:
-
FILE$NAMEandSYSTIMESTAMPsource columns are not included by default. You must check the Include check box and run the load for the target table to display these two columns. -
When you are creating a livefeed, the
FILE$NAMEandSYSTIMESTAMPsource columns appear in the Mapping table by default.
-
-
Target column: Lists the columns in the target table. Accept, select, or enter a column in the target table. You need to make sure that the target column is not empty. The target column name cannot have duplicate name as another target column. The target column length must not be beyond 128 bytes. 128 byte limit is a database limit.
The contents of this column differ, depending on what you selected for the table processing Option and whether you selected for the Column header row option.
-
If (1) the processing option is Create Table or Drop Table and Create New Table and (2) the Column header row option is selected, then the Target column uses the names of the columns in the source file. You can change the name of a target column by replacing the provided name with a new one.
-
If (1) the processing option is Create Table or Drop Table and Create New Table and (2) the Column header row option is not selected, then generic names like COLUMN_1, COLUMN_2, etc., are used. You can change the name of a target column by replacing the provided name with a new one.
-
If (1) the processing option is Insert into Table, Replace Data, or Merge Into Table and (2) the Column header row option is selected, then the Target column has a drop-down list of all the columns in the target table, with their data types. By default, the column with the name corresponding to the source column is selected, but you can select a different one from the list.
-
If (1) the processing option is Insert into Table, Replace Data, or Merge Into Table and (2) the Column header row option is not selected, then the Target column has a drop-down list of all the columns in the target table, with their data types. Select a column from the list to use as the target column.
Note: If you’re loading multiple files from a folder in a single data load job, only the first file will be shown in the Mapping section. However, as long as the column names and data types match, the data from all source files will be loaded.
-
-
Data Type: Lists the data type to use for data in that column. This column is displayed only for Create Table or Drop Table and Create New Table. The contents change depending on whether the Get from file header option is selected.
-
If the Get from file header option is selected, Data type shows the data types of the columns in the source file (for Create Table) or in the existing table (for Drop Table and Create New Table). If you want to change the data type for the target, click the name and select a different one from the list.
-
If the Column header row option is not selected, Data type shows all available data types. Select the data type to use for the target column from the list.
-
-
Length/Precision (Optional): For columns where the Data Type is NUMBER, enter the length/precision for the numbers in the column. Precision is the number of significant digits in a number. Precision can range from 1 to 38.
For columns where Data Type is VARCHAR2, the Auto value in Length/Precision field enables the Auto Size feature.
With the Auto-Size column Width feature, you can automatically size any column to fit the largest value in the column. Select Auto from the Length/Precision drop-down values or pick a value from the drop-down list.
-
Scale (Optional): For columns where the Data Type is NUMBER, enter the scale for the numbers in the column. Scale is the number of digits to the right (positive) or left (negative) of the decimal point. Scale can range from -84 to 127.
-
Format: If the data type in the Data type column is DATE or one of the TIMESTAMP types, select a format for that type from the Format drop-down list.
-
Merge Key: This option is used only for the processing option Merge into Table.
For the Merge into Table option, you must specify at least one column to use as a key column. Merge keys are one or more columns that uniquely identify each row in the table. To specify a key column, select the Merge Key checkbox for the column. Merge keys must not contain any null values. For loading tables with primary keys, this option automatically enables the selection of primary key columns as the merge keys.
Preview Tab
The Preview tab displays the source data in tabular form in the Load Preview menu. The display reflects the settings you chose in the Properties section.
The File menu in the Preview tab displays the source data with all the columns with their names. You can copy the text.
Table Tab
The Table tab displays what the target table is expected to look like after the data has been loaded. If you chose the Create Table processing option, no table is shown.
SQL Tab
The SQL tab displays the SQL commands that will be run to complete this data load job.
Note: You can see the SQL code even before the table is created.
Close Button - Save and Close the Pane
After entering all the details for the data load job, click Close at the bottom of the page. This saves the details you entered and returns you to the Load Data from Cloud Storage pane. To close the page without saving your entries, press Escape.
Run the Data Load Job
Once you’ve added data sources to the data load cart and entered details about the data load job, you can run the job.
To run the job:
-
If you haven’t already done so, click the Close button in the Load Data from Cloud Storage pane to save your settings and close the pane. If any of the settings are invalid, an error message reports the problem. Fix the problem and click Close.
-
Click
 Start in the data load cart menu bar. To stop the data load job, click Stop.
When you have added all of the sources for the job and specified the settings for each source, to run the job click the Start icon in the Data Load Cart menu bar. In the Run Data Load Job dialog box, click Start. To stop the data load job, click the Stop icon.
Once the data load job starts, you can view the progress of the job in the Data Load dashboard.
When the data load job completes, the Data Load dashboard page displays the results of the job. At the top of the header of the table load, you can view the name of the table along with the total columns present in the table.
Click Job Report to view the total number of rows processed successfully and the count of rejected rows. You can also view the Start time. The SQL pane of the Job Report displays the equivalent SQL code of the job.
To view information about an item in the job, click the Actions icon on the Table Load.
To view a log of the load operation, click the Logging icon. You can save the log, clear it, or refresh it. Click OK to dismiss the log.
View Details of Data Load Job
To view details about the data load job after it is run, click the Actions icon on the Table and View Loads section of the Data Load dashboard.
You can view Table details, Gather Statistics, Register to Cloud Link, Create Analytic View, Export Data to Cloud, Edit Table and delete the table.
When the data load job completes, the Data Load dashboard page displays the results of the job. At the top of the header of the table load, you can view the name of the table along with the total columns present in the table.
Click Report to view the total number of rows processed successfully and the count of rejected rows. You can also view the Start time. The SQL pane of the Report displays the equivalent SQL code of the job.
After your data load job, you might see errors that you want to correct, or upon inspection, realize that you wanted to name a column differently. In such cases, you will view a warning sign on the Table load. Click the Reload icon to reload source with suggested fixes. Click Actions icon on the Table load and select Edit to make any changes to the data load job (i.e., change a column name).
View the Table Resulting from the Data Load Job
To view the new tables or tables modified by the data load job, you can:
-
Fix your data load job. After your data load job, you might see errors that you want to correct, or upon inspection, realize that you wanted to name a column differently. In such cases, click the Reload option on the selected Table Load to reload cards from your recent cart and edit them as you did before your first attempt. The Reload icon reloads the source data with the fixes suggested by the tool. Click the Actions icon on the Table header, click Table and select Edit to make any changes to the data load job (i.e., change a column name).
-
You can use the Edit icon as mentioned in the above paragraph to review the table.