Get to Know the Site Builder Page
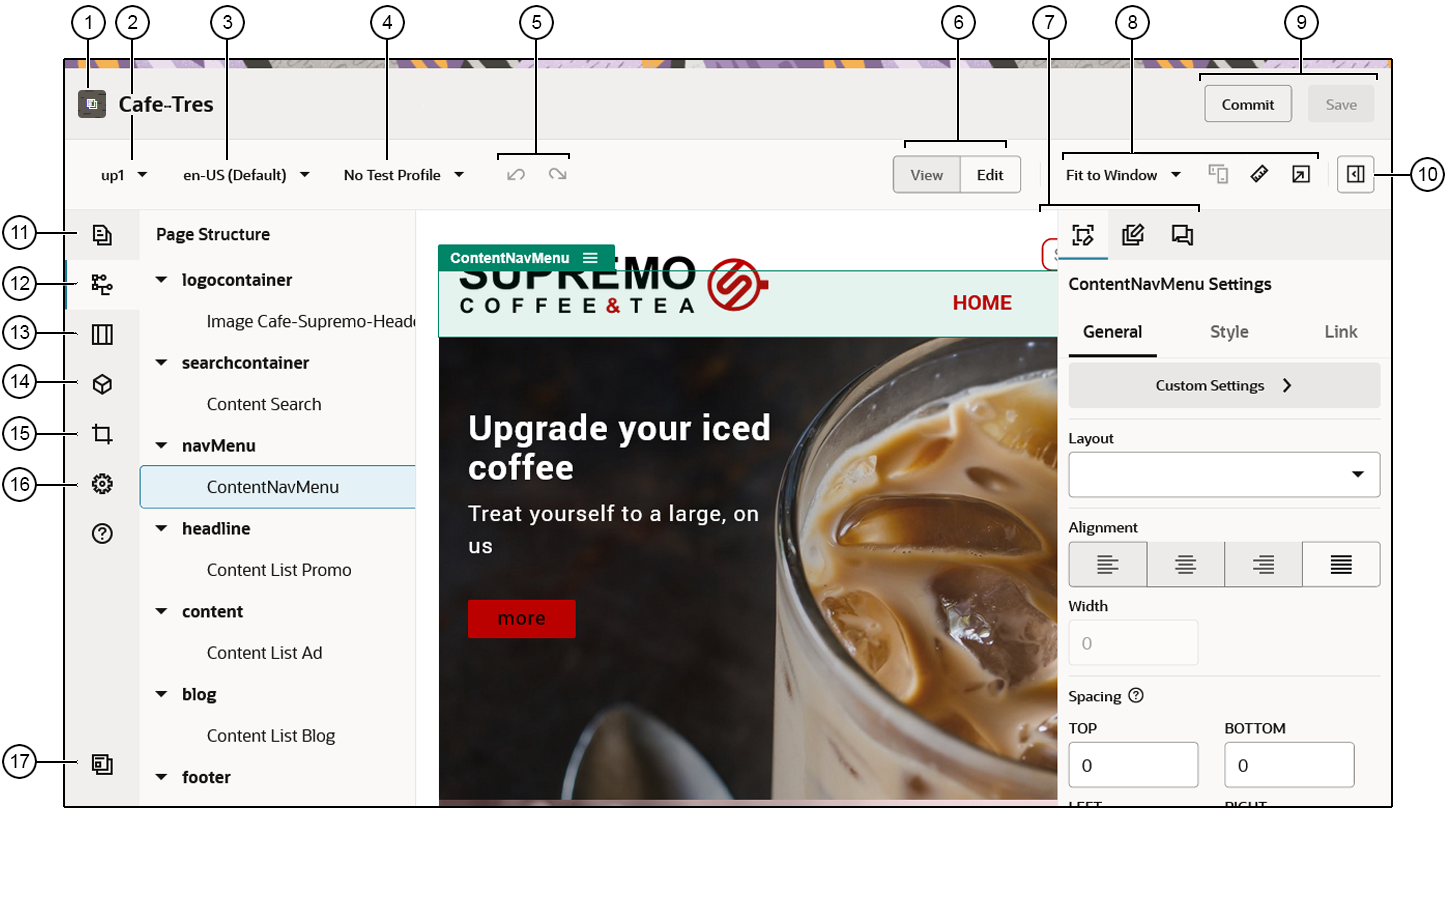
When you edit an existing update or create an update for a site, the update opens in Site Builder. Take a minute to become familiar with the layout of the page and the tools available.
Here are a few things to note:
| Callout | Description |
|---|---|
| 1 |
The name of your site is listed next to the site icon. |
| 2 |
Check the update for the name of the update you’re currently working on. If there’s more than one update available, you can switch to a different update. |
| 3 |
Check the language to see which version you're currently working on. |
| 4 |
Test Profiles give you the opportunity to create profiles with various audience attributes and use the profiles to represent different site visitors to test recommendations. Test profiles are set up when a site administrator creates a recommendation. |
| 5 |
Use Undo
|
| 6 |
Select View to see a preview of the site and Edit and make any changes to an update. |
| 7 |
Option menu for the side panel. Click
|
| 8 |
Use the preview options to see how the content
will look under different circumstances. You can navigate to any page and see the
base site with the changes from the current update applied. Click Fit to
Window and choose a dimension to view the page as it will appear on a
device with that screen size. Several sizes are given and you can create your own
device size. Click Click Note: Links to site pages don't work in preview mode. |
| 9 |
Use the available options to process your changes. Click Commit to merge your changes to the base site, or click Save to save your changes to the update. |
| 10 |
Click |
Note:
You must be set to Edit before you can use the tools in the sidebar.| Callout | Click... | To... |
|---|---|---|
| 11 |
Edit and add pages, manage nested page structures, reorganize pages, and change page settings. |
|
| 12 |
View the structure of your page with the elements displayed in a
hierarchy. Drag-and-drop the elements in the hierarchy to move them on the page. To
adjust component settings, select an element in the hierarchy, open the right side
panel and select the element settings option ( If a component or slot has become orphaned, usually because of switching to a different layout that has a different set of slots, then those items get moved out of the page layout grid and you will find them at the bottom of the hierarchy panel in the Orphaned Component and Orphaned Slots sections. Components can be moved back into the page by dragging them into one of the current slots, and orphaned slots can be deleted only, to clean up page data. From there you can either move them back into the grid or delete them from the site. Note that only the top-level of an orphaned hierarchy is listed in the orphaned component section. For example, if a section layout has orphaned components, the orphaned component section will only show the section layout, not any orphaned components in it. To see them, you need to drag the section layout into the frame. Also, if any inline components are used, they're displayed at the top of the hierarchy in the Inline Components section. |
|
| 13 |
Add section layouts, such as horizontal or vertical layouts. |
|
| 14 |
Add assets to your site. You can select any assets that are in the repository that was selected when the site was created. |
|
| 15 |
Insert components into your site. You can choose from different types of components, such as themed, custom, seeded, or see all available components. |
|
| 16 |
Adjust the settings for the site, such as keywords for search engine optimization (SEO) and site redirects. |
|
| 17 |
Return to the Sites page to manage your sites. |
