 Pass Customer Information to a
Live Chat
Pass Customer Information to a
Live Chat Before
You Begin
Before
You Begin
This 30-minute tutorial shows you how to pass chat customer information from an Oracle Digital Assistant skill to Oracle Service Cloud.
This is the second tutorial in a series. Read the tutorials in this order:
- Transfer a Conversation to an Oracle Service Cloud Agent
- Pass Customer Information to a Live Chat
- Transfer a Chat Session to a Live Chat Queue
Background
When you transfer a skill's chat session to Oracle Service Cloud, there are several ways to pass contextual information with the transfer:
- Conversation History: When insights is enabled for the skill, the skill passes the whole chat history to Oracle Service Cloud automatically. When you tested your skill in the first tutorial of this series, you saw the chat conversation history after you accepted an incoming request.
- Chat Customer Information: Skills can
pass the following chat customer information to
Oracle Service Cloud.
- E-mail address
- First name
- Last name
- Contact
- Organization
- Category
- Product
- Incident Custom Fields: You can pass values for any Oracle Service Cloud custom field of type Incident.
You'll learn how to pass chat customer information in this tutorial, and you'll learn how to pass Incident custom fields in the next tutorial in this series.
Here’s the scenario for this tutorial:
You are a developer for a pizza restaurant that has an Oracle Digital Assistant skill on its web site that lets people order pizzas through natural conversation. If someone can't complete the order successfully or has questions that the skill can't handle, then the person can ask to speak to a human and the skill transfers the conversation to an Oracle Service Cloud live chat.
To put the transferred chat session in better context for the agent, you want to enhance the skill to pass the skill's category to the agent.
Here's what you'll need to do:
- Learn the structure of the Oracle Service Cloud chat customer information fields.
- Use cURL to get the category valid values from Oracle Service Cloud.
- Add the category object to a map variable in the skill's dialog flow.
- Pass the map variable from the
System.AgentInitiationstate in the dialog flow. - Test the skill and view the passed information in the live chat UI.
This tutorial guides you through these steps.
What Do You Need?
Before you can start this tutorial, you must first complete Integrate a Skill with Oracle Service Cloud Live Chat, which is the first tutorial in this series. You'll enhance the skill that you built during that tutorial.
Also, in this tutorial, you'll use cURL to access an
Oracle Service Cloud REST API. If you haven't done
so already, install cURL on your local system. See
https://curl.haxx.se/. After
you install cURL, set the cURL environment variable,
CURL_CA_BUNDLE, to the location of your
local CA certificate bundle. For information about
CA certificate verification using cURL, see
http://curl.haxx.se/docs/sslcerts.html.
As with the first tutorial, you also need:
- Access to Oracle Digital Assistant 20.01 or later. If you are using an earlier version, then see The Legacy customerInformation Object in Using Oracle Digital Assistant to learn how to pass customer information.
- Access to Oracle Service Cloud release 19A or
later with Chat enabled and with the following
chat configuration settings set to
true:- Chat Custom Interface API
(
CHAT_CONSUMER_WS_API_ENABLED) - Chat Third Party Queue Integration API
(
CHAT_UQ_WS_API_ENABLED)
Contact your Oracle account manager to set these configurations.
If you are using a version earlier than 19A, see The Legacy customerInformation Object in Using Oracle Digital Assistant to learn how to pass customer information.
- Chat Custom Interface API
(
- A chat-enabled Oracle Service Cloud interface, preferably one that is for development or testing, and not for production. You can use the Oracle Service Cloud Configuration Assistant, which you access from My Services, to verify that the interface is enabled for chat.
- An Oracle Service Cloud staff account with the
following profile permissions. Ask a Service
Cloud administrator for assistance.
- Account Authentication for Agent Browser User Interface
- Account Authentication and Session Authentication for Public SOAP API
- Agent access to the default chat queue
Available - Unrestrictedchat agent status
- Oracle Service Cloud chat-rules configuration that routes the conversations that are transferred from the skill to a queue that will be directed to your staff account. Ask a Service Cloud administrator for assistance.
 Learn the Structure of the
Chat Customer Information Fields
Learn the Structure of the
Chat Customer Information Fields
Starting with Oracle Digital Assistant version 20.01
in combination with Oracle Service Cloud 19A, the
skill uses Oracle Service Cloud REST APIs to pass
information to Service Cloud Chat, and thus the
format for passing data has changed. To pass
customer information, you add the
customerInformation object with the
desired properties from the example shown below to
the customProperties property in the
System.AgentInitiation component.
customerInformation:

  incidentID: 12345

  contactId:

    id: 12345

  organizationId:

    id: 12345

  productId:

    id: 12345

  categoryId:

    id: 12345
Although you can also include the
eMailAdress, firstName,
and lastName properties in this object,
there's no need to do so because the skill
automatically sets those values from the
corresponding profile properties.
 Get the Valid Values for
Customer Information Fields
Get the Valid Values for
Customer Information Fields
Later in this tutorial, you'll modify the dialog flow to pass in the category ID, and you'll need to know which values are valid for your Oracle Service Cloud instance. You can get the valid values for your instance's categories through the Oracle Service Cloud REST API.
To use cURL to get the valid values:
-
In the fields below, enter the site name and
domain name of your Oracle Service Cloud
instance. For example, if the URL to your Oracle
Service Cloud instance is
https://sitename.example.com, then the site name issitenameand the domain name isexample.com. If your instance has multiple interfaces, then you must include the interface ID in the site name . For example, for the interface that has an ID of 2, you would use something like sitename-2.exampledomain.com.
-
If necessary, such as if you are behind a
firewall, get the host and port for the HTTPS
proxy. For example:
host.domain:80. -
In a terminal window, use one of the following cURL commands to get the valid values.
-
Without a proxy: Remember to
replace
<YOUR-USER-NAME>and<YOUR-PASSWORD>before you send the command.curl --request GET --user "<YOUR-USER-NAME>:<YOUR-PASSWORD>" --header "osvc-crest-application-context: 1" https://./services/rest/connect/latest/serviceCategories -
With a proxy: Remember to replace
<YOUR-PROXY>,<YOUR-USER-NAME>, and<YOUR-PASSWORD>before you send the command.curl -x <YOUR-PROXY> --request GET --user "<YOUR-USER-NAME>:<YOUR-PASSWORD>" --header "osvc-crest-application-context: 1" https://./services/rest/connect/latest/serviceCategories
You can omit
:<YOUR-PASSWORD>if you would rather be prompted for the password.The output will look similar to this:
{"items":[{"id":3,"lookupName":"Manuals","links":[{"rel":"canonical","href":"https://site.domain/services/rest/connect/latest/serviceCategories/3"}]},
{"id":4,"lookupName":"Installations","links":[{"rel":"canonical","href":"https://site.domain/services/rest/connect/latest/serviceCategories/4"}]},
...
Here's an example of a category object from a formated version of the response:
{ "id":61, "lookupName":"Ordering", "links":[ { "rel":"canonical", "href":"https://site.domain/services/rest/connect/latest/serviceCategories/61" } ] }, -
Without a proxy: Remember to
replace
 Add Customer Information to
the Skill's Dialog Flow
Add Customer Information to
the Skill's Dialog Flow
The skill uses the profile values to
populate and send the following chat customer fields
automatically,
you don't need to do anything to set these values:
- E-mail address
- First name
- Last name
The skill also populates the question
field automatically.
You'll enhance the dialog flow to set and pass the category ID.
As mentioned in What Do You Need, chat must be enabled for the interface. You can use the Oracle Service Cloud Configuration Assistant, which you access from My Services, to verify that the interface is enabled for chat.
- From Oracle Digital Assistant, open the skill that you created in the first tutorial in this series, and go to the dialog flow.
- Add a
liveChatInfocontext variable of typemapto hold the customer information.context: variables: size: "PizzaSize" type: "PizzaType" crust: "PizzaCrust" iResult: "nlpresult" liveChatInfo: "map" - Find the
setupProfileEmailstate, add the following state after it, and then set theidproperty to a valid category ID:setupLiveChatInfo: component: "System.SetVariable" properties: variable: "liveChatInfo" value: customerInformation: categoryID: id: 61 #Set this property transitions: next: "agentInitiation" - In the
setupProfileEmailstate, change thenexttransition to"setupLiveChatInfo".setupProfileEmail: component: "System.SetVariable" properties: value: "first.last@example.com" #Set this property variable: "profile.email" transitions: next: "setupLiveChatInfo" - In the
agentInitiationstate, add acustomPropertiesproperty and set it to"${liveChatInfo.value}"as shown here:agentInitiation: component: "System.AgentInitiation" properties: agentChannel: "ServiceCloudIntegration" #Set this property nlpResultVariable: "iResult" waitingMessage: "Let me connect you with a customer service agent who can further assist you." resumedMessage: "Please wait, someone will be with you shortly." customProperties: "${liveChatInfo.value}" transitions: actions: accepted: "agentConversation" rejected: "reject" error: "agentSystemError"You can see the complete dialog flow in dialog-flow.txt. - Click Validate to make sure that your dialog flow doesn't have syntax errors.
 Test Your Changes
Let's test receiving the skill's chat sessions with the newly added chat customer information.
Note that typically you'll see the customer information in the chat console, but it depends on how the Interaction Browser and Incident Browser workspaces are configured for your instance. Check with your administrator if you don't see the fields described in the steps below.
-
In a browser, go to the Oracle Service Cloud
Agent Browser UI (BUI), and sign in with the
user name and password for the staff account
described in What Do
You Need?.
The URL for the Agent Browser UI is typically:
https://./AgentWeb/ - If you aren't signed into the chat, click
Chat Logon
 .
. - Set your status to one that enables you to
receive chats (for example,
unrestricted). If you see the Request a chat button, click it.
(Your profile determines if you need to request
a chat or chats appear in your queue
automatically.)
button, click it.
(Your profile determines if you need to request
a chat or chats appear in your queue
automatically.)
You are ready to accept the chat.

- Resize your browser windows such that you can see Digital Assistant and the Agent Browser UI and side-by-side.
- In the Digital Assistant UI, click Channels in the left navbar, click Agent Integrations, and verify that the Agent Integration channel for the Service Cloud interface is enabled.
- Go back to the skill.
- If the Train button doesn't show a check mark next to it, click Train and train the skill.
- Click Skill Tester
 , and then enter this
text in the message field.
, and then enter this
text in the message field.
I need to chat with a human - In the Agent Browser UI, accept the incoming chat.
-
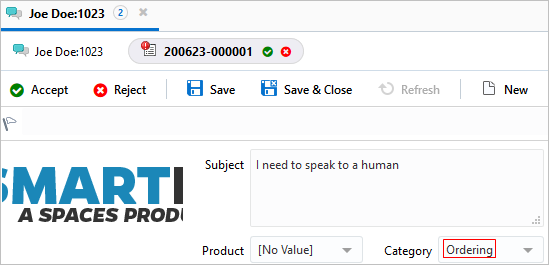
Click the tab for the incident, as shown here:

The category field should show the name of the category that you passed in.
- To terminate the live chat, click Terminate
the chat session
 .
. - In the skill tester, click Reset, and then close the tester.
Congratulations! You've completed this tutorial.