JavaScript must be enabled to correctly display this content
Before You Begin
This 60-minute tutorial shows you how to develop and deploy an entity event handler component for a
composite bag entity using an external IDE.
Note:
This advanced tutorial requires familiarity with entity event handlers. If you haven't already worked with entity event handlers, you should complete this tutorial, which teaches you how to create an entity event handler using Digital Assistant's embedded JavaScript editor before starting this one.
Background
Composite bag entities group related entities as well as string, attachment, and location items into a single object
that represents a real world entity -- a booking,
an incident report, a person, etc. Composite bag entities automatically prompt users to provide information for each of its bag items. User
input is validated against the underlying entity or, using
expressions, against custom validation rules.
With entity event handlers, you can execute custom
component code to validate user input, execute business logic
and access backend services in the context of changing data
values for a single bag item, or when the entity as a whole
resolves.
This tutorial explores entity event handler functionality using a pizza ordering skill with a composite bag entity whose bag items include the PizzaToppings, PizzaDough, and DeliveryTime entities. The entity event
handler that you are that you are going to create provides the following functions for these bag items:
Displays a disambiguation prompt for the PizzaToppings bag
item.
Adds an error message to the prompt when a user fails to
provide a valid value for the pizza size.
Sets regular as the default value for the PizzaDough bag
item.
Validates the DeliveryTime bag item value as follows:
No new orders can be taken after 8.30 p.m.
Delivery time must be a time in the future.
No delivery in the morning (a.m.)
Delivery time must be at least 60 minutes later than
current time.
Ensures that the delivery time cannot be scheduled after business hours, which conclude at 9.30
p.m.
What Do You Need?
This tutorial is for developers who are familiar with
composite bag entities, JavaScript and Node.js development. To
complete this tutorial, you need:
Access to an Oracle Digital Assistant instance (Release
21.02 or higher).
Version 2.5.2 (or higher) of the Oracle Bots Node SDK
You must have Node.js
and Node Package Manager (NPM) installed for global access. If
you used a Node installer (Windows, Mac), then both the node
and npm executables should be available. To
verify that you have installed Node.js and NPM, open a terminal
window and enter the following commands separately:
$ node -v
$ npm -v
The starter skill (CompositeBagEntityEventHandlerStarter(21.03_1).zip).
Click here to download the Starter_Skill.zip file that contains this skill. Then extract Starter_Skill.zip to your local system.
A JavaScript IDE. For example, this tutorial uses Microsoft Visual Studio Code for its
screens captures. If you feel comfortable using a text editor, then
that's fine too.
If, for whatever reason, you can't finish this tutorial, you
can download the completed entity event handler source file (oda.PizzaEEH.js)
here and the component
project that includes this source file here.
If you download the ZIP of the project, you must:
Unzip the project.
Run npm install from the PizzaEEH
folder.
Run bots-node-sdk pack to create a deployment
package (a .tgz file). You need Version 2.5.2 or later of
the Bots Node SDK.
Get
Started
Before you can use the starter skill, you need to import it
into your Oracle Digital Assistant instance.
Open a browser and use the following URL to access your
Oracle Digital Assistant instance: <your oracle
digital assistant instance>/botsui/home.
Click to open
the side menu.
Expand Development, then select Skills.
Click to
close the side menu.
In the Skills dashboard, click Import Skill.
Navigate to the Starter_Skill file, then select the CompositeBagEntityEventHandlerStarter(21.03_1).zip
file. Then click Open. Wait for the import
to complete. If you can't see the imported skill, select Created
Descending as the Sort by option.
Select the tile for starter skill to open it for editing.
If the Train option in the upper right corner shows
an exclamation mark (!), it means that you need to train the
model before you can use the skill.
Description of the
illustration.
Click Train, accept all the default settings, then
click Submit.
Test the Starter Skill
In this section, you'll use the Skill Tester to explore the pizza
order conversation. In the context of guiding you through the
order conversation, this part of the tutorial will call out the
behavior that you will be changing by adding the entity event handler.
Enter hello or hi to see the welcome message
with important customer information.
Next, enter I like to order a pizza.
When prompted for the pizza size, enter mega.
Because mega is not a valid option for the pizza size,
the same dialog is displayed once more. Following the
instructions provided by this tutorial, you will implement an
error prompt that extends this prompt with an error message.
Description
of the illustration.
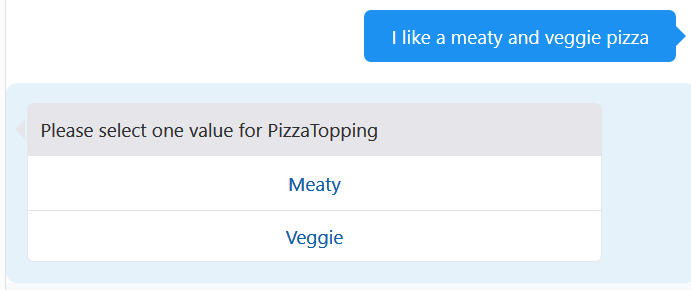
Select Large for the pizza size.
Note: The PizzaToppings composite bag item has been
configured to allow users to select a single value. Therefore,
a disambiguation dialog displays for selecting either Meaty
or Veggie as the pizza topping. Because no
disambiguation prompt has been configured for the
PizzaToppings bag item, an auto-generated one (Please
select one value for PizzaTopping) is presented instead.
Following the instructions in this tutorial, you will return a
custom disambiguation prompt from the entity event handler you
will be building.
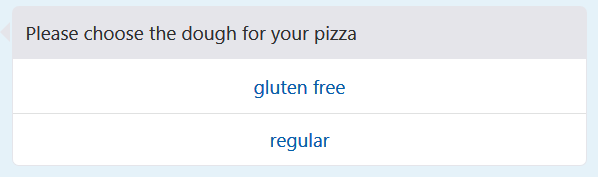
Note: For the pizza dough option, you'll implement
the following use case for this scenario using the entity event handler:
When analyzing the conversation logs, the pizza skill owners
noticed that only a few customers chose the gluten-free
option. To shorten the conversation, the owners want you to
set regular for the pizza dough unless gluten-free is
explicitly mentioned in the initial message.
Enter 11pm into the Message field when prompted for
the delivery time.
Note: Here's another use case that you'll implement
with the entity event handler: You're going to limit the
ordering to the store's operating hours. In this case, the
pizza store is only open for business until 9.30 p.m.
Deliveries outside of operating hours are not possible.
Because it takes 60 minutes to make a pizza, the cutoff for
the last pizza order must be 8.30 p.m. The pizza skill
owners want their skill to prevent users from choosing delivery times outside of operating hours.
When prompted for the delivery address, enter home
into the message field.
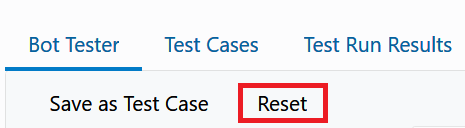
Click Reset to clear the conversation. Then
click Close.
Next, explore the Composite Bag Entity that you're going to
build the entity event handler for. Select Entities in the
left navbar.
Select the PizzaBag entity.
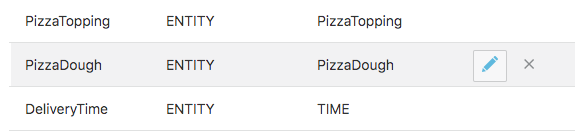
Take a quick look at the PizzaBag entities bag items:
PizzaSize, PizzaTopping, PizzaDough, DeliveryTime,
DeliveryAddress, and NamedLocation.
Install the Oracle Bots Node SDK
The Oracle Bots Node SDK is a node package that provides a
command line interface (CLI) that you can use to generate a
starter project for your entity event handler component. You can
find the Oracle Bots Node SDK sources and documentation on GitHub
(https://github.com/oracle/bots-node-sdk).
In this part of the tutorial, you're going to install the Oracle
Bots Node SDK on your local computer. You can skill this part if
you have previously installed Version 2.5.2 or higher of the
Oracle Bots Node SDK. You can check the version by entering bots-node-sdk
-v on the command line.
To install the Oracle Node.js Bots SDK on your local machine:
Open a terminal window.
If your Internet access is through a proxy, you might need to
do the following to install the Oracle Bots Node.js SDK from the
Internet:
$ npm config set https-proxy http://<external_ip>:80
To install Oracle Bots Node.js SDK for global access on your
laptop, enter this command:
$ npm install -g @oracle/bots-node-sdk
On a Mac, you use the sudo command:
$ sudo npm install -g @oracle/bots-node-sdk
To verify the success of your installation, enter this
command:
$ bots-node-sdk -v
The command should print the Oracle Bots Node.js SDK version
(for example, 2.5.2).
Note: If you are on your company's network, access to the npm registry may be blocked. If so, contact your network administrator for information on
installing the node packages required to run the bots-node-sdk command.
Create
the Entity Event Handler Project
The entity event handler component is a Node application that's
initialized using the command line interface (CLI) of the Oracle
Bots Node SDK.
Depending on the operating system that you use on your local
machine, open a terminal window or command line.
Create a new folder called PizzaEEH using the
following command:
$ mkdir PizzaEEH
Navigate to that folder:
$ cd PizzaEEH
Initialize the node project:
$ npm init -y
Note: Using the initialization command of the node
package manager ensures that the name of the parent folder,
PizzaEEH, also becomes the name of the component
project. The name is defined in the package.json
file that's created by this command. This name later becomes
the name of the component deployment file.
Initialize and create the entity event handler component
project using the following command:
Note: To learn more about the bots-node-sdk
command that you used to create the project and other
options, refer to the Oracle Bots Node SDK documentation on
GitHub.
To confirm that the component was created, issue these
commands:
$ cd components
Mac:
$ ls
Windows:
$ dir
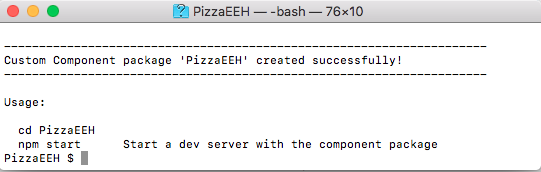
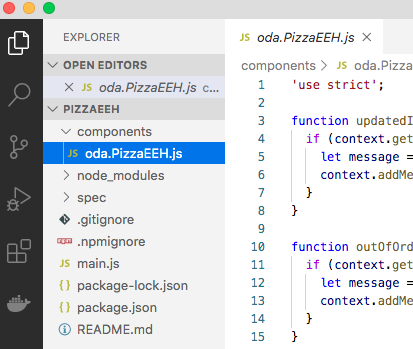
Now that you've created the entity event handler component
package, you're now ready to implement the entity event handler's functions. Throughout this tutorial, you'll be editing
the oda.PizzaEEH.js file that's in the components
file of the generated project.
Implement
a Disambiguation Prompt for the PizzaToppings Entity
When you asked for two different pizza toppings, the skill
responded with the default, auto-generated disambiguation
prompt, Please select one value for PizzaTopping. In this part
of the tutorial, you're going to create a custom disambiguation prompt
for the PizzaTopping bag item. This message
displays a list of values to select from, provides keyboard
shortcuts for these list items, and mentions the number of
selected toppings in its prompts.
Open the PizzaEEH entity event handler project in your
JavaScript IDE. If you're using Microsoft Visual Studio Code,
choose File > Open Folder. Navigate to
the PizzaEEH folder, then click Select Folder.
To return a custom disambiguation message for the
PizzaTopping bag item, you need to create an item-level
function. In this case, you will create a publishDisambiguateMessage
function, one of the entity event handler callbacks that can
be used to interact with a composite bag entity while it's
being resolved by a System.CommonResponse
component or a System.ResolveEntities component.
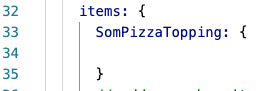
Add the following code to Lines 34-36 of the event
handler component.
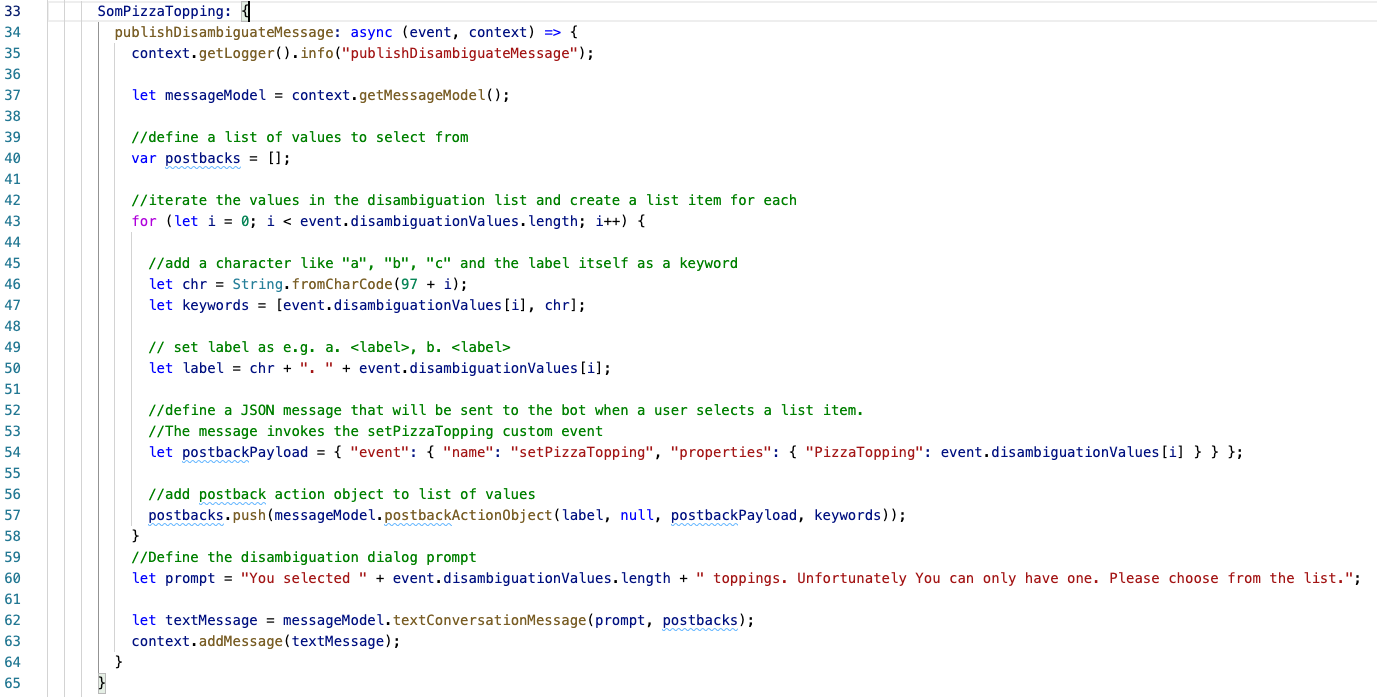
After adding the code, your entity event handler should look
like this. Description of the
illustration.
While the code implements the callback handler function that
publishes the disambiguation dialog, it does not change the
default behavior yet. To change the default disambiguation
dialog, you'll need to add the actual code logic (which is
what you're going to do in the next step).
Copy the following code into Line 35. You can copy
and paste the code from here
(without the line numbers).
35. context.getLogger().info("publishDisambiguateMessage");
36.
37. let messageModel = context.getMessageModel();
38.
39. //define a list of values to select from
40. var postbacks = [];

41. //iterate the values in the disambiguation list and create a list item for each
42. for(let i=0; i< event.disambiguationValues.length; i++){
43.
44.   //add a character like "a", "b", "c" and the label itself as a keyword
45.   let chr = String.fromCharCode(97 + i);
46.   let keywords = [event.disambiguationValues[i],chr];
47.
48.   // set label as e.g. a. <label>, b. <label>
49.   let label = chr+". "+event.disambiguationValues[i];
50.
51.   //define a JSON message that will be sent to the bot when a user selects a list item.
52.   //The message invokes the setPizzaTopping custom event
53.   let postbackPayload = {"event" : {"name":"setPizzaTopping","properties":{"PizzaTopping": event.disambiguationValues[i]}}};
54.
55.   //add postback action object to list of values
56.   postbacks.push(messageModel.postbackActionObject(label, null, postbackPayload,keywords));
57. }
58. //Define the disambiguation dialog prompt
59. let prompt = "You selected "+event.disambiguationValues.length+ " toppings. Unfortunately you can only have one. Please choose from the list.";
60.
61. let textMessage = messageModel.textConversationMessage(prompt, postbacks);
62. context.addMessage(textMessage);
When you're done, the entity event handler code should look like this:
Description
of the illustration.
The following table describes code that you've just added
and also gives you information about rendering custom user
interfaces with the entity event handler and postback
actions.
Code Line(s)
Comments
37
The context object is passed to
every callback function and provides access to
entity and SDK functions like the MessageModel.
The MessageModel enables you to
create rich responses from the skill like lists
and carousels. It's the preferred option to create
custom component and entity event handler skill
responses in Oracle Digital Assistant.
40
Postback actions render buttons and select items
when added to a skill response. In this sample, you
are building a text response that displays the
user-selected pizza toppings as select items. To add
postback actions to a text response, you need to add
them to an array.
42
The event object gets passed to all
callback functions and provides information about
the current event. For the disambiguation prompt,
the event object contains an array of strings with
the values of the user-selected toppings. The
for-loop iterates over the toppings and creates
postback actions for each of them.
45-46
In this
implementation, you are adding a character shortcut
to each of the select items. Users can then tap the a or b keys on their devices to select
a topping instead of entering the complete label
string. On a keyboard, the ASCII characters for
lower case letters start with Index 97. As you are
iterating the area of toppings to disambiguate, you
add the index number (zero-based) to 97 to get the
corresponding character. Line 56 then sets the
keywords in an array of strings.
49
To visually indicate the shortcut to users, add
the character to the list item display label.
53
The payload for a button or select item is a JSON
object. This sample creates the complete
disambiguation dialog and uses a custom event
function that is called for each selected item. For
this tutorial, this custom event is the setPizzaTopping
custom event that you'll create in the next section
of this tutorial. The what? gets a JSON object
passed as an argument. This JSON object contains a
key-value pair wherein the value is one of the
user-selected pizza toppings displayed in the
disambiguation dialog.
56
This line of code creates the postback action and
saves it in the array that you will later associate
with the text message.
59
You create a text message as the disambiguation
prompt that displays above the select items.
60-62
To display the disambiguation prompt, you create a
textConversationObject from the MessageModel
object. The text object receives the prompts and the
array of postback actions as an argument. Finally,
in Line 72, the message is returned for display.
Create a Custom Event
Custom components defined in an entity event handler
component can be called from postback actions (buttons or list
items) that are rendered by the event handler. In this
tutorial, a custom event, setPizzaTopping, is
called from the disambiguation dialog items to set the
selected pizza value as the user's choice.
In Line 69, add the following code. You can copy
this code from here
(without the line numbers).
69. setPizzaTopping: async (event, context) => {
70.   context.clearItemValue("PizzaTopping");
71.   context.setItemValue("PizzaTopping", event.PizzaTopping);
72.   //set a confirmation message. The boolean value true at its end sets the "keepTurn"
73.   //behavior. True means that the bot continues with the next bag item, not waiting
74.   //for user input
75.  context.addMessage("Great. Now that we've got this sorted, let us continue.", true);
76. }
The following table highlights the
code lines for handling the payload sent by the postback
actions.
Code Line(s)
Comments
70
No topping has been set for the composite bag
entity. However, to use this custom event elsewhere
-- not just from the disambiguation dialog -- the
existing value must first be cleared.
71
The disambiguation dialog that you created earlier
sends a JSON payload that has a key-value property
defined. The key name in this payload is PizzaTopping.
The key names don't need to match the bag items that
they're created for; you can name these keys
anything. The fact that the key name matches the bag
item in this tutorial is just coincidence.
75
After updating the pizza toppings, this optional
message displays to acknowledge the user selection
and to guide the user through the next step.
Congratulations! You've completed the
custom disambiguation prompt for the PizzaToppings
entity. This means that you've completed the first part of
this tutorial. Next, you'll package the event entity
handler and test out your work.
Deploy
the Custom Entity Event Handler Component
In this step, you're going to package the entity event handler
in to a TGZ file and then test it with the Skill Tester.
Package the Entity Event Handler
Ensure you saved the latest changes of the entity event handler in your JavaScript editor.
Open a terminal window or command line and navigate to the
PizzaEEH folder.
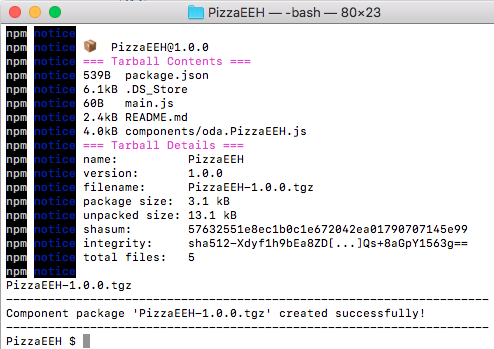
Run the following command:
$ bots-node-sdk pack
A confirmation statement for the creation of the PizzaEEH-1.0.0.tgz
deployment file displays after the packaging process
completes.
Description
of the illustration.
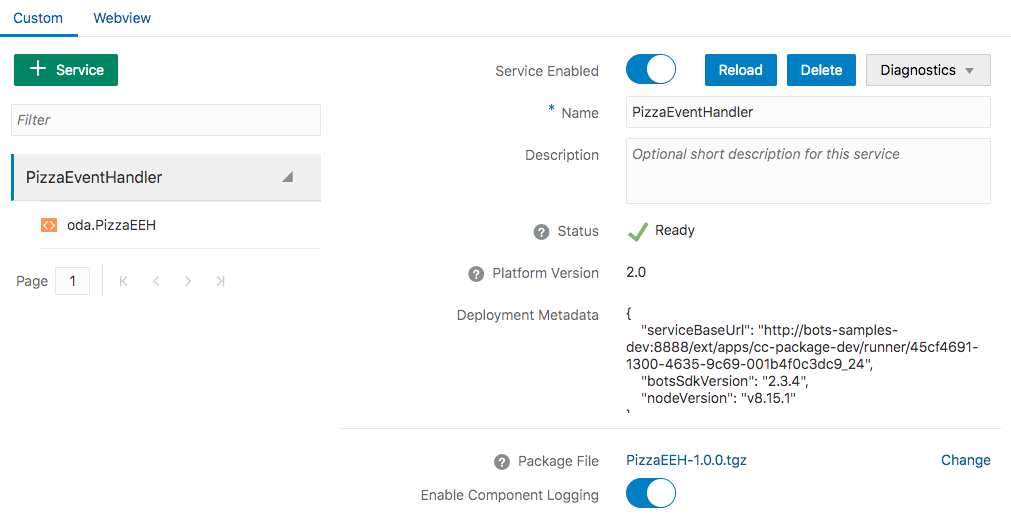
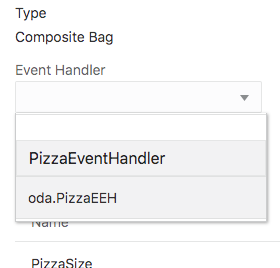
In Oracle Digital Assistant, navigate to the Composite Bag
entity event handler starter skill. If you closed the skill,
re-open it.
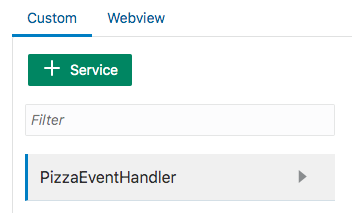
Click Components the side menu to open the
custom components panel.
Click + Service.
Set the value of the Name field to PizzaEventHandler.
Optionally, enter a value for the Description
field. The PizzaEventHandler name will later display in the
select dialog that you use to register the event handler
with the composite bag entity.
Ensure that Embedded Container is
selected.
Click Upload a component package file (.tgz file
created by npm pack).
Navigate to the PizzaEEH folder on your
local machine.
Select the PizzaEEH-1.0.0.tgz file, then
click Open.
Switch on the Enable Component Logging toggle
button.
Click Create.
The deployment of the entity event handler will take a few
seconds to complete. Oracle Digital Assistant displays the
Ready status
after a successful deployment and populates the left side of
the page with the oda.PizzaEEH component
entry under the PizzaEventHandler header.
Description
of the illustration.
In this step, you're going to use the Skill Tester to test
the disambiguation prompt.
Click
to open the Skill Tester.
If a previous conversation exists, click Reset.
Enter I like to order a pizza.
Select Large as a pizza size.
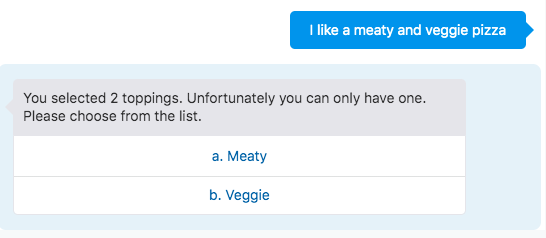
When prompted for a pizza topping, enter I like a
meaty and veggie pizza. The PizzaTopping entity's
custom disambiguation prompt displays along with the
customized list of values.
Description
of the illustration.
You can now either select Meaty as a choice, or
enter a. Both options will set Meaty as
the pizza topping and display the confirmation prompt
defined by the custom event function.
Description of the
illustration.
Click Reset.
Add an
Error Message to the Pizza Size Prompt
You've probably noticed when testing the skill that the prompt
displayed for selecting a pizza size always remains the same.
This might be confusing to users who may not be paying close
enough attention to their input to notice that they've
mistakenly entered an invalid value. To help them out, you're
going to add a error prompt message that alerts them the first
time that they've entered an invalid value for the pizza size.
To add this error message:
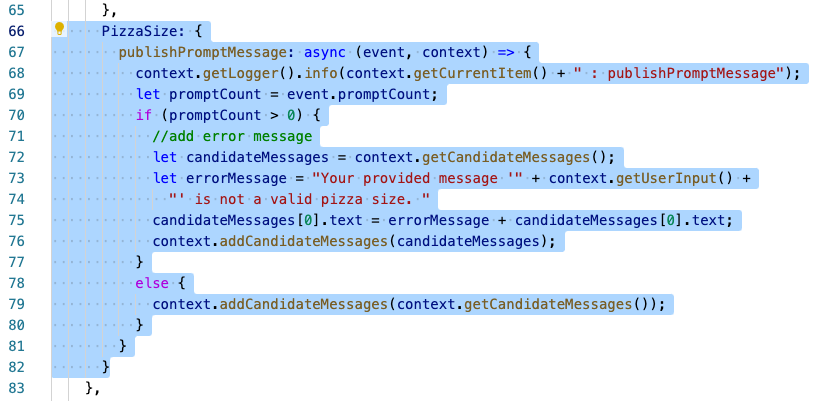
Navigate to the end of the code you've written for the
PizzaTopping bag item. This is located at around Line 65.
After you've added this code, the Event Handler Component
should look like this:
Description
of the illustration.
The following table highlights the code lines for detecting a
previously failed attempt by a user to input a valid value and
for adding an error message as a prefix to the bag item
prompt.
Code Line(s)
Comments
67
The publishPromptMessage function
allows you to display a custom prompt. If this
function has not been set by the entity event handler,
then the prompt defined for the composite bag entity
item is used instead.
69
The event object that gets passed to the publishPromptMessage
function contains the promptCount
attribute that keeps track of how often the prompt
displays for a bag item. If the value is set to 0,
then it's the first time that the prompt has been
displayed for the entity to resolve. A value of 1 or
higher indicates a previously failed attempt by the
user to provide a valid value for the bag item.
Because of this, all that your code needs to do to
display an error message is to check whether the promptCount
is greater than zero.
72 - 76
The validation error message should be displayed
before the prompt defined for the bag item. To enable
this, the default prompt is accessed through the context.getCandidateMessages() function.
The context object, also provides access
to the user input, which is incorporated into the
error message. To display the custom prompt, call context.addCandidateMessages()
and pass the changed message as an argument.
79
If you add the publishPromptMessage
function for a bag item, then you also must return a
prompt. Therefore, if the promptCount
value is 0, meaning that there were no previously
failed input attempts for this bag item, then you can
access the candidateMessages generated
by the system and return them.
Save your work.
Deploy the Event Entity Handler Project and Test the
publishPromptMessage Function
Open a terminal window or command line and then navigate
into the PizzaEEH folder.
Run the following command:
$ bots-node-sdk pack
A confirmation statement for the creation of the PizzaEEH-1.0.0.tgz
deployment file displays after the packaging process
completes.
Description of
the illustration.
In Oracle Digital Assistant, navigate to the Composite Bag
entity event handler starter skill. If you closed the skill,
re-open it.
In the dialog, navigate into the PizzaEEH
folder and select the PizzaEEH-1.0.0.tgz file.
Click Open. Wait for the file to be
uploaded and processed.
Click
to open the Skill Tester.
Enter I like to order a pizza.
When prompted for the pizza size, enter mega.
Just as before, because mega is not a valid option for
the pizza size, the same dialog is displayed again. This time
however, the prompt contains a validation error message that
alerts the user that mega is not a valid pizza size.
Description of
the illustration.
Click Reset to clear the conversation.
Add
the Code that Validates the Delivery Time
In this section, you'll validate the user-provided value for
the delivery time. The following rules need to apply to validate
the DeliveryTime bag item:
No new orders cannot be taken after 8:30 p.m.
The delivery time must be a time in the future.
No delivery in the morning (a.m.).
The delivery time must be at least 60 minutes later than
current time.
The delivery time cannot be after business hours
(9:30 p.m.).
Note: This tutorial assumes that the skill and its
customers are all in the same timezone. Keep in mind, that the skill's timezone is UTC (Coordinated Universal Time).
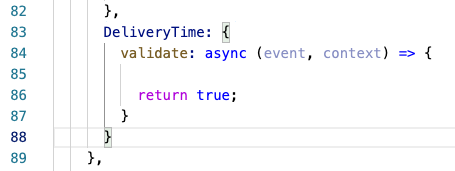
In your JavaScript IDE, navigate to the end of the PizzaSize
bag item definition, which is around Line 82.
Add an ending comma after the end curly bracket of the PizzaSize
item (},) and then click Return create a new
blank line (as Line 83).
Add the following code to Line 83 to create the DeliveryTime
composite bag item:
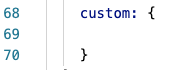
DeliveryTime: {

}
To perform custom validation, add this validate
function to the DeliveryTime code block at Line
84:
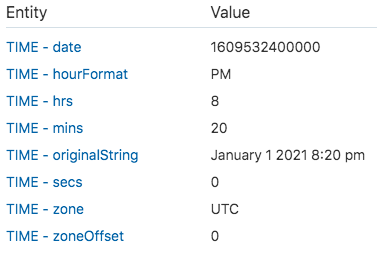
The DeliveryTime bag item is defined as a TIME entity. This
means that the user input is provided in a structure as shown
in the image below.
Description of the
illustration.
On Line 85, add the following code to the validate
function. You can copy this code from here
(without the line numbers).
85. const monthNames = ["January", "February", "March", "April", "May", "June", "July", "August", "September", "October", "November", "December"];
86.
87.  //create order date (will be created in UTC as milliseconds)
88.  let orderDate = new Date();
89.  let orderDateTimeInMs = orderDate.getTime();
90.
91. //access delivery hours, minutes and whether it is am or pm
92. let hrs = event.newValue.hrs;
93. let mins = event.newValue.mins;
94  let ampm = event.newValue.hourFormat;
95.
96. //get timezoneOffset from user profile (channel)
97. let timezoneOffset = context.getVariable('profile.timezoneOffset');
98.
99. //determine max delivery time in milliseconds
100. let orderDay = orderDate.getDate();
101. let orderMonth = monthNames[orderDate.getMonth()];
102. let orderYear = orderDate.getFullYear();
103. let maxDeliveryTimeInMilliseconds = (new Date(orderMonth + " " + orderYear + ", " + orderDay + " 8:30 pm")).getTime() + (timezoneOffset != null? timezoneOffset:0);
104.
105. //compose delivery date string from order date day, month, year and
106. //the hours and min information passed through the TIME entity. This
107. //avoids people ordering pizza e.g. for tomorrow or yesterday
108. let deliveryDateString = monthNames[orderDate.getMonth()] + " " +
109.                          orderDate.getFullYear() + ", " +
110.                          orderDate.getDate() + " " +
111.                          hrs + ":" + mins + " " + ampm;
112.
113. //delivery date should consider timezoneOffset if available
114. let deliveryDateInMilliseconds = (new Date(deliveryDateString)).getTime() + (timezoneOffset != null? timezoneOffset:0);
115.
116. //hours and minutes cannot both be 0
117. if ((hrs == 0) && (mins == 0)) {
118.   let message = "Please enter a time. Pizzas are delivered the same day. Orders must be placed 60 minutes before delivery, but at the latest at 8:30 p.m.";
119.   context.addValidationError('DeliveryTime', message);
110.   return false;
121. }
122.
123. //check if shop is closed for deliveries, which is for when order time plus pizza
124. //creation time is later than max delivery time
125. if ((orderDateTimeInMs + 3600000) > maxDeliveryTimeInMilliseconds) {
126.   let message = "Sorry, but I only accept orders until 8:30 p.m. All orders after 8.30 pm must be processed by an employee";
127.   context.addMessage(message, true)
128.   context.cancel();
129.   return false;
130. }
131.
132. //delivery is for "pm" hours until 9:30
133. if (ampm.toLowerCase() === 'am') {
134.   let message = "Sorry, we only deliver from 12 pm to 9.30 pm. Orders must be received 60 minutes before delivery, that is, at 8:30 pm at the latest. Please choose another time.";
135.   context.addValidationError('DeliveryTime', message);
136.   return false;
137. }
138.
139. //is delivery time in future? If it is not, raise validation error.
140. if (deliveryDateInMilliseconds < orderDateTimeInMs) {
141.   let message = "The delivery time cannot be in the past. Please enter a time that is at least 60 minutes ahead of the current time.";
142.   context.addValidationError('DeliveryTime', message);
143.   return false;
144. }
145.
146. //is requested delivery time outside delivery hours?
147. if (deliveryDateInMilliseconds > maxDeliveryTimeInMilliseconds) {
148.   let message = "We deliver until 9:30 pm. Orders must be placed 60 minutes before delivery. Please try again.";
149.   context.addValidationError('DeliveryTime', message);
150.   return false;
151. }
152.
153. //is delivery within 60 minutes? If so, ask user to change to later
154. if (deliveryDateInMilliseconds < (orderDateTimeInMs + 3600000)) {
155.   let message = "Quality takes time. We need at least 60 minutes to create the pizza. Please provide a new delivery time";
156.   context.addValidationError('DeliveryTime', message);
157.   return false;
158. }
159.
160. return true;
While the validate function adds a lot of code to
accommodate the various date validations, an Apache FreeMarker
implementation of the same validation rules would have
resulted in a complicated expression that would be difficult
to manage. Handling complex validations is one of the
strengths of the entity event handler. The following table
explains the code lines for the date validation. The
highlights include using the event object argument and using
validation to trigger a cancel action.
Code Line(s)
Comments
88 - 114
To validate the delivery time for an order, the
entity event handler validation function must
compute the values for the order date, the requested
delivery time, and the maximum delivery time, in
milliseconds.
92-94
The DeliveryTime bag item is a
TIME entity type. The TIME entity passes the time entered
by the user as a JSON object to the event handler. To
access information about the hour, minutes (and
whether it's a.m. or p.m.), the JSON object contains
the hrs, mins, and hourFormat
attributes. The validate function
receives the time information in the event
object. The content of the event object is specific to
an event. For the validate function, the
newValue property holds the TIME entity
payload.
97
The dates are computed as UTC, which also is the time set for Oracle Digital
Assistant in the cloud. To adjust UTC to local time so
that orders from Duesseldorf in Germany (+1hr) have
the same closing time for deliveries as orders from
Mumbai in India (+5:30hrs), the time offset must be
accessed from the user profile. The time offset is set
by the messenger client. The embedded conversation
tester used in this tutorial sets the offset. For
other messengers like the Oracle Web SDK, it's up to
the developer who configures the Web SDK to access the
timezone offset and pass it to the skill. If no
timezone is set, it will be
set to 0.
119
The context object that gets passed to
the event handler function provides a function,
addValidationError, that is used in the
code to write a validation message. The validation
message must provide the error description as well as
information needed for the user to try to enter a
valid value again. If a skill has a resource bundle
defined to display messages, then this resource bundle
can also be accessed from the context
object.
120, 160
The validate function needs to return
the false Boolean value for a validation
that has failed and true for a
validation that has succeeded. If no value is
returned, then false is set as the
default. The validate function is called after the
entity has been validated (that is, when the user
provides a valid time) and after any optional custom
validation defined for the bag item using Apache
FreeMarker has succeeded.
127-128
Customers who place orders that are outside of the
delivery times are connected to a pizza store
employee. The sample skill connects customers to pizza
store employees when the cancel action
transition that's configured for the OBotML component
state has been triggered. To trigger the cancel
action from the validation code, the event handler
uses the cancel() function on the context
object. Because a validation message does not display
when customers are connected to an employee, the code
in Line 137 uses addMessage() to
prompt the user.
Save your work.
Deploy the Updated Entity Event Handler and Test the Delivery
Time Validation
It's time for another round of testing! That means that you
need to first repackage and then redeploy the entity event handler before you have another chat with the skill.
Open a terminal window or command line and navigate to the PizzaEEH
folder.
Run the following command:
$ bots-node-sdk pack
Reopen Oracle Digital Assistant (if needed). Click Components
in the left navbar.
In the dialog, navigate to the PizzaEEH folder
and then select the PizzaEEH-1.0.0.tgz file.
Click Open. Wait for the confirmation
message.
Click
to open the Skill Tester.
Enter I like to order a small regular veggie pizza.
The command contains information for the pizza type, pizza
size and the pizza dough, so that navigation goes straight to
the delivery time prompt.
When prompted for the delivery time, Enter 10 pm.
Because delivery is only available until 8:30 p.m., you should
see a validation error prompt generated by the entity event handler that you just updated.
Try try a time that is less than 60 minutes from your
current time. For example, if it's 3:00 p.m. for you, then
enter 3:30 pm. You should see a message telling you
that you need to allow at least 60 minutes for the preparation
and delivery of the pizza.
Enter 8 am into the Message field. This time, a
message should display that tells you that pizzas are only
delivered from 12 p.m. to 9.30 p.m. Note: The skill directs you to a human agent after a
certain number of failed attempts. If this happens, clear the
conversation by clicking Reset and start the
testing again by entering I like to order a small regular
veggie pizza.
When you're done testing the delivery time, click Reset.
Set
the Default Value (regular) for the the PizzaDough Bag Item
The skill offers two types of dough: regular and gluten-free.
Because gluten-free dough is ordered less often than regular
dough, you will make regular dough the default. Unless a user
explicitly mentions gluten-free, the pizza will be on a regular
base. So far, the conversation has displayed a dialog for
selecting one of the pizza dough types. To suppress this dialog,
you need to first change a setting for the composite bag item
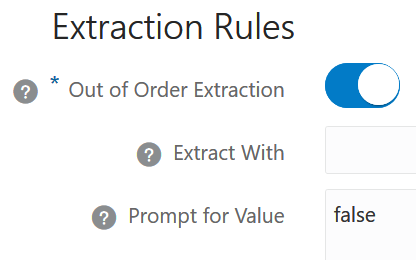
configuration:
Scroll down to the Extraction Rules section and enter false
in the Prompt for Value field.
Description of the
illustration.
Setting this field to false ensures that the
PizzaDough item is not prompted for during the user
conversation. The only option for setting its
value for this item is through the initial user message. If the user does
not explicitly request gluten-free dough at the outset of the
conversation, then the entity event handler sets the value to
regular dough by default.
Exit the editing page for the PizzaDough item by clicking Close
(located at the upper right).
Click
to open the Skill Tester.
Enter I like to order a small veggie pizza. Notice
that skill now just prompts you for the delivery time. It no
longer displays the pizza dough prompt.
Click Reset and the close the Skill Tester.
Go back to your JavaScript IDE and if needed, open the
entity event handler.
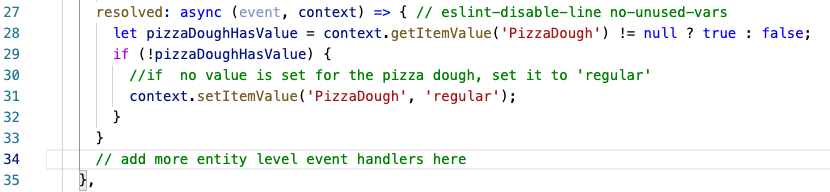
Navigate to Line 27, where the resolved:
async (event, context) function in the entity level
event handler is located.
Description of the
illustration.
In Line 28, remove the //add your backend
REST API call here comment to create blank line.
Add the following block of code at Line 28. You can
copy this code from here
(without the line numbers).
28. let pizzaDoughHasValue = context.getItemValue('PizzaDough') != null? true : false;
29. if(!pizzaDoughHasValue){
30.   //if  no value is set for the pizza dough, set it to 'regular'
31.   context.setItemValue('PizzaDough', 'regular');
32. }
The resolved event handler function is
called when the composite bag entity has been
resolved. Up to this point, values should be set for
all of the bag items. If there is no value set for the
PizzaDough item, then the code in Line 41 sets it to regular.
28
The PizzaDough item is based on a custom value list
entity. This means that the value accessed for the bag
item is either a string or null. If it's null, then
no PizzaDough value has been set by the user
Save your work.
Deploy the Updated Event Entity Handler and Test the Default
Value
Now that you've completed the entity event handler, it's now
time for some end-to-end testing.
Open a terminal window or command line and navigate into
the PizzaEEH folder.
Run the following command:
$ bots-node-sdk pack
A confirmation for the creation of the PizzaEEH-1.0.0.tgz
deployment file displays after the packaging process
completes.
Description
of the illustration.
Navigate to the PizzaEEH folder and then
select the PizzaEEH-1.0.0.tgz file.
Click Open. Wait for the confirmation
message.
Click to
open the Skill Tester.
Enter I like to order a small veggie pizza. Note
that the message contains no information about the pizza
dough.
Because the PizzaDough bag item is configured so that it's
not be prompted for, the next prompt asks for the delivery
time. You already have tested the DeliveryTime bag item
validation in the entity event handler, so enter 8 pm.
When prompted for the delivery address, enter home.
The confirmation message should show the delivery of the
small veggie pizza on a regular pizza dough base. So,
without having to mention the pizza dough, enter your
initial message. The skill has defaulted to regular
dough.
Click Reset to clear the conversation.
Enter I like to order a small veggie pizza with a
gluten-free dough.
When prompted for the delivery time, enter 8 pm.
When asked for the delivery address, enter home.
Note the confirmation prompt for veggie pizza includes
gluten-free dough. This proves that the entity event handler
does not set the PizzzaDough bag item value when it already
has a value. This value could also have been set to regular
had the initial message included a request for regular
dough.
Describes how to create an entity event handler with an external editor.
This software and related documentation are provided under a license agreement containing restrictions on use and disclosure and are protected by intellectual property laws. Except as expressly permitted in your license agreement or allowed by law, you may not use, copy, reproduce, translate, broadcast, modify, license, transmit, distribute, exhibit, perform, publish, or display any part, in any form, or by any means. Reverse engineering, disassembly, or decompilation of this software, unless required by law for interoperability, is prohibited.
If this is software or related documentation that is delivered to the U.S. Government or anyone licensing it on behalf of the U.S. Government, then the following notice is applicable:
U.S. GOVERNMENT END USERS: Oracle programs (including any operating system, integrated software, any programs embedded, installed or activated on delivered hardware, and modifications of such programs) and Oracle computer documentation or other Oracle data delivered to or accessed by U.S. Government end users are "commercial computer software" or "commercial computer software documentation" pursuant to the applicable Federal Acquisition Regulation and agency-specific supplemental regulations. As such, the use, reproduction, duplication, release, display, disclosure, modification, preparation of derivative works, and/or adaptation of i) Oracle programs (including any operating system, integrated software, any programs embedded, installed or activated on delivered hardware, and modifications of such programs), ii) Oracle computer documentation and/or iii) other Oracle data, is subject to the rights and limitations specified in the license contained in the applicable contract. The terms governing the U.S. Government's use of Oracle cloud services are defined by the applicable contract for such services. No other rights are granted to the U.S. Government.
This software or hardware is developed for general use in a variety of information management applications. It is not developed or intended for use in any inherently dangerous applications, including applications that may create a risk of personal injury. If you use this software or hardware in dangerous applications, then you shall be responsible to take all appropriate fail-safe, backup, redundancy, and other measures to ensure its safe use. Oracle Corporation and its affiliates disclaim any liability for any damages caused by use of this software or hardware in dangerous applications.
Oracle and Java are registered trademarks of Oracle and/or its affiliates. Other names may be trademarks of their respective owners.
Intel and Intel Inside are trademarks or registered trademarks of Intel Corporation. All SPARC trademarks are used under license and are trademarks or registered trademarks of SPARC International, Inc. AMD, Epyc, and the AMD logo are trademarks or registered trademarks of Advanced Micro Devices. UNIX is a registered trademark of The Open Group.
This software or hardware and documentation may provide access to or information about content, products, and services from third parties. Oracle Corporation and its affiliates are not responsible for and expressly disclaim all warranties of any kind with respect to third-party content, products, and services unless otherwise set forth in an applicable agreement between you and Oracle. Oracle Corporation and its affiliates will not be responsible for any loss, costs, or damages incurred due to your access to or use of third-party content, products, or services, except as set forth in an applicable agreement between you and Oracle.
 to open
the side menu.
to open
the side menu.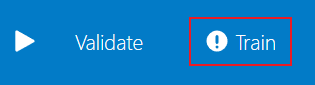
 in the top right to open the Skill Tester.
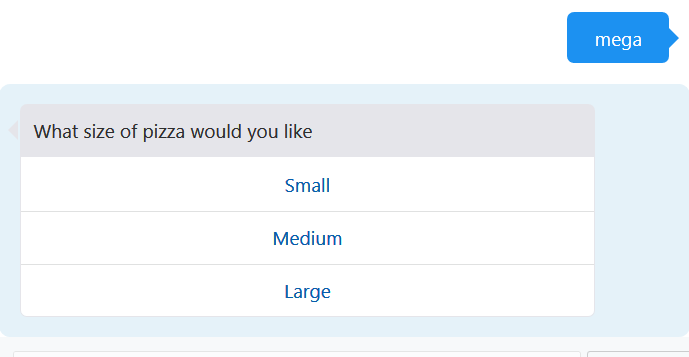
 .
.
 in the
left navbar.
in the
left navbar.

 the side menu to open the
custom components panel.
the side menu to open the
custom components panel. after a successful deployment and populates the left side of
the page with the oda.PizzaEEH component
entry under the PizzaEventHandler header.
after a successful deployment and populates the left side of
the page with the oda.PizzaEEH component
entry under the PizzaEventHandler header.


 to open the Edit Bag Item page.