Use Best Practices for Bulk Loading Data
Implementing these best practices when bulk loading data reduces the possibility of errors occurring during the bulk load process. Read and understand this section before you start bulk loading data.
Use the following sections to learn about key elements for bulk loading data.
Bulk Loading File Specifications
Learn about the bulk loading files specification to reduce the possibility of errors.
-
Use a comma as the delimiter between the values
-
Save the file in a CSV format (*.csv)
-
Limit file size to 52 MB
Tip:
Although the system upload limit is 52 MB, as a best practice, segment your bulk load files into small, manageable sets of data. For example, import just one user to familiarize yourself with the process. You can then import a larger set of users, for example, 100 users. If you do not experience any import errors, increase the import file size according to your level of comfort.
| Bulk Load File | Required Column Headings |
|---|---|
| Users |
User ID Last Name First Name Work Email |
| Groups |
Display Name Description User Members Requestable |
| Application Role Membership |
Entitlement Value Grantee Name Grantee Type App Name |
For each account, you create a new row (line) and enter data into each column (field). Each row equals one record.
Important:
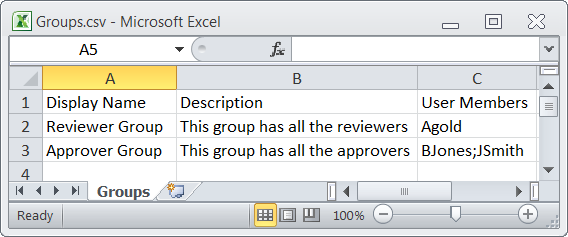
Whichever application you use to create the file, ensure that you save the file in a valid CSV format.Spreadsheet applications make it easy to create, edit, and save import files. You can use standard features to add and delete rows of data, edit individual fields, search for records, or sort the list. The following illustration shows an example of group account data defined in a Microsoft Excel file. The layout lets you easily review the data.

Description of the illustration description-illustration-csv-import-file-displayed-ms-excel-file.png
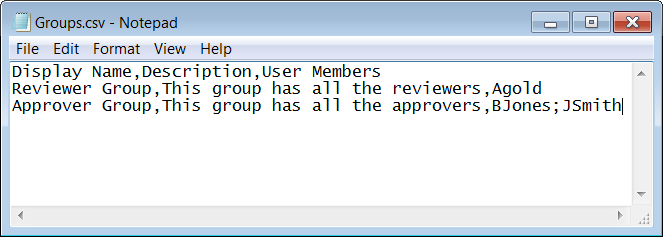
When you save your spreadsheet as type CSV (*.csv), a comma separates the values in each row. For example, the following illustration shows the group data from the Microsoft Excel spreadsheet, saved as CSV file, and opened in Notepad.

Description of the illustration description-illustration-csv-import-file-displayed-notepad.png
List of User Attributes for CSV Column Headers
Oracle Identity Cloud Service provides a list of user attributes that you can use as column headers while importing or exporting user accounts using a comma-separated values (CSV) file.
|
User Name Active Work Address Street Work Address Locality Work Address Region Work Address Postal Code Work Address Country Work Address Formatted Home Address Street Home Address Locality Home Address Region Home Address Country Home Address Postal Code Home Address Formatted Other Address Street Other Address Locality Other Address Region Other Address Country Other Address Postal Code Other Address Formatted Primary Address Type Display Name Work Email Home Email Primary Email Type Other Email Recovery Email Work Email Verified Home Email Verified Other Email Verified Recovery Email Verified External Id Locale |
Created Date Formatted Name Honorific Prefix First Name Middle Name Last Name Honorific Suffix Nick Name Work Phone Mobile No Home Phone Fax Pager Other Phone Recovery Phone Primary Phone Type Preferred Language Profile Url Time Zone Title User Type Cost Center Department Division Employee Number Manager Organization Name ByPass Notification Federated Locked Locked Reason Locked Date Password |
Sample Files
To assist you to bulk load data, Oracle provides sample files for you to use. You can download the compressed sample files in the Identity Cloud Service console or from a link provided by Oracle. Whether you download the sample files from the Identity Cloud Service console or from a link provided by Oracle, the sample files are the same.
To download the sample files from the Identity Cloud Service console, click the Download sample file link.
Important:
If you’re using the sample file to import application role memberships, then make sure the column headings are Entitlement Value, Grantee Name, and Grantee Type (instead of Display Name, Member, and Member Type). If the column headers aren’t correct, then change them accordingly.
Also, if you exported application role memberships before version 17.2.2 of Oracle Identity Cloud Service, and you want to import them back into Oracle Identity Cloud Service, then you must change the column headers before doing so.
Tip:
First import the appropriate sample file with the sample data to familiarize yourself with the process. When you are comfortable with the process, delete the sample data, and then import live data.Workflow
Before you start bulk loading data, make sure that you understand the typical bulk loading data workflow.
Workflow is described in Typical Workflow for Bulk Loading Data.
Deactivate Notifications
While you are testing, deactivate notifications so that users don’t receive unnecessary notifications.
You can deactivate all notifications or you can choose which notifications are enabled and which notifications are not enabled. See Deactivate Notifications.