- Create a Decision Model for Your Business Process
- Model Decision Logic
Model Decision Logic
Now let’s change the empty logic of the decisions. You can configure decision logic in a variety of ways, but here you’ll create a Boolean expression, an if-then-else expression, and a decision table.
- Configure a Boolean expression for the rain forecast.
- Change the Rain decision to an Expression decision. Select the Expression logic from the list that is displayed within the decision.
Notice that the decision’s icon changed to an expression icon and the decision expanded. Also, a number and a yellow circle with an exclamation point
 indicate a validation error because you haven’t entered an expression yet.
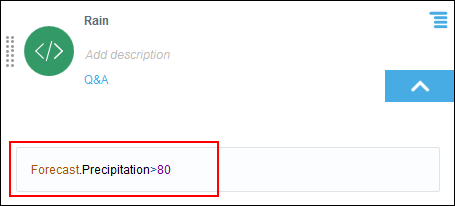
- Enter the expression using the input data you already defined. Click the Enter expression field and enter this condition:
Forecast.Precipitation>80
Description of the illustration decision-logic1.pngWhen the precipitation input value is greater than 80 percent, this Boolean expression will be true (rain is likely); otherwise it will be false (rain is unlikely).
- Click Collapse
 to collapse the Boolean expression. Notice that the validation error no longer displays because the expression is now valid.
- Change the Rain decision to an Expression decision. Select the Expression logic from the list that is displayed within the decision.
- Configure an if-then-else decision for the temperature forecast.
- Expand the Temperature decision and change its type to If-Then-Else. The decision expands and shows validation errors for items you need to complete.
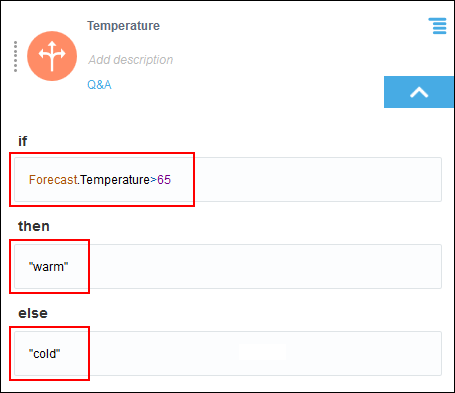
- Complete the decision’s if, then, and else expression fields as follows:
-
if:
Forecast.Temperature>65 -
then:
“warm” -
else:
“cold”
Because “warm” and “cold” values are strings, you must include quotation marks around the values. (Depending on your location, you may want to adjust the temperature condition of >65 from degrees in Fahrenheit to >18 in Celsius.)
-
- Collapse the decision and verify that the validation errors no longer display.
- Configure a decision table for the What To Bring decision.
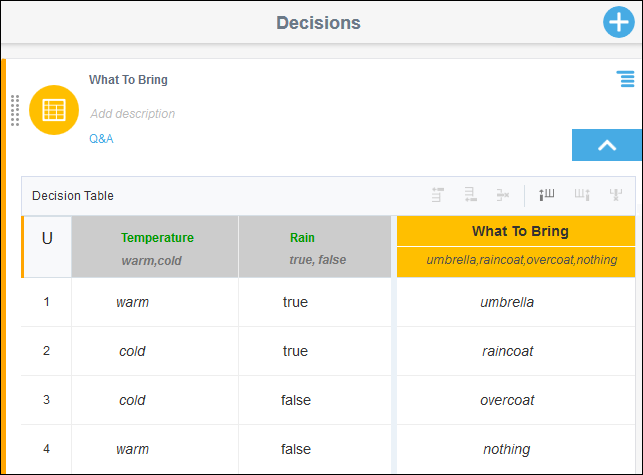
A decision table lets you model input, output, and rules in a compact way. It derives a final output decision using input data and the results of other decisions.
In the example, the temperature and rain input decisions each have two possibilities, resulting in a total of four output possibilities.
Temperature (input) Rain (input) What To Bring (output) warm true umbrella cold true raincoat cold false overcoat warm false nothing - Expand the What To Bring decision and change its type to Decision Table.
- Expand the decision and explore the table started for you.
-
The yellow column is for output, and is always the final column of the table. What To Bring is already designated as your output decision.
-
The adjacent grey column is for input. You’ll add a second input column, using one of the controls located above the output column.
-
Rows are for rules. A row labeled 1 is already listed.
-
Above the 1 in rule 1 is a U, indicating that the table uses a unique hit policy. The hit policy determines the output of a decision table when more than one rule matches the input data.
-
- Configure the possible values for the What To Bring output column.
-
In the What To Bring column, click Enter Allowed Values.
-
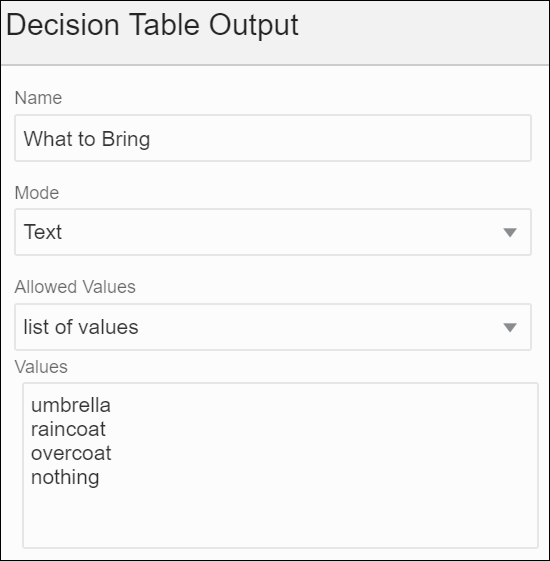
In the resulting dialog, select Text in the Mode field, select list of values in the Constraints field, and enter the following values:
umbrella,raincoat,overcoat,nothing. -
Click Close.

Description of the illustration decision-input-configuration.png -
- Configure the Temperature input column.
In the Enter Expression cell of the gray input column, press Ctrl+Space to open a pop-up menu. Select Temperature from the menu. For an input column, the Allowed Value cell is auto-populated based on the input expression.
- Add and configure the Rain input column.
-
Click the Temperature input column and select Add column after
 .
.
-
In the Enter Expression cell, press Ctrl+Space to open a pop-up menu. Select Rain from the menu. The Allowed Value cell is auto-populated with Boolean values.
-
- Add and configure rules.
-
In row 1, click the cell below Temperature and select warm.
Notice the
 icon in the cell, which stands for text. Clicking this icon, you can toggle between Text
  , Any, and Advanced
  modes for all the cells in this column.
In the text mode, text strings are automatically italicized and quotation marks aren’t needed.
-
Click the cell below Rain and select true. Notice the
 icon in the cell, which stands for Boolean. Clicking this icon, you can toggle between Boolean
  , Any, and Advanced
  modes for all the cells in this column.
-
Click the cell below What To Bring and select umbrella from the auto-suggest menu. If needed, set the cell’s mode to Text. Quotation marks aren’t needed.
-
- Click Add rule after
 three times to add three rows to the table.
 - Complete rules 2 through 4 of the decision table:
-
For rule 2, select cold, true, and raincoat.
-
For rule 3, select cold, false, and overcoat.
-
For rule 4, select warm, false, and nothing.
-
- Collapse the decision.

