Create an Integration to Exchange Messages Between Oracle Integration and a Local Host
In this tutorial, you’ll learn how to transfer messages from Oracle Integration to a file on your local host using the connectivity agent.
In the first part of the tutorial, you’ll download and install the connectivity agent in your local environment. Subsequently, you’ll create a file-based connection to the agent, create an integration to write a message—received through a REST request—to a file on your local machine, and test the integration’s output.
Upon completing this tutorial, you’ll be familiar with several important skills related to the connectivity agent, such as creating an agent group, installing the connectivity agent, creating a connection using the agent, and configuring a simple integration to exchange messages between Oracle Integration and your system.
Install the Oracle Integration Connectivity Agent
To exchange messages between Oracle Integration and a host machine, you must download and install the connectivity agent on the machine.
Prerequisites to Download and Install the Connectivity Agent
To download and install the connectivity agent, you need:
- Access to Oracle Integration. Don't have access? Use free credits to try Oracle Integration now.
- Sign-in credentials (user name, password, data center/region, and identity domain) for your Oracle Integration user account.
- The Java Platform, Standard Edition 17 Development Kit (JDK 17) installed on your local host. See JDK Development Kit 17 Downloads. The use of JDK for the connectivity agent only is licensed as part of Oracle Integration usage.
- One of the supported operating systems on the host. See System Requirements.
Note:
This tutorial demonstrates installation of the connectivity agent on a Linux machine.
Create an Agent Group
The connectivity agent installation setup requires you to associate each agent installation with an agent group in Oracle Integration.
Let's create a new agent group for our installation. You can reuse this group for another installation of the agent on the same or a different host. An agent group supports up to two connectivity-agent installations, and an Oracle Integration instance supports up to five agent groups.
To create an agent group:
- In the navigation pane, click Integrations, then click Agents.
- Click Create Agent Group. The Create New Agent Group window is displayed.
- Enter the following information and click Create.
Field Information to Enter Name Enter Tutorial.Identifier Accept the default identifier value. Description Enter the following text: Facilitates exchange of messages between Oracle Integration and a local host.A confirmation message is displayed when a group is successfully created.

Description of the illustration agent_group_confirmation.png
Download the Connectivity Agent Installer
On the Agents page, click Download and then Connectivity Agent to download the agent installer file to your machine.
A confirmation message informs that the download has begun.

Description of the illustration agent_download_confirmation.png
Install the Connectivity Agent on Your Local Host
To run the agent installer file and perform other installation-related tasks, we'll use the command prompt.
Note:
The instructions and commands provided in this section apply to Linux machines and the Bash shell.- On your local machine, create a directory to install the connectivity agent. For example, run the following command from your home directory (that is,
/home/user1).mkdir ConnectivityAgent - Move the installer file into the directory you just created. The following command shows the file being moved from the
Downloadsfolder.mv /home/user1/Downloads/oic_conn_agent_installer.zip /home/user1/ConnectivityAgent/oic_conn_agent_installer.zip - Navigate to the
ConnectivityAgentfolder.cd ConnectivityAgent - Unzip the installer file. You'll find the executable and configuration files within it.
unzip oic_conn_agent_installer.zipor
jar xf oic_conn_agent_installer.zip - To view the extracted files, list all files in the folder.
ls - Now, open the
InstallerProfile.cfgfile, and add the Oracle Integration URL and the agent group identifier within it. This associates the agent installation with the agent group you created earlier.vi InstallerProfile.cfgCopy the URL and the identifier values to the respective fields in the command prompt as follows. To get the agent group identifier, click View on your agent group in the Oracle Integration instance.oic_URL=https://oic_host:ssl_port agent_GROUP_IDENTIFIER=TUTORIALUse the following key sequence to save and exit the configuration file: Esc, and then Shift + z z.
- Provide execute permissions on all items within the
ConnectivityAgentfolder (including the executable file,connectivityagent.jar) for yourself (the owner) or for anyone else that may run the installation file. For example:To provide all permissions (read, write, and execute) only to the owner, use:chmod -R 700 .To provide all permissions to everyone, use:chmod -R 777 . - Append the
PATHenvironment variable with the location of Java binaries. This helps you run Java executables (in this case,connectivityagent.jar) from any directory without having to type the full path of the binaries for each execution. - Check if the
PATHvariable has been updated successfully:echo $PATH - Run the
connectivityagent.jarfile to install the agent on your machine.Enter the following command:java -jar connectivityagent.jar - Enter your Oracle Integration credentials when prompted. After the installation completes, you'll see the following message:
Agent started successfully...Now available for new messages... - Refresh the Agents page on your Oracle Integration instance, and you'll find the agent you installed registered against the
Tutorialgroup.
Description of the illustration agent_registered.pngClick the Actions menu of the agent group, and then click Agents to view the machine details on which the agent is running.
- To stop the agent on your host, enter
crtl+cin the command prompt. To restart it, use the same command provided in Step 9.
Congratulations! You've now successfully installed the Oracle Integration connectivity agent on your local host.
Use the Connectivity Agent to Configure an Example Integration
In this part of the tutorial, you'll create an integration that uses the connectivity agent and writes messages to files on your host machine.
- An external application sends a message through a POST request to Oracle Integration.
- An app-driven integration with a REST interface trigger receives the message.
- A File Adapter action in the integration writes this message to a file on a local machine using the connectivity agent.
Topics:
Prerequisites to Set Up the Integration
To complete this tutorial, you need:
- Access to Oracle Integration. Don't have access? Use free credits to try Oracle Integration now.
- Sign-in credentials (user name, password, data center/region, and identity domain) for your Oracle Integration user account.
- The Oracle Integration Connectivity Agent installed and running on your host machine. See Install the Oracle Integration Connectivity Agent.
- A directory on your host machine for the output files. See Create a Directory on the Host Machine for Output Files.
Create a Directory on the Host Machine for Output Files
On your local machine, create a separate directory to hold the output files from Oracle Integration. You’ll provide the path of this directory while configuring the integration actions.
Navigate to your home directory, and create a directory named output.
mkdir outputCreate a File Connection Using the Agent
You'll use a File Adapter in the integration to connect to your host machine and write messages to files. In order to connect to your machine, the File Adapter requires a connection set up using the connectivity agent you’ve installed.
- In the navigation pane, click Integrations, then click Connections.
- Click Create.
The Create Connection — Select Adapter dialog is displayed.
- Select the File from the dialog.
The Create Connection dialog is displayed.
- Enter the information to describe the connection.
- Enter a name for your connection (
File Connection). - Select Trigger and Invoke in the Role field.
- Enter an optional description for the connection.
- Enter a name for your connection (
- Click Create.
Your connection is created and you are now ready to configure other details.
- In the Agent Group section, click Configure Agents, select Tutorial, and click Use.
- Click Save.
- Click Test to ensure that your connection is successfully configured.
A confirmation message is displayed if your test is successful.
- Click Back
 to return to the Connections page. Click Save again if prompted.
Now you're ready to create the integration.
Create an App Driven Integration
Let's create an app-driven integration to receive a POST message from an external application and write the message to a file on your host machine.
- In the navigation pane, click Integrations.
- On the Integrations page, click Create.
The Create Integration - Select a Style dialog is displayed.
- Select App Driven Orchestration. The Create New Integration dialog is displayed.
- Enter the following information.
Field Information to Enter What do you want to call your integration?
Provide a name for the integration,
Write Messages to Files.Identifier
Accept the default identifier value.
Version
Accept the default version number of
01.00.0000.What does this integration do?
Enter the following text:
Receives messages from a remote application and writes them to files on a host machine. - Click Create. The integration canvas is displayed, where you can configure your integration.
Add a REST Interface to Receive Messages
Add a REST interface as a trigger connection to receive messages from an external application.
- Click the + sign below START on the integration canvas to view a list of available trigger connections.
- Select Sample REST Endpoint Interface from the list.
The Configure REST Endpoint wizard is displayed.
- On the Basic Info page, enter a name without a space (
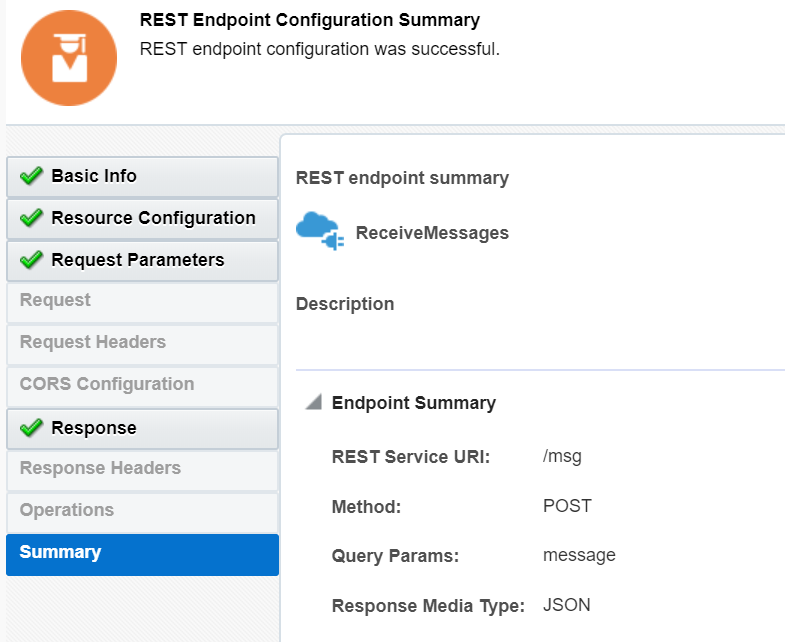
ReceiveMessages) and a description for the endpoint. Click Next. - On the Resource Configuration page, enter the following details.
Field Information to Enter What is the endpoint's relative resource URI?
Enter
/msg.What action do you want to perform on the endpoint?
Select POST.
Add and review parameters for this endpoint
Select the check box.
Configure this endpoint to receive the response
Select the check box.
Click Next.
- On the Request Parameters page, specify a query parameter. This parameter will contain the message received from the external application. Click + in the Specify Query Parameters section to add a new row. Enter
messagein the Name field and select string in the Data Type field. Click Next. - On the Response page, select JSON Sample in the Select the response payload format field, and click the inline link to enter a sample JSON. Enter the following sample and click OK.
{ "msg": "Hello" } - Click Next. On the Summary page, review the data you've entered and click Done.

Description of the illustration rest-summary.pngNote that a map action corresponding to the ReceiveMessages action is automatically added to the canvas. You'll configure it later in this tutorial.
- In the canvas toolbar, select Horizontal from the Layout list. Click Save.
Configure a File Adapter to Write Messages to Files
Add a File Adapter to write messages received by the REST interface to files on your host machine.
- Click Invokes
 on the pane to the right of the canvas.
- Expand File and drag File Connection to the + sign after the ReceiveMessages action.

Description of the illustration file-adapter.pngThe Configure File Operation Endpoint wizard is displayed.
- On the Basic Info page, enter a name without a space (
WriteFile) and a description for the adapter. Click Next. - On the Operations page, enter the following details and click Next.
Field Information to Enter Select Operation
Select Write File.
Specify an Output Directory
Enter the path to the directory you created earlier. See Create a Directory on the Host Machine for Output Files. For example, your path can be
/home/user1/output.File Name Pattern
Specify the file name pattern for the new files that will be created to write messages. For example, enter the following pattern:
msg%SEQ%.jsonThis pattern creates a JSON file with the name
msg1.jsonfor the first message received,msg2.jsonfor the second message, and so on.Append to Existing File Leave it unchecked. - On the Schema page, leave Yes selected in the first field, and in the second field, select Sample JSON document. Click Next.
- On the File Contents - Definition page, click Choose File to upload a sample JSON document. Create a
.jsonfile with the namesample.json, add the following text to it, and upload the file on this page.{ "msg":"Hello" }Click Next.
- On the Summary page, review the data you've entered and click Done.
- Note that the Map to WriteFile action is automatically added to the canvas. Click it and select Edit
 to define the mapping.
- In the mapper, expand Query Parameters under ReceiveMessages Request (REST) on the left, and expand request-wrapper on the right.
- Map Message on the left to msg on the right. This mapping ensures that the message received by the REST interface is passed on to the WriteFile action.
- Click Validate and then Close.
- At this point, the integration flow appears as follows:
Configure Data Mapping to Return a Response
Configure the data mapping in the Map to RecieveMessages action to return a response to the external application after each message has been received and written to a file on the host machine.
- Click the Map to RecieveMessages action and select Edit
 to define the mapping.
- In the mapper, expand Query Parameters under ReceiveMessages Request (REST) on the left, and expand Response Wrapper on the right.
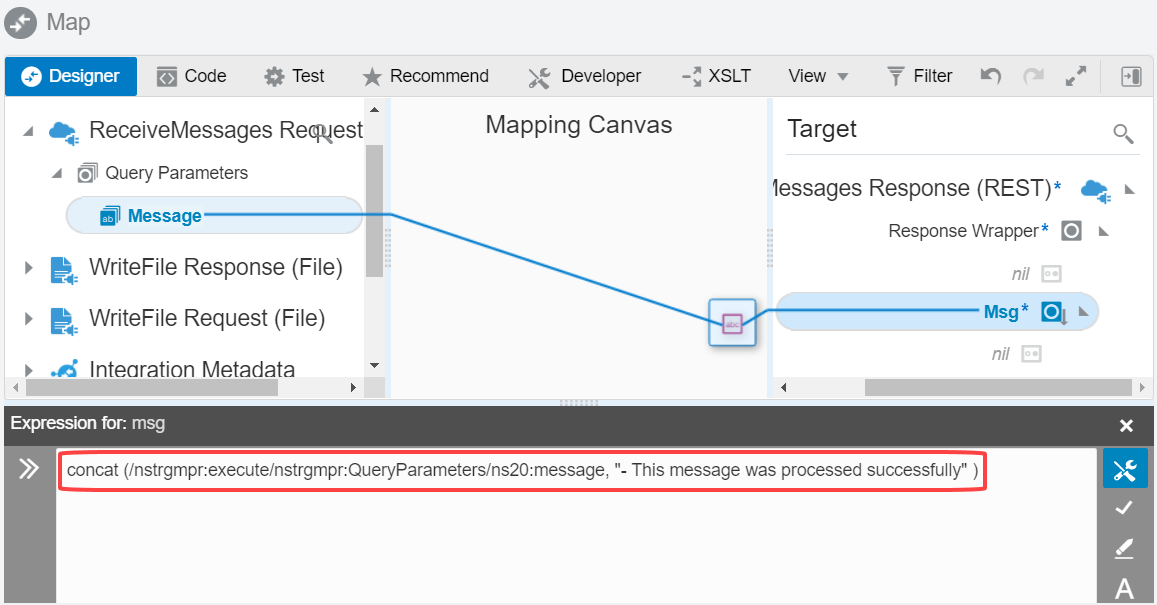
- Map Message on the left to Msg on the right.
The expression builder with a corresponding mapping expression opens.
- Click Toggle Functions
 in the toolbar to view the Components pane. Expand String and drag the concat function to the expression builder pane.
- Copy the existing expression in the pane (for example,
/nstrgmpr:execute/nstrgmpr:QueryParameters/ns20:message) into the concat function as the first operator and add"- This message was processed successfully"as the second operator. The final expression in the pane will be of the following format:concat ( /nstrgmpr:execute/nstrgmpr:QueryParameters/ns20:message , " - This message was processed successfully" ).This mapping ensures that a success message is sent back to the external application after each incoming message is written to a file.
- Click Save
 and click Validate.
- Click Close to return to the integration canvas.
Activate and Test Your Integration
Check for errors, save, and activate the integration flow.
You'll notice an error notification on the canvas. To resolve it, assign a primary business identifier for tracking. Business identifiers enable you to track payload fields in messages during runtime. A primary business identifier is required to activate an integration. See Assign Business Identifiers for Tracking Fields in Messages.
To assign an identifier:
- Click Actions Menu
 in the top-right corner of the canvas, and select Tracking.
- On the resulting page, select message on the left and move it to the table on the right.
- Click Save.
- Save the integration and click Close.
Now, activate and test your integration.
- On the Integrations page, click the Activate
 button against your integration.
- In the Activate Integration dialog, select Enable Tracing and Include Payload check boxes, and click Activate.
- After the integration is activated, click Run
 and select Test to test run the integration.
- On the resulting page, enter a message (for example,
Hello World) to send to the integration as a POST request, and click Test. - After the message has been processed by the integration and written to a file on your host machine, you receive the following response on the Test page:
{
  "msg" : "Hello World - This message was processed successfully"
}
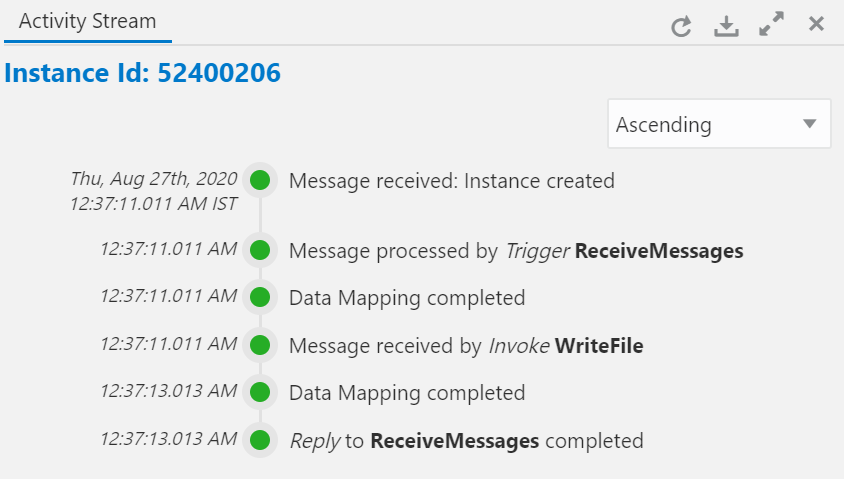
The activity stream also appears on the page, showing the successful execution of the integration and all the actions within it.
- On your host machine, navigate to the
outputfolder to find the file written by the integration. Open the file and verify its contents. - Repeat Step 4 to write another file on the host machine.
Congratulations! You've successfully created an integration using the connectivity agent and transferred messages from Oracle Integration to a local host.


