Configure OAuth 2.0 Authentication Using Client Credentials
To configure OAuth 2.0 authentication for invoking Oracle Integration APIs, configure and use client credentials.
For OAuth authentication in Oracle Cloud Infrastructure in government environments, client credentials is the only authorization grant flow supported. OAuth client credentials grant flow semantics are built into Oracle Cloud Infrastructure's IAM and scoped to an IAM user profile. Any user can create an OAuth 2.0 client credentials user for their user account using the Oracle Cloud Infrastructure Console.
Gather Needed Information
| Field | Description | Example Value |
|---|---|---|
|
Instance (friendly URL) |
The friendly URL of your Oracle Integration instance. On the Integration Instance Details page, this is the value of the Service Console URL. |
|
|
Audience (permanent URL) |
The unique URL of the Oracle Integration resource this client is allowed to access. This value is automatically populated by the OAuth resource selector. |
|
|
Scope |
The applications you want this client to invoke or the APIs of the service instances you want to invoke. Scopes relevant for Oracle Integration are listed. You can use either one. This value is automatically populated by the OAuth resource selector. |
|
|
Associated UPI stripe |
The associated UPI stripe for the Oracle Integration instance, along with its admin user and admin password. This is used to obtain an OAuth 2.0 token. To find the UPI stripe:
|
|
 |
||
|
Client ID |
The OCID of the generated OAuth 2.0 client credentials and can be retrieved from the UI next to the client credentials on the client credentials page. |
|
|
Client Secret |
The secret generated when you generate the OAuth 2.0 client credential. Copy it when it appears once. It isn't shown again; the only option is to regenerate another secret. |
|
Generate the Client Credentials
To generate the client credentials:
-
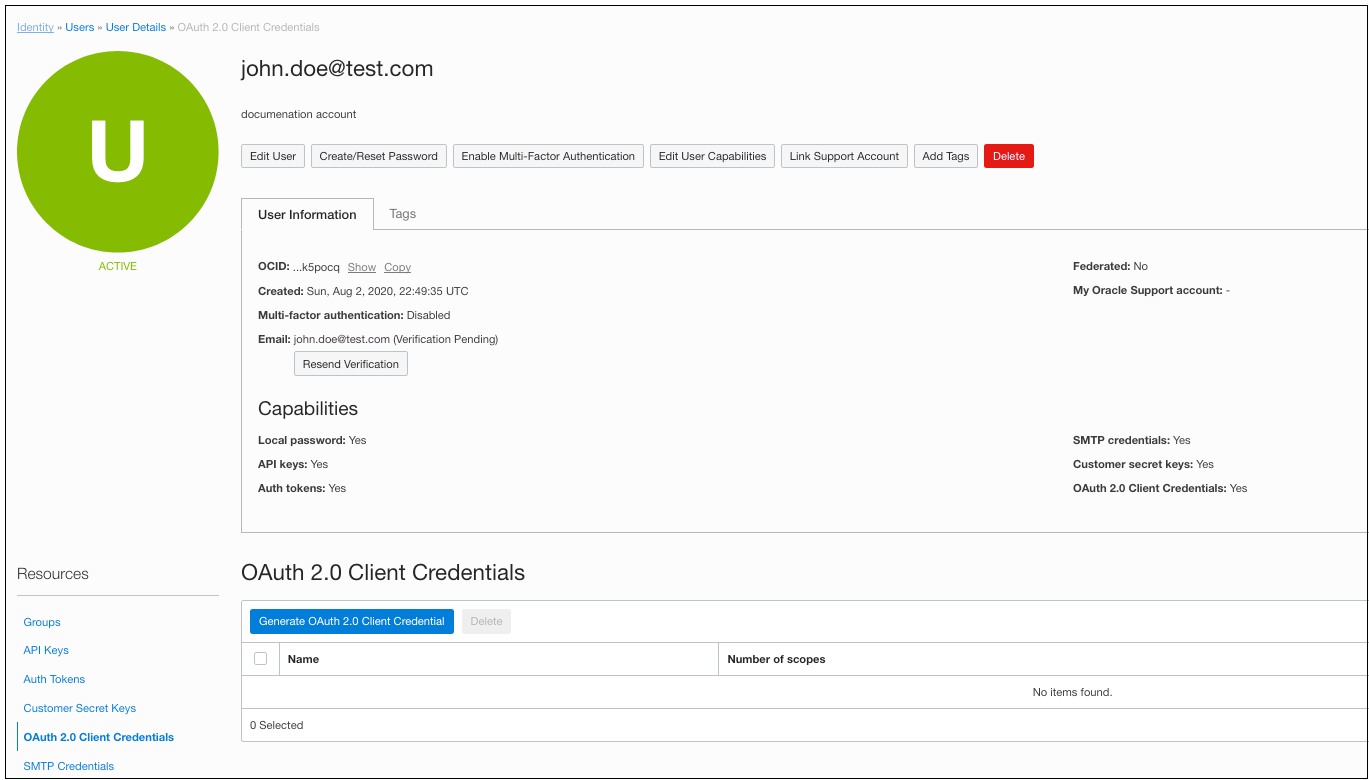
Open the navigation menu and click Identity & Security. Under Identity, click Users. In the Name column, click the user name that you want to update. The User Details screen is displayed.
To programmatically invoke an API, you typically create a client credential under a service account user. The credential must be created at the user level, not a group level.
-
Under Resources, select OAuth 2.0 Client Credentials.
-
Click Generate OAuth 2.0 Client Credential.
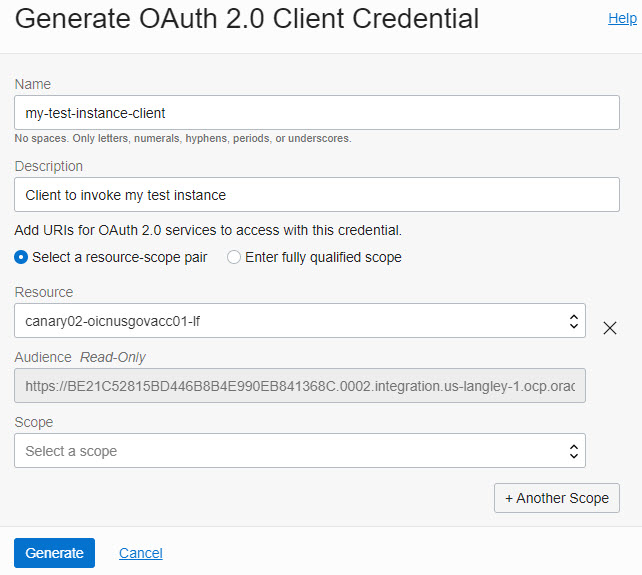
The Generate OAuth 2.0 Client Credential dialog is displayed.
-
Use the resource selector to select an Oracle Integration instance and populate audience and scope fields.
The resource selector dropdown lists all Oracle Integration instances across all subscribed regions in your Oracle Cloud Infrastructure tenancy. The list is further filtered by the compartments to which you have access. This view enables you to select the Oracle Integration instance that the client needs to invoke, and doing so automatically populates the audience and scope values, as shown below. Note that IAM users and by extension OAuth 2.0 client credentials are global, whereas Oracle Integration instances are created in a region and so are regional.
-
Complete additional entries in the Generate OAuth 2.0 Client Credential dialog.
For more information, refer to the table in Gather Needed Information.
-
Click Generate.
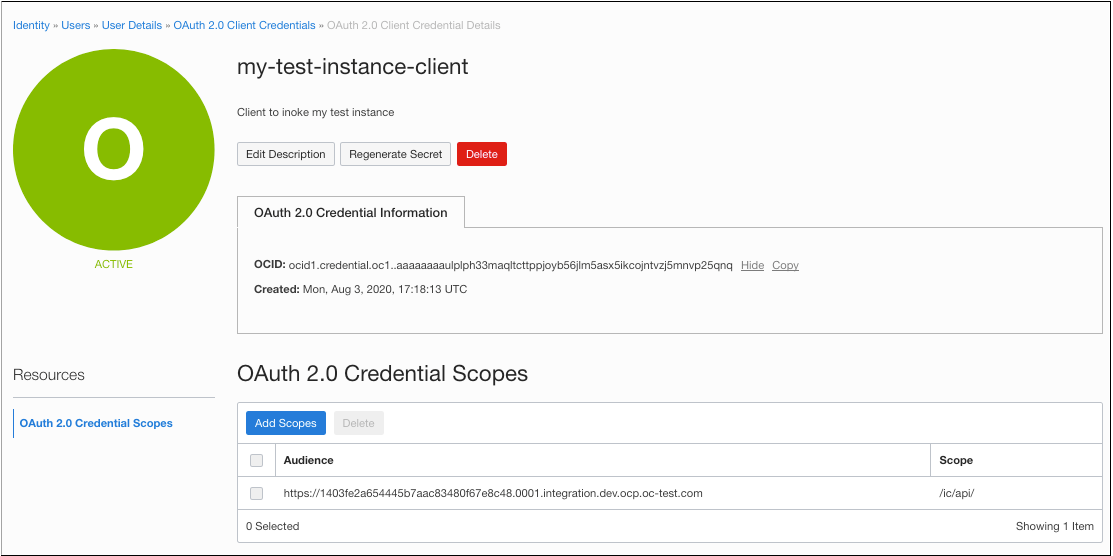
The generated credential is displayed. The client credential includes the client credential's OCID and a one-time password.
-
Note the password, then click Close.
The credential password appears here just once. There is no way to retrieve a password; if you lose it, you must regenerate the credential.
-
If needed, edit the client credential.
The generated client credential is listed under OAuth 2.0 Client Credentials. You can view or change its attributes and regenerate the client secret if needed on the credential details screen.
Obtain an OAuth Bearer Token
Once you have the OAuth client credential configured, you can get an OAuth bearer token based on the generated values.
To obtain an OAuth bearer token, enter the following values in your API request, using either POSTMAN or curl:
-
Client ID and secret:
-
Client ID:
ocid1.credential.oc1..aaaaaaaaulplph33maqltcttppjoyb56jlm5asx5ikcojntvzj5mnvp25qnq -
Client Secret:
i7BKNOG:1z1A)bqaY(]F
-
-
UPI stripe token request endpoint (POST):
https://idcs-364c06d3202948828edee2b8ba4dbc16.idcs.identity.us-phoenix-1.oci.oraclecloud.com/oauth2/v1/token -
Scope definition in the POST request payload:
For this instance the scope definition is a concatenation of the audience and scope (exactly) as defined in the client credentials creation step above.
'grant_type=client_credentials' 'scope=https://1403FE2A654445B7AAC83480F67E8C48.0001.integration.dev.ocp.oc-test.com:443urn:opc:resource:consumer::all https://1403FE2A654445B7AAC83480F67E8C48.0001.integration.dev.ocp.oc-test.com:443/ic/api' -
Request:
curl -X POST \ https://idcs-364c06d3202948828edee2b8ba4dbc16.idcs.identity.us-phoenix-1.oci.oraclecloud.com/oauth2/v1/token \ -H 'Accept: application/json'\ -H 'Authorization: Basic b2NpZDEuY3JlZGVudGlhbC5vYzEuLmFhYWFhYWFhdWxwbHBoMzNtYXFsdGN0dHBwam95YjU2amxtNWFzeDVpa2Nvam50dnpqNW1udnAyNXFucTppN0JLTk9HOjF6MUEpYnFhWShdRg=='\ -H 'Cache-Control: no-cache' \ -H 'Content-Type: application/x-www-form-urlencoded' \ -H 'cache-control: no-cache' \ -d 'grant_type=client_credentials&scope=https://1403FE2A654445B7AAC83480F67E8C48.0001.integration.dev.ocp.oc-test.com:443urn:opc:resource:consumer::all https://1403FE2A654445B7AAC83480F67E8C48.0001.integration.dev.ocp.oc-test.com:443/ic/api' -
Response:
{
 "access_token": "eyJ4NXQjUzI1NiI6Ijc3NmdPRkNZZUxSZ0J2Q2JFcHE4dkg3OVc1UUxhWG91Q1c1QkN0U0xEekEiLCJ4NXQiOiJtejFrdVE4TEJudUF1VEs3S3EwQ3lRUlpCMmsiLCJraWQiOiJhc3ctb2F1dGhfb2MxXzY1MmI4YjI5IiwiYWxnIjoiUlMyNTYifQ.eyJ1c2VyX3R6IjoiTVNUIiwic3ViIjoiam9obi5kb2VAdGVzdC5jb20iLCJ1c2VyX2xvY2FsZSI6IkVOIiwidXNlcl9kaXNwbGF5bmFtZSI6ImpvaG4uZG9lQHRlc3QuY29tIiwic3ViX21hcHBpbmdhdHRyIjoidXNlck5hbWUiLCJpc3MiOiJhdXRoU2VydmljZS5vcmFjbGUuY29tIiwidG9rX3R5cGUiOiJBVCIsInB0eXBlIjoidXNlciIsInVzZXJfdGVuYW50bmFtZSI6ImlkY3MtMzY0YzA2ZDMyMDI5NDg4MjhlZGVlMmI4YmE0ZGJjMTYiLCJjbGllbnRfaWQiOiJvY2lkMS5jcmVkZW50aWFsLm9jMS4uYWFhYWFhYWF1bHBscGgzM21hcWx0Y3R0cHBqb3liNTZqbG01YXN4NWlrY29qbnR2emo1bW52cDI1cW5xIiwiYXVkIjpbImh0dHBzOlwvXC90ZXN0ZG5zdXBpNnVzaW5nbWlnbGFiLWlkYWF0MzFkanZpcy1jcGkuMDAwMS5pbnRlZ3JhdGlvbi5kZXYub2NwLm9jLXRlc3QuY29tOjQ0MyIsImh0dHBzOlwvXC8xNDAzRkUyQTY1NDQ0NUI3QUFDODM0ODBGNjdFOEM0OC4wMDAxLmludGVncmF0aW9uLmRldi5vY3Aub2MtdGVzdC5jb206NDQzIiwidXJuOm9wYzpsYmFhczpsb2dpY2FsZ3VpZD0xNDAzRkUyQTY1NDQ0NUI3QUFDODM0ODBGNjdFOEM0OCJdLCJ1c2VyX2lkIjoib2NpZDEudXNlci5vYzEuLmFhYWFhYWFhMjdqZW1vcmZ3YXp2ZDVtc2JiNzJxM2hlN3Frd2JzeXlkNzd0bWxvbmVoYzU0aGs1cG9jcSIsInN1Yl90eXBlIjoidXNlciIsInNjb3BlIjoidXJuOm9wYzpyZXNvdXJjZTpjb25zdW1lcjo6YWxsIFwvaWNcL2FwaSIsImNsaWVudF90ZW5hbnRuYW1lIjoiaWRjcy0zNjRjMDZkMzIwMjk0ODgyOGVkZWUyYjhiYTRkYmMxNiIsInVzZXJfbGFuZyI6IkVOIiwiZXhwIjoxNTk2NTYzNzcwLCJpYXQiOjE1OTY1NjAxNzAsImNsaWVudF9ndWlkIjoib2NpZDEuY3JlZGVudGlhbC5vYzEuLmFhYWFhYWFhdWxwbHBoMzNtYXFsdGN0dHBwam95YjU2amxtNWFzeDVpa2Nvam50dnpqNW1udnAyNXFucSIsImNsaWVudF9uYW1lIjoibXktdGVzdC1pbnN0YW5jZS1jbGllbnQiLCJ0ZW5hbnRfaXNzIjoiaHR0cHM6XC9cL2lkY3MtYmEyZDI0NDg0MmJhNGZiYWJlNmIzM2VlMGIxM2MwYzEuaWRjcy5pZGVudGl0eS51cy1hc2hidXJuLTEub2NpLm9yYWNsZWNsb3VkLmNvbSIsImp0aSI6IjkyZGNkMDQzLTc0MDYtNGJhZi1hZTMxLTVmY2JmZTk4YzRiNSIsInRlbmFudCI6ImlkY3MtMzY0YzA2ZDMyMDI5NDg4MjhlZGVlMmI4YmE0ZGJjMTYifQ.J8atPO-RjSsplzzzTYkT5_NCYo33gfHQJgZomJ3dZvrSpGdPDJ6Xxtb-UrLMLFGOZEaw-b4-JaY_z4KWETjlicseeMTBIgnpeiqf0QppqS0vJeMzy3kA_EIJrtcX_NQglOUYpGtyNq5-HTix6fPULYMf_ZMhLm7XAh551QAwL_TP_gz1QAXRsbYkzN_19Hs_kgJZ-KlZ2cwYLl2H3o36x2d2V3ESZNejPwSwutky8nT0bLBT78kwfc3YRzkhThb613XD3r4oLyYLGbTie9wHbufHjkAbcZRX7JR_hPjSxhm_ijVlOlEvFCy5Smn5-vss3dDBKJocGIIpbSfFyffxHQ",
 "token_type": "Bearer",
 "expires_in": "3600"
}
Use the Bearer Token to Invoke Oracle Integration APIs
Using the bearer token obtained in Obtain an OAuth Bearer Token, you can now invoke Oracle Integration APIs. See REST API for Oracle Integration.
For example:
curl -X GET \
  https://testdnsupi6usingmiglab-idaat31djvis-cpi.0001.integration.dev.ocp.oc-test.com:443/ic/api/integration/v1/integrations
      \
  -H 'Authorization: Bearer eyJ4NXQjUz........'\
  -H 'cache-control:
    no-cache'


