Configure a Trusted Application to Authenticate with OAuth
Before you can use the REST API with OAuth in Oracle Integration, you need to register your Oracle Integration instance as a trusted application in Oracle Identity Cloud Service.
Register a trusted application for every Oracle Integration instance that you want to access through the REST API.
You need Identity Domain Administrator or Application Administrator credentials to perform this task.
-
Access your Oracle Identity Cloud Service instance.
To find the Oracle Identity Cloud Service administrative console URL for your Oracle Integration:-
Go to the URL for your Oracle Integration instance.
For example, if your Oracle Integration instance is
https://myhost.example.com/ic/home, when you go to that URL, you are redirected to an URL such ashttps://idcs-c2881.identity.myhost.example.com/ui/v1/signin. -
Replace
/signinwith/adminconsoleto go to the Oracle Identity Cloud Service.For example:
https://idcs-c2881.identity.myhost.example.com/ui/v1/adminconsole. You'll be prompted to sign in again and will be signing in to the administrative console. - Log in to your Oracle Identity Cloud Service administrative console with your Identity Domain Administrator credentials.
-
- Add a trusted application for your Oracle Integration instance.
- In Oracle Identity Cloud Service, from the menu, click Applications, then Add.
- Select Trusted Application as the type of application.
- Enter an application name, then click Next.
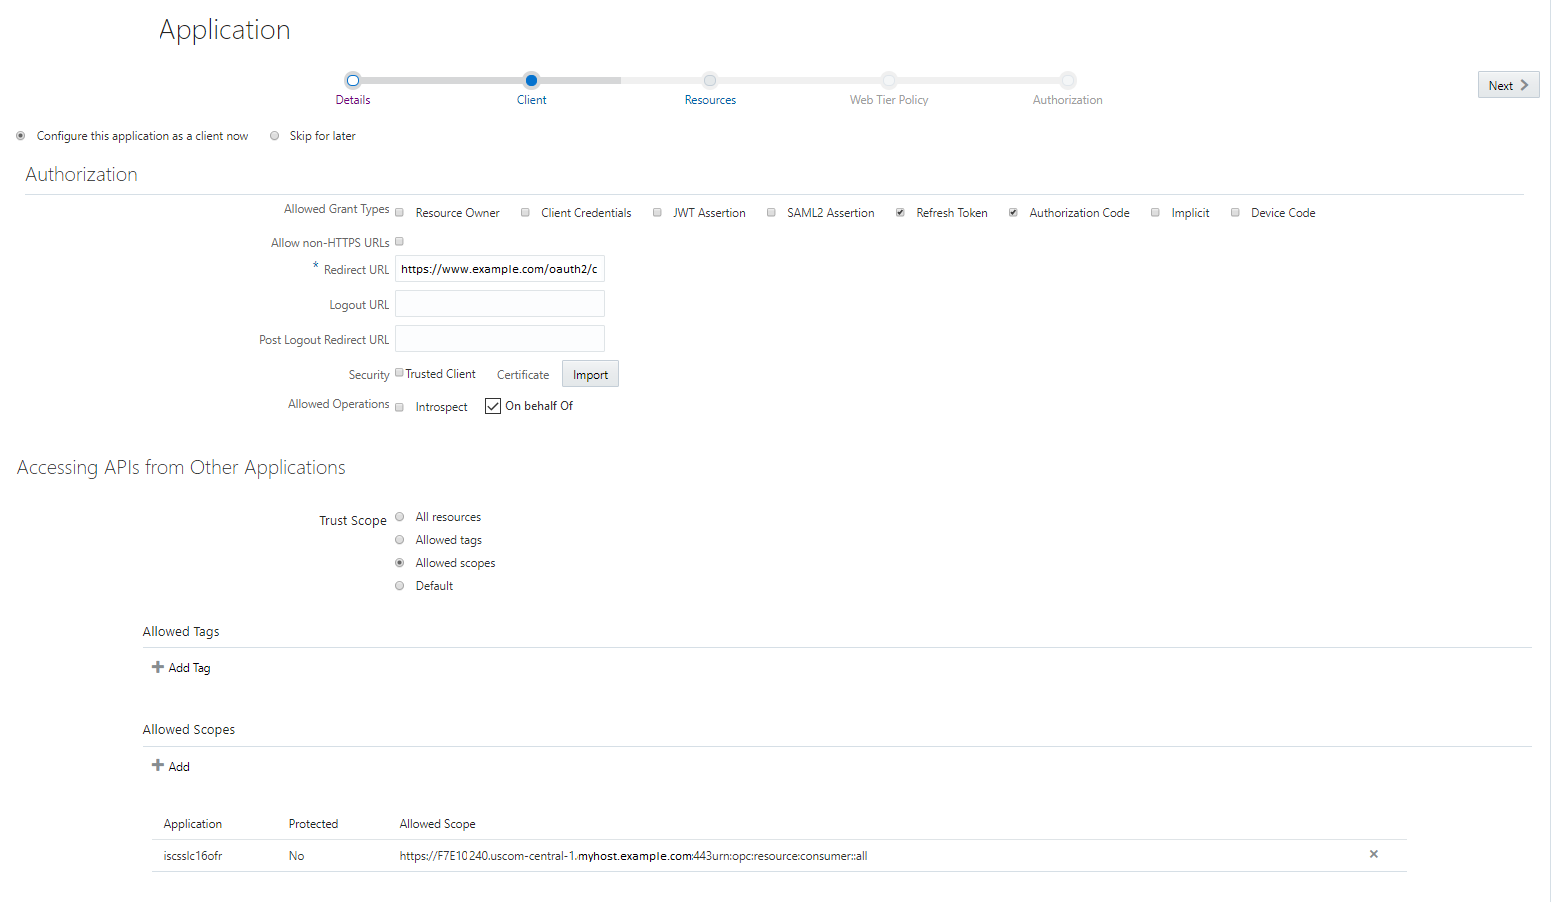
- Select Configure this application as a client now .
-
On the Authorization page, select the following fields:
- In Allowed Grant Types, select: Refresh Token and Authorization Code. Make sure you select Refresh Token because otherwise, clients will not be able to refresh expired tokens.
- In Redirect URL, specify the URL of the application where responses to authentication requests are sent. This is the callback URL for your application where the authorization code and authorization token will be sent.
- In Client Type, select Confidential.
- In Allowed Operations, select On behalf Of. This allows the trusted application to get a token and create a token on behalf of the user who is logged in.
-
In Accessing APIs from Other Applications, select Allowed scopes. This specifies which resources the trusted application can access.
- In Allowed Scopes, click Add, select your Oracle Integration instance from the list. Your instance name will be the instance ID. Click Add.
The following image displays the Client Configuration in the trusted application.

- Click Next.
-
In Expose APIs to Other Applications, select Configure this application as a resource server now.
- In Access Token Expiration, change the default expiration time of 3600 seconds(1 hour) if desired.
Note:
To change the default expiration time, a custom scope is required. For details, see IDCS OAuth Access Token Expiration Time Behaviour with IDCS Scopes and Custom Scopes (Doc ID 2580015.1) . -
In Primary Audience, specify the host on which the Oracle Integration is running. You can find out this information from the URL that you use to access the Oracle Integration user interface.
For example, if your Oracle Integration instance is
https://myhost.example.com/ic/home, your host name ismyhost.example.com. Specifymyhost.example.com:443as the Primary Audience value. This is where the access token will be sent. - In the Allowed Scopes section, you don't need to add any additional scopes because the scope you added in the Client Configuration is enough to access all the resources.
The following image displays the Resources configuration in the trusted application.
- In Access Token Expiration, change the default expiration time of 3600 seconds(1 hour) if desired.
- Click Next and skip sections until you get to Finish.
- Copy the Client ID and the Client Secret that are displayed in the confirmation window, and then click Close.
- Click Activate in the upper-right section of the page to activate the application.
Next step: Use OAuth with REST API Calls