Prerequisites for Creating a Connection
You must satisfy the following prerequisites to create a connection with the Salesforce Adapter.
- Prerequisites for Oracle Integration Release 20.2.2.0.0 (200524.0200.35760) or Later
- Prerequisite for Oracle Integration Releases Earlier Than 20.2.2.0.0
- Prerequisites to Use the Salesforce Username Password Security Policy
- Prerequisites to Use the Salesforce OAuth Three-Legged (Authorization Code Credentials) or Resource Owner Password Credentials Security Policy
- Prerequisites to Use Platform Events
- Prerequisite to Use Change Data Capture (CDC) Events
- Prerequisite to Use Outbound Messaging
- Prerequisite to Use Apex Web Services
Prerequisites for Oracle Integration Release 20.2.2.0.0 (200524.0200.35760) or Later
When you create or edit your Salesforce Adapter connection on release 20.2.2.0.0 (200524.0200.35760) or later of Oracle Integration, you must specify the following details on the Connections page. Therefore, you must obtain the following details before creating or editing a connection.
Topics:
- Instance type. See Identify the Instance Type of Your Salesforce Organization.
- Custom domain name (optional). If you are using Salesforce Government Cloud or a custom domain to log in to your Salesforce account, a custom domain name is required for creating a connection on the Connections page. See Obtain the Custom Domain Name.
- API version. See Find Your Current Salesforce API Version.
Identify the Instance Type of Your Salesforce Organization
Follow these methods to identify your instance type:
- If you use the URL https://login.salesforce.com to log in to your Salesforce account, your instance type is Production.
- If you use the URL https://test.salesforce.com to log in to your Salesforce account, your instance type is Sandbox.
Obtain the Custom Domain Name
When you create your Salesforce Adapter connection on the Connections page, you must specify your custom domain name.
Note:
The steps provided here apply to the Salesforce Classic UI. If you are using the Lightning Experience UI on your Salesforce instance, switch to the Salesforce Classic UI. See Toggle or switch between Lightning Experience and Salesforce Classic.To obtain the custom domain name:
Find Your Current Salesforce API Version
You can find your current Salesforce API version in the enterprise WSDL.
Note:
The steps provided here apply to the Salesforce Classic UI. If you're using the Lightning Experience UI on your Salesforce instance, switch to the Salesforce Classic UI. See Toggle or switch between Lightning Experience and Salesforce Classic.To find your current Salesforce API version.
Prerequisite for Oracle Integration Releases Earlier Than 20.2.2.0.0
Perform the following prerequisite for Oracle Integration releases earlier Than 20.2.2.0.0.
Generate the Salesforce Enterprise WSDL
If you edit an existing connection created prior to release 20.2.2.0.0 (200524.0200.35760) of Oracle Integration, you must upload an enterprise WSDL to use in an integration.
You must generate the Salesforce enterprise WSDL, then upload this WSDL on the Connections page when creating a Salesforce Adapter connection.
Note:
The steps provided here apply to the Salesforce Classic UI. If you're using the Lightning Experience UI on your Salesforce instance, switch to the Salesforce Classic UI. See Toggle or switch between Lightning Experience and Salesforce Classic.To generate the Salesforce Adapter enterprise WSDL:
-
Log in to your Enterprise, Unlimited, or Developer Edition Salesforce.com account.
- Click Setup in the header or click your username, then select Setup. See Explore the Salesforce Setup Menu.
- Search for
APIin the Quick Find box, then select API under Develop. -
If the organization has managed packages installed in the organization, click Generate Enterprise WSDL. Salesforce prompts you to select the version of each installed package to include in the generated WSDL or right-click Generate Enterprise WSDL and save it to a local directory.
In the right-click menu, Microsoft Edge/Google Chrome users can select Save link as, while Mozilla Firefox users can select Save Link As to save it to the local directory.
The Save dialog is displayed.
-
Provide a name for the WSDL file and a location to save the file on your file system, and click Save. For information about uploading this WSDL when creating a connection, see Configure Connection Properties.
Prerequisites to Use the Salesforce Username Password Security Policy
To use the Salesforce Username Password security policy, you must create a
user account in Salesforce.com.
Prerequisites to Use the Salesforce OAuth Three-Legged (Authorization Code Credentials) or Resource Owner Password Credentials Security Policy
To use the Salesforce OAuth Three-Legged or Resource Owner Password
Credentials security policy, you must create a connected application in
Salesforce.com.
Note:
The steps provided here apply to the Salesforce Classic UI. If you are using the Lightning Experience UI on your Salesforce instance, switch to the Salesforce Classic UI. See Toggle or switch between Lightning Experience and Salesforce Classic.Prerequisites to Use Platform Events
Perform the following prerequisites to use platform events.
Define Your Platform Event
To receive notifications using platform events, you must define the platform
event. The list of platform events you defined in Salesforce.com is
displayed for use on the Streaming API page of the Adapter Endpoint Configuration Wizard
when configuring the Salesforce Adapter as a trigger connection.
Note:
The steps provided here apply to the Salesforce Classic UI. If you are using the Lightning Experience UI on your Salesforce instance, switch to the Salesforce Classic UI. See Toggle or switch between Lightning Experience and Salesforce Classic.Publish Platform Events
After a platform event is defined, you must publish event messages from a Salesforce application.
Note:
See Publishing Platform Events.Prerequisite to Use Change Data Capture (CDC) Events
Perform the following prerequisite to use change data capture (CDC) events.
Select an Entity (Business Object)
To receive notifications using change data capture (CDC) events, you must select the entity/entities. Once selected, these objects are displayed for use on the Operations page of the Adapter Endpoint Configuration Wizard when configuring the Salesforce Adapter as a trigger connection.
Note:
The steps provided here apply to the Salesforce Classic UI. If you are using the Lightning Experience UI on your Salesforce instance, switch to the Salesforce Classic UI. See Toggle or switch between Lightning Experience and Salesforce Classic.- Log in to your Enterprise, Unlimited, or Developer Edition Salesforce.com account.
- Click Setup in the header or click your username, then select Setup. See Explore the Salesforce Setup Menu.
- Search for
Change Data Capturein the Quick Find box, then select Change Data Capture. - Select the required entities (business objects) for which you want to receive change event notifications.
- Click Save.
Prerequisite to Use Outbound Messaging
To use outbound messaging, perform the following prerequisites.
Note:
New workflow rules are blocked in the Salesforce application as of the Winter 2023 release. New workflow rules cannot be created in Salesforce. However, you can activate, deactivate, and edit existing workflow rules.Use Outbound Messaging with a Flow
To use outbound messaging with a flow, follow these instructions.
Note:
- You must first create an outbound message and then develop a flow.
- These steps apply to the Salesforce Classic UI. If you are using the Lightning Experience UI on your Salesforce instance, switch to the Salesforce Classic UI. See Toggle or switch between Lightning Experience and Salesforce Classic.
Create the Salesforce Outbound Message
- Log in to your Salesforce account.
- Click Setup in the header or click your user name, then select Setup. See Explore the Salesforce Setup Menu.
- Search for
Outbound Messagesin the Quick Find box. - Click Outbound Messages under Workflow & Approvals in the Build section.
- Select an object.
- Enter the required details.
- Click Save.
Develop a Flow in Salesforce
- Log in to your Salesforce account.
- Click Setup in the header or click your user name, then select Setup. See Explore the Salesforce Setup Menu.
- Search for
Flowsin the Quick Find box. - Select Flows under Workflow &
Approvals in the Build section.
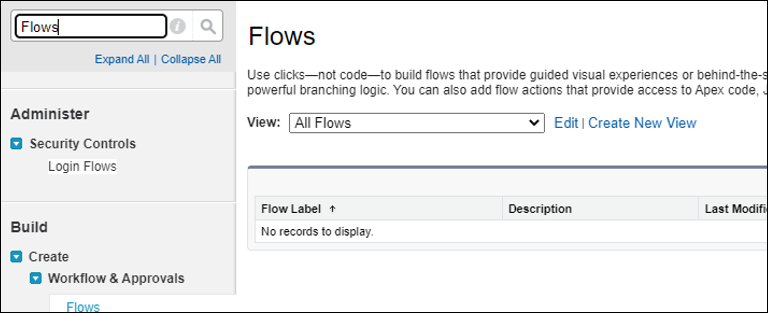
- Click New Flow.
- Select Record-Triggered Flow.
- Click Create. The Configure Start page appears.
- Select an object.
- Set the trigger criteria.
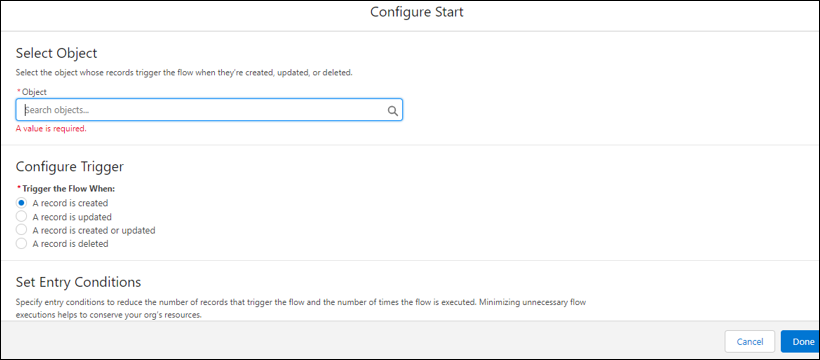
- Select the condition requirement in the Condition
Requirements field. You click add
condition to add an element.
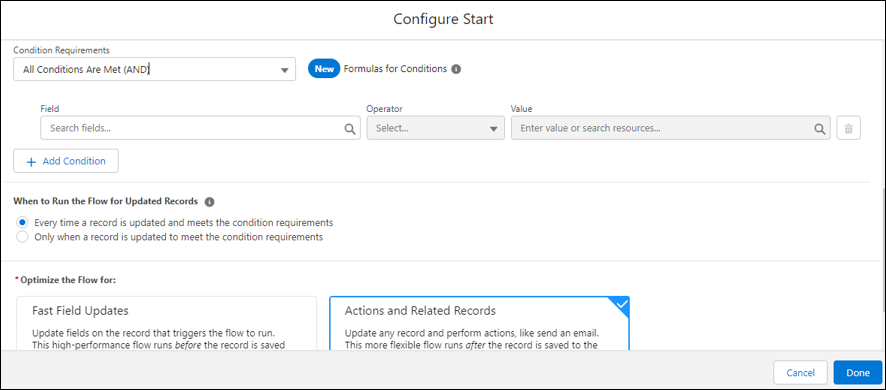
- Select Actions and Related Records.
- Click Done.
- Click the + icon.
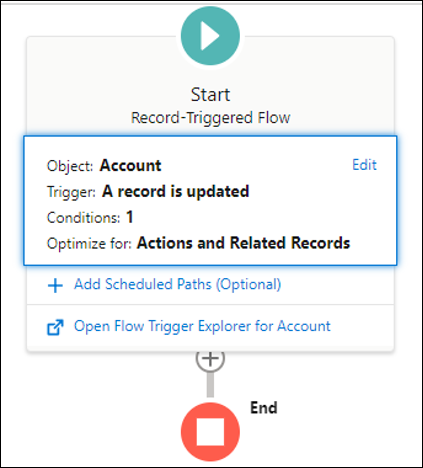
- Select Action from Add
Element.
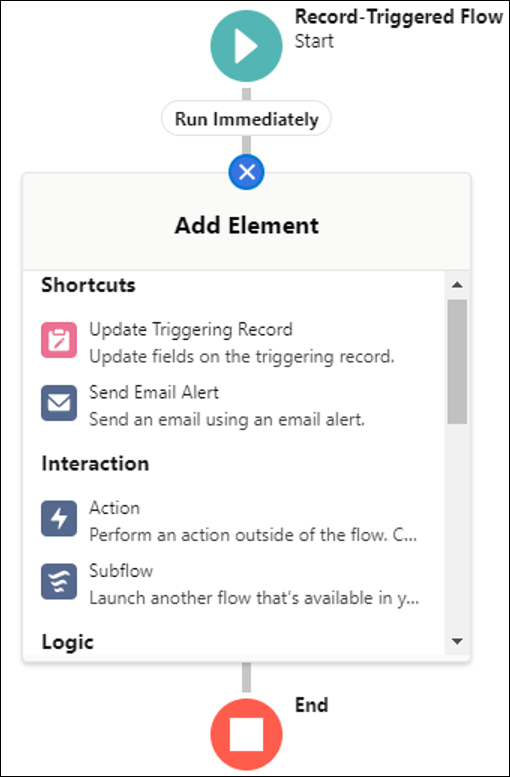
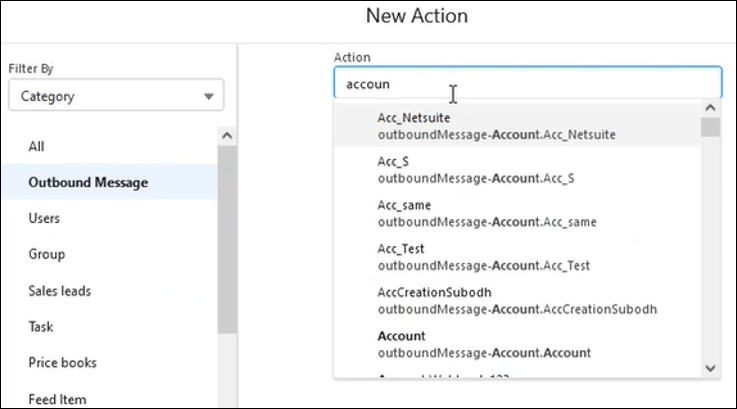
- Click Outbound message.
- Select the outbound message that you created.
- Enter a label name of the outbound message.
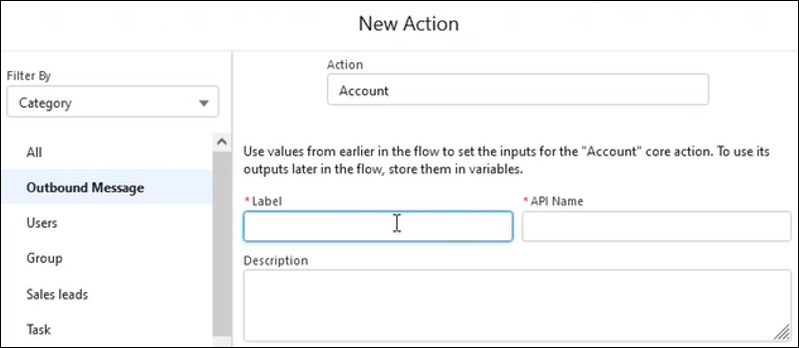
- Click Done and click Save.
- Enter a flow name and click Save.
- Click Save and click Activate.
Use Outbound Messaging with a Workflow
Perform the following prerequisite to use outbound messaging.
Generate the Salesforce Adapter Outbound Messaging WSDL
You can generate an outbound messaging WSDL for the Salesforce Adapter to receive outbound message notifications from the Salesforce application. You then select this WSDL when configuring the Salesforce Adapter as a trigger on the Outbound Messaging page of the Adapter Endpoint Configuration Wizard.
This process consists of several steps. You must first create a workflow rule and generate an outbound messaging WSDL. The outbound message consists of a workflow, approval, or milestone action that sends your specified information to your specified endpoint. You configure outbound messaging in the Salesforce setup menu. Afterward, you configure the endpoint.
Note:
The steps provided here apply to the Salesforce Classic UI. If you are using the Lightning Experience UI on your Salesforce instance, switch to the Salesforce Classic UI. See Toggle or switch between Lightning Experience and Salesforce Classic.To create a workflow rule:
-
Log in to your Salesforce account.
- Click Setup in the header or click your username, then select Setup. See Explore the Salesforce Setup Menu.
- Search
Workflowin the Quick Find box. -
Click Workflow Rules under Workflow & Approvals in the Build section.
-
Click New Rule.
-
Select an object and click Next.
-
Enter a rule name, select an evaluation and rule criteria, and click Save & Next.
-
Click Add Workflow Action and select New Outbound Message or Select Existing Action (if you already have the outbound message).
-
Provide the required information in the wizards and click Save.
- Enter a name, description for this outbound message,
and endpoint URL, and select the fields you want included in the
outbound message.
Note:
You can enter a dummy URL in the Endpoint URL field. For example:https://test.com - Click Add.
- Enter a name, description for this outbound message,
and endpoint URL, and select the fields you want included in the
outbound message.
- Generate the Salesforce outbound messaging WSDL at www.salesforce.com. You then select this WSDL to receive outbound message notifications from the Salesforce application on the Outbound Messaging page in the Adapter Endpoint Configuration Wizard. See Trigger Outbound Messaging Page.
Note:
The steps provided here apply to the Salesforce Classic UI. If you are using the Lightning Experience UI on your Salesforce instance, switch to the Salesforce Classic UI. See Toggle or switch between Lightning Experience and Salesforce Classic.To generate the Salesforce outbound messaging WSDL:
- Log in to your Salesforce account.
- Click Setup in the header or click your username, then select Setup. See Explore the Salesforce Setup Menu.
- Search
Outbound Messagesin the Quick Find box. - Click Outbound Messages under Workflow & Approvals in the Build section.
- Select the required outbound message.
- Click Click for WSDL to download the outbound messaging WSDL.
- Drag the Salesforce Adapter to the trigger (inbound) section of the integration canvas. This invokes the Adapter Endpoint Configuration Wizard.
- Browse for the generated WSDL on the Outbound Messaging page.
- Activate the integration and copy the endpoint URL from the integration information icon.
- Select the required outbound message.
- Click Edit.
- Replace the dummy URL with the activated integration endpoint URL in the Endpoint URL field. You entered the dummy URL when configuring your outbound message.
Prerequisite to Use Apex Web Services
Perform the following prerequisite to use Apex web services.
Generate the Salesforce Adapter Custom WSDL
You can generate a custom WSDL that includes custom Apex classes written on
force.com and exposed as SOAP web services. This enables external
applications to access your code and application.
You select the custom WSDL for the Invoke Apex Web Services option when configuring the Salesforce Adapter in the invoke direction. See Invoke Apex Operations Page.
For more information about custom WSDLs, see Exposing Apex Methods as SOAP Web Services.