Configure a Decision Sentry in a Dynamic Process

Use a decision model to activate or terminate a stage, activity, or process in a dynamic process.

Here are the main steps for using a decision model to activate or terminate a stage, activity, or process in a dynamic process.
  1. Create the process applications and its components.
    1. Create a dynamic process with activities to support the decision. For example, the first activity may include a form that provides input to the decision. The second activity may activate based on the decision's result.
    2. Create or import a decision model, and activate it. Ensure that the decision is visible and active on the Decisions page of the process application.
    3. Create a form to capture user input. Set the dynamic process to start with the form. Most likely, you'll use the values entered in the form as input values for the decision. (Alternately, you can start the dynamic process with data instead, such as an API.)
  2. Configure data and its flow in the process.

    Data values drive the decision as well as the dynamic process. Typically, business objects are shared among the form, decision, and dynamic process elements. You configure data association so that data flows in and out of the decision and other activities of the dynamic process.

    For example, you may create a business type that is used in the form and as input data type in the decision.

  3. Define the decision condition.
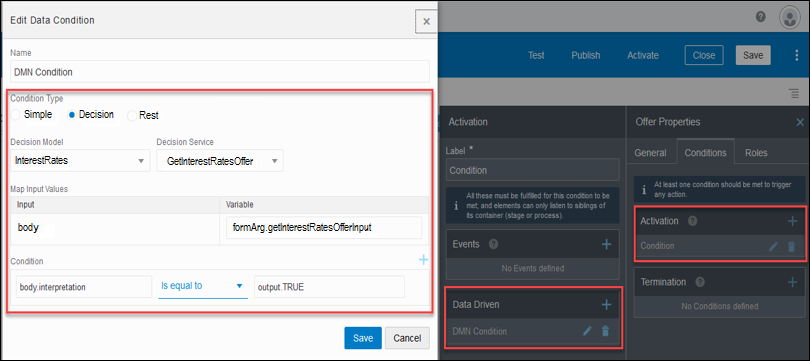
    1. Select the activity, stage, or process and edit properties. Choose an activation or termination condition and set a data driven condition.
    2. In the resulting dialog box, select Decisions as the condition type.
    3. Select your activated decision model and service.
    4. Map the input values of the decision and the form.
    5. Define the decision's output as a condition. For example, if the decision's output evaluates to TRUE, activate or terminate the activity.
  4. Try out the application in runtime with different form entries to test the decision condition.