Define Conditions for a Stage
In the Conditions tab, you can specify conditions to enable, activate, or terminate a stage in runtime.
Enablement
If the Manually Activated marker is enabled, you can define an enablement condition to control transition of a stage from Available to Enabled.
Activation
If the Manually Activated marker is disabled, you can define an activation condition to control transition of a stage from Available to Active.
An enablement or activation decorator ![]() appears on the stage (or activity) that has these conditions defined.
appears on the stage (or activity) that has these conditions defined.
Termination
You can define a condition to terminate an Active stage without its execution being complete. A termination decorator ![]() appears on the stage (or activity) that has this condition defined.
appears on the stage (or activity) that has this condition defined.
Want to know more about state transitions of a stage? See Stage or Activity State Model.
Conditions are triggered by events or by data or both. To create a condition:
-
Click the Create Condition
 icon.
icon.
-
In the resulting pane, provide a suitable label for the condition.
-
To create an event trigger, click Create Event
 and define a trigger from the available drop-down controls.
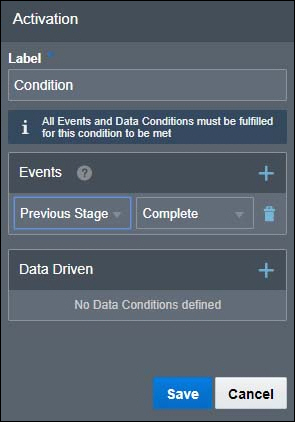
For example, if you want a stage to be activated only after its previous stage is complete, select Previous Stage in the Stage or Activity drop-down menu and select Complete in the Actions drop-down menu.
Similarly, you can create event triggers based on various actions on other stages (or activities) within your process. The following table details all the runtime actions or transitions that you can select from the Actions drop-down menu. To know when these actions precisely occur in a stage or activity lifecycle, see the figure in the Stage or Activity State Model section.
Selection Triggers the Condition When… Complete The selected plan item completes execution. Auto-Start The selected plan item is automatically started. (Auto transition between Available to Active) Create The selected plan item is instantiated. Disable The disable action occurs on the selected plan item. Enable The enable action occurs on the selected plan item. Exit The exit transition occurs on the selected plan item. Fault The selected plan item encounters a fault. Manual Start The selected plan item is manually started. Reactivate The selected plan item is reactivated. Re-Enable The selected plan item is re-enabled. Terminate The selected plan item’s termination condition is met. The following table details the options that you can select from the Actions drop-down menu for a milestone activity. To know when these actions precisely occur in a milestone’s lifecycle, see the figure in Milestone State Model.
Selection Triggers the Condition When… Occur The selected milestone’s completion condition is met. Create The selected milestone is instantiated. Note:
-
You can create event triggers for a plan item based only on its siblings. That is, for an activity within a stage, you may create an event trigger based on other activities within the same stage. Similarly, you can define event triggers for a stage based on other stages or global activities only.
-
When you create multiple event triggers for the same stage, a logical AND expression is formed which includes all triggers.
-
-
To create a data trigger, click Create Data Condition
 and choose one of the available condition types in the resulting dialog box.
- Simple: Select to define a simple condition based on a process variable’s value in the payload.
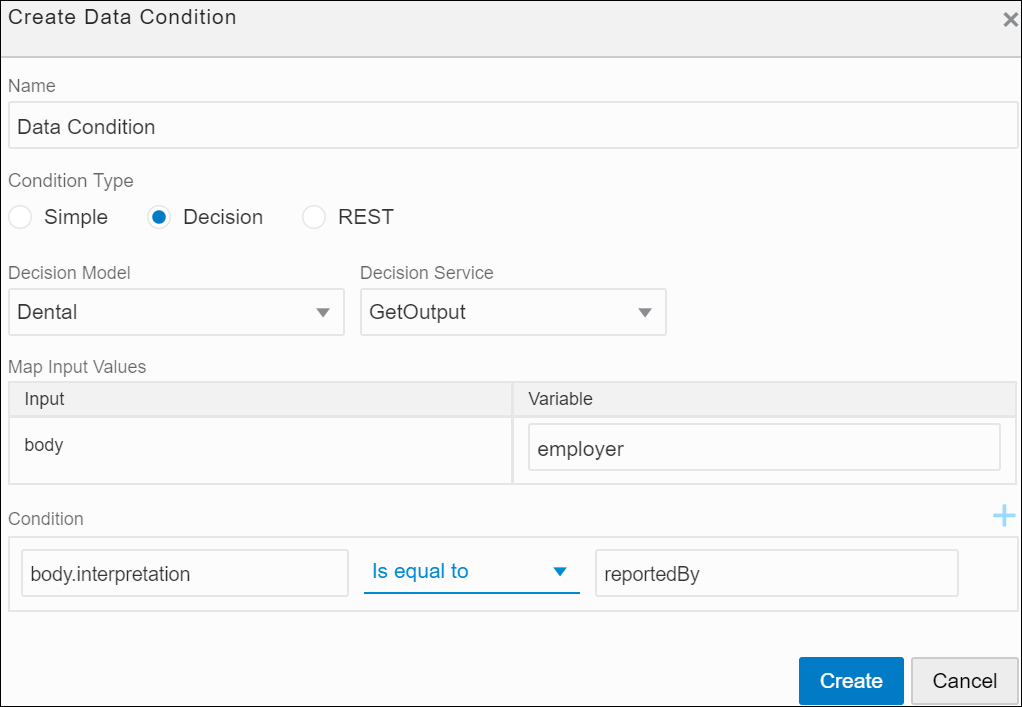
- Decision: Select to define a condition based on a decision model. Choose the decision model and the service you want to use (only the models for which you’ve created a connector within the application show up in the drop-down menu), specify the process variable you want to pass as input to the model, and, finally, define a condition using the model’s output (body.interpretation) or problems array (body.problems). See Configure a Decision Sentry in a Dynamic Process.
- REST: Select to define a condition based on a REST connector. You can also use OIC integrations of the type REST to define conditions.
Specify the integration you want to use in the Integration field. If you choose a REST connector defined within the process application (that is, a native connector), specify a resource and an operation for it too. Map a process variable as input to the connector’s request body or parameter, and then define a condition using the connector’s response body.
The following figure shows an example decision condition defined:

Description of the illustration dmn-rest-sentries.pngNote:
In Decision and REST condition types, you can create multiple data triggers and form a logical expression using AND or OR operators. Click the drop-down arrow to switch between operators.
-
Click Create to save the changes.
-
Click Delete
 to delete a condition or triggers within it.
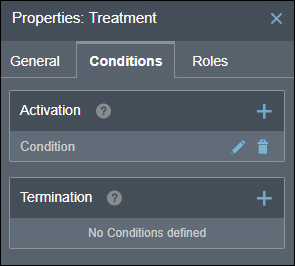
The following figure shows an activation condition defined for a stage:

