Ready to create a web form?

If so, we’ll take you through the main steps—from creating a web form to testing it as an end user. You’ll learn about forms and their controls, pick up web forms editor tips, and complete the entire web form development life cycle.

Create a Simple Application

Web forms enable humans to interact with a business process. For example, a form can start an application or be used in a human task. Let’s start by creating a simple application that contains those elements for use in a travel request form.

  1. Go to the Home page, click Processes, click Process Applications, and then click Create.
  2. Click Create an Application.
  3. In the Create Application dialog box, enter Travel, and click Create.
  4. In the Create a Process page, select Start with a form.
  5. In the Create Process window, enter Travel Process, and click Create.
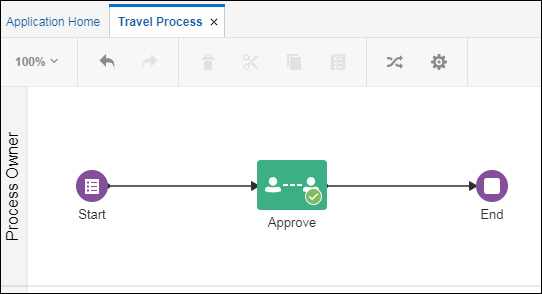
  6. Add an Approve human task to the process and title it Approve.

Create a Web Form

Let’s create a form for employees to complete with travel request details. This form should also display to users responsible for approving or rejecting the request.

  1. In the process, open the Start Form’s properties. Click the Start icon, and click its actions menu. (Notice how the Open Form command is dimmed, because no form is associated with the flow element yet.) Select Open Properties.
  2. In the Title field, enter Request Travel.
  3. Click Create New Form Create New Form icon by the Form field, and select New Web Form.
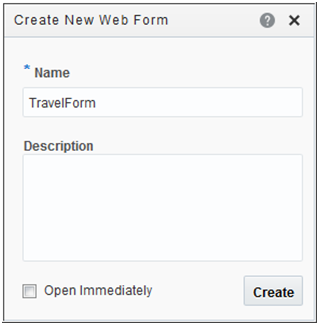
  4. In the Create New Web Form dialog box, enter TravelForm in the Name field, and click Create.

    Description of create-new-web-form.png follows
    Description of the illustration create-new-web-form.png

    In the Properties pane, notice how the Form field identifies the new form.

  5. Click the Edit Form icon.

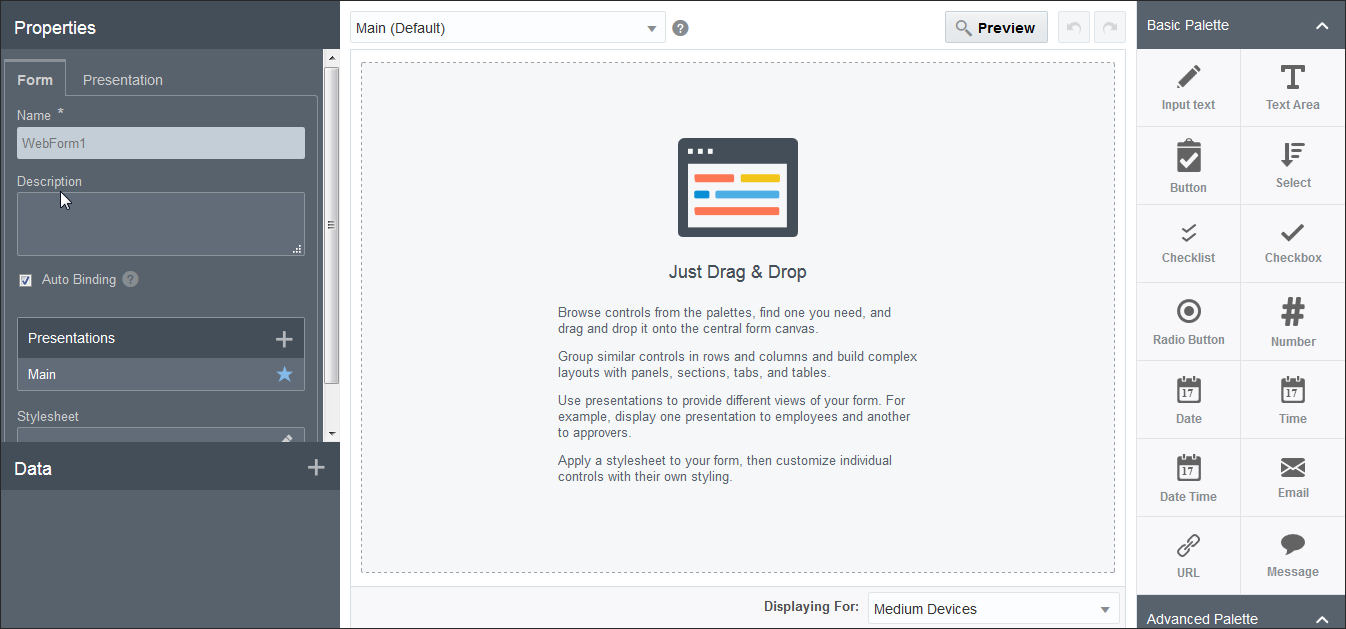
    The web forms editor opens in a new tab named with the title you entered for the form.

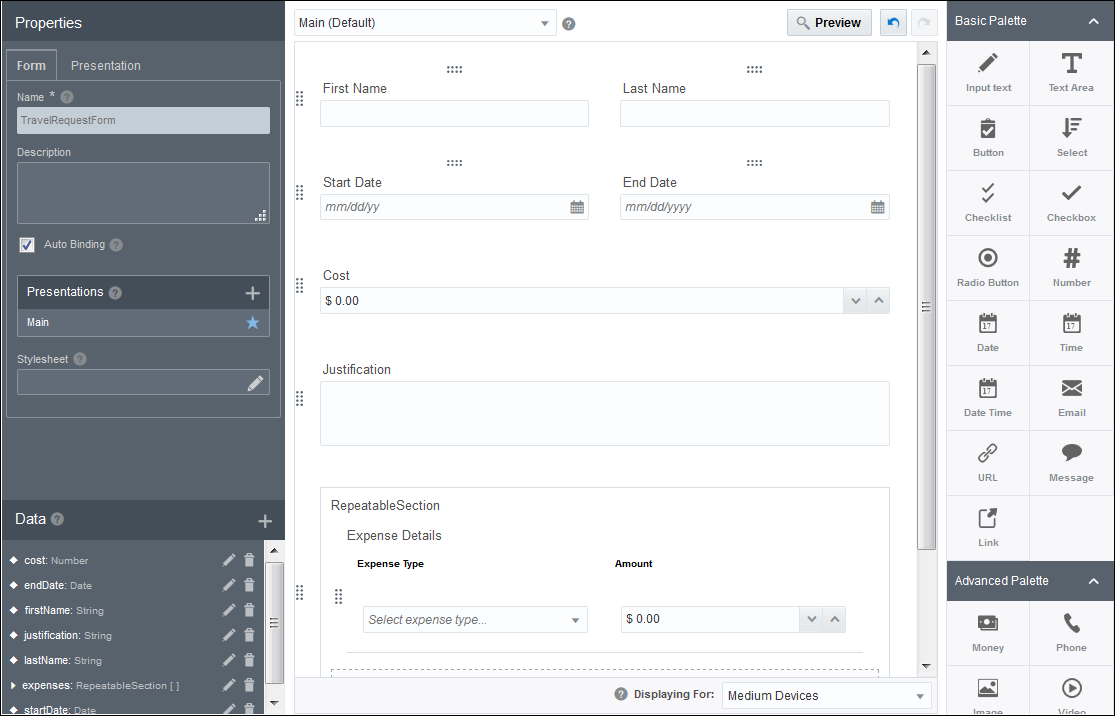
    The editor contains a central canvas on which you construct the form by dragging and dropping available controls from the palettes onto the canvas. The Properties pane lets you select settings. The Data pane lists data attributes for the form’s controls.

Add and Configure Controls

Let’s add controls from the basic palette and the advanced palette to the travel request form.

  1. Add and configure name fields onto the form’s canvas in a row.
    1. From the Basic Palette, drag and drop an Input Text control onto the canvas.
    2. Drag and drop another Input Text control next to the first control.

      As you drag, a box with a dotted outline shows where you can place the control, such as next to, between, or below another control. When you drop, controls are adjusted on an invisible grid to make space. (You can place up to 12 controls in a row across the form.)

      To reposition a control, drag its dotted handle and drop it in a new location. The controls around it adjust accordingly. As you edit, click Undo and Redo as needed.

    3. Select the first text control. Notice how the Properties tabs are General and Styling. The tab settings apply to the selected control.
    4. On the General tab, change the Name field to FirstName, and the Label field to First Name. (The Name field applies to the control itself and the Label field determines its display name.)
    5. Repeat steps c and d to change the second control’s name to LastName and its label to Last Name.
  2. Add and configure date fields.
    1. Drag and drop two Date controls in a row below the name controls.
    2. Select the first date control and change its name to StartDate and its label to Start Date. Scroll down on the General tab and select a date format in the Format field (for example, MM/dd/yy).
    3. Select the second date control, change its name to EndDate and its label to End Date, and set its format in the Format field.
  3. Add a travel justification text control.
    1. Drag and drop a Text Area control below the date controls.
    2. Select the control and change its name and label to Justification.
  4. Add and configure a cost control.
    1. From the Advanced Palette, drag and drop a Money control above the justification text control.
    2. Select the control, change its name and label to Cost, and select your currency in the Currency field.
  5. Add and configure an expenses control.
    1. Position a Repeatable Section control below the justification text control.
    2. Select the control and change its name to Expenses. Scroll down on the General tab and select Users can Add/Remove Rows.
  6. Add and configure an expense details control.
    1. Drag and drop a Table control on to the expenses section.
    2. Select the control, change its name to ExpenseDetails and its label to Expense Details.
    3. Scroll down on the General tab to the Columns section and click Add Add icon to add another column. Rename Column to Expense Type and Column 1 to Amount.
    4. Scroll down further and select Users can Add/Remove Rows.
  7. Configure the expense type column.
    1. Position a Select control into the dotted line area within the expense type column.
    2. Select the control and change its name to SelectExpenseType and its label to Select Expense Type.
    3. Scroll down on the General tab and enter Select expense type… in the Placeholder field.
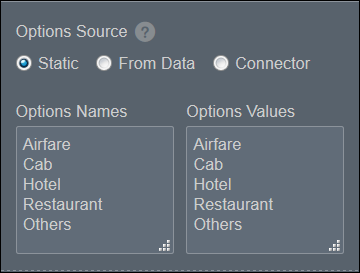
    4. Scroll down further to the Options Source section, and enter the following for the Options Name and Options Value fields:
      • Airfare

      • Cab

      • Hotel

      • Restaurant

      • Others

      Description of advanced-controls-options.png follows
      Description of the illustration advanced-controls-options.png

      Note:

      The options name and the options value count must be the same.
  8. Configure the amount column.
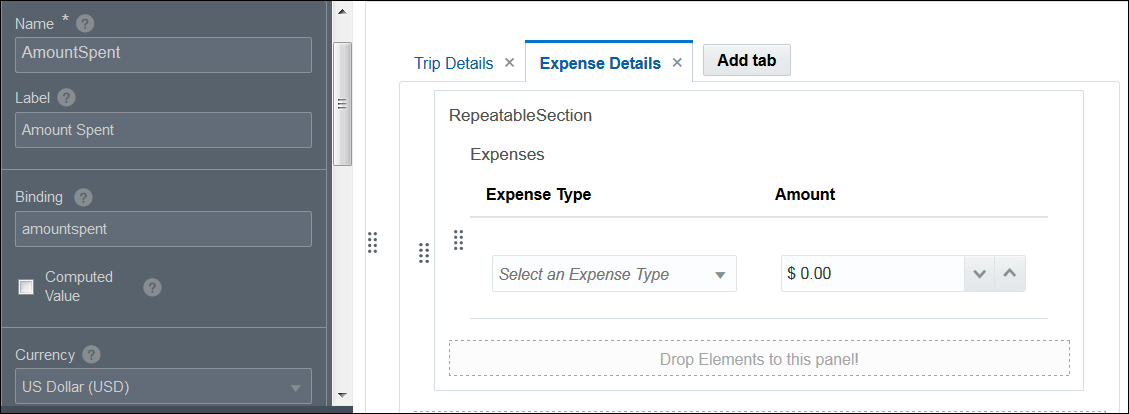
    1. Drag and drop a Money control into the dotted line area within the amount column.
    2. Select the control, change its name to AmountSpent, and its label to Amount Spent, and select your currency in the Currency field.
  9. Switch between control and form properties.
    1. Click a blank area of the form canvas.

      Notice that the Properties tabs changed to Form and Presentation, and now apply to the entire form rather than the selected control. Click a control and the tabs change to General and Styling, and apply to the control.

      Also notice that the Data pane lists data attributes with the same names as your controls (but different capitalization). These attributes were automatically created as you added each control. That happens when you have the Auto Binding field on the Form tab selected. These attributes hold the form’s payload (working) data while the process is running.

    2. Click Save to save the form.

Add Another Presentation

Let’s add an alternate view of the form that displays only to the users who review and approve travel requests.

  1. Click the Presentation tab in the Properties pane. (If you see General and Styling tabs instead, select a blank area of the canvas first to display the Presentation tab.)
  2. In the Name field, replace Main (the default name) with Employees. This presentation, which was already created, is the default presentation.
    A presentation is a single view of a form. A form can have multiple presentations.
  3. Click the Form tab. Notice that the Presentations table now lists our presentation as Employees. The star indicates that Employees is the default presentation.
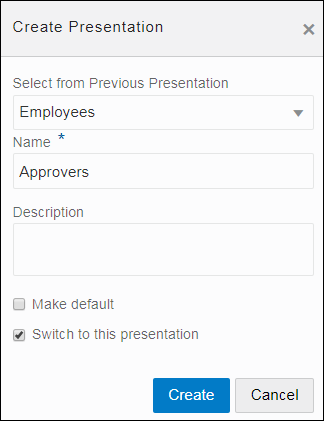
  4. In the Presentations table, click Add Add icon to add a presentation. Instead of building your presentation from scratch, you can clone it from an existing presentation. In the Select Presentation Type dialog box, select Clone. In the Create Presentation dialog box, select Employees in the Select from Previous Presentation field, and enter Approvers in the Name field. Keep Switch to this presentation check box selected, and click Create.
    Description of create-presentation.png follows
    Description of the illustration create-presentation.png

    Notice that all controls of the Employees presentation get copied to the newly created Approvers presentation. The Approvers presentation is an independent presentation. You can add or modify controls, and customize it to your business needs.

  5. To switch between your two presentations, use the Presentation field at the top of the canvas.
    Now let’s make the two presentations different.
  6. Select different background colors for the presentations.
    1. Select the Approvers presentation, and click the Presentation tab.
    2. Click the square below Background Color, select a light yellow color, add it to custom colors, and click OK. Optionally select a border color.
    3. Repeat the same steps to change the Employees presentation’s background color to light green.
  7. Make the name fields on the Approvers presentation read-only.
    1. Select the Approvers presentation.
    2. Select the First Name field. On the General tab, scroll down and select Read Only. The field turns blank to indicate that its value can’t be changed.
    3. Change the Last Name field to read-only.

Change the Form’s Stylesheet

To apply your organization’s branding, you can upload and apply a stylesheet. You can assign one stylesheet to a form.

  1. Click a blank area of the form, then click the Form tab on the Properties pane.
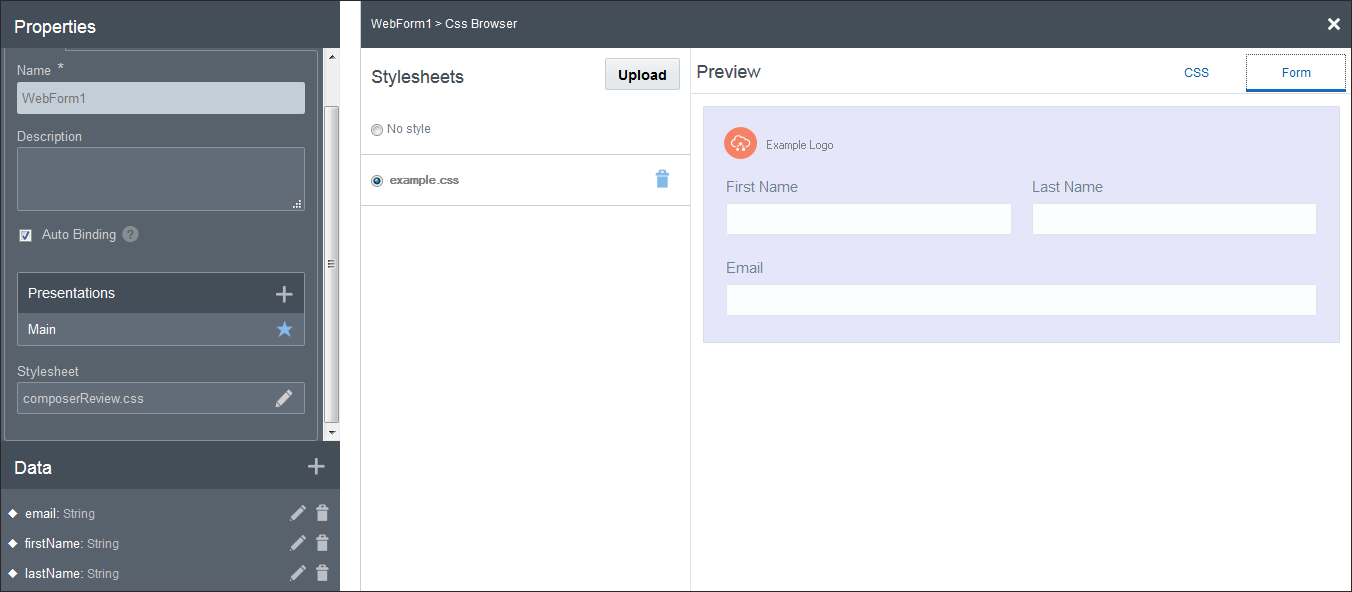
  2. Scroll down if needed, and click Edit in the Stylesheet field. The Stylesheets page displays.
  3. To upload a stylesheet, click Upload and select a stylesheet file (.css or .txt). In the Stylesheets area, click an available stylesheet to apply it.
  4. In the Preview area, click CSS to view a stylesheet’s format or Form to preview it.
  5. Click the X to close the CSS browser and return to the form.

Preview the Form

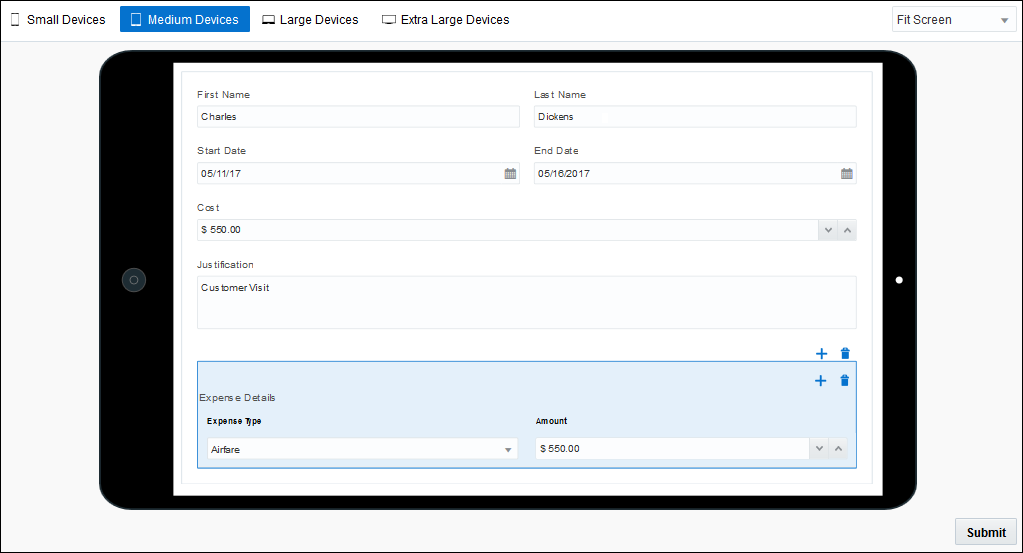
Forms you create automatically adapt to the screen size, whether end users display them on mobile devices, tablets, or on large screens.

  1. In the web forms editor, click Preview.
  2. In the Preview window, select different device sizes in which to view the form.
  3. Enter sample values in the form’s controls and click Submit.
    The field at the bottom of the window shows how form entries (also called payload values) are stored as data attributes and used in the process.
  4. Click Close Close icon to close the Preview window. Click Save.

Use Forms and Presentations in a Process

Now let’s use the Employees presentation in the start form, and the Approvers presentation in the Approve task.

  1. Click the Application Home tab, then Forms. Notice that your form displays here.
    The Forms pane displays all forms created for the application, regardless of whether they’re used. Note that you can create and use both web and basic type forms in an application.
  2. Click the Travel Process tab.
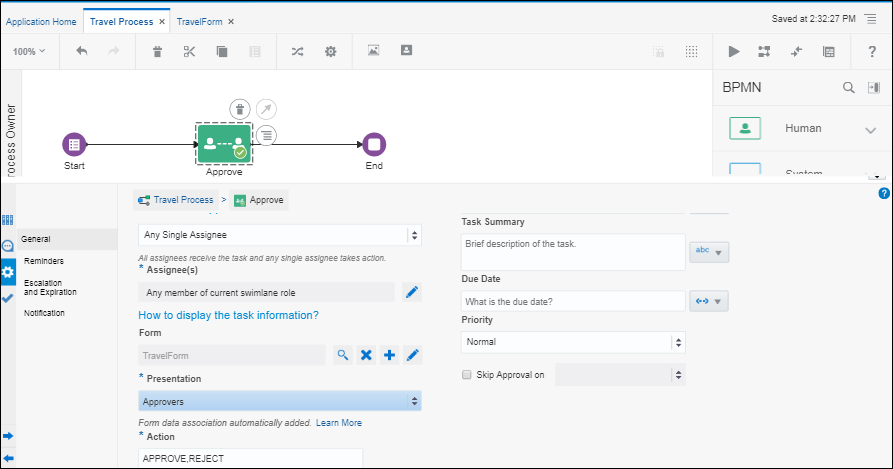
  3. Select the Approve human task, and click its action menu. Notice that the Open Form command is dimmed, because no form is associated with it yet. Select Open Properties. The pane expands to display its properties.
  4. In the Form field, browse and select TravelForm.
  5. In the Presentation field, select the Approvers presentation to display for this task.

Define a Control’s Behavior

To change a control’s behavior, make use of the web form editor’s extensive set of event, action, condition, and connector options. For your travel request, let’s apply an event, condition, and action to the Cost control: if the cost is over a certain amount (such as $500), the Justification text field can’t be left blank.

  1. From the Approve task’s properties, click the Edit Form icon for the Form field.
  2. In the web forms editor canvas, select the Cost control. On the General tab, scroll down to the Events field and click Add Add icon to create an event.

    An event represents something that may occur, which triggers specific conditions, actions, or REST connector calls.

    Each control has possible events you can define for it. The Cost input text field, for example, may fire an event when the form loads (On Load), an end user changes the control’s value (On Change), the cursor is in the control (On Focus), the control loses focus (On Blur), or the form is submitted (On Submit).

  3. Select On Change as the event type and click Edit.
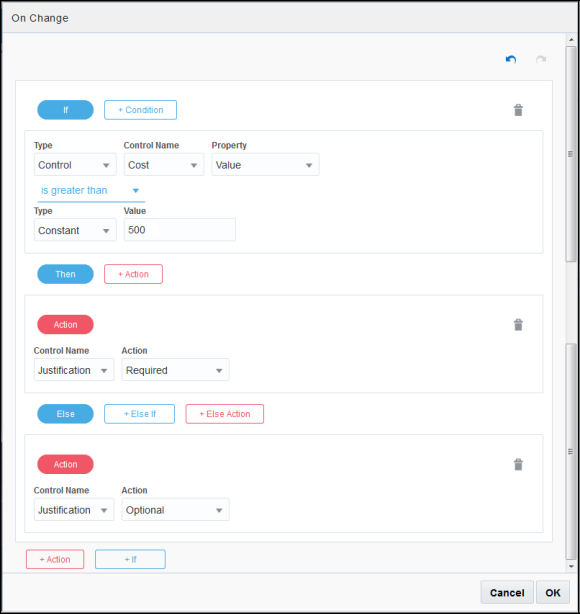
    The event window displays, with its type listed as On Change. Notice how the square buttons contain +s, because you use them to either add an action, if condition, or connector call. Actions display in red, and conditions display in blue.
  4. Create a condition and actions for the event.
    1. Click the blue outlined +If button to add a condition. Now solid blue round buttons display to use to configure the condition.
    2. Below the solid blue If button, configure the If condition as follows. Note that related fields display, depending on the selections you make.
      • In the Control Name field, select Cost.

      • In the Property field, select Value, then select is greater than below it.

      • In the Value field, enter 500.

    3. Next to the solid blue Then button, click the +Action button.
    4. Below the solid red Action button that displays, configure the Then condition:
      • In the Control Name field, select Justification.

      • In the Action field, select Required.

    5. Scroll down. Next to the solid blue Else button, click the +Else Action button.
    6. Below the solid red Action button, configure the Else condition, which specifies what happens if the condition isn’t met:
      • In the Control Name field, select Justification.

      • In the Action field, select Optional.

      The event is complete: If the end user enters a cost over 500, Then the Justification field is required, Else the Justification field is optional.
    7. Click OK to close the event window, then Save.

Try the Form in Runtime

Let’s try using the form as an employee and as an approver.

  1. Click Test. A Test Application tab opens.
  2. Click Activate. Leave the Add Me to All Roles field checked and click Activate. A message displays that the application deployed successfully.
  3. Click Try in Test Mode.
  4. In Runtime, click your Request Travel application under My Apps. The Travel form displays. Notice that it’s the Employees presentation (green) that you created.
    1. Notice built-in validation for some fields. For example, if you type an invalid character in the date field, an error displays when you change to another field.
    2. Enter a cost over 500 in the Cost field and change to another field. Notice that an asterisk displays in the Justification field to indicate that it’s required.
    3. Click Submit. Now an error indicates that a value is required. Enter a justification and submit again.
  5. Click My Tasks to view the task as an approver.
Notice that when you open the task, the yellow Approvers presentation displays. Notice that the name fields are read only, as you configured them.

Explore Advanced Form Options

Here are some other areas to explore in the web forms editor:

  • Try out the advanced controls

    Use the Advanced Palette to add advanced items such as panels, sections, tabs, and tables to your form. You can also configure controls that dynamically populate by calling an external service through a connector. See Configure Advanced Controls.

  • Reuse other forms defined in the application

    The Forms Palette lists previously created forms you can reuse in any form. Drag and drop a form onto the canvas and use in one of two ways:

    • As a referenced form whose controls can’t be edited.

    • As single controls that you can edit, reposition, and remove after clicking Detach, which removes the link with the original form.

    See Reuse Forms.

  • Create a data first form

    This exercise led you through creating a form by adding controls, and data attributes were automatically created through auto binding. You can also select a business type defined for the application, and Process creates a form based on its data attributes. See Create a Web Form Based on a Business Type.