3 Enable Monitoring for Previously Discovered Entities
Entities can be added from other Oracle Management Cloud services. The following topics cover how to allow Infrastructure Monitoring to monitor entities added via Log Analytics and Application Performance Management.
Auto-Discovery of Previously Discovered Entities
What is Auto-Discovery
Auto-Discovery allows you to enable Infrastructure Monitoring on entities that were previously added by non-monitoring services, such as Application Performance Management or Log Analytics, without further intervention. Enabling auto-discovery is carried out in two phases:
-
Prepare a Cloud agent for auto-discovery.
-
Register the entity/agent auto-discovery configuration from the Oracle Management Cloud console.
Prerequisites
-
Oracle Management Cloud agents version 1.23 and greater are auto-discovery capable.
-
If Cloud agents are upgraded, auto-discovery can start only after configuration metric collections from the selected Cloud agents have begun. This can take up to 24 hours depending on configuration metric collection schedule.
-
Only Tomcat and WebLogic J2EE Server entity types can be auto-discovered for the current release. For Tomcat and WebLogic Server monitoring prerequisites, see Prerequisites and Monitoring Credentials.
-
If the WebLogic J2EE Server does not use the t3/t3s security protocol, then two auto-discovery attempts are made: One with "t3" and the second with "t3s"
-
For targets that require secured communications, one of the following will be true:
-
Either all targets of the same entity type will be configured to use the same security settings for auto-discovery or,
-
all targets of the same entity type with the same "tag" will be configured to use the same security settings for auto-discovery. See Prerequisites and Monitoring Credentialsfor more information regarding monitoring credentials.
-
Setting Up Auto-Discovery
Preparing the Cloud Agent
The first step is to select and configure one or more agents for Auto-Discovery. This involves creating named global credentials for each Auto-Discovery supported entity type that requires credentials and then preparing the agent for target communication
-
Prepare the credential store:
-
Stop the agent
./omcli stop agent -
Create the credential store:
./omcli add_credential_store agent -no_password -
Restart the agent:
./omcli start agent
-
-
Prepare the JSON files for creating global named credentials. The following examples show JSON files for both Tomcat and WebLogic entity types.
Example: Tomcat
[{
        "name": "tomcat_creds",
        "type": "TomcatCreds",
        "globalName": "omc_tomcat.Credential",
        "description": "Dummy Credential for accessing Credential-less Tomcat Targets used for Auto-Discovery",
        "properties": [{
                        "name": "jmx_username",
                        "value": "CLEAR[none]"
                },
                {
                        "name": "jmx_password",
                        "value": "CLEAR[none]"
                }
        ]
}]
Example: WebLogic
[{ "name": "DomainCredsMonitoring", "type": "MonitorCreds", "globalName": "omc_weblogic_domain.Credential", "description": "Credential for accessing WebLogic Domain Targets for Auto-Discovery", "properties": [{ "name": "user_name", "value": "CLEAR[weblogic]" }, { "name": "password", "value": "CLEAR[user_pw]" } ] }] -
Run OMCLI commands to create the named credentials.
Example: Tomcat
./omcli add_credentials agent -credential_file /myjsons/tomcat_named_creds.json -allow_entitylessExample: WebLogic
./omcli add_credentials agent -credential_file /myjsons/wls_autodiscovery_creds.json -allow_entityless -
You can verify that the named credentials have been created by listing them.
./omcli list_credentials agent -global -usage MONITORING -
Enable the named credentials.
Example: Tomcat
./omcli enable_credential agent omc_tomcat.Credential -globalExample: WebLogic
./omcli enable_credential agent omc_weblogic_domain.Credential -global
Registering the Auto-Discovery Configuration from the Oracle Management Cloud Console
-
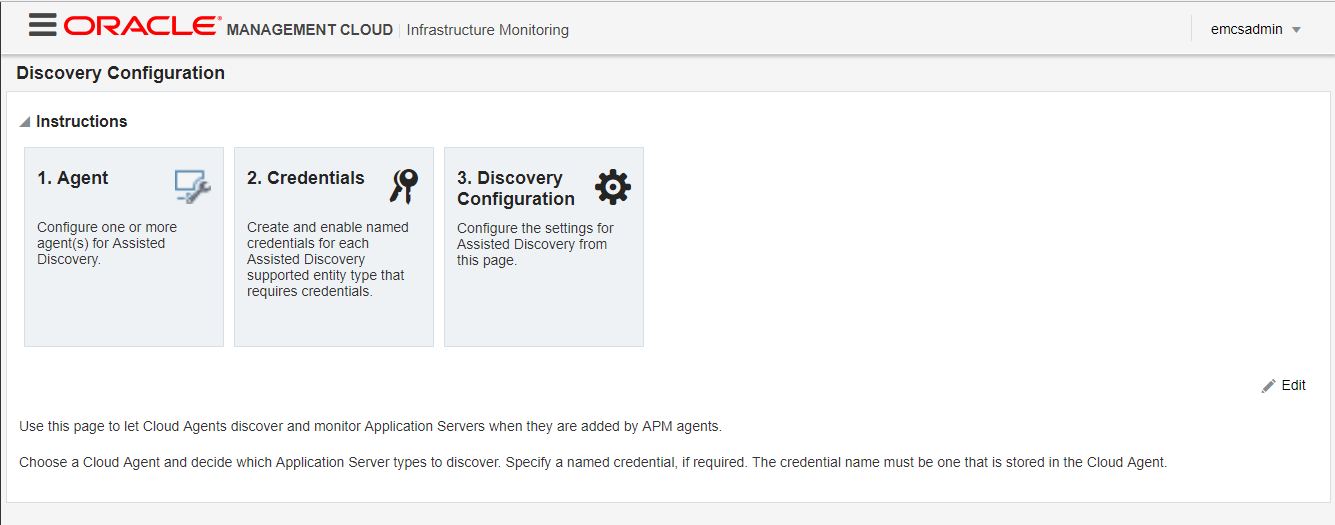
From the Oracle Management Cloud console main menu, select Monitoring and then Discovery Configuration. The Discovery Configuration page displays.

-
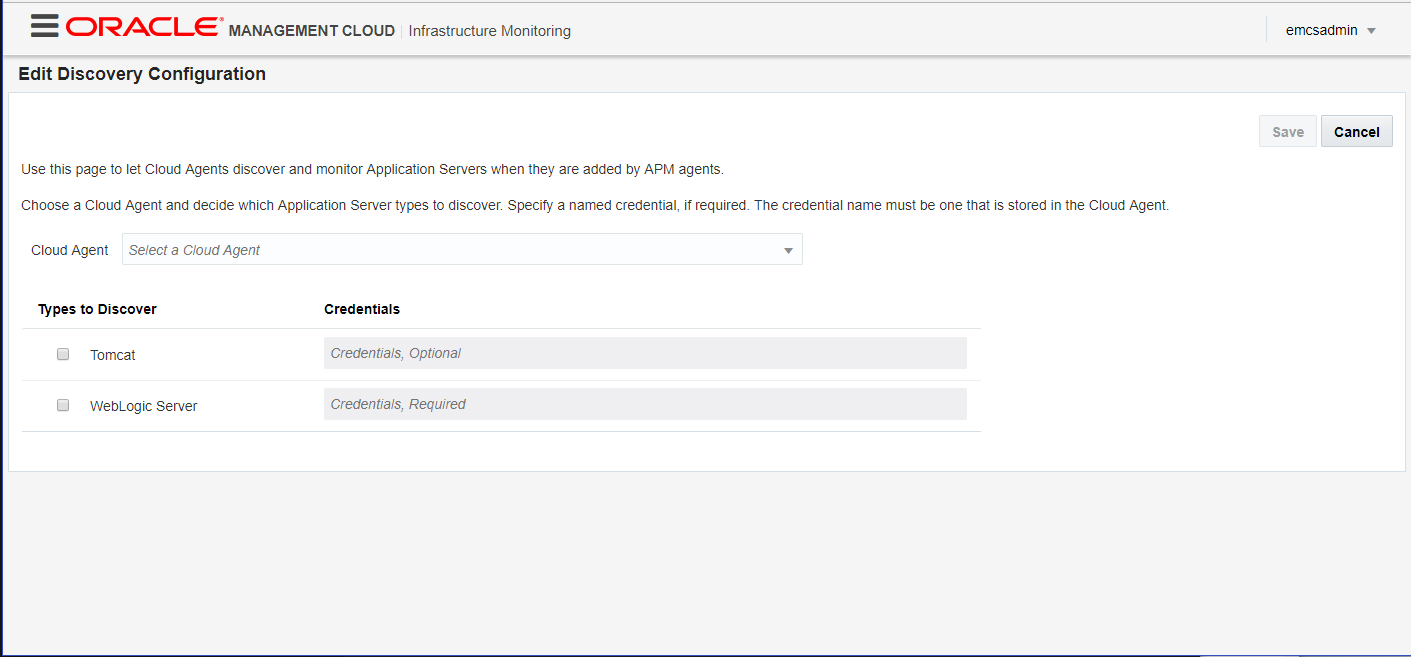
Click Edit. The Edit Discovery Configuration page displays.

-
Choose a compatible agent from the drop-down list.
Note:
Agents must be version 1.23 or greater. -
Choose the entity types you want auto-discovered.
-
Register the named credentials. IMPORTANT: Credentials must match the corresponding Named Credentials created on the selected agent.
-
Click Save to save your changes.
Once you have enabled auto-discovery for the specific agent and entity type, whenever you add entities from other services, such as Application Performance Management or Log Analytics, those entities will be automatically discovered and monitored by Infrastructure Monitoring.
Manual Discovery of Log Analytics Entities
When monitoring entities using both Oracle Infrastructure Monitoring and Oracle Log Analytics, it’s important to keep in mind which service you used first to discover the entities. If you discovered entities using Oracle Infrastructure Monitoring first, the Oracle Log Analytics entities are automatically discovered. However, if you discovered entities using Oracle Log Analytics first, you will need to edit the entity JSON files in order for Oracle Infrastructure Monitoring to discover these entities. The following examples illustrate how to update the JSON files.
Monitoring Oracle Databases with Oracle Infrastructure Monitoring and Oracle Log Analytics
Enabling infrastructure monitoring for an Oracle Database entity varies depending on the sequence you want to use Oracle Log Analytics and Oracle Infrastructure Monitoring. The following scenarios illustrate the most common implementations. For both scenarios, no Oracle Database entities were added to either Oracle Log Analytics or Oracle Infrastructure Monitoring. The Cloud agent resides locally on the database host.
Example 1: Enabling Oracle Infrastructure Monitoring and Oracle Log Analytics Concurrently
What you want: You want to use both Oracle Infrastructure Monitoring and Oracle Log Analytics to monitor an Oracle Database entity.
How to do it: Add the Oracle Database entity using the Oracle Infrastructure Monitoring JSON files:
-
omc_oracle_db_sample.json
-
omc_oracle_db_sample_creds.json
Once the Oracle Database entity has been added, the database will be monitored by Oracle Infrastructure Monitoring and a database instance will have been added for Oracle Log Analytics.
Example 2: Enabling Oracle Log Analytics First and Adding Oracle Infrastructure Monitoring Later
What you want: You only want to use Oracle Log Analytics for a newly added Oracle Database entity at this time. However, at some point in the future, you may want to monitor that same Oracle Database entity using Oracle Infrastructure Monitoring.
Note:
DB_Discovery_Credless.json file is a Oracle Log Analytics-specific JSON file that allows you to add Oracle Infrastructure Monitoring capability at a later time. It cannot be used interchangeably with Oracle Infrastructure Monitoring JSON files used to add Oracle database entities (shown in Example 1).Example 3: Adding Oracle Infrastructure Monitoring
What you want: You now want to enable Oracle Infrastructure Monitoring for the Oracle Database entity you previously added to Oracle Log Analytics.
How to do it: Modify a copy of DB_Discovery_Credless.json file, and update the Oracle Database entity added in Example 2 using the following steps:
-
Edit your copy of the DB_Discovery_Credless.json file to include only the following information For this example, we’ll call the file omc_oracle_yourdb_credless.json.
-
Entity name: Use the same name used for Oracle Log Analytics.
-
Entity type: This is a reserved field name, unique for each entity type. Use the same type used for Oracle Log Analytics.
-
Under attributes, add the
credentialRefs, marked ascredential_refs_id, as follows. Note: "credential_refs_id" must match credential ID in credential file."credentialRefs":[ "credential_refs_id" ] -
Under property, keep only the
capabilitysection, marked asmonitoring,"capability":{ "displayName":"capability", "value":"monitoring" }
-
-
Edit the credentials JSON files, as documented for monitoring. For this example, let’s call the file omc_oracle_yourdb_creds.json.
"credentials" : [ { "id" : "SQLCreds", "name" : "SQLCreds", "credType" : "DBCreds", "properties" : [ { "name" : "DBUserName", "value" : "CLEAR[Your Database User Name]" }, { "name" : "DBPassword", "value" : "CLEAR[Your Database Password]" }, { "name" : "DBRole", "value" : "CLEAR[Normal]" } ] } ]For target communications in secured mode, you need additional entity-type specific information, so make sure you select the appropriate credentials sample JSON file to edit.
-
Update the entity with the edited JSON files:
omcli update_entity agent DEFINITION_FILE [-credential_file CREDENTIAL_FILE]For example, on a UNIX system, from the<AGENT_BASE_DIR>/agent_inst/binrun:./omcli update_entity agent omc_oracle_yourdb_credless.json -credential_file omc_oracle_yourdb_creds.json
{
"entities": [{
"name": "DB_Name",
"type": "omc_oracle_db",
"displayName": "DB_Name",
"timezoneRegion": "PST",
"credentialRefs":[
"SQLCreds"
],
"properties": {
"host_name": {
"displayName": "Host Name",
"value": "host.example.com"
},
"port": {
"displayName": "Port",
"value": "1521"
},
"sid": {
"displayName": "SID",
"value": "sid_name"
},
"protocol": {
"displayName": "Protocol",
"value": "tcp"
},
"is_cluster": {
"displayName": "Is Cluster",
"value": "FALSE"
},
"service_name": {
"displayName": "Service Name",
"value": "host1.example.com"
},
"global_name": {
"displayName": "Global Name",
"value": "host1.example.com"
},
"capability":{
				"displayName":"capability",
				"value":"monitoring"
			}
},
"associations": [{
"assocType": "omc_contains",
"sourceEntityName": "DB_Name",
"sourceEntityType": "omc_oracle_db",
"destEntityName": "DB_Name/sid_name",
"destEntityType": "omc_oracle_db_instance"
}]
},
{
"name": "DB_Name/sid_name",
"type": "omc_oracle_db_instance",
"displayName": "DB_Name/sid_name",
"timezoneRegion": "PST",
"properties": {
"host_name": {
"displayName": "Host Name",
"value": "host.example.com"
},
"audit_dest": {
"displayName": "Audit Dest",
"value": "/opt/ORCLemaas/InfrastructureSoftware/oracledb/base/admin/orcl12c/adump"
},
"instance_name": {
"displayName": "Instance Name",
"value": "sid_name"
},
"adr_home": {
"displayName": "ADR Home",
"value": "/opt/ORCLemaas/InfrastructureSoftware/oracledb/base"
}
}
}
]
}Adding a WebLogic Server Entity to Oracle Log Analytics and Later Oracle Infrastructure Monitoring
The process of adding a WebLogic Server entity to Oracle Log Analytics and later adding it to Oracle Infrastructure Monitoring is shown in the Oracle by Example tutorial, “Adding a WebLogic Server Entity to Oracle Log Analytics and Later Oracle Infrastructure Monitoring”.
The process shown in this tutorial also demonstrates the general process used to add Oracle Infrastructure Monitoring to an existing Oracle Log Analytics deployment.