6 Entities
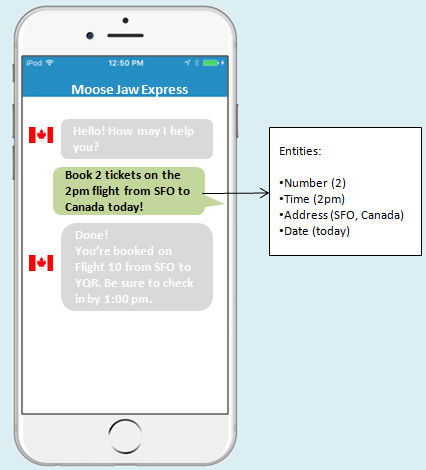
While intents map words and phrases to a specific action, entities add context to the intent itself. They help to describe the intent more fully and enable your bot to complete a user request. The OrderPizza intent, for example, describes a user request, but only in general terms. To fill in the specifics, this intent is augmented by the PizzaSize entity, which identifies values like large, medium, and small from the user input. There are two types of entities, both of which you can declare as variables in the dialog flow: built-in entities that we provide for you and custom entities, which you can add on your own.
Built-In Entities
Whenever you define a variable as an entity in your dialog flow, be sure to match the entity name and letter case exactly. In other words, you’ll get a validation error if you enter confirm: "YESNO" instead of confirm: “YES_NO”.
Simple Entities
| Entity Name | Content Identified | Examples |
|---|---|---|
| NUMBER | Matches ordinal and cardinal numbers |
|
| An email address—The NLU system can recognize email addresses that have combinations of letters (a-z), numbers (0–9), underscores (_) and plus (+) and minus (-) signs before the at symbol (@). The address can’t have a dot (.) immediately after the @ symbol, but the domain name (which is comprised of letters and numbers only), must include the dot. | ragnar.smith@example.com | |
| ADDRESS | An address or location-related entities |
200 Oracle Parkway, Redwood Shores, CA |
| YES_NO | Detects a “yes” or “no”. | Yes, Yeah, no |
Complex Entities
Unlike simple entities, complex entities extract content using properties, each of which recognizes a specific value. When you train and test your intents, you can see these properties in the Tester. The JSON output that’s returned by the NLU Engine shows these entities along with the value that they’ve identified from the user input. 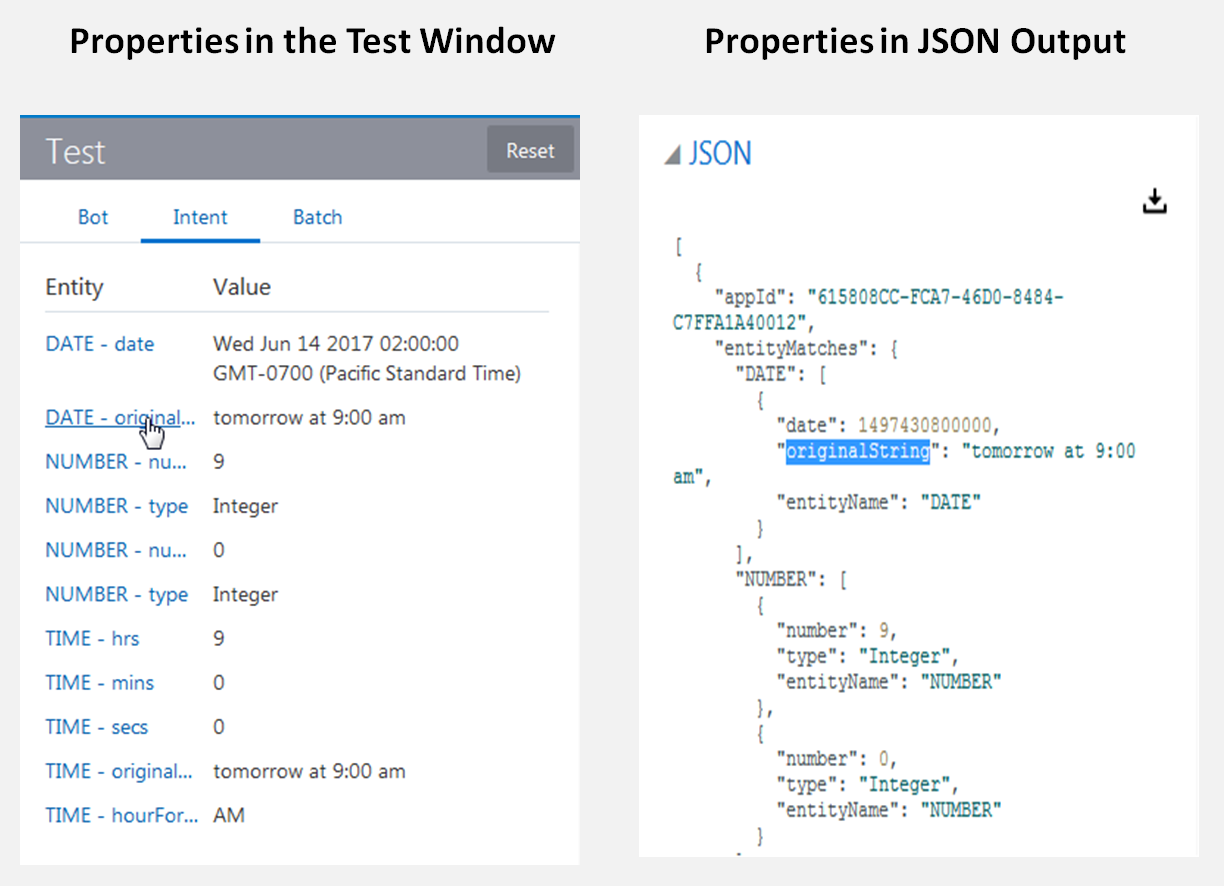
Description of the illustration entity_properties.png
When you define a variable in your dialog flow that uses a complex entity, you will need to include these properties in the value expression. See Accessing Variable Values with Apache FreeMarker FTL.
| Entity Name | Content Extracted | Examples | Properties (Referenced in Value Expressions) | Example NLU Engine Response |
|---|---|---|---|---|
| DATE | An absolute or relative date |
|
|
|
| TIME | A specific time | 2:30 pm |
|
|
| DURATION | The amount of time between the two endpoint of a time interval |
|
|
|
| SET | Recurring time periods. |
|
|
|
| CURRENCY | Representations of money |
|
|
|
| PHONE NUMBER | A phone number—The NLU Engine recognizes phone numbers that have seven or more digits (it can’t recognize any phone number with fewer digits). All country codes need to be prefixed with a plus sign (+), except for the United States of America ( where the plus sign is optional). The various parts of the phone number (the area code, prefix, and line number), can be separated by dots (.), dashes (-), or spaces. If there are multiple phone numbers entered in the user input, then the NLU Engine can recognize them when they’re separated by commas. It can’t recognize different phone numbers if they’re separated by dots, dashes or spaces. |
|
|
|
| URL | A URL—This entity can extract IPv4 addresses, Web URLs, deep links (http://example.com/path/page), file paths, and mailto URIs. If the user input specifies login credentials, then it must also include the protocol. Otherwise, the protocol isn’t required.
|
http://example.com |
|
|
Custom Entities
Because the built-in entities extract generic information, they can be used in a wide variety of bots. Custom entities, on the other hand, have a narrower application. Like the FinancialBot’s AccountType entity that enables various banking transactions by checking the user input for keywords like checking, savings, and credit cards, they’re tailored to the particular actions that your bot performs.
Custom Entity Types
| Entity Type | Description |
|---|---|
| Derived | A derived entity is the child of a built-in entity or another entity that you define. You base this relationship on prepositional phrases (the “to” and “from” in utterances like I want to go from Boston to Dallas or Transfer money from checking to savings). |
| Value list | An entity based on a list of predetermined values, like menu items or the FinancialBot’s checking, credit, and card options that are output by the System.List component. You can optimize the entity’s ability to extract user input by defining synonyms. These can include abbreviations, slang terms, and common misspellings. Synonym values are not case-sensitive: USA and usa, for example, are considered the same value.
|
| Entity list | A super set of entities. Using a travel bot as an example, you could fold the entities that you’ve already defined that extract values like airport codes, cities, and airport names into a single entity called Destination. By doing so, you would enable your bot to respond to user input that uses airport codes, airport names, and cities interchangeably. So when a user enters “I want to go to from JFK to San Francisco,” the Destination entity detects the departure point using the airport code entities and the destination using the cities entity. |
| Regular Expression | Resolves an entity using a regular expression (regex). Using regular expressions lets your bot identify pre-defined patterns in user inputs, like ticket numbers. |
| Composite Bag | A composite bag is a set of related entities that illustrates a larger concept like a business domain. For example, you can create an itinerary entity from a set of travel-related entities. Unlike the Entity List entity, composite bag entities are comprised of both custom and built-in entities. All of the member entities get resolved as a single unit. |
Create Entities
- Click Entities (
 ) in the side navbar.
 - Click Add Entity and then enter the name.
- In the Configuration section, choose entity type from the list.

- Value List—Define a set of values for an entity that’s defined by predetermined terms.
.
Note:
Adding punctuation or special characters to the same term creates different values: the entity can't match USA from the user input with either USA? or USA!, or cafe with café. To match a value regardless of case or punctuation, create a regular expression entity. You can define it using syntax like(\w+)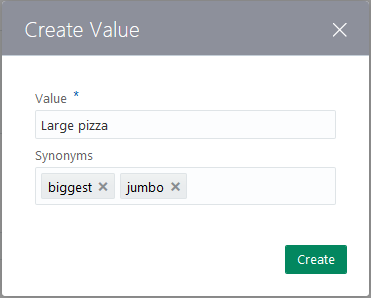
- Entity List—A super set of entities.
- Derived Entities—A derived entity is the child of another entity (either built-in or custom) that’s modified by a preposition that you add using the Preceding Phrase or Following Phrase rules.
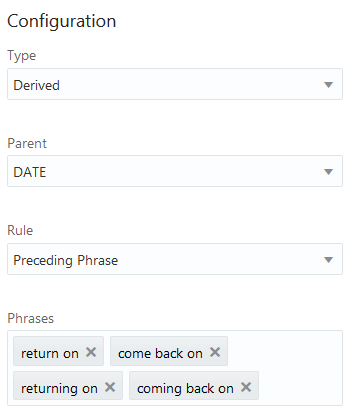
Important:
Derived entities can’t be parent entities. And because the NLU Engine detects derived entities only after it detects all of the other types of entities, you can’t add derived entities as members of an entities list. Only custom or the built-in entities can belong to a list. - Regular Expression—Enter the regular expression (regex) pattern. Unlike the other entity types, regex-based entities don’t use NLP because the matching is strictly pattern-based.
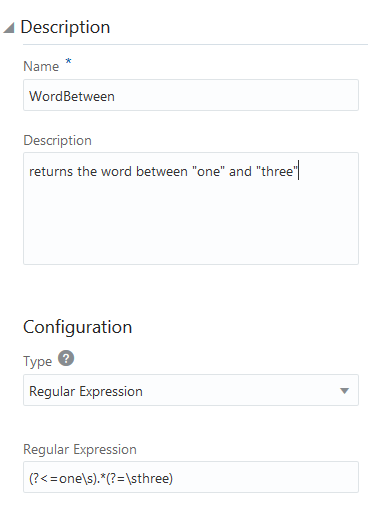
For example this expression,(?<=one\s).*(?=\sthree)returns the word that’s between “one” and “three” in the user input.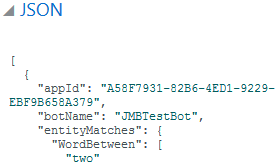
- Value List—Define a set of values for an entity that’s defined by predetermined terms.
- If this entity will be part of a composite bag entity, click Add Prompt. You can edit the default value and enter more strings. Your bot picks these prompts randomly. If the current entity getting resolved has ten or less entries, the bot displays each as a button. Use the Apache FreeMarker
ifdirective that referencessystem.invalidUserInput(a boolean variable). For example:<#if user.botsUserError == 'true'>We don't have that one.</#if> Pick one!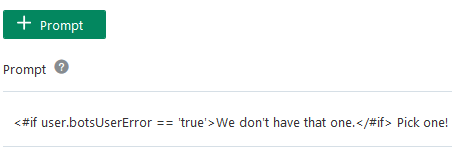
You can’t add a prompt for a built-in entity. For these, the bot outputs default prompts like Please enter value for DATE. Using theSystem.CommonResponsecomponent, you can customize the prompts for built-in entities. - Next steps:
Import Value List Entities from a CSV File
entity, value, and synonyms. For example:entity,value,synonyms
CheeseType,Mozzarella,Mozarela:Mozzarela
CheeseType,Provolone,
CheeseType,Gouda,
CheeseType,Cheddar,
PizzaSize,Large
PizzaSize,Medium
PizzaSize,Small-
Click Entities (
 ) in the side navbar.
-
Click More, choose Import Value list entities, and then select the
.csvfile from your local system.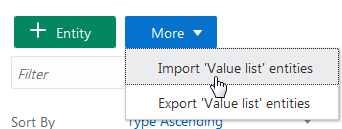
-
Add the entity or entities to an intent (or to an entity list and then to an intent).
Export Value List Entities to a CSV File
-
Click Entities (
 ) in the side navbar.
-
Click More, choose Export Value list entities and then save the file.
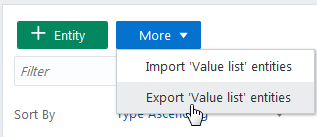
The exported
.csvfile is named for your bot.
Create a Composite Bag Entity
-
Click Entities (
 ) in the side navbar.
-
Click Add Entities.
-
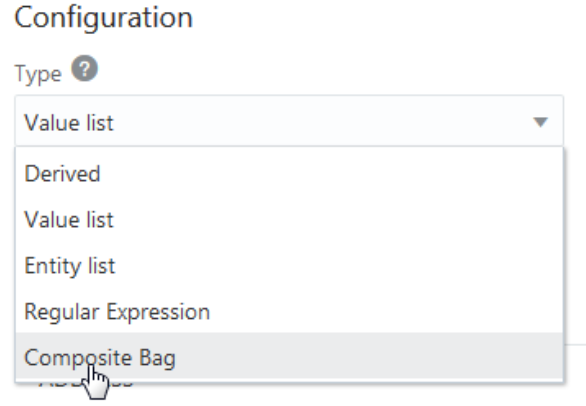
Choose Composite Bag as the entity type.
-
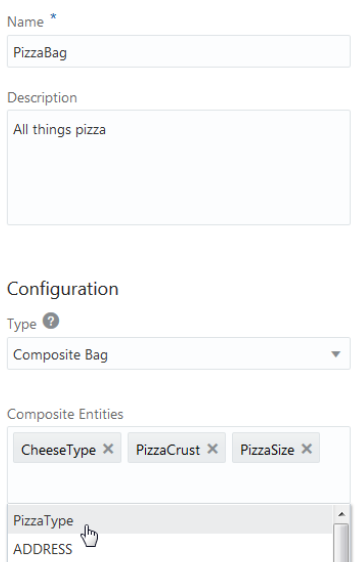
Add the custom and built-in entities to the Composite Entities field.
-
Next steps:
-
Add the entity to an intent. See Add Entities to Intents.
-
Configure the dialog flow to use the composite bag entity. See Configure the Dialog Flow for Composite Entities
-
Configure the Dialog Flow for Composite Entities
-
In the
contentnode, declare the composite bag entity as a variable:... metadata: platformVersion: "1.0" main: true name: "PizzaBot" context: variables: pizza: "PizzaBag" iResult: "nlpresult" -
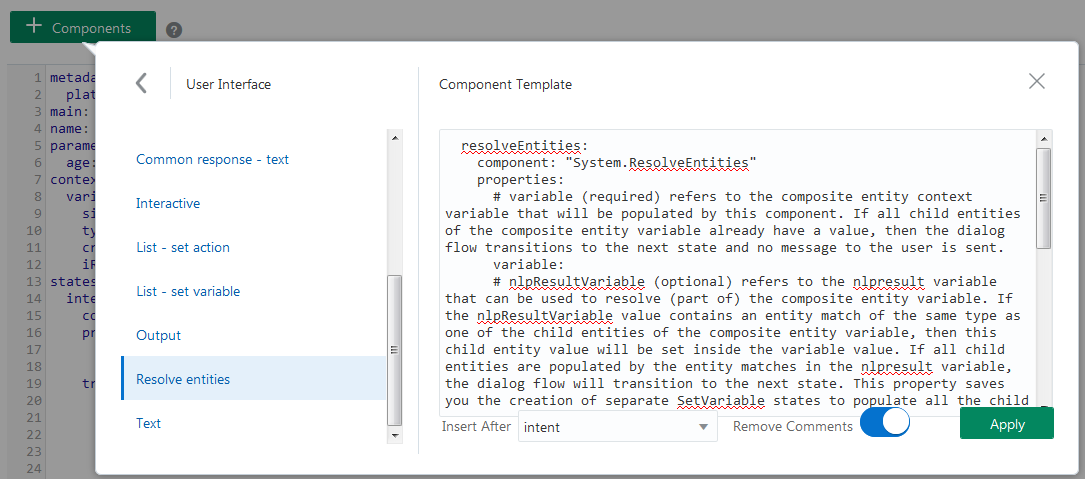
Click Add Components > User Interface.
-
Choose Resolve Entities, select the insertion point, and then click Apply.
-
Define the System.resolveEntities component. Specifically, reference the composite bag entity context variable in its variable
variableproperty. See Using Composite Bag Entities in the Dialog Flow.
Using Composite Bag Entities in the Dialog Flow
| Task | Individual Entities | Composite Bag Entity |
|---|---|---|
| Declaring context variables. | You declare context variable for several entities: |
You declare the composite bag entity: |
| Setting variable values. | You need to resolve the different entity variable values using:
|
You resolve the entity values within the composite bag by defining the variable and nlpResultVariable properties of the System.resolveEntities component: |
| Defining states for setting variable values. | You need to define a series of states that set values and prompt user input. | You only need to define a single state to resolve all of the entity values. While the nlpResultVariable, maxPrompts, and entityOrder properties enable you to control how the System.resolveEntities resolves user input. The component’s metadata properties provides you with more options.
Note: |
| Referencing values for output text. | Use ${variable name.value}expressions. |
Reference the fields of the entity ${variable name.value.entity}: |
Resolving Entities with the System.CommonResponse Component
System.CommonResponse component enables you to manipulate the prompts for the entities in the composite bag. Using this component instead of the System.resolveEntities component, you can:
-
Add complex conditional logic to determine the entity prompt.
-
Output custom prompts for the built-in entities within the composite bag.
-
Add global actions to the message that prompts the user input so that the current entity can be resolved.
${system.entityToResolve.value.prompt FreeMarker expression to randomly output one of the prompts. It also shows how you can specify the special iterator variable, system.entityToResolve.value.enumValues, to stamp out action buttons for each allowable value.
resolvePizza:
  component: "System.CommonResponse"
  properties:
    variable: "pizza"
    nlpResultVariable: "iresult"
    processUserMessage: true
    entityOrder: "PizzaSize,Toppings,Crust,DATE"
    metadata:
      responseItems:
      - type: "text"
        text: "${system.entityToResolve.value.prompt}"
        actions:
        - label: "${enumValue}"
          type: "postback"
          iteratorVariable: "system.entityToResolve.value.enumValues"
          payload:
            variables:
              pizza: "${enumValue}"
  transitions:
    actions:
      cancel: cancel
      help: help
next: donevisible property to show a customized prompt for a built-in entity. In this case, it’s a DATE entity in the bag. The exclude: “DATE” property suppresses the built-in prompt. The custom prompt (What date should the pizza be delivered?) is displayed because of the visible property’s include: “DATE”. When the System.CommonResponse, resolves this entity, the bot outputs instead of the default output message.
The snippet also shows you how to configure the globalActions property to output Cancel and Help buttons when the user enters an invalid value.
resolvePizza:
  component: "System.CommonResponse"
  properties:
    variable: "pizza"
    nlpResultVariable: "iresult"
    processUserMessage: true
    entityOrder: "PizzaSize,Toppings,Crust,DATE"
    metadata:
      responseItems:
      - type: "text"
        text: "${system.entityToResolve.value.prompt}"
        visible:
          entitiesToResolve:
            exclude: "DATE"
        actions:
        - label: "${enumValue}"
          type: "postback"
          iteratorVariable: "system.entityToResolve.value.enumValues"
          payload:
            variables:
              pizza: "${enumValue}"
      - type: "text"
        text: "What date should the pizza be delivered?"
        visible:
          entitiesToResolve:
            include: "DATE"
      globalActions:
      - label: "Help"
        type: "postback"
        visible:
          onInvalidUserInput: "true"
        payload:
          action: "help"
      - label: "Cancel"
        type: "postback"
        visible:
          onInvalidUserInput: true
        payload:
          action: "cancel"
  transitions:
    actions:
      cancel: cancel
      help: help
    next: done