3 Quick Reference
Touring the Bot Builder User Interface
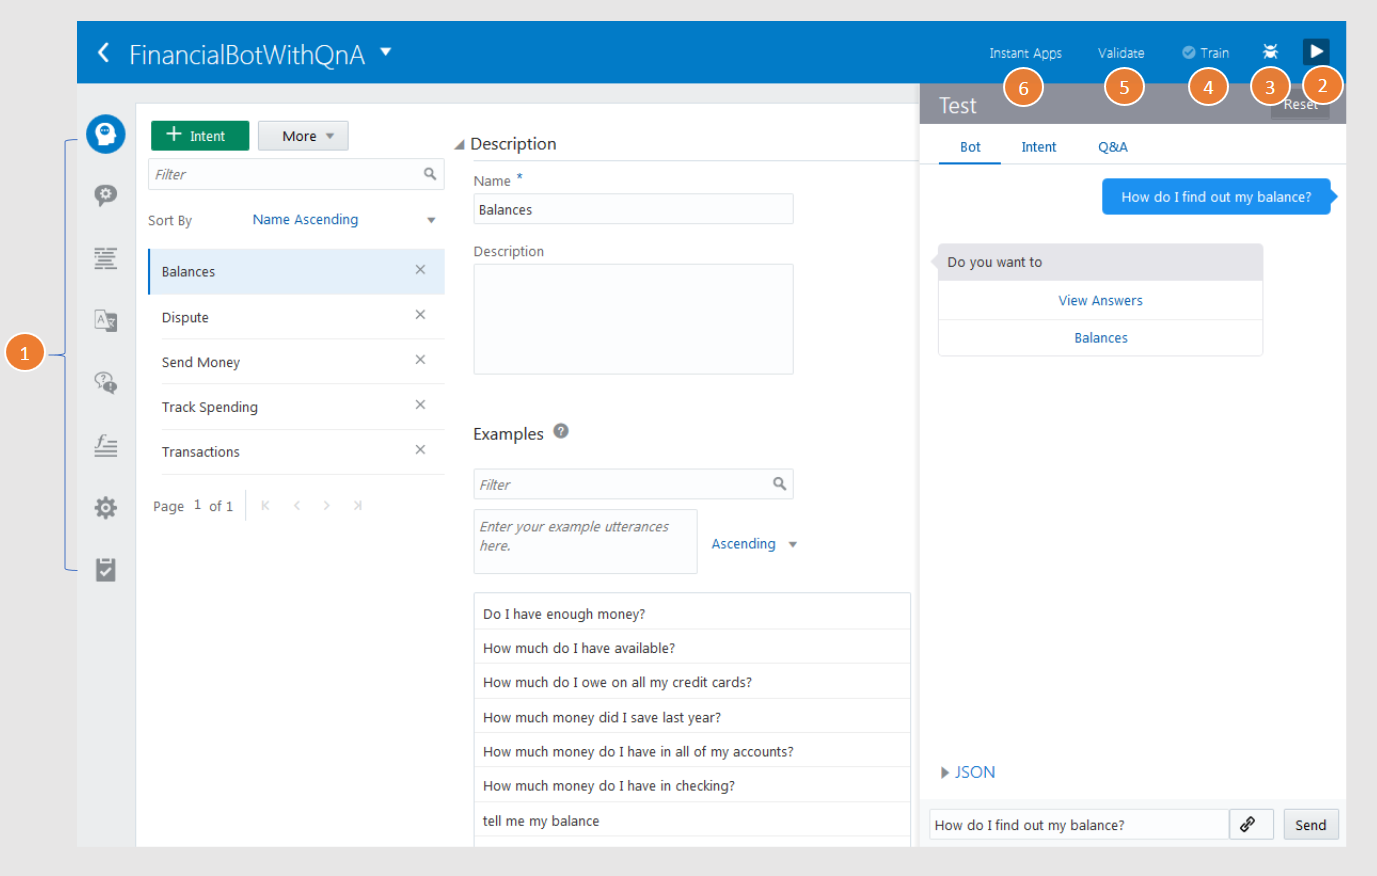
Let’s take a quick look at the main features of the Bot Builder.
| Name | Description | |
|---|---|---|
| 1. The left navbar | Tools for building the bot. | |
| Icon | Use this to | |
 Intents |
Create intents and add, edit, and delete their utterances. | |
 Entities |
Create entities. | |
 Flows |
Compose a dialog flow using an editor and templates. When you create a new bot, the editor is populated with a starter dialog flow that echoes back your input. | |
 Resource Bundles |
Localize your bot’s output using autotranslation services and resource bundles. | |
 Q&A |
Add, edit, and refine the data sources that provide the bot with question and answer pairs. | |
 Components |
Create a component service that connects your bot to a backend service (including access through AMCe.) | |
 Settings |
|
|
 Quality |
Run an utterance quality report that helps you to see how distinct your intents are from one another. You can also run report that show you an intent resolution history. | |
| 2. The Tester | A test window that enables you to test, evaluate, and update the intents and the questions from your Q&A source. As you build your dialog flow, the Tester lets you chat with your bot. | |
| 3. Logger Window | Shows the syntax errors for the dialog flow definition after you click Validate. | |
| 4. Train | A set of training models for building your bot’s cognition and for training your bot to use your Q&A source. | |
| 5. Validate | Checks the dialog flow syntax. | |
| 6. Instant Apps | Opens the Instant App Builder. You can explore an instant app using the FinancialBotwithQnA. | |
Managing Your Bots
Using the landing page (accessed by clicking Development > Bots in the left navbar), you can manage the lifecycle of your bots by creating, revising, or deleting them. It’s also where you can import a bot and access the Instant App builder and configure a translation service. See Autotranslation and Instant Apps.
Managing Your Bots
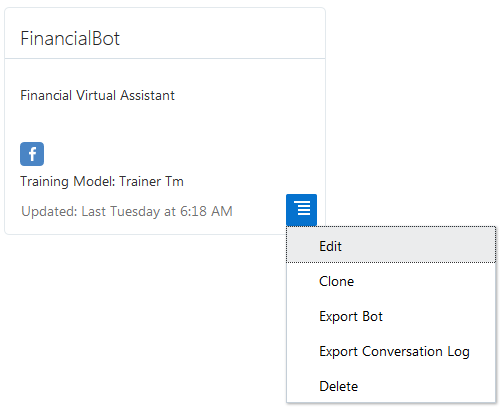
Clicking the tile menu gives you access to the following options:
-
Edit—Update your bot.
-
Clone—You can clone a copy of your bot to try out new features, or you can use this option to create an entirely new version of your bot.
-
Export Bot—Share your bot as a ZIP file. This ZIP packages the different components of your bot in different formats. The bot itself is a
.jsonfile. The dialog flow is a.yamlfile, and the other components (intents, entities, channels, settings, and resource bundles) are all.jsonfiles. You can use the Export Bot option, for example, when you need someone to troubleshoot your app. You can send the ZIP to your designated expert to get a second opinion. When you get it back, you add it to your bot library by clicking Import Bot. If you or your expert added comments to your dialog flow definition (#), they’ll be preserved.Note:
If you import a bot, you’ll need to re-enter the user credentials for component services and channels. -
Export Conversation Log—You can also export the conversation logs to test out new and revised versions of your bot.
-
Delete—Trashes the bot.


