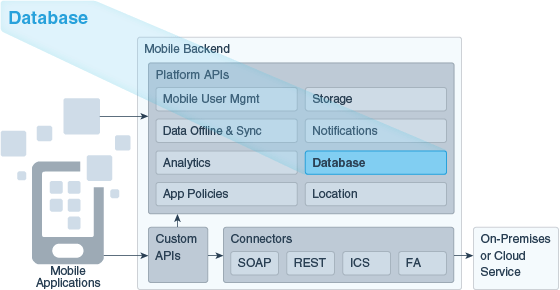
18 Database
Database APIs help you create and manage database tables for use in mobile apps. As a service developer, you can call the Database Access API from custom API implementations to create and access database tables, and use the Database Management API to manage and view table metadata.
What Can I Do with Database APIs?
-
The Database Access API, which is available only from custom code implementations using the custom code SDK, lets you to create and access database tables. For security reasons, you can’t call this API from client apps. To try out calls to this API, open a custom API, go to the Custom Catalog, and then click Database Access.
-
The Database Management API can be accessed through custom code implementations and HTTP REST calls to manage table metadata and deploy tables. To try out calls to this API from the UI, click
 to open the side menu, and click Applications > APIs. In the Platform APIs section at the bottom of the APIs page, click Database Management.
This chapter discusses how to use these Database APIs to perform common tasks. For more details on using the platform APIs, see REST APIs for Oracle Mobile Cloud Service.
Database Access API
All your mobile apps’ interactions with the Database Access API are made through custom API implementations. You can’t access this API directly from client apps. This section covers how to use the custom code SDK in a custom API implementation to interact with the database. To learn about designing APIs, see Custom API Design. To learn about implementing a custom API, see Implementing Custom APIs. For complete details for each custom code SDK database method, see Accessing the Database Access API from Custom Code .
Calling the Database Access API from Custom Code
Before we delve into how to implement a custom API to perform database tasks, let’s go over a simplified description of how to call the Database Access API from custom code. Here we talk about some API operations that you learn about later. While they may not make sense now, these steps should give you some context for how you use the operations that you will learn about.
{
  "items":[
    {
      "status":"Open",
      "customer":"Lynn Smith"
    },
    {
      "status":"Completed",
      "customer":"John Doe"
    }
  ]
}
Creating and Restructuring Database Tables
You might think that before you can access a database table, you need to first add it to the schema. However, you can create a new table simply by adding a row to the table. This action is referred to as a implicit table creation.
Note:
Typically, you take advantage of implicit table creation when you’re developing your mobile app. When you deploy your mobile app to another environment, you use explicit table creation to create the tables in that environment as described in Database Management API.You use the following methods to insert rows into a table:
-
insert(): Add one or more rows. -
merge(): Add or update one or more rows.
When you call these methods for a table that doesn’t exist, a new table with the row(s) is created by deriving the table specifications from information in the object and options arguments.
To specify the table structure:
-
Call either
insert()ormerge(), both of which requiretableandobjectarguments. In theobjectargument, which is a JSON object, include all the columns that you want in the table, and provide mock or real data for each column. The column type and size are based on the content. For example, if the value is100then the column will beNUMBER(3,0). Don’t worry about the size being too small. If you later post3.25, the column is resized toNUMBER(5,2), which is large enough for both100and3.25. Also don’t worry about adding all the columns that you need. If you later decide you want more columns, then add the new columns to a JSON object and send it in aninsert()ormerge()call. The table will be restructured automatically to add the new columns.Note:
The maximum size for a string column is 4000 characters. If you need to store a larger string, then you can use the Storage API to store the object.Here’s an example of the JSON object:
{ "incidentReport": 1, "title": "Water heater is leaking", "customer": "Lynn Smith", "address": "200 Oracle Parkway Redwood City, CA 94065", "phone": "(555) 212-4567", "technician": "jwhite", "status": "Open", "notes": "lynnf|Initial incident report description", "priority": 1, "imageLink": "http://link.to.storage" } -
By default, a set of predefined columns are added and populated automatically whenever you add or update a record using
If you don’t want all these columns in your table, then use theinsert()ormerge().extraFieldsproperty in the optionaloptionsargument to specify which columns to include, such ascreatedOn,createdBy(be sure to includeidif you aren’t specifying a primary key). If you later decide you want to add more predefined columns, you can just add them to theextraFieldsproperty the next time you add a row.If you don’t want any of these columns, then set the
extraFieldsproperty tonone. However, if you don’t add any predefined columns when you create the table, then you can’t add any later.The predefined fields are:
-
id: The row key. This column is added only if both theprimaryKeysandextraFieldsproperties are absent. Theidis an integer set and incremented automatically. -
createdBy: Who created it. -
createdOn: When it was created. -
modifiedBy: When it was last modified. -
modifiedOn: Who modified it last.
The dates are in W3C date-time format, and include hours, minutes, seconds, and a decimal fraction of a second
(YYYY-MM-DDThh:mm.ss.SSSZ). -
-
If you want a primary key, use the
primaryKeysproperty in theoptionsargument to specify which columns to use for the primary key. For example,incidentReport,technician. Note that the order that you list the fields is the order that you use when you retrieve or update a row. Because you can’t retrieve the primary key order from the table metadata, make sure that you document the order of the primary fields.
You can see code examples for these two methods in the next section.
Note:
You also can use the Database Management API to create a table. However, you typically use the Database Access API for the initial creation and then use the Database Management API to copy the table structure to other environments, as described in Copying Table Structures to Another Environment.The following table summarizes what aspects of a table can be changed implicitly:
| Object | Can It Change? |
|---|---|
|
Table Name |
No. The name is set when the table is first created. |
|
Primary Key |
No. The primary key is defined when the table is created. |
|
Predefined Columns |
Yes. You can allow predefined columns in the table when it’s created by the call. However, you can’t add these predefined columns at a later point if the table was not originally intended to use them. If predefined columns are allowed, then any of them (other than |
|
Columns |
Yes. Although columns are created with the table, subsequent calls can add columns. These calls can also alter the column size. However, you can’t change the column type after the table has been created. |
Note:
You can also disable implicit table creation. If theDatabase_CreateTablesPolicy environment policy is neither allow (the default setting) nor implicitOnly, adding a row to a non-existent table will fail.
Preventing Passing SQL Using Implicit Table Creation
When the Database_CreateTablesPolicy environment policy is set to allow (default setting) or implicitOnly, the Database Access API dynamically constructs SQL statements that create and alter tables from user input.
none or explicitOnly in the staging and production environments. You should also do this in the development environment when:
-
All the tables required by an application have been created.
-
The mobile backend is ready to be deployed to another environment.
Adding and Updating Table Rows
You use the insert() and merge()methods to add and update rows:
-
insert()adds one or more rows. -
merge()adds or updates one or more rows. Whether an add or update is performed depends on whether the table usesidor primary key fields to uniquely identify rows.-
idfield: If you include anidproperty in theobject, then the matching row is updated if it exists. Otherwise a new row is added. -
Primary key fields: If the table uses primary key fields, the matching row is updated if it exists. Otherwise, a new row is added.
-
Note:
If you submit a batch of rows, then all the rows must have the same set of columns.To call either of these methods:
-
Pass the table name in the first argument.
-
If the table doesn’t exist, and you want to limit which predefined columns to include, set the
extraFieldsproperty in theoptionsargument. For example:options = {'extraFields' : 'createdOn,createdBy'}If you want all the predefined columns, omit this property. If you don’t want any predefined columns, set it to
none. It doesn’t hurt to include it in subsequent adds, but make sure you include it in your first add if you don’t want the full set of predefined columns. -
If the table doesn’t exist, and you want to specify a primary key, make sure you set the
primaryKeysproperty in theoptionsargument. For example:options = { 'primaryKeys' : 'incidentReport,technician' }The primary key list must be URL encoded.
-
Put the row data in the request body in JSON format. The JSON object can contain data for one row or several rows.
Here is an example of data for one row:
{
  "status" : "Open",
  "code" : "3"
}
Here is an example of data for multiple rows:
[
    {
        "status":"Open",
        "code":3},
    {
        "status":"Completed",
        "code":9}
]
Here’s an example of using the insert() method to add two rows to the FIF_Status table. The first argument is the table name, and the second argument is the object argument, which contains the rows to add to the table. The third argument is the options argument, which specifies to not add any extra (predefined) fields, and to create a primary key based on the code field.
service.post('/mobile/custom/incidentreport/initStatus', function (req, res) {
  req.oracleMobile.database.insert(
    'FIF_Status',
    [
      {
        "status": "Closed",
        "code": "0"},
      {
        "status": "Completed",
        "code": "9"}
    ],
    {extraFields: 'none', primaryKeys: 'code'}).then(
    function (result) {
      res.status(statusCode).send (result.result);
      },
      function (error) {
        res.status(statusCode).send(error.error);
    }
  );
});
Retrieving Table Rows
You can retrieve a single table row by its primary key or ID, and you can retrieve a set of table rows.
To retrieve a row by its primary key or ID, call the get() method. You use the keys argument to identify the row that you want.
-
If the table uses the
idcolumn for the row key, then setkeysto the row’s ID. -
If the table has a primary key, then set
keysto the primary key values in the order in which the primary keys were specified when the first row was added to the table (which resulted in the creation of the table). Use an array for a composite key. For example, if theoptions.primaryKeysproperty was set toincidentReport,technicianwhen the table was created, then the values must be listed in that order, such as:['5690','jwhite'].
Here’s an example of using the get() method to retrieve a row from the FIF_Incidents table. The first argument is the table name, and the second argument is the keys argument:
/**
 * GET INCIDENT BY ID
 */
service.get('/mobile/custom/incidentreport/incidents/:id',
  function (req, res) {
    req.oracleMobile.database.get(
      'FIF_Incidents', req.params.id).then(
      function (result) {
        res.status(statusCode).send (result.result);
      },
      function (error) {
        res.status(statusCode).send(error.error);
      }
    );
  });
The response body looks like this:
{
  "items":[
    {
      "id":168,
      "title":"Oven not working",
      "technician":"jwhite",
      "status":"Open",
      "customer":"John Doe",
      "incidentReport":"5690",
      "createdBy":"jdoe",
      "createdOn":"2015-11-16T23:42:18.281823+00:00"
    }
  ]
}
To get a set of rows from a table, call the getAll() method.
-
To filter the rows, add the columns to search on and the values to match to the
qsproperty in the optionalhttpOptionsargument. For example, this requests all the incident reports for the technician J. White:httpOptions.qs = {technician : 'jwhite'}; -
To specify which columns to return, use the
For example, to get a quick phone list:fieldsproperty in theoptionsargument.options={'fields' : 'customer,phone'}
Here’s an example of using getAll() to retrieve the customer and status fields for all rows in the FIF_Incidents table that match the query string that’s specified in httpOptions.qs.
/**
 * GET ALL INCIDENTS
 */
service.get('/mobile/custom/incidentreport/incidents',
function (req, res) {
    httpOptions={};
    httpOptions.qs = {technician : 'jwhite'};
    req.oracleMobile.database.getAll(
      'FIF_Incidents', {fields: 'customer,status'}, httpOptions).then(
      function (result) {
        rres.status(statusCode).send (result.result);
      },
      function (error) {
        res.status(statusCode).send(error.error);
      }
    );
  });
The response body looks like this:
{"items":[
  {"title":"Water heater is leaking",
  "technician":"jwhite",
  ,"customer":"Lynn Smith"
  ...
  "incidentReport":25
  "createdOn":"2015-03-05T12:10:15.171284-07:00"},
  {"title":"Dryer doesn't dry",
  "technician":"jwhite",
  ,"customer":"Lynn Smith"
  ...
  "incidentReport":67
  "createdOn":"2015-08-07T14:22:37.171284-07:00"}
]}
Deleting Table Rows
To delete a row, you call the delete() method.
You use the keys argument to identify the row that you want to delete.
-
If the table uses the
idcolumn for the row key, then setkeysto the row’s ID. -
If the table has a primary key, then set
keysto the primary key values in the order in which the primary keys were specified when the first row was added to the table (which resulted in the creation of the table). Use an array for a composite key. For example, if theoptions.primaryKeysproperty was set toincidentReport,technicianwhen the table was created, then the values must be listed in that order, such as:['5690','jwhite'].
Here’s an example of deleting a row from the FIF_Incidents table. The first argument to the delete() method is the table name, and the second argument is the keys argument.
/**
 * DELETE INCIDENT BY ID
 */
service.delete('/mobile/custom/incidentreport/incidents/:id',
  function (req, res) {
    req.oracleMobile.database.delete(
      'FIF_Incidents', req.params.id).then(
      function (result) {
        res.send(result.statusCode, result.result);
      },
      function (error) {
        res.send(error.statusCode, error.error);
      }
    );
  });
If the table has a primary key, then the response body looks like this:
{ "rowCount" : 1 } If the id is the key value for the table, then the response body looks like this:
{"items":[{"id":42}]}Database Management API
In addition to the Database Access API, there’s also a Database Management API, which lets you manage the tables that you created through the Database Access API. This API lets you view table metadata, create, drop, re-create tables, and create indexes for them.
You can use the Database Management API only if you have been granted the database management role (Mobile_DbMgmt). If you don’t have this role, then you can’t create a table or use the GET operation to see which tables have been created. You don’t need this role to use the Database Access API. For more information about roles, see Team Members.
You can access the Database Management API through custom API implementations and HTTP REST calls. To try out calls to the API, click ![]() to open the side menu. Next, click Applications then APIs. In the Platform APIs section located at the bottom of the page, click Database Management . For further details about each API operation, see Here, we give a brief overview of the Storage API endpoints. For detailed information, see REST APIs for Oracle Mobile Cloud Service..
to open the side menu. Next, click Applications then APIs. In the Platform APIs section located at the bottom of the page, click Database Management . For further details about each API operation, see Here, we give a brief overview of the Storage API endpoints. For detailed information, see REST APIs for Oracle Mobile Cloud Service..
Creating a Table Explicitly
You can create a table from a JSON object using the POST method for the /mobile/system/databaseManagement/tables endpoint. To restructure a table, use the PUT method for the same endpoint. The PUT method drops the existing table and re-creates it.
To create a table explicitly:
-
If you want to include predefined columns in the table, set the
Oracle-Mobile-Extra-Fieldsheader to a comma-separated list of the columns to include from amongstid,createdBy,createdOn,modifiedBy, andmodifiedOn. If you don’t want any of these columns, specifynone. Theidcolumn, which is a row key, is added to the table only if no primary key is specified. -
Create the JSON object for the request body. The JSON attributes are:
-
name: The table name. -
columns: An array of the table columns. For each column, specify:-
name: The column name. -
type: The data type. The binary data type is not supported. -
size: (Optional) The size or precision of the column. -
subSize: (Optional) For decimal columns, the scale of the column, meaning the number of places after the decimal point.
-
-
primaryKeys: An array of column names. -
requiredColumns: An array of column names.
-
-
Call the
POSTmethod for the/mobile/system/databaseManagement/tablesendpoint.
POST request, a table called Movies is created with the specified columns and primary key.{ "name" : "Movies",
"columns": [
{"name": "title", "type": "string", "size": 50},
{"name": "synopsis", "type": "string"},
{"name": "inTheaters", "type": "boolean"},
{"name": "releaseDate", "type": "dateTime"},
{"name": "runningTime", "type": "integer", "size": 3},
{"name": "totalGross", "type": "decimal", "size": 10, "subSize": 2}],
"primaryKeys" : [ "title" ],
"requiredColumns": ["title", "releaseDate" ]
}Oracle-Mobile-Extra-Fields request header was set to none, so the table does not have any predefined fields.CREATE TABLE "Movies" (
"title" VARCHAR2(50) NOT NULL,
"synopsis" VARCHAR2(4000),
"inTheaters" CHAR(1),
"releaseDate" TIMESTAMP NOT NULL,
"runningTime" NUMBER(3,0),
"totalGross" NUMBER(10,2),
CONSTRAINT "Movies_PK" PRIMARY KEY ("title"))| Type | Description | Size / Subsize | Database Type |
|---|---|---|---|
|
|
A JSON string |
Maximum of 4000 bytes |
|
|
|
An ISO- or date-formatted JSON string |
|
|
|
|
A JSON boolean |
|
|
|
|
A JSON number |
Precision (the total number of digits). Optional. / Scale (number of decimal digits). Optional. |
|
|
|
A JSON number with no decimal digits |
|
The size and subSize attributes are optional. Don’t provide them for columns of type dateTime and boolean. As a best practice, unless you have a valid business constraint, don't provide size or subSize for integers and decimals because doing so limits what values are acceptable and makes it harder to resize the column. When possible, allow the database to size and store the value as efficiently as possible. However, you should provide the size attribute for string columns. The maximum size for a string column is 4000 characters. If you need to store a larger string, then you can use the Storage platform to store the object.
Copying Table Structures to Another Environment
When you promote a mobile backend to a staging or production environment, you can use the Database Management API’s operations to copy the table structures. These are the table structures that you created either implicitly through calls to the insert() and merge() methods or explicitly through the Database Management API.
Note:
As noted above, only a team member with the database management role (MobileEnvironment_DbMgmt) in the target environment can use the Database Management API.
-
Use the Database Management API’s
GEToperations to get the table metadata from the source environment.Note:
The metadata lists the primary key fields in alphabetical order, and not in the order that you specified when the table was created. When you use this metadata to recreate a table, you must reorder the fields correctly. -
From the target environment in the MCS UI, export the environment policy file.
-
Change the
Database_CreateTablesPolicypolicy for the target environment toexplicitOnly. For information about updating environment policies, see Environment Policies.Note:
In a development environment, schema creation occurs implicitly becauseDatabase_CreateTablesPolicyis set toallowby default (*.*.Database_CreateTablesPolicy=allow). By the time the mobile database is deployed to a staging environment, this policy should be disabled to prevent tables from changing. -
Import the environment policy file back into the target environment.
-
Create a cURL script that sets up the tables in the target environment with the table metadata you retrieved in step 1, using
POSTcommands to the/mobile/system/databaseManagement/tables/{table}endpoint. Run the script to create the tables.Remember to reorder the primary fields in the correct order.
-
Repeat Step 3, but set the
Database_CreateTablesPolicypolicy tonone.
Creating or Deleting an Index on a Table
To improve the speed of data retrieval, you can use the Database Management API to create an index for a table. This API is also used to delete an index for a table.
To create a database index for an existing table:
-
In the Platform APIs section located at the bottom of the APIs page, click Database Management .
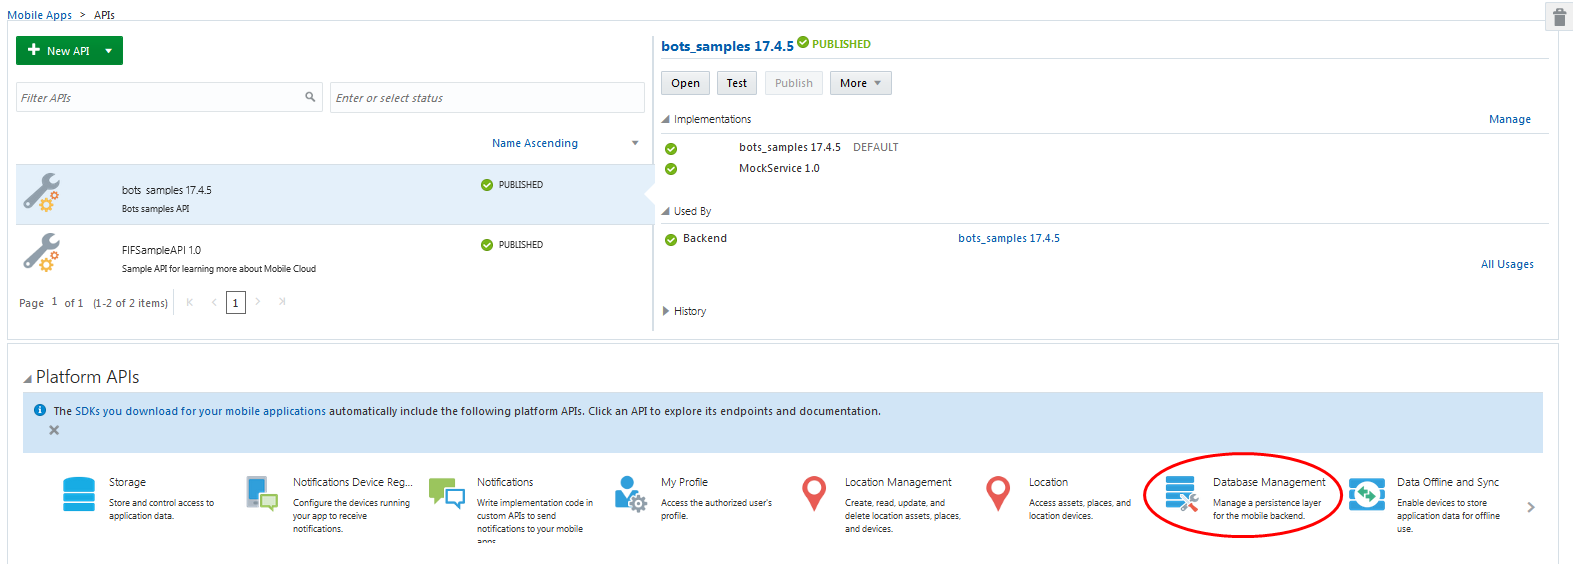
Description of the illustration choose-database-management.png -
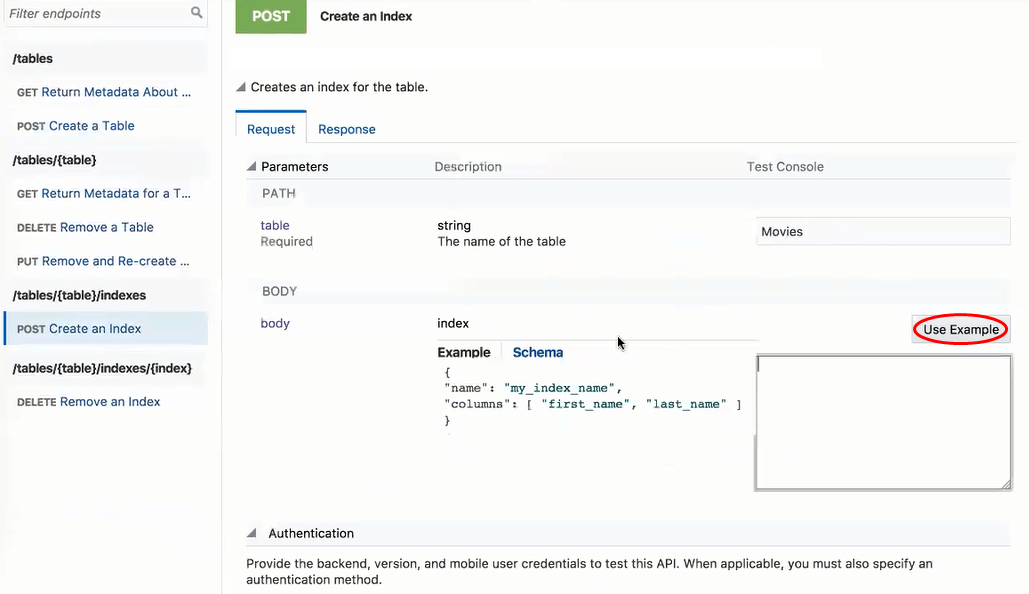
On the left panel, click Create an Index.
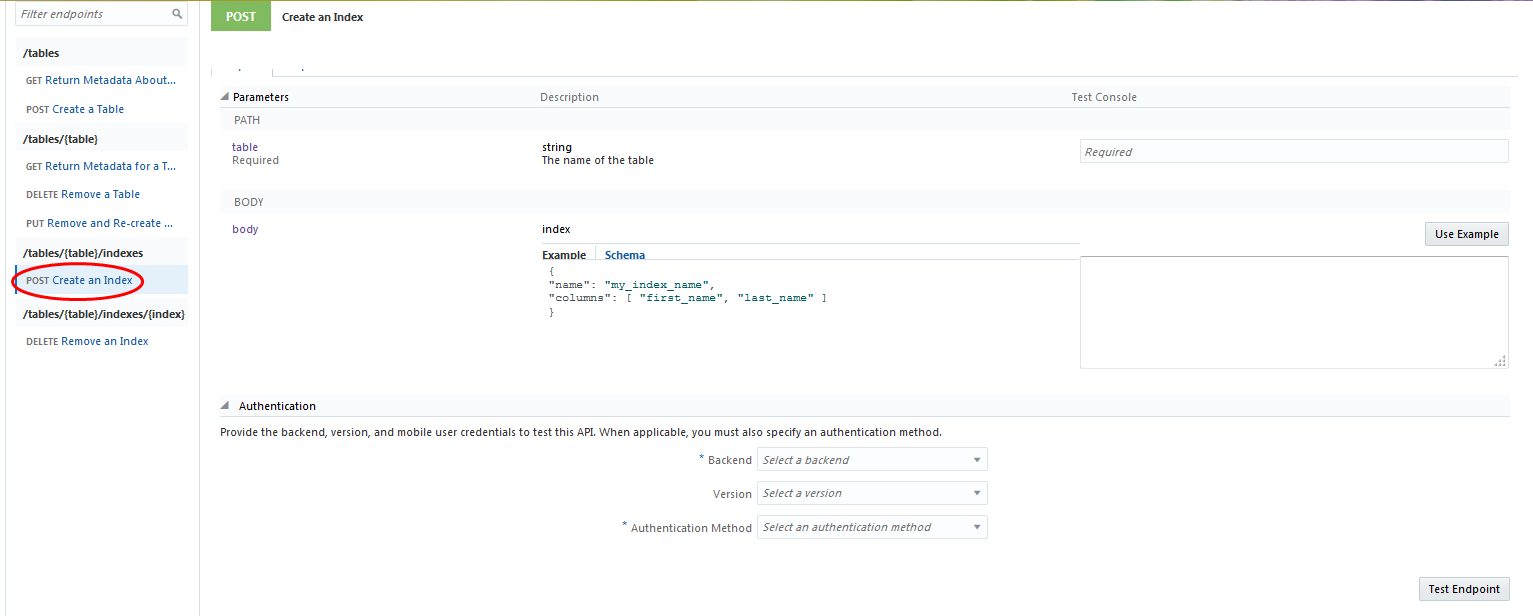
-
Fill in the name of the database table you want to index.
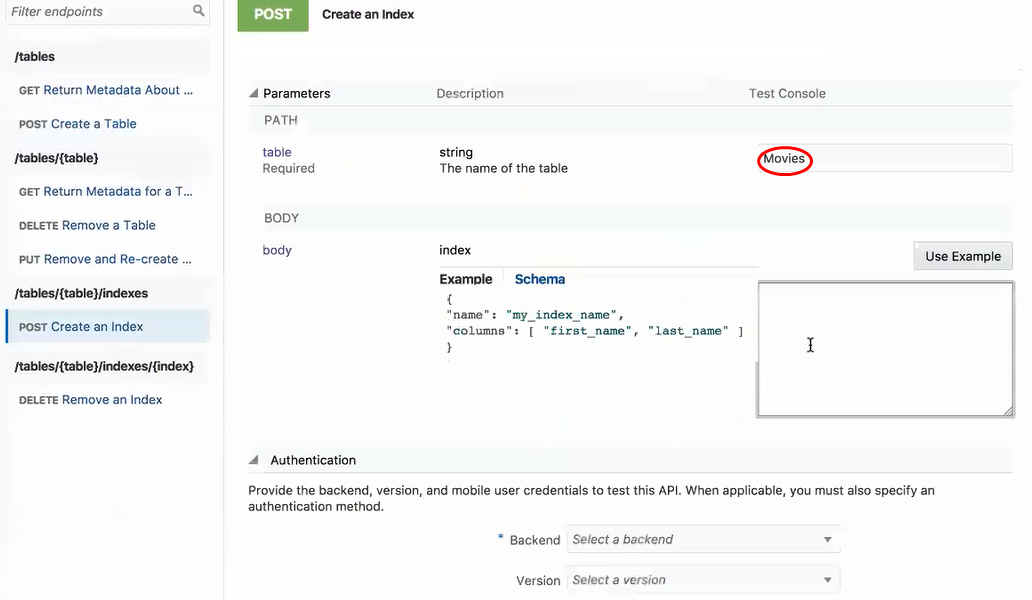
-
Click Use Example to use the example code for the index.
-
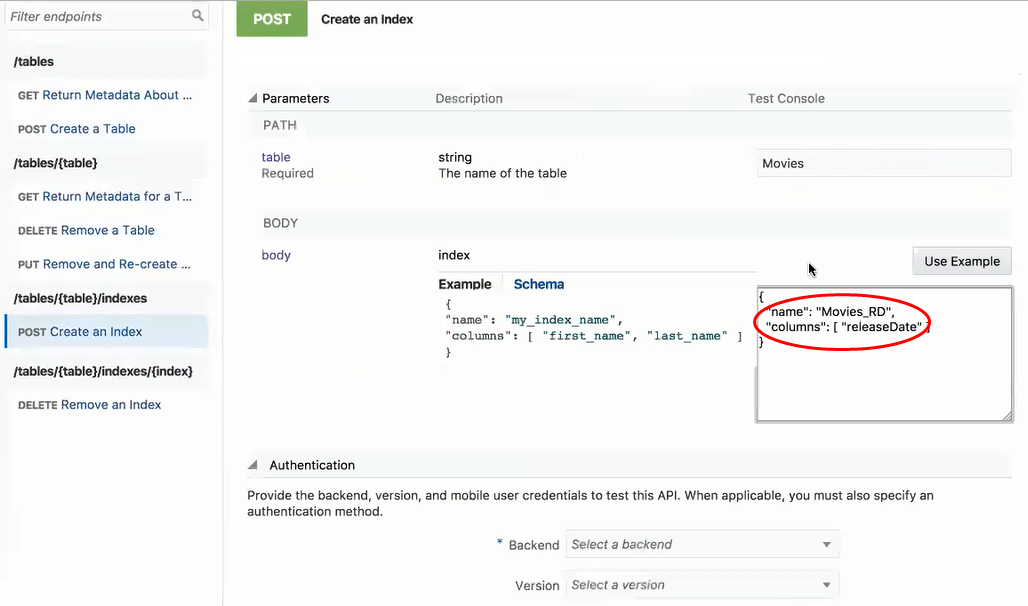
In the example code, replace the index and column names with whatever names you want to use.
-
In the Backend menu, select the backend, then version, you want to use to test the API.
-
Select Current User for the authentication method.
-
Click Test Endpoint.
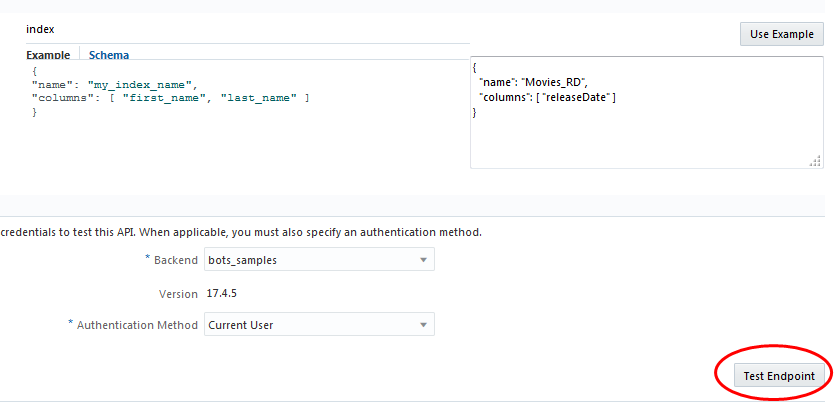
You should receive a 201 response indicating your index has been created.
Note:
If you create an index on a table, then call PUT/mobile/system/databaseManagement/tables, any user-defined indexes will be dropped. However default indexes, like the one created on a primary key, will be recreated.Deleting an Index
The process for deleting an index is very much like creating one. Just choose Remove an Index from the left panel. Then enter the names of the index and the table, as well as the backend and authentication method. Finally, click Test Endpoint to see that the index has been removed.
