21 Custom API Design
In Oracle Mobile Cloud Service (MCS), you can create custom REST APIs that can be used by your mobile apps. If you’re a mobile app developer, use the API Designer to sketch out and test the endpoints that you define and then have a service developer fill out the details of the API (add resource types or traits, provide a schema, and set the access to the API and its endpoints), and implement it in JavaScript. If you’re a service developer, use the API Designer to explicitly configure a complete API that you can test with mock data. Alternatively, you can generate custom APIs from a REST or Fusion Applications connectors without writing any code.
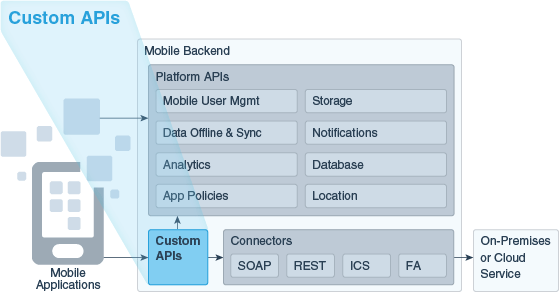
Unlike the MCS platform APIs, which provide a core set of known services, custom APIs let you use Node.js to code any service your mobile app needs, published through a REST interface. You can relay data by using an MCS connector to a backend service, which transforms complex data into mobile-friendly payloads. By using custom APIs to build a catalog of reusable services, you can save lots of time that might otherwise be spent periodically re-creating and maintaining implementation details in your mobile apps.
If you want to create an API quickly by providing sample data and letting MCS define a set of endpoints for you, use the Express API Designer.
API Design Process
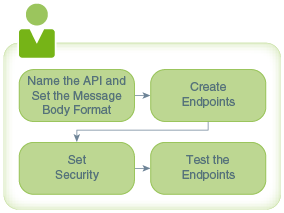
The API Designer guides you through the process of creating a custom API.
You can quickly create a draft version of the API in just a few steps:
-
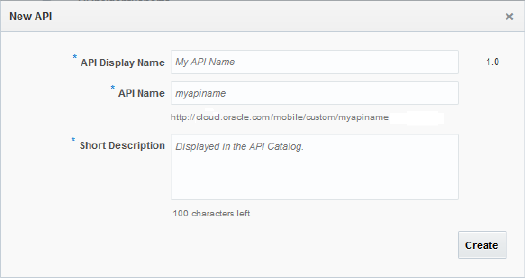
Add the basics (name of the API, the message media type, and a brief description).
-
Define an endpoint by setting a resource and at least one method for it.
-
Set access security.
-
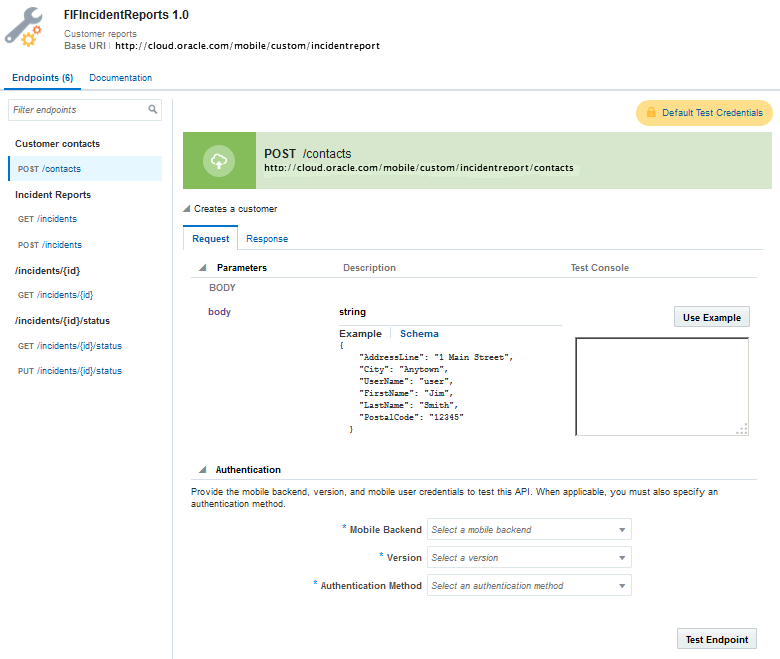
Test your endpoint after you've defined at least one resource.
You can create mock data to quickly test and validate an endpoint even when you haven’t completely finished configuring your API. When you define your message body, you can provide placeholder values to verify that the correct data is being sent or returned. See Testing API Endpoints Using Mock Data.
Completing Your Custom API
To fully complete your API, use the API Designer to help you add the essential components for a robust API:
-
Provide the API metadata (that is, the basic attributes of the API, which are the API display name, API name, and short description) or, if you already have a RAML document that contains the configuration of your API, then you can upload it to the API Designer. All the information (metadata, resources, methods, and the schema for the message body) is extracted from the RAML document and loaded into the API Designer, letting you quickly proceed to testing your endpoints or editing your API configuration. To provide a valid RAML file, see RAML.
-
Add one or more root and nested resources.
-
Add methods to act on the resources.
-
Create a schema to describe the body of data.
-
Test your endpoints during design time with sample data and make any changes as needed.
-
Allow anonymous access to your API or specify which roles can access it.
-
Add documentation for your custom API
Later on, as you create more APIs, you might find that you are repeatedly defining the same methods, using the same parameters, etc. You can reduce the redundancy by creating resource types and traits. If your API is still in the draft state, then you can go back into your configuration and add the resource types and traits that you’ve defined.
The API Designer
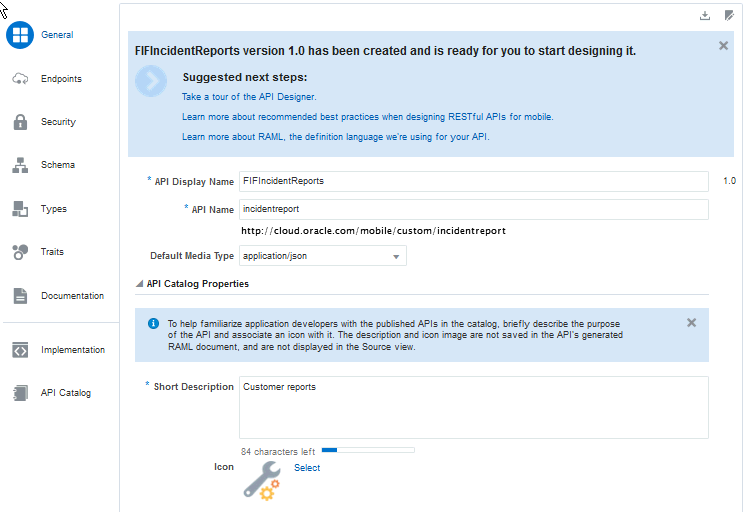
The API Designer helps you configure a custom API with task-specific tabs that you use to name your API, define its endpoints, set security, add API documentation, add a schema, define resource types and traits, and test the API.
When you double-click an existing API, it automatically opens in the API Designer. Only APIs in draft state can be edited. If you open a published API, then it’s displayed as read-only information. To make changes to a published API, you need to create a new version of it (see Creating a New Version of an API).
While you’re configuring the API, you can switch between the Design view and the Source view. In the Design view (the default view), you enter values in fields. In the Source view, you manually define the API’s properties in a source code editor. Click Enter RAML Source Editor Mode ![]() to toggle between the Design and Source views.
to toggle between the Design and Source views.
Note:
If you came to the API Designer by clicking the APIs navigation link from a mobile backend, the feature to upload a RAML document is not available.MCS APIs are based on the RESTful API Modeling Language (RAML) standard. Once you’ve begun to configure your API, MCS generates a RAML document of the configuration. See RAML to learn more about it.
If you want to work on the RAML document outside of MCS, you can export it by clicking Export RAML document ![]() at the top of the page.
at the top of the page.
Generating Custom APIs for Connectors
Oracle Mobile Cloud Service (MCS) can generate custom code from connectors to connect to external services. As a service developer, you can select a Fusion Applications connector or a REST connector that has been created with a valid descriptor, generate the custom API, and use the generated API to make it easier to call these services from the implementations of your custom APIs, or directly from a mobile app.
A connector is a means of enabling a mobile backend to communicate with an external service such as enterprise system or third-party APIs, which in turn, allows a mobile app to interact with the functions of that service. A connector API is a configuration for communicating with a specific external service to send and receive data.
As a service developer, you can generate a custom API that exposes the methods of a connector API and provides a default implementation, without writing code.
The custom API is generated with an endpoint for each resource in the connector API, and it is opened in the API Designer for you to continue to specify details of the API, such as roles. The default implementation, passes through all the requests coming from the generated custom API to the target connector API, is also generated and assigned to the generated API. As soon as you have assigned roles to the API if they are required for security on the connector you can use the implementation to test the API. You can download and modify the implementation and then upload it.
Creating a Generated Custom API for a Connector
Being able to create a custom API for a connector means that it is much easier to create a prototype which you use to test a connector. As you find things you want to change, you can quickly make a change to the connector, and generate a new custom API and implementation. Once you are satisfied you can generate a final version of the custom API and implementation.
-
First, you develop a REST connector or Fusion Applications connector that is defined using a descriptor.
-
Generate the custom API from the connector. It opens in the API Designer, where you can define one or more roles or specify the authentication required by the API.
-
You can immediately call the generated API from the mobile device. The default implementation passes through all the requests coming from the generated API to the target connector API.
-
You will probably want to download the implementation and modify it to shape the data returned.
-
You may want to revisit the connector and make changes to the connector resources or descriptor. If you do you must generate a new custom API and implementation. If you make changes to the generated custom API, these changes are not reflected in the connector. You should make the appropriate changes in the connector and then generate the custom API and implementation again.
Limitations of Generated Custom APIs for Connectors
You can only generate a custom API for a REST or Fusion Applications connector which is defined using a descriptor. You cannot generate a custom API for another type of connector, or where the REST or Fusion Applications connector does not have a descriptor.
If you want to send multipart form data or use the http options object, you might need to replace the callConnector method in the implementation with your own code. See Calling Connector APIs from Custom Code.
How Do I Generate a Custom API from a Connector
-
REST connectors that use a descriptor URL
-
Fusion Applications connectors
Note:
Make sure that you have the descriptor defined for the connector, and that you have selected the resources and methods you want to generate code for. The connector should be as complete as possible-
Make sure that you’re in the environment for which you want to generate the custom API.
-
Click
 and select Applications > APIs from the side menu.
The Connectors page appears. Select the connector API you want to generate custom code for. You can filter the list to see only the connector APIs that you're interested in or click Sort to reorder the list.
-
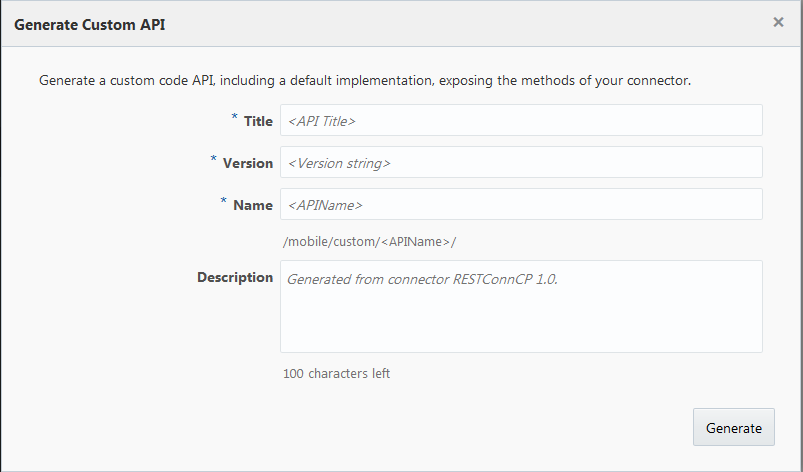
Click More and from the drop-down list, select Generate Custom API.
The Generate Custom API dialog appears. -
Provide the following information for the generated custom API:
-
Title: Enter a descriptive name (an API with an easy-to-read name that clearly identifies the API makes it much easier to locate in the list of custom APIs).
For example,
myCustomAPI.Note:
The names you give to a custom API (the value you enter in the API name field) must be unique among custom APIs. -
Version: Enter a version number.
If you enter a version number that already exists, you'll get a message letting you know that number is already in use.
-
Name: The title you entered is automatically entered here as the name. You can change it if you want. This name is used a unique name for your custom API.
By default, this name is appended to the relative base URI as the resource name for the custom API. You can see the base URI below the Name field.
Note:
The custom API name must consist only of alphanumeric characters. It can’t include special characters, wildcards, slashes /, or braces {}.If you edit the name for the API here, the base URI is automatically updated.
Other than a new version of this custom connector API, no other custom connector API can have the same resource name.
-
Description: You can accept the default description, or provide a brief description, including the purpose of this API.
After you've filled in all the required fields, click Generate.
The draft API is generated and displayed in the General page of the API Designer (see The API Designer) where you can continue to edit it.
-
You can find the new custom connector API listed under Applications > APIs.
Completing the Custom API
The generated API opens in the API Designer.
-
An endpoint exists for all the resources selected in the connector, along with an implementation that you can use to test the API.
-
By default, security is set that login is required and security is enterprise level so you need to add the roles that can access the API. See Security in Custom APIs
As soon as you assign appropriate roles, you can test the custom API.
Working with the Implementation
The default generated implementation passed through all requests. You can edit the implementation to shape the data returned, which is useful if there is a lot of data.
-
Make sure that you’re in the environment where you can download the implementation.
-
Click
 and select Applications > APIs from the side menu.
The APIs page appears. Select the custom API that you have generated. You can filter the list to see only the custom APIs that you're interested in or click Sort to reorder the list.
-
Click the Implementations navigation link, select the implementation which will have the same name as the custom API, and click Download.
-
The download is a zip file with the default name
<custom-api><version>.zip. Expand it to a suitable location. The implementation files are:-
callConnector.js, passes the client’s request to the connector, and sends back the connector’s response. -
<custom_api>.js, provides the main body of the scaffolding of the custom API implementation. You can uncomment lines in this to shape the data returned from the connector. -
<custom_api>.raml, the RAML definition of the custom API. -
package.json, the package descriptor file. -
ReadMe.md, has a description of the implementation files. -
samples.txt, code samples. -
swagger.json, the Swagger definition of the custom API. -
toolsConfig.json, used by the command-line development tools.
-
-
In an appropriate editor, open
<custom_api>.js, which is the only file in the generated implementation which you should edit.To shape the response from the connector, uncomment the relevant lines and if necessary change the
typeandlimit. See theservice.useexamples in the sample of<custom_api>.jsbelow.service.use(bodyParser.raw({type: 'application/octet-stream', limit: '100mb'}));and
service.use(bodyParser.text({type: 'text/*', limit: '1mb'}));This is the first few lines of the
<custom_api>.jsgenerated implementation file.// no need to add body-parser as a dependency in package.json - it's provided by custom code container var bodyParser = require('body-parser'); // passes client's request to the connector, sends back connector's response var callConnector = require('./callConnector.js'); /** * Mobile Cloud custom code service entry point. * @param {external:ExpressApplicationObject} * service * @see {@link http://expressjs.com/en/4x/api.html} */ module.exports = function(service) { // uncomment if using customizer to customize binary request with content-type 'application/octet-stream' - it will be parsed into a Buffer and assigned to req.body. Otherwise these requests streamed through (recommended approach if no customization is required). //service.use(bodyParser.raw({type: 'application/octet-stream', limit: '100mb'})); // uncomment if using customizer to customize text request with text content-type - it will be parsed into a string and assigned to req.body. Otherwise these requests streamed through (recommended approach if no customization is required). //service.use(bodyParser.text({type: 'text/*', limit: '1mb'})); // In the product UI, in Diagnostics -> Logs tab, ServerSetting button allows to set backend log level: set your mbe log level to FINE (FINER, FINEST) to see the generated custom code sdk calls. service.post('/mobile/custom/sample_api/emps', function(req,res) { // uncomment customizer to customize request and/or response callConnector(req, res/*,customizer*/); }); service.get('/mobile/custom/sample_api/emps', function(req,res) { // uncomment customizer to customize request and/or response callConnector(req, res/*,customizer*/); }); ...
There is a sample customizer in the same generated implementation file. You can edit it and pass it as a last parameter to callConnector to override the request sent to the connector and/or the connectors response. See the comments in the code for examples of what you can do.
// Edit this sample customizer and pass it as a last parameter to callConnector to override request sent to connector and/or connector's response.
// Without customizer callConnector streams request to connector, then connector's response is streamed back to client - recommended approach in case no customization is required.
var customizer = {
    // allows to customize request sent to connector. If omitted then the request streamed to the connector - recommended approach in case no request customization is required.
    request: {
        // used - with post and put only - to customize request body
        // If not specified then request body is streamed directly to the connector - no need to define this function unless you need to override the payload.
        body: function(req) {
            console.log('customizer.request.body: req.body = ', req.body);
            var body = req.body;
            // OVERRIDE request body here - substitute this sample code:
            if (typeof body == 'string'){
                // to enable string parsing uncomment  service.use(bodyParser.text... - otherwise req.body would never be a string
                body += ' customized request';
            } else if (typeof body == 'object'){
                if (Buffer.isBuffer(body)){
                    // to enable binary parsing uncomment  service.use(bodyParser.raw... - otherwise req.body would never be a Buffer
                    body = Buffer.concat([Buffer.alloc(8, '00000000'), body]);
                } else {
                    // json parsing is enabled by default
                    body['customized-request'] = true;
                }
            }
            console.log('customizer.request.body ->', body);
            return body;
        }/*,
        // advanced: uncomment to add options to connector request, see https://github.com/request/request#requestoptions-callback
        options: function(req) {
            var options = {headers: {myHeader: 'myHeaderValue'}};
            console.log('customizer.request.options ->', options);
            return options;
        }*/
    },
Spec Out a Custom API
As a mobile developer, you might want to quickly spec out an API for your backend then configure it later, or hand it to someone like the service developer to complete. You can construct a functioning API with just a few steps: name your API, define an endpoint, and test the endpoint. These next steps use a simplified FixItFast example. It doesn’t show you how to add method parameters, or schemas, or resource types and traits.
Creating a Complete Custom API
Previously, you learned how to spec out an API using the API Designer. You gave a name to the API, added at least one resource and method and tested your endpoint. At this point you have a draft version of the API but it isn’t quite complete. In this section, you’ll fill in more details (such as defining the method requests and response, adding a schema, and setting secure access) to make a more robust API. Just in case you’re starting from scratch though or want more details about setting the basics, the complete set of steps to creating a custom API are presented.
Click ![]() and select Applications > APIs from the side menu. If an API has already been created (whether in a Draft or a Published state), you'll see a list of APIs. If no custom APIs exist, then you'll see a page with the New API button. Click the API you spec’d out already or click New API to get started.
and select Applications > APIs from the side menu. If an API has already been created (whether in a Draft or a Published state), you'll see a list of APIs. If no custom APIs exist, then you'll see a page with the New API button. Click the API you spec’d out already or click New API to get started.
Setting Up Your API
Let’s use the FixItFast example to create a custom API. In this example, you work for the FixItFast appliance repair company. You need to find a way to track the repair calls and responses. It would also be helpful to know which technicians are assigned to the repair jobs. You want to create an API that lists the customer service calls based on the customer who called to report the problem, the customer location, and the technician assigned to the job. You’ll create the following API with the following properties:
-
An API called
FIFIncidentReports -
A base URI:
https://fif.mcs.cloud.oracle.com/mobile/custom/fif-incidentreport/ -
An
application/jsonmedia type -
An icon to associate with the API display name (a PNG file that we selected)
When you click Create, a Draft state of the API is created and added to the list of custom APIs.
First, set the basic characteristics for your API by going to the General page.
Defining Endpoints
You create resources to define the endpoints of your API. A resource is the crux of an API. It has a type, some data associated with it, a relationship to other resources, and contains one or more methods that act on it. A resource can be nearly anything: an image, a text file, a collection of other resources, a logical transaction, a procedure, etc. See API Resources.
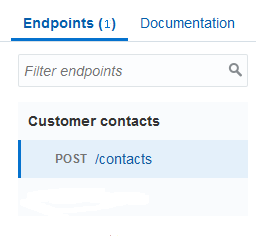
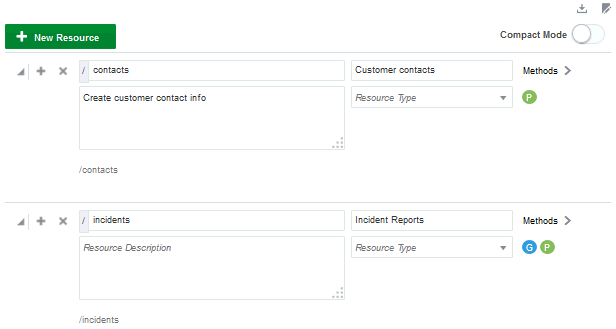
When you create a method for a resource, a symbol for that method appears below the Methods link. You can immediately see what methods have defined for a resource if you need to examine a resource definition. Click on an icon to go directly to that method definition.
You can clear the clutter to locate a resource more quickly by switching to Compact Mode (it's to the right of New Resource). The compact display hides the resource description, resource type, and path.
Adding Methods to Your Resources
Methods are actions that can be performed on a resource. The Methods page shows you one method at a time. After at least two methods are defined, you can click on the icon for a method at the top of the page to see its details.
After you’ve defined methods for the resource, you can define the requests and responses for those methods. See Defining a Request for the Method and Defining a Response for the Method.
Defining a Request for the Method
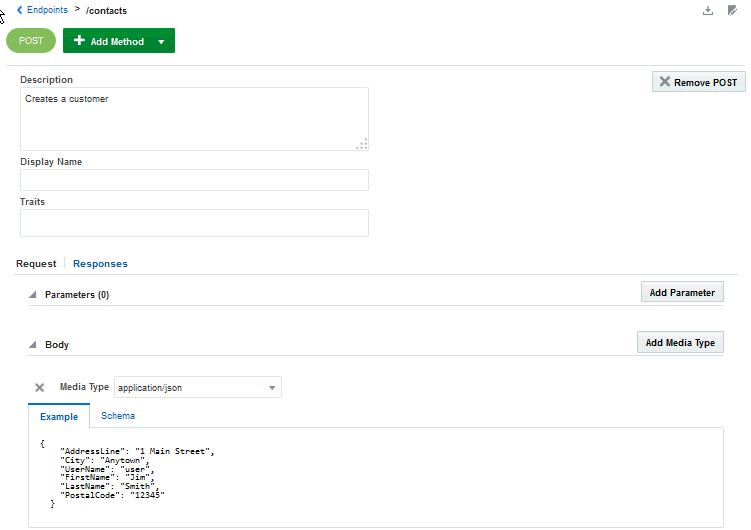
Now that you've selected a method, define the request you're making of the service that you want to connect to. For instance, if you selected a POST method, then now you can define what to create. You do this by adding parameters and a request body, which contains the description of the data to send to the service.
- Click Request to define a request.
- Click Add Parameter and select a parameter type: Query or Header. Select Required if the parameter is required for the method.
- Depending on the method you selected, click Add Media Type and define the method body. The body contains the data that you're sending to the server. For instance if you’re defining a
POSTmethod, you’ll need to define the item you’re creating, such as a new customer listing or service request. If you’re defining aGETmethod, you don’t need to send a method body so you don’t need to specify a media type. - Click Add Media Type to add additional media types. If you decide that you don't want the method, then click X in the banner to delete it.
Defining a Response for the Method
Depending on the request, you may or may not need a response. A response describes the process for returning results from the service. You might want to define a response that verifies that the data you requested was returned or you might want a response that just acknowledges whether or not the request was received. Defining a response is similar to defining a request. The main difference is that you'll need to select a status code to let you know the result of the connection.
POST method of the incidents resource was created with a status code of 201 indicating a new resource was successfully created. The example also shows a return response format of application/json, a Location header that was added, and the message body containing mock data:responses:
201:
description: |
The request has been fulfilled and resulted in a new resource
being created. The newly created resource can be referenced
by the URI(s)returned in the entity of the response, with the
most specific URI for the resource given by a Location header
field.
headers:
Location:
displayName: Location
description: |
Identifies the location of the newly created resource.
type: string
example: |
/20934
required: true
body:
application/json:
example: |
{
"id": 20934,
"title": "Lynn's Leaking Water Heater",
"contact": {
"name": "Lynn Adams",
"street": "45 O'Connor Street",
"city": "Ottawa",
"postalcode": "a1a1a1",
"username": "johnbeta"
},
"status": "New",
"driveTime": 30,
"priority": "high",
"notes": "My notes",
"createdon": "2014-01-20 23:15:03 EDT",
"imageLink": "storage/collections/2e029813-d1a9-4957-a69a-fbd0d74331d77/objects/6cdaa3a8-097e-49f7--9bd2-88966c45668f?user=lynn1014"
}When you've defined your response, you can decide to test your endpoints (see Testing API Endpoints Using Mock Data) or click <Endpoints in the navigation bar to return to the main Resources page. From there, you can proceed to another page in the API Designer to create a root, resource types or traits, or add API documentation.
If you decide you don't want the method, then click X in the banner to delete it.
Testing API Endpoints Using Mock Data
You can provide mock data in your request and response message bodies during the design phase of your API configuration. This lets you examine the context of each call without having to use real time data or interact with a real time service. For example, to test whether your code correctly handles an invalid ID, you can add an example in your request body with mock data containing an invalid ID. When you finish the test, you can replace the example with other code to test some other aspect of the method.
contact resource in the FixItFast example:{
"id": 20934,
"title": "Lynn's Leaking Water Heater",
"contact": {
"name": "Lynn Adams",
"street": "45 O'Connor Street",
"city": "Ottawa",
"postalcode": "ala1a1"
"username":"johneta"
}
"status": "new",
"driveTime": 30,
"priority": "high",
"createdon": "2015-04-23 18:12:03 EDT"
}When you create a custom API, a mock implementation is created automatically. The mock implementation lets you invoke the API from your mobile application before you’ve implemented the custom code. This lets you develop and test the mobile applications and the custom code simultaneously. If you’re satisfied with the configuration, you can add a real implementation.
Until you create your first implementation, the default implementation is the mock implementation. After you create a real implementation, it becomes the default implementation for the API.
Click the Implementations navigation link to upload an implementation or to see any existing implementations. You can change the default implementation on the Implementations page. After you upload an implementation, you see a list of existing implementations, which includes the mock implementation.
See Testing with Mock Data to learn more about testing an API with a mock implementation. See Implementing Custom APIs to create a real API implementation.
For details on testing fully-implemented custom APIs, see Testing Your Custom API.
Providing a Schema
You have the option of adding a JSON schema, which describes the structure of your data and is written in JSON. If you want to add a schema, go to the Schema page and click New Schema. After you've defined at least one schema, you can select one from the list.
To define a schema, provide:
-
The schema name
-
The schema definition (in JSON format) in the editor pane, which you can manually enter or copy and paste into the editor
For example, a schema called schema# is defined as follows:
schemas:
- reports: |
      {
        "$schema": "http://json-schema.org/draft-04/schema#",
        "type": "array",
        "description": "Incident Reports array",
        "items": {
          "type": "object",
          "properties": {
            "id":  { "description": "Unique id for the incident report",
                     "type": "integer" },
            "title": { "description": "Title for the incident report",
                       "type": "string" },
            "createdon": { "description": "Date and time of creation",
                           "type": "string" },
            "contact": { "decription": "Contact information of customer filing the report",
                           "type": "object",
                           "properties": {
                             "id" : { "description": "Unique id for the customer",
                                      "type" : "string" },
                             "name" : { "description": "First and last name of contact",
                                       "type" : "string" },
                             "street": { "description": "Street address of contact",
                                       "type" :  "string"},
                             "city" : { "description": "City of contact",
                                       "type" : "string"},
                             "postalcode" : { "description" : "Postalcdoe of contact",
                                               "type": "string" }
                             }
                  },
             "status" : { "description": "The current status of the incident",
                          "type" : "string" },
             "priority" : { "description": "The current priority of the incident",
                          "type" : "string" },
             "driveTime" : {"description" : "Calculated field based on location",
                          "type" :  "integer"},
             "imageLink" : { "description" : "Link to image from Storage",
                           "type": "string" }
            },
          }
      }
Add more schemas to define by clicking New Schema. Click X to delete a schema. See Schemas for details about the structure of a JSON schema.
Note:
You can define multiple schemas for use with the given API. Schemas are specific to the API and aren’t shared across other APIs.Security in Custom APIs
In MCS, an API is protected through its association with a mobile backend to allow only authorized users and devices to access the API and its endpoints.
For enterprise applications, you can use HTTP Basic Authentication, OAuth, or SSO OAuth Token credentials to control user authentication and authorization of access to resources:
-
With OAuth, when you create a mobile backend or register with an existing mobile backend, a set of OAuth consumer keys (that is, client credentials) consisting of a client ID and client secret are generated for you. The values of these keys are unique to the mobile backend (for information about authenticating with OAuth, see Authenticating with OAuth in Direct REST Calls). You authenticate yourself to the OAuth server by providing your client credentials and receive an access token that is passed in each API call via a header. Only a user with a valid token can access the API.
Alternatively, you can provide a Single Sign-On OAuth token provided by your Remote Identity Provider if the Enable SSO option is selected for the mobile backend. For information on how to enable single sign-on for a mobile backend, see Authentication in MCS.
-
With HTTP Basic Authentication, when a mobile backend is created, a mobile backend ID and an anonymous access key are generated for it. You authenticate yourself to MCS by providing these items, which are passed in each API call via a header. You must provide this information to access the API. You can obtain the mobile backend ID and anonymous access key from the mobile backend landing page. Select the mobile backend associated with the API and expand the Keys section. To learn more about authenticating with HTTP Basic, see Authenticating with HTTP Basic in Direct REST Calls.
-
With Social Identity, when you register an app with a social identity provider (for example, Facebook), an access token is generated by the provider. You authenticate yourself to MCS by specifying the social identity provider and providing the access token.
To find out how to get an access token, see Getting a Facebook User Access Token Manually.
To learn about authentication in MCS, see Enterprise Single Sign-On in MCS.
Setting Access to the API
You have the option of requiring developers to login and provide authentication credentials to access the API.
-
Set Login Required to
OFFto allow access to the API from a mobile app as an anonymous user. Also, you won’t need to use authentication credentials on the API's Test page.This setting is particularly useful when you’re in the early phases of configuring your API and you just want to validate some endpoints or when the data being requested or received is from a service that doesn’t require security.
-
Set Login Required to
ONto require authenticated access to the API:-
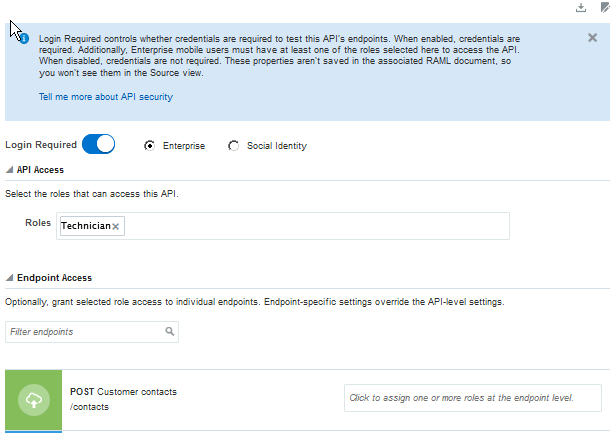
Select Enterprise to set access for mobile users who login with their MCS username and password or who have configured Single Sign-On authentication providers.
When you set Login Required to
ONand select Enterprise, the API Access and Endpoint Access fields are exposed and you must select at least one role to access the API. This ensures that only those mobile users that have the selected role or roles can access the API endpoints. Click in the Roles field to select one or more roles.Optionally, you can further refine access to the API by selecting roles for specific endpoints. Only mobile users having the role selected for a specific endpoint can access it. For example, you can allow only users with a Mobile Develop role to access the
DELETEmethod. Click in the field for each endpoint and select one or more roles. -
Select Social Identity to set access for mobile users who want to use their social media accounts for authentication.
If you choose this setting, you can save your API configuration and move on to the Test page. In addition to specifying the mobile backend and its version, you’ll be asked to select the social authentication provider and provide the access token generated for you by the selected provider.
-
Note:
You can obtain information about the current mobile and social users by including theums.getUserExtended() method in the custom code for the API. See Accessing the Mobile Users API from Custom Code.
Testing Your Custom API
Note:
A few things before you start testing your API:-
If Login Required is turned
ONand Enterprise is selected, you must have a role assigned that allows access to the API. -
If Login Required is turned
ONand Enterprise or Social Identity is selected, you must provide values for all fields in the Authentication section of each method to test it. -
If Login Required is turned
OFF, providing authentication credentials is optional. -
Save your configuration before you test. If you haven’t, then you can check the Always save before testing option in the Save Before Testing confirmation dialog that appears when you click Test. That way, any changes that you make to the API configuration are automatically saved.
To learn how to get a Single Sign-On OAuth token, see Enterprise Single Sign-On in MCS.
To find out how to get an access token from a social authentication provider, see Getting a Facebook User Access Token Manually.
Creating Resource Types
Using the incident report example, you might want to get reports from several departments (billing, service technicians, and clerks). For each department, you want to get a list of employees involved with a particular incident and you want the name, ID, and extension number for each employee. You can define a resource type, employee_contact that defines a GET method that retrieves all the personnel information that you need. Instead of defining an employee_contact for each branch of the company, you can apply the employee_contact resource type to each incident report resource.
Note:
Resource types can’t be used with nested resources.
You can define multiple resource types for use with the given API. Resource types are specific to the API and aren’t shared across other APIs.
Adding a resource type through the API Designer is simple:
Creating Resource Traits
A trait is a partial method definition that provides method-level properties such as a description, headers, query string parameters, and responses. Define traits for obtaining descriptive information like version numbers or vendor information. Methods that use one or more traits inherit those traits' properties. As with resource types, if you’re defining methods with the same attributes multiple times, then define a trait to prepopulate a method with certain attributes. You don't have to use resource traits, but they’re useful if you have several methods with the same operational structure.
Note:
You can define multiple resource traits for use with the given API. Resource traits are specific to the API and aren’t shared across other APIs.Here's how to define a resource trait:
Providing API Documentation
A good, even great API is useless without documentation describing it so others can use the API too. While the API Designer can't write that documentation for you, you can upload it through the API Designer so that the next time you or someone else selects this API from the API Catalog, a full description of the API is available (its purpose, its resources and schemas, the security policies that it uses, and helpful code comments).
How Do I Write in Markdown?
Markdown is a simple set of syntax that you can use to produce basic formatting structures such as section heads, paragraphs, ordered and itemized lists, block quotes, and links.
| Construct | Markdown | Output |
|---|---|---|
|
Header: Use hash marks (#) to denote headers |
#First-Level Heading ## Second-Level Heading ### Third-Level Heading |
First-Level Heading Second-Level Heading Third-Level Heading |
|
Paragraph: Separate paragraphs with one or more blank lines. |
This is a paragraph. This is a second paragraph. |
This is a paragraph This is a second paragraph. |
|
Simple List: Use +, -, or * followed by a space to denote list items. List markers are interchangeable. |
- list item 1 + list item 2 * list item 3 |
- list item 1 - list item 2 - list item 3 |
|
Nested List: Use +, -, or * followed by a space to denote list items and indent nested list item by exactly four spaces. |
-list item 1 + list item 1a + list item 1b -list item 2 |
- list item1 - list item 1a - list item 1b - list item 2 |
|
Ordered List: Precede each item with a number in a consecutive sequence followed by a space. |
1. list item 1 2. list item 2 * list item 2a * list item 2b 3. list item 3 |
1. list item 1 2. list item 2 2a. list item 2a 2b. list item 2b 3. list item 3 |
|
Emphasis Italics: Wrap text with an asterisk (*) or single underscore. |
*text* _more text_ |
text more text |
|
Emphasis Bold: Wrap text with two asterisks (*) or double underscores. |
**text** __more text__ |
text more text |
|
Inline code: Use back quotes (`) around the text. |
This is an `inline code` example. |
This is an |
|
Code Block: Indent each line by four spaces |
Format a block of preformatted code: This is a code line. |
Format a block of preformatted code:
|
|
Links: Put the link text in brackets, followed immediately by the URL in parentheses. |
This is an [example link](http://example.com). |
This is an example link. |
If you want to find out more about Markdown, see What is Markdown?
Getting Diagnostic Information
You can view the response code and returned data to determine if your endpoints are valid. A response status other than 2xx doesn't necessarily mean that the test failed. If the operation was supposed to return a null response, then the response should show a 4xx code.
For every message you send, MCS tags it with a correlation ID. A correlation ID associates your request with other logging data. The correlation ID includes an Execution Context ID (ECID) that’s unique for each request. With the ECID and the Relationship ID (RID), you can use the log files to correlate messages across Oracle Fusion Middleware components. By examining multiple messages, you can more easily determine where issues occur. For example, you can retrieve records from Oracle Fusion Middleware Logging using the call's ECID. From the Administration page, you can click Logs to view logging data.
Depending on your MCS access permissions, you or your mobile cloud administrator can view the client and server HTTP error codes for your API's endpoints on the Request History page, allowing you to see the context of the message status when you're trying to trace the cause of an error. Every message sent has a set of attributes such as the time the event occurred, the message ID, the Relationship ID (RID), and the Execution Context ID (ECID).
To learn more about getting and understanding diagnostics, see Monitoring Performance and Troubleshooting .
After you've configured your custom API, you can provide an API implementation, that is, create your own custom code and add it to your mobile backend to access the API. See Implementing Custom APIs.
API Design Considerations
When you configure your custom API, there are some things you can do to ensure you have a well-formed API, including making sure that URLs and resources are well-formed, that reasonable read and connect timeouts have been set, and, if you’re providing a RAML file, that it’s correctly configured.
Here are some things to consider when you configure your API and some detailed descriptions of more advanced constructs that you can use to refine your API.
Valid URLs
In creating your RESTful API, it's important that you define a valid URL. You can see the URL for your API as you define it from the API name that you provide and the resources and methods that you add. To ensure that you have a valid URL, it must adhere to the following best practice guidelines:
-
Provide a relevant and easily identifiable resource name. Using identifiers in your URLs make for a more understandable resource than using a query string. Which makes more sense to you, the resource name
/customers/2223or/customers/api?type=customerid=2223? -
Resources can be grouped into a collection, so make the collection resource name consistent with the attribute names used to refer to the collection.
For example, if an attribute is a collection of favorite bookmarks, be obvious and name the collection
favoriteBookmarksinstead offavoriteLinks. -
Always make the resource names plural nouns and alternate between plural nouns and singular resource identifiers (rid):
/services/1.0/items/{rid}/subitems/{rid}/For example:
/customers/2223/orders/555To ensure that the API is sync-compatible, always put the identifier immediately after its related resource name as shown in the previous example, where
2223is the designation of a specific customer and555is the designation of a specific order. A poorly formed URL to indicate a specific customer could look like this:/customers/orders/2223/555or/customers/orders/locations/2223. -
Use lowercase for resource names and use camel case for attribute names.
For example:
/services/1.0/items?limit=10&totalResults=true -
Keep resource identifiers down to 32 characters or fewer due to the limitations of some browsers.
-
Keep URLs as short as possible. A long rambling URL is difficult to read and all the more difficult to debug.
-
When defining the URL, you can be as concrete or abstract as desired, but you should use the curly brace {} notation to indicate URI parameters. This makes the corresponding RAML more detailed and easier to test.
-
Ensure that all date formats are in the form:
YYYY-MM_DD[THH:mm:ss.sss]Z.For example:
2014-10-07T18:35:50.123Z -
For pagination, use the
limitandoffsetquery parameters so that the Synchronization library uses paged downloads correctly. If you don’t need to support pagination, you don’t need to specify these parameters. -
To ensure sync compatibility, use the
orderByquery parameter to specify sorting. For example:“orderBy=propA,propB:desc,propC:asc”. In this example, the default sort order is by ascending value.For details on designing sync-compatible custom APIs, see Making Custom APIs Synchronizable.
-
Provide values for query parameters as a URL-encoded JSON string. For example:
[
  {
    "property":"propertyName",
    //Supports Equals, NotEquals, LessThan, GreaterThan, LessThanOrEqual,GreaterThanOrEqual
    "comparison":"Equals",
    "value":"Must be a string",
  },
  {
    "property":"Another clause, only support ANDS not ORs",
    ...
  }
]
API Timeouts
Sometimes when an API fails, it’s due to a stream or connection timeout. Stream timeouts happen when, after a successful connection to the server, data is being transmitted and the network time outs before all the data can be sent or received. Connection timeouts happen when the network connection is never made.
To ensure that connectors have sufficient time to make a connection and that data can be transmitted, the HTTP read and connection timeouts should have smaller values than the API timeout.
The Network_HttpRequestTimeout value determines the amount of time spent transmitting an HTTP request before the operation times out. The default value is 40,000 ms. The value of this policy can affect your API timeout values, which should be less than the value of the policy. Note that policy values are specific to a particular environment. The value for this policy in a development environment can be different from its value in a runtime environment. Your mobile cloud administrator can increase or decrease the timeout value from the Administration tab.
If you have mobile cloud administrator privileges, then you can select an environment in the Administration view and export the policies.properties file to see a list of the current environment policies and their values. For information about API environment policies and policy settings, see Oracle Mobile Cloud Service Environment Policies. For information about environment policies in general, see Environment Policies.
API Resources
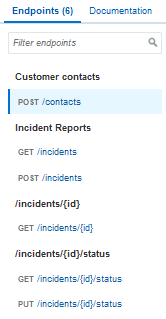
A key element of an API is the resource. A resource is the conceptual mapping to an entity or to a set of entities and is identified by its relative base URI. In other words, a resource is a thing (noun) that’s located at an address to which you want to transmit information or receive information. It has at least one method (verb) that operates on it. A method is what you use to retrieve, create, update, or delete a representation of a resource. For example, GET incidents.
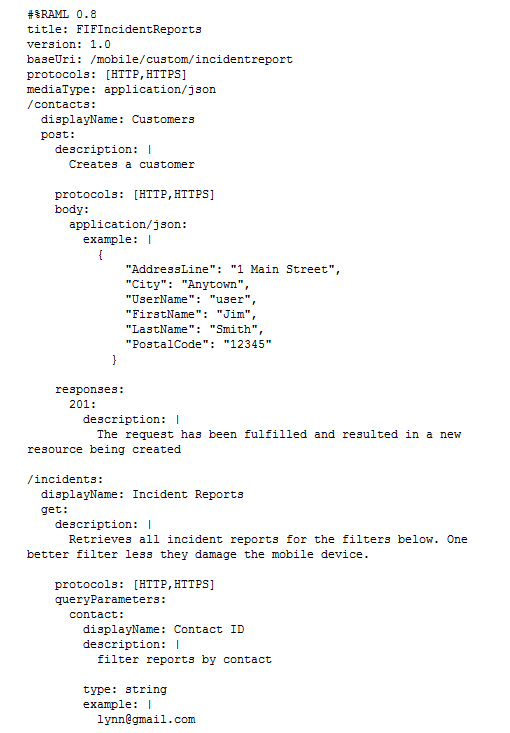
A top-level resource is a resource defined at the root level (also referred to as the root resource). A resource that’s defined as a child of another resource is a nested resource. Nested resources let you specify aspects of the parent resource. A nested resource is identified by its URI relative to the parent resource URI. For example, let’s say you have a root resource defined as .../incidents, and you have a nested resource, {id}. The API definition in RAML looks like:
title: FIFIncidentReports
version: 1.0
baseURI: /mobile/custom/fif-incidentreport
protocols: [HTTPS]
mediatType: "application/json"
/incidents:
  displayName: Incident Reports
  get:
    description: |
      Retrieves all incident reports.
.
.
.
/{id}:
  uriParameters:
    id:
      displayName: id
      description: |
          The unique id of the incident report.
A resource is always preceded with a slash (/), whether it’s a root or nested resource. For information about constructing a valid RAML document, see RAML.
If you think of a resource as a collection of objects and a nested resource as an item in that collection, then your resource path shows the parent resource in plural form and a nested resource in singular form. For example:
.../mobile/custom/fif-incidentreport/incidents/{id}The root resource is incidents and the instance of an incident is {id}. You can give the resource an easy-to-read display name on the Endpoints page. If you don't provide a display name, then the resource URI is used as the name.
A common practice when designing a resource is to have PUT and POST methods return the same objects that are sent in the request.
URI Parameters
If you want to allow API calls that change or restrict the value of the relative base URI, then you can override it by setting a base URI parameter. The URI of a resource can contain parameters, which are variable elements, for example {id}.
Like resources, parameters have a name. The RAML generated for our fif-incdentreport shows the resource parameter named id, a display name (id, although the display name doesn't have to be the same as the parameter name), and a value type (in this example, the value type is integer):
  /{id}:
    uriParameters:
      id: displayName: id
      description: |
        the unique id of the incident report

      type: integer
      required: true
   get:
     description: |
       Retrieves the incident report with the specified id.
You place the path parameter after the resource name. Use a semicolon to separate multiple parameters. For parameters that can have multiple values, separate the values with commas.
In the example, the URI parameter /{id} is a variable that identifies a specific incident report by its ID number. The parameter contains the properties displayName and type. The URI would look like this:
.../fif-incidentreport/incidents/{id}If the parameter, id, has a value of 1234, then the resulting URI would look like this:
.../fif-incidentreport/incidents/1234Parameters can be added as part of the URI path as a child (nested) resource or added as a query. There are no hard and fast rules to adding parameters to the URI path versus adding parameters as a query. One possible consideration is whether the parameter is essential to the request. For example, to get data for a specific report, you would use an identifier (id) of the resource in the URI path as shown in the previous fif-incidentreport URI example.
However, if you’re using the parameter as a filter to narrow down the data, then add it in the query. For example, you would use technician as a query parameter .../fif-incidentreport/incidents?technician=joe to filter reports only by a particular technician.
Endpoint Requirements for Sync Compatibility
To ensure optimal synchronization of data when a custom API is used by the Synchronization library on a client, the custom API must include a specific set of server-side endpoints.
For example, let's say a custom API endpoint is defined that returns a collection of Department records and is consumed by a client that uses the Synchronization library. Records are retrieved from the collection endpoint, /Departments, and stored in the client’s local cache by the library. Later on, the library identifies two records in the cache that require updating because they’ve expired (/Departments/Finance and /Departments/HR).
In this case, to get the most up-to-date data, the Synchronization library retrieves only the records that need to be updated, and not the entire collection.
On the server side, via the associated Synchronization library, these endpoints are called individually on behalf of the client. The data is returned to the client in a single payload and response, saving multiple round trips for each required object.
To support this, the Synchronization library requires that the custom API includes GET methods for both the collection resource (GET /{collection}) and the object resource (GET /{collection}/{objectId}). That is, in our Department example, the following endpoints are needed:
-
GET /Departments -
GET /Departments/{DeptId}
To go a step further, if the offline API collection objects that were retrieved can be modified, say by the addition, update, or deletion of an object, the Synchronization library calls the appropriate custom code APIs to enact the change on the objects on the server side. To support creating, updating, or deleting the object requires that the following types of endpoints are implemented on the server-side custom API:
-
GET /{collection} -
GET /{collection}/{objectId} -
PUT /{collection}/{objectId} -
POST /{collection} -
DELETE /{collection}/{objectId}
The inclusion of the PUT, POST, and DELETE operations are optional. If, for example, your application never deletes an object in a collection, you don’t need to implement the DELETE operation.
Note:
The Synchronization library doesn’t support thePATCH operation.
See Making Custom APIs Synchronizable to learn more about configuring a sync-compatible custom API.
Schemas
A JSON schema defines the structure of your API in a JSON-based data format. The JSON schema can be used to validate JSON data. You can define a schema from the Schema page. Let's look at the schema from the IncidentReports example:
{
        "$schema": "http://json-schema.org/draft-04/schema#",
        "type": "array",
        "description": "Incident Reports array",
        "items": {
          "type": "object",
          "properties": {
            "id":  { "description": "Unique id for the incident report",
                     "type": "integer" },
            "title": { "description": "Title for the incident report",
                       "type": "string" },
            "createdon": { "description": "Date and time of creation",
                           "type": "string" },
            "contact": { "decription": "Contact information for customer filing the report",
                           "type": "object",
                           "properties": {
                             "id" : { "description": "Unique id for the customer",
                                      "type" : "string" },
                             "name" : { "description": "First and last name of contact",
                                       "type" : "string" },
                             "street": { "description": "Street address of contact",
                                       "type" :  "string"},
                             "city" : { "description": "City of contact",
                                       "type" : "string"},
                             "postalcode" : { "description" : "Postalcdoe of contact",
                                               "type": "string" }
                             }
                  },
             "status" : { "description": "The current status of the incident",
                          "type" : "string" },
             "priority" : { "description": "The current priority of the incident",
                          "type" : "string" },
             "driveTime" : {"description" : "Calculated field based on location",
                          "type" :  "integer"},
             "imageLink" : { "description" : "Link to image from Storage",
                           "type": "string" }
            },
          }
      }
This schema contains the following keywords:
-
$schema: denotes that this schema is based on the draft v4 specification. It must be located at the root of the JSON schema. You should always include this keyword in your JSON schema. -
type: defines a JSON constraint, so the data must be an array. -
description: describes the contents of the schema. -
items: define the items in the array. In an incident report, we want to assign attributes to each report. In this example, all items are of typeobjectand each object has a set of properties, such as report ID, title, contact info, status, priority level, etc.
For a complete list of keywords to use in your JSON schema, see http://json-schema.org/.
To add a schema for your API, see Providing a Schema.
RAML
When you create an API using the MCS interface, the API definition is stored as a RAML document. RAML is a simple efficient way to describe RESTful APIs. REST stands for Representational State Transfer (REST) and is a way to perform basic operations (create, read, update or delete) information on a server using simple HTTP calls.
You can also upload a RAML document that you create from scratch into the API Designer. The API Designer takes the input that you provide and creates a RAML file that documents the contents of the custom API. Note that the RAML defines only the API itself, not the implementation of the API. You must create custom code using JavaScript to implement the API. For information on how to implement an API, see Implementing Custom APIs.
Note:
The feature to upload a RAML document isn’t available if you came to the API page by clicking APIs from the navigation list of a mobile backend. If you upload a RAML file, then the values for the required Name fields are extracted from the RAML file. You still have to add the short description. At a minimum, your RAML file must include the API name, a base URI (/mobile/custom/apiname), and a version number.
For your RAML file to be valid, it must specify a media type, base URI, the HTTPS protocol, and a version number:
#%RAML 0.8
---
title: api_title
version: 1.0
protocols: [HTTPS]
baseURI: /mobile/custom/api_name
mediaType: application/json
Note:
MCS requires the HTTPS protocol for custom APIs. If you upload a RAML document that configures the API using the HTTP protocol, then it’s automatically edited to use HTTPS.
For new a API, a default version of 1.0 is automatically applied when you save the configuration (unless the mobile cloud administrator has changed the value of the Asset_DefaultInitialVersion environment policy). However, if you upload an API configuration, then the version value displayed is taken from the file.
Note:
The version value uses a specific format. Versions are specified with an integer. For example, in your RAML file specifying version: 2.0 is valid while version: v2.0 isn’t.
RAML lets you define resource types and traits for describing resources and methods, which results in a more succinct RESTful API by reducing repetition in the design. The principle components of a RAML (.raml) document are:
-
Basic API information consisting of:
-
API Display Name: the easy—to—read name of the API, which appears in the API list (for example,
FIFIncident Reports) -
Base URI: The address of the resource (
/mobile/customfor custom APIs) -
API Name: name of the API (
fif-incidentreport) in the configuration -
Short description: Brief description of your API
-
-
Resource types and traits, which allow you to characterize resources to avoid unnecessary repetition in the API definition
-
Resources (the conceptual mappings to one or more entities), resource methods, and schema
To ensure that your RAML document is correctly configured, follow these tips:
-
Although RAML allows both HTTP and HTTPS protocols, MCS requires the HTTPS protocol for custom APIs. If you upload a RAML document that configures the API using the HTTP protocol, then it’s automatically edited to use HTTPS.
-
If you define a top-level resource with an empty relative URI (that is, /:), then you can’t add a subresource to it.
An error message will alert you that the structure is invalid. For example, the following resource definitions will fail:/: /reports:You need to make reports a top-level resource:/: /reports: -
Top-level resources shouldn’t contain empty relative URI subresources, for example:
/books: /: -
Avoid creating duplicate paths, for example:
/reports/{id}:
/reports:
  /{id}:
Multiple subresources in the resource name are valid. For example:/reports: /county/branchid/reportissue: -
Add comments only in a property’s
description:field. Adding a comment using a comment line (for example,#report issue by technician) is not supported by the RAML source editor. Comments added in a comment line are stripped out by the parser.
For a thorough discussion about RAML, see http://raml.org/.
Editing a Custom API
You can always edit an API as long as it’s in the Draft state. A published API can’t be changed.
Your edited version is still in a Draft state and you can continue to edit your custom API until you’re satisfied with the configuration. At that point, you’re ready to publish your custom API. See Publishing a Custom API. If you need to make a change to a published API, you’ll have to create a new version of it. See Creating a New Version of an API.
After you’ve published it, you can then deploy your API to other environments. See API Lifecycle for information on specific parts of an API lifecycle. For general information about lifecycle in MCS, see Lifecycle.
Video: End-to-End Custom API Demo
To see the process of designing and developing a custom API, including how it fits in with a mobile backend and a connector, take a look at this video:
Troubleshooting Custom APIs
When an incorrect value is entered in a field, a message window displays the error and, depending on the field, the correct syntax or value type to use. In some cases (such as when a malformed schema or RAML is uploaded), the error message includes a Show Details link that displays a description of the error. See Viewing Log Messages.
To learn more about common errors that can occur when you configure custom code, see Common Custom Code Errors.
-
If the API was accessed using social identity, then the access token of the provider that was entered in the Authentication header must be the access token of the provider of the target mobile backend (that is, the mobile backend to which the original mobile backend was redirected).
-
If the API was accessed by a mobile user, then the user must be a member of the realm that is associated with the target mobile backend (the mobile backend to which the original mobile backend is being redirected).
