32 Managing an Artifact’s Lifecycle
Mobile backends, APIs, and other artifacts in Oracle Mobile Cloud Service (MCS) each have an independent lifecycle. As a mobile cloud administrator, you can manage the versioning, deployment, and dependency management of each.
In most respects, how an artifact is managed after it’s created is the same regardless of whether it’s a client, mobile backend, collection, connector API, or a custom API. You‘ve learned how to create an artifact, then modify it, and test it. Now that you have a viable artifact, it’s time to publish it, perhaps create new versions or update existing versions and eventually deploy it to another environment for others to test and use.
We'll show you how to take each of these artifacts through its lifecycle phases:
Note:
Remember, to perform operations on artifacts, such as viewing, creating new versions, editing, and so on in an environment, you need the following:-
Permission to perform the operation on the artifact
-
Permission to access the environment containing the artifact
If you can’t access the environment containing the instance of the artifact you want or if you can’t perform an operation on the artifact, ask your mobile cloud administrator for permission.
Realm Lifecycle
Realms go through lifecycle stages similar to other artifacts. You begin by creating a realm and publishing it.
You learned about realms in Creating Realms. Now it’s time to discover how to take a realm through its lifecycle.
If you think you need a better understanding of how artifacts interrelate in the overall MCS lifecycle before exploring the lifecycle of realms, see Lifecycle.
Publishing a Realm
Realms are created and tested in a development environment. They can then be published and deployed to other environments.
Creating a New Version of a Realm
You can create a new version of a realm, which can be in a Draft or Published state.
- Make sure you’re in the environment containing the realm you want.
- Click
 and select Applications > Mobile User Management from the side menu.
 - Click the Realms navigation link.
- Select the realm.
- In the right section, select More > New Version.
- (Optional) Add a brief description that states what distinguishes this version from the previous one.
- Click Create.
Deploying a Realm
You must have Oracle Cloud identity domain administrator permissions to deploy a realm. Only the user schema is migrated during deployment. No mobile app user data is migrated. In the target environment, the realm won’t have any users associated with it.
Sometimes deploying a realm along with its mobile backend and all the dependencies of that mobile backend can result in various permissions issues that can affect the deployment process. You can avoid these issues by deploying just the realm first and then deploying the mobile backends and its dependencies. This ensures that all the dependencies in the underlying security systems are resolved before deploying your mobile backend.
Moving a Realm to the Trash
To learn how dependencies can affect moving an artifact to the trash, see Dependencies That Affect a Move to the Trash. To restore a realm that’s in the trash, see Restoring a Realm.
Restoring a Realm
Managing a Realm
When at least one realm exists, you’ll be taken to the Mobile User Management page every time you click ![]() and select Applications > Mobile User Management from the side menu. On the left side of the page, you see a list of all the mobile backends, their version numbers, and their Draft or Published state (mobile backends in Trash aren’t displayed).
and select Applications > Mobile User Management from the side menu. On the left side of the page, you see a list of all the mobile backends, their version numbers, and their Draft or Published state (mobile backends in Trash aren’t displayed).
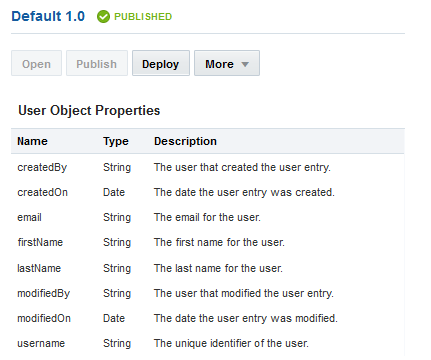
On the upper right side of the Realms page, you can open, test, publish, and deploy your realm. You can view the user object properties defined for this realm also:
-
Click Trash
 to see which realms are in Trash.
-
Click Open to see details about the selected realm.
-
Click Publish to change the state of the realm from Draft to Published.
-
Click Deploy to deploy the realm to another environment.
-
Click More to create a new version, set the realm as the default realm, or move the realm to the trash.
-
Click User Object Properties to see information about the users assigned to the realm.
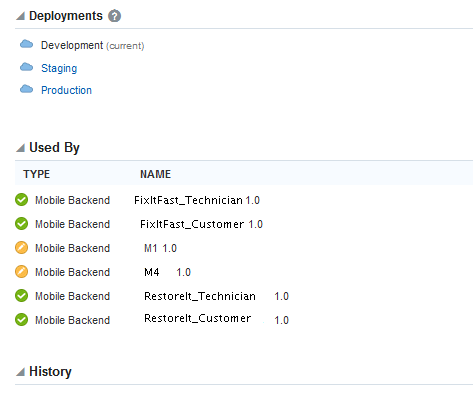
On the lower side of the page, you can examine deployment, usage, and history details:
-
Expand Deployments to see the environments that contain the selected the realm. You are only shown the environments that you have permission to access.
Click on an environment to switch to it.
-
Expand Used By to see the list of mobile backends that are associated with the realm.
-
Expand History to quickly see the latest activity for the realm.
Client Lifecycle
If your mobile app uses push notifications or you want to use analytics to examine and improve your app, you need a client. As a mobile developer, you associate a client, which represents a mobile backend binary, with a mobile backend. Clients go through similar lifecycle phases as other Mobile Cloud Service (MCS) artifacts with a few differences.
MCS can help you manage a client’s lifecycle. You can publish, deploy, and export a client. You can modify its version number and move it to the trash when you don’t need it anymore. Clients are top-level artifacts and their relationships with mobile backends can affect how clients and mobile backends are deployed, exported, imported, and moved to trash. see Client Management for details on creating clients.
If you want a general understanding of how artifacts interrelate in the overall MCS lifecycle, see Lifecycle.
Publishing a Client
Updating the Version Number of a Client
If you need to modify the version number for a draft client, you just need to open that client and change the value in the Version field.
Creating a New Version of a Client
Another reason for creating new versions is to create multiple clients for the same platform if there are multiple mobile app binaries for the same platform that use the same backend.
Note:
Unlike other artifacts, which require that the version number use the Major.minor format, the version number for a client should be the same as the mobile app binary that’s set by the app store. Depending on the version of the mobile app binary, the version could take the format of Major.minor or include an alphanumeric suffix with or without parentheses, a hyphen, space, or full stop. For example:-
1.2
-
1.2 build 3452
-
1.2 (3452)
-
1.2–3452
-
1.2.3 (01–Jun-2016)
- Click
 and select Applications > Client Management from the side menu.
 - Select the client that you want and then select More > New Version.
- Enter a version number. (The same as the mobile app binary set by the app store.)
- Click Save.
Deploying Clients
When you have a published client that you’re satisfied with, you can deploy it to another MCS environment. The Deployment wizard takes you, the mobile cloud administrator, through the process of specifying your target environment, identifying any dependencies, and alerting you to any dependency issues. You'll have the opportunity to view any possible effects that deploying the client could have on other artifacts.
When you deploy a client, the associated mobile backend is automatically deployed with it.
Note:
When you deploy a client, its associated mobile backend is automatically deployed with it. However, if you’re deploying a mobile backend, the client associated with it isn’t deployed.If you deploy a mobile backend without a client associated with it, you’ll have to create a client for it in the target environment.
After the client has been deployed, the copy of the client in the target environment is assigned a new client ID and application key. Also the mobile backend associated with it is given an anonymous access key if HTTP Basic Authentication is enabled or a consumer key if OAuth is enabled. In addition, there's a different base URL for each environment. You'll need to incorporate all of these details into the apps that use this client.
You can view details for the client on the Clients page. The values applicable to that environment are shown in the Keys section, which includes the client application key value. To see the authentication and key information for the mobile backend, go to the Mobile Backends page.
On the Clients page, select your published client and click Deploy to open the Deployment wizard. Go to the links at the top of the wizard to complete these deployment steps:
-
dependencies
-
policies
To learn more about deployment in MCS, see Deployment.
Specifying a Target Environment for the Client
Identifying Dependencies and Deployment Impact
When you deploy a client, the mobile backend that it references is also deployed. You can’t deploy a client unless it’s associated with a mobile backend.
Setting Environment Policies for Clients
Deploying the Client
You can manually add notification profiles to the client in the target environment.
Moving a Client to the Trash
Note:
Moving a client to the trash does not move the associated mobile backend or any profiles referenced by the client to the trash.Restoring a Client
- Make sure that you're in the environment containing the client that you want to restore.
- Click
 and select Applications > Client Management from the side menu.
 - Click Trash (
 ).
). - In the list of items in the trash, click by the client you want and select Restore from Trash.
- Click Restore in the confirmation dialog if there are no conflicts.
Managing a Client
When at least one client exists, you'll be taken to the Clients page every time you click ![]() and select Applications > Client Management from the side menu. On the left side of the page, you see a list of all the clients, their version numbers, and their Draft or Published state (clients in the trash aren't displayed).
and select Applications > Client Management from the side menu. On the left side of the page, you see a list of all the clients, their version numbers, and their Draft or Published state (clients in the trash aren't displayed).
On the Clients page, you can open, test, publish, deploy, see the client dependencies, history, and the environments containing the client:
-
Click Open to see details about the selected client.
-
Click Publish to change the state of the client.
-
Click Deploy to deploy the client to another environment in the same MCS instance.
-
Click More to create a new version, export the client to another instance of MCS, or move the client to the trash.
-
Click Trash (
 ) to see which clients are in the trash.
-
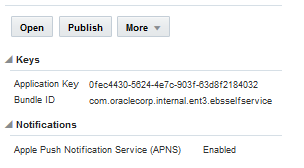
Expand Keys to obtain the values for the client ID and the application key.
To see application key and client ID information for clients deployed to another environment, click on an environment in the Deployments section.
-
Expand Notifications to see which push notifications, if any, are enabled for this client.
On the lower right side of the page, you can view data about the selected client:
-
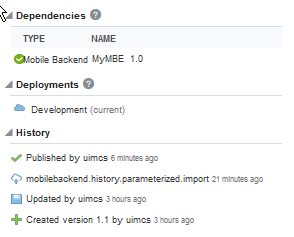
Expand Dependencies to see the mobile backend that this client references.
Note:
Only the mobile backend is listed. If the mobile backend has downstream dependencies, go to Applications > Mobile Backends and view them from the Dependencies section of the selected mobile backend. -
Expand Deployments to see the environments that contain the client. Note: You're only shown the environments that you have permission to access.
Click on an environment to switch to it.
-
Expand History to quickly see the latest activity for the client.
Mobile Backend Lifecycle
You, the mobile developer, have created a mobile backend and now it's time to use it by publishing and deploying it. Remember that after you publish it, it becomes immutable, that is, you can't modify it.
If you want to make a change, you can create a new version of it. Because mobile backends are tightly integrated with custom code, APIs, and other objects in Oracle Mobile Cloud Service, you'll need to consider the relationships and dependencies on those objects.
If you think you need a better understanding of how artifacts interrelate in the overall MCS lifecycle before exploring the lifecycle of mobile backends, see Lifecycle.
Backend Lifecycle States
Relationships with other artifacts create dependencies. For example, your backend might depend on other artifacts, such as collections or APIs. When any artifact changes state, all dependent artifacts must also change states. Oracle Mobile Cloud Service keeps track of any dependencies for you.
Backends have the following activation states that determine whether they can be updated, deleted, or whether or not a new version can be created:
-
Active: Denotes the version of the backend is valid and active.
-
Quiesce: Denotes the version of the backend has become quiet, that is, it no longer supports new requests, and after all currently running requests are completed, it’s changed to Inactive. This is a transitional state.
-
Inactive: Denotes the version of the backend that’s present but not in an active state (that is, not usable).
If a user tries to access an API through an inactive backend, a 404 code is returned.
-
Deleted: Denotes the version of the backend that’s been moved to the trash and susceptible to a hard delete (actually removed from the repository).
Note:
Only mobile cloud administrators can purge (that is, permanently delete) an item in the trash.
Publishing a Mobile Backend
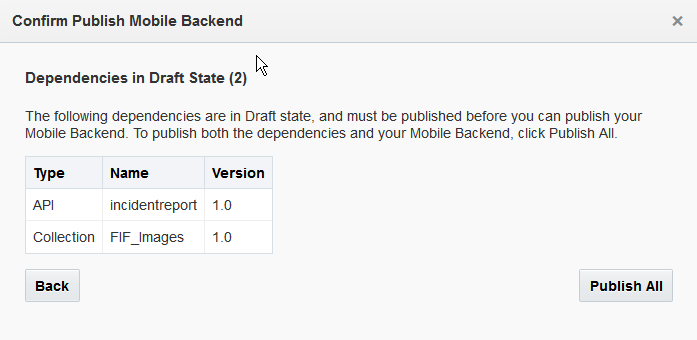
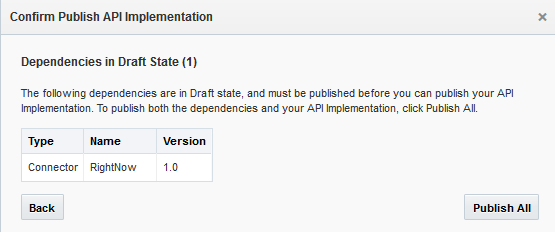
Follow these steps to publish a mobile backend. When a backend is published, all dependencies that aren’t yet published must also be published.
Published mobile backends can be deployed to your staging server or your production server.
Updating the Version Number of a Backend
If you created a new version of a backend using the New Version dialog, you can update its version number if it’s still in a Draft state. This is useful if you need to designate a different version number for it before you publish it or you’ve made a change to the configuration and you need a new version designation.
Creating a New Version of a Backend
When you create a new backend, the version is automatically set to 1.0. As long as the backend is in a Draft state, you can change any aspect of it. As you develop your backend, you can change the version's major and minor version values as you see fit.
You can use a published backend as a root for a new version.
- Make sure you’re in the environment containing the backend.
- Click
 and select Applications > Mobile Backends from the side menu.
 - Select the published backend.
- In the right section, select More > New Version.
The new version is created in a Draft state.
Note:
If the backend is associated with an API, you can’t associate another version of that API with the backend, regardless of whether the backend is in a Draft or Published state. You must create a new version of the backend and associate it with the other API version.Deploying Mobile Backends
The Deployment wizard takes you, the mobile cloud administrator, through the process of specifying your target environment, identifying any dependencies, and alerting you to any dependency issues, such as associated APIs that aren’t deployed yet. You’ll have the opportunity to view any possible effect that deploying the mobile backend could have on other artifacts. Because you’re deploying from one environment to another, the policies applied to the mobile backend in the source environment may need to change in the target environment. You can view and modify these policies before you deploy your mobile backend.
After the mobile backend has been deployed, the copy of the mobile backend in the target environment is assigned a new mobile backend ID and either an anonymous access key if HTTP Basic Authentication is enabled or a consumer key if OAuth is enabled. In addition, there’s a different base URL for each environment. You’ll want to incorporate all of these details into the apps that use the mobile backend. You can view these details on the Mobile Backends page. Select the mobile backend and click one of the environments listed under the Deployments section. The values applicable to that environment are shown in the Keys section.
Select your published mobile backend and click Deploy to open the Deployment wizard. Go to the links at the top of the wizard to complete these deployment steps:
To learn about deployment in MCS, see Deployment.
Specifying a Target Environment for the Mobile Backend
After a mobile backend is published, the Deploy action is enabled. This step shows you how to designate a target environment.
Identifying Dependencies and Deployment Effects
The next two navigation links let you view all the dependencies related to the artifact and whether they’re currently deployed in the target environment. You can also see what impact the deployment might have on other artifacts.
Setting Environment Policies for Mobile Backends
Each environment has policies that govern the behavior of the artifacts within that environment. Policies and policy values in one environment can differ from policies in another environment. For instance, if you’re deploying from a development environment to a runtime environment, you might want a higher degree of logging information in the runtime environment because your artifact will be thoroughly tested there prior to being made publicly accessible. The Policies page is where you can view the policies in both the source and target environments and edit policy values as needed.
Moving a Backend to the Trash
Remove a backend in a by moving it to the trash. A backend in the trash is no longer listed but it’s still viable, that is, it could continue to serve requests. If the backend is needed later on, you can restore it from the trash.
Note:
If a backend is referenced by a client, you can’t move that backend to the trash. If the backend is in Draft state, you can disassociate it from the client by opening the backend, selecting Clients in the navbar and clicking Delete (X) for that client. Then you can move the backend to the trash.An alternative to removing a backend is to deactivate it, in which case it no longer services requests. See Deactivating a Mobile Backend for information.
To find out how dependencies can affect moving an artifact to the trash, see Dependencies That Affect a Move to the Trash. To restore a backend that’s in the trash, see Restoring a Backend.
If you move a backend to the trash that has been redirected to another backend, the redirection still occurs.
Restoring a Backend
- Make sure that you're in the environment containing the backend that you want to restore.
- Click
 and select Applications > Mobile Backends from the side menu.
 - Click Trash (
 ).
). - In the list of items in the trash, click
 by the backend you want and select Restore from Trash.
 - Click Restore in the confirmation dialog if there are no conflicts.
Deactivating a Backend
- Make sure you’re in the environment containing the backend you want to deactivate.
- Click
 and select Applications > Mobile Backends from the side menu.
 - Select your backend and click Manage.
- In the dialog that appears, select Inactive from the drop-down list to deactivate the backend, or Active to reactivate an inactive backend.
- Click Save.
If you deactivate a backend that has been redirected to another backend, the redirection still occurs.
Managing a Mobile Backend
When at least one mobile backend exists, you’ll be taken to the Mobile Backends page every time you click ![]() and select Applications > Mobile Backends from the side menu. On the left side of the page, you see a list of all the mobile backends, their version numbers, and their Draft or Published state (mobile backends in Trash aren’t displayed).
and select Applications > Mobile Backends from the side menu. On the left side of the page, you see a list of all the mobile backends, their version numbers, and their Draft or Published state (mobile backends in Trash aren’t displayed).
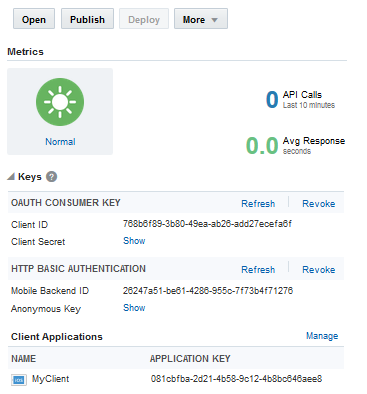
On the upper right side of the Mobile Backends page, you can open, test, publish, deploy, see runtime data about your mobile backend, and get authentication and application key values:
-
Click Trash
 to see which mobile backends are in the trash.
-
Click Open to see details about the selected mobile backend.
-
Click Publish to change the state of the mobile backend from Draft to Published.
-
Click Deploy to deploy the mobile backend to another environment.
-
Click More to create a new version, update an existing version, change the activation state, or move the mobile backend to the trash.
-
Look in the Metrics section to see the number of calls to the API associated with the mobile backend and the average response time.
-
Expand Keys to obtain the values for the mobile backend ID, anonymous key (click Show), and the application key for the associated client.
On the lower right side of the page, you view data about the selected mobile backend:
-
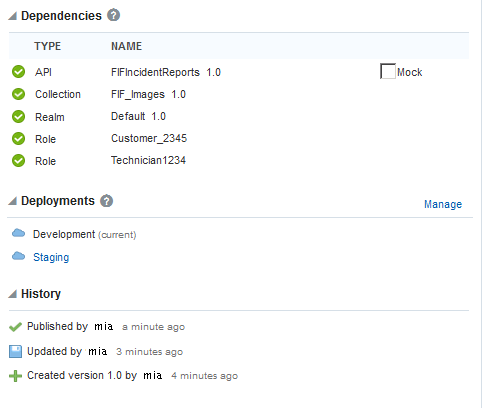
Expand Dependencies to see the artifacts the mobile backend is dependent on.
-
Expand Deployments to see the environments that contain the selected the mobile backend. You are only shown the environments that you have permission to access.
Click on an environment to switch to it.
Click Manage to change the activation state of the mobile backend.
-
Expand History to quickly see the latest activity for the selected mobile backend.
To see metrics information for mobile backends in another environment, for example Staging, switch to it by selecting Staging from the environment drop-down list (across from Metrics). Select Staging from the environment list across from Keys to see the HTTP Basic Authentication values in the Staging environment for the Mobile Backend ID, Anonymous Key, and Application Key fields.
To see metric and key information for mobile backends in the Production environment, choose Production from the environment drop-down lists.
Mobile Client SDK Demo Applications
The mobile client SDK provides a single demo application, FixItFast, which runs on each of the MCS-supported vendor platforms, iOS and Android.
FixItFast simulates an enterprise company application very close to what can be found in the real world. Its purpose is to give application developers a good idea of what’s possible and how this mobile application can be set up and run with MCS.
API Lifecycle
The lifecycle stages of custom APIs and API implementations are similar. Both artifacts go through a design-time phase where each is created, tested, edited, and then published.
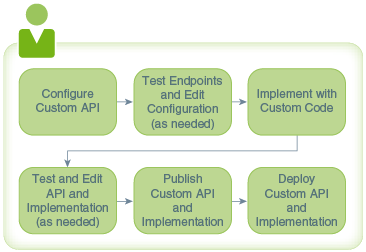
The following figure shows the life stages of custom APIs and their implementations:
When you create a new custom API, its version is automatically set to 1.0 and it’s considered to be in a Draft state. In the Draft state, you can test and edit your API as often as needed.
When you’re satisfied with your API configuration, publish it with the understanding that a published API can’t be changed. APIs are implemented with custom code. To make a change to a published API, create a new version of the API. For custom APIs, you'll also need to create a new implementation for the new version.
As you develop your API, you can change the version's major and minor values as you see fit, that is, creating a new version of your API or updating an existing version. After you've implemented, tested, and published your API, you can deploy it to one or more environments (for example, you can deploy from a development environment to one or more runtime environments if you have multiple environments). Eventually, the API may become obsolete, and you can move it to the trash.
If you think you need a better understanding of how artifacts interrelate in the overall MCS lifecycle before exploring the lifecycle of custom APIs, see Lifecycle.
Publishing a Custom API
Before you can deploy a custom API, you must publish it first. As soon as it’s published, the API can’t be changed. You can create a new version of it, but you cannot edit it.
Note:
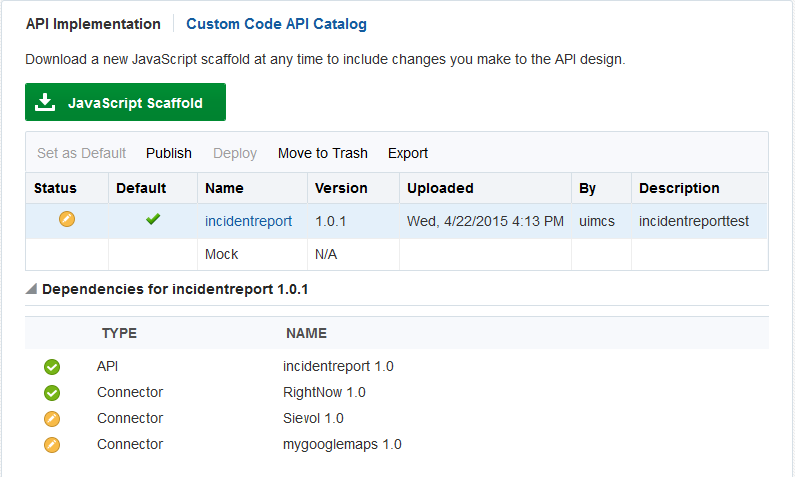
You must have an implementation associated with the API to publish it. A mock implementation is provided by default. To associate an implementation other than the mock implementation, open the API, and click Implementations in the left navigation bar. Select the implementation you want and click Set as Default.
When the API is published, you’re returned to the APIs page where you can see the updated status of your API.
Note:
Custom APIs can be published independently of implementations. When you publish an API, the implementation isn’t published automatically. To understand the relationship between custom APIs and their implementations, see Custom APIs and API Implementations.Custom APIs and API Implementations
Oracle Mobile Cloud Service tracks a custom API as it's created, saved, published, deployed, implemented, deactivated, and reactivated. Custom APIs can be published independently or when a related mobile backend is published. The relationship between custom APIs and their implementations is given in the following sections.
Scope and Version Format
Both custom APIs and API implementations have versions that use the format Major.minor.
Active Versions
If you have multiple environments, each environment can contain multiple active versions of a custom API.
Though there can be multiple active versions of an API implementation per environment, only a single implementation version is mapped to a specific API version.
Draft and Published States
Both custom APIs and API implementation can have a Draft state or a Published state. A custom API can be published independently or published when a related mobile backend is published.
An API implementation can be published independently.
Actions Tracked by Oracle Mobile Cloud Service
MCS tracks the following operations for custom APIs: Create, Update, Publish, and Move to Trash.
MCS tracks the following operations for API implementations: Create and Save.
Number of APIs Referenced From a Mobile Backend
A mobile backend can reference multiple APIs, with each API having a specific version. That is, only one version of a given API can be referenced by a mobile backend. For example, a mobile backend can’t reference both myAPI1.1 and myAPI2.0, but it can reference both myAPI1.1 and yourAPI2.0.
An API implementation isn’t referenced directly by a mobile backend. The implementation is referenced by the API version, which is in turn referenced by the mobile backend.
Dependencies
A custom API is dependent on the active API implementation (as determined by the environment policy).
An API implementation is dependent on the API that implements it and other APIs that custom code call (as listed in the file manifest).
In reverse, mobile backends and API implementations are dependent on custom APIs. For an API implementation, it is a dependency of any APIs that list it as the active or default implementation.
Environment Policy Attributes
A custom API is affected by the API version to implementation policy mapping and the default API version setting.
An API implementation is affected by the number of node instances per virtual machine and standard runtime policies such as read-only, log-levels, etc.
At deployment, the API version to implementation policy mapping must be set in the target environment for a custom API. When deploying an API implementation, any policy that is referenced must be defined in the target environment.
For descriptions of environment policies and their values, see Oracle Mobile Cloud Service Environment Policies.
Updating the Version Number of an API
If you created a new version of an API using the New Version dialog, you can update the version number of the API if it’s still in a Draft state. This is particularly useful if you need to designate a different version number for it before you publish the API.
Creating a New Version of an API
You can make a new version of a custom API regardless of whether it’s in a Draft or Published state. When you create a new version of a custom API, you are basically cloning the API configuration and making changes to it alone. You can specify the implementation to associate with the new version of the API. You can upgrade your custom API easily by creating a new version of it:
Deploying APIs
To make a custom API accessible for use, it needs to be deployed to a runtime environment. Generally, a custom API would get deployed at the same time as the mobile backend with which it’s associated. When a new version of a custom API is published, it can be deployed to a target environment.
If you deploy an artifact that depends on an API not currently in the target environment, that API is automatically deployed, however, you won't be able to select the implementation for that API. If that API can’t be deployed (due to version conflict or not being in Published state, for example), the deployment process stops.
The Deployment wizard takes you, the mobile cloud administrator, through the process of specifying your target environment, identifying any dependencies and alerting you to any dependency issues, such as the implementation associated with the API is a mock implementation. You’ll have the opportunity to view any possible effects that deploying the API could have on other artifacts. Because you’re deploying from one environment to another, the policies applied to the API in the source environment may need to change in the target environment; you can view and modify these policies before you deploy your API.
Select your published custom API and click Deploy to open the Deployment wizard. Go to the links at the top of the wizard to complete these deployment steps:
To learn about deployment in MCS, see Deployment.
Identifying Dependencies and Deployment Effects
The next two navigation links let you view all the dependencies related to the artifact and whether they’re currently deployed in the target environment. You can also see what impact the deployment might have on other artifacts.
Setting Environment Policies for APIs
Each environment has policies that govern the behavior of the artifacts within that environment. Policies and policy values in one environment can differ from policies in another environment. For instance, if you’re deploying from a development environment to a runtime environment, you might want a higher degree of logging information in the runtime environment because your artifact will be thoroughly tested there prior to being made publicly accessible. The Policies page is where you can view the policies in both the source and target environments and edit policy values as needed.
Moving a Custom API to the Trash
Remove a custom API by moving it to the trash. If the API is needed later, you can restore it from the trash.
Restoring a Custom API
- Make sure that you're in the environment containing the custom API that you want to restore.
- Click
 and select Applications > APIs from the side menu.
 - Click Trash (
 ).
). - Make sure APIs is selected in the trash drawer.
- In the list of items in the trash, click
 by the API you want and select Restore from Trash.
 - Click Restore in the confirmation dialog if there are no conflicts.
Restoring an artifact can cause conflicts if a duplicate artifact already exists. To restore an artifact when a duplicate artifact exists, see Restoring an Artifact.
Managing an API
After you create a custom API, you’ll want to edit it, publish it, see what implementations are associated with it, in short, you want to be able to manage the API and examine details of the APIs created by other service developers. The APIs page gives you access to all these features.
When at least one custom API exists, you’ll be taken to the APIs page every time you click ![]() and select Applications > APIs from the side menu. On the left side of the page, you’ll see a list of all the custom APIs except for those in the trash. You can see which APIs are in the Draft state and which are in the Published state. Every API is listed by its name and version number.
and select Applications > APIs from the side menu. On the left side of the page, you’ll see a list of all the custom APIs except for those in the trash. You can see which APIs are in the Draft state and which are in the Published state. Every API is listed by its name and version number.
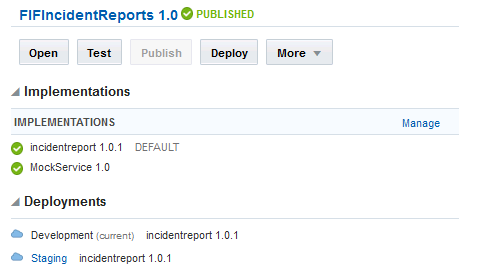
The right side of the page is where you can open, test, publish, and examine data about your custom API.
On the upper right side of the APIs page, you can perform the following actions:
-
Click Open to view details and settings for the selected custom API.
-
Click More to create a new version, update an existing version, or move an API to the trash.
-
Expand Implementations to see what implementations are available, along with their version numbers and whether they are in a Draft or Published state. Click Manage to go directly to the Implementations page.
-
Expand Deployments to see the environments that contain the selected the API. You are only shown the environments that you have permission to access.
Click on an environment to switch to it.
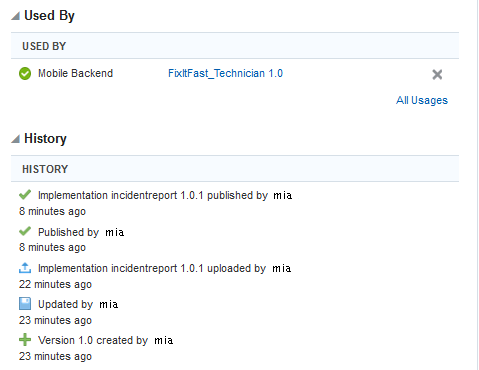
On the lower right side of the page, you view data about the selected API:
-
Expand Used By to see the list of the backends that call on the API.
Click All Usages to see the complete list.
-
Expand the History section to quickly see the latest activity for the selected custom API.
API Implementation Lifecycle
After you have an API implementation in a Draft state that’s configured and tested, you’re ready to publish and deploy it to another environment. API implementations go through the same lifecycle phases as APIs, in addition to being published and deployed, new versions can be created, existing versions can be updated, and obsolete implementations can be moved to the trash.
Remember that after an API implementation is published, it can’t be changed. If you’re still configuring and testing the implementation, keep it in a Draft state until it’s ready for the next phase of the lifecycle.
If you think you need a better understanding of how artifacts interrelate in the overall MCS lifecycle before exploring the lifecycle of API implementations, see Lifecycle.
Publishing an API Implementation
Creating a New Version or Updating the Version of an API Implementation
Implementations can be published independently of APIs and can have separate versions as well. This lets you make changes to a published implementation, such as minor modifications or bug fixes, without requiring the API itself to be updated. You can create a new version of an API Implementation that is in a Draft or Published state. If you want to make changes to a published implementation, you must create a new version of it.
If you have previously uploaded an implementation with a given version specified and that implementation is still in a Draft state, you can replace that version without incrementing the version number. This might be desirable if you’ve uploaded the implementation and find, after testing the implementation, that there are further changes that you need to make before you can publish the changes. After you’ve published a version, that version is final.
You can also update the version number of an implementation in a Draft state. The process for both is the same. You set the version attribute in the implementation’s package.json file.
- Open the
package.jsonfile and change theversionattribute. For example, change“version”:”1.0”to“version”:”1.1”. - Upload a zip file of the modified implementation to the associated API version.
-
Implementation versions are maintained independently of API versions. When you publish an API, the implementation isn’t published automatically.
-
When you upload a new version of an implementation, it becomes the default version (active implementation) for that API. You can change the default version in the API’s Implementations page.
-
The custom API’s
Routing_BindApiToImplpolicy defines the association between an API version and the implementation version.
Deploying an API Implementation
When an API implementation is published, it can be deployed to a target environment. Note that you must be a mobile cloud administrator to deploy an implementation. The Deployment wizard takes you through the process of specifying your target environment, identifying any dependencies and alerting you to any dependency issues, such as connectors that the implementation is associated with. You’ll have the opportunity to view any possible effect that deploying the API implementation could have on other artifacts. Because you’re deploying from one environment to another, the policies applied to the API implementation in the source environment may need to change in the target environment; you can view and modify these policies before you deploy your implementation.
Select your published custom API and click Deploy to open the Deployment wizard. Go to the links at the top of the wizard to complete these deployment steps:
To learn about deploying artifacts in MCS, see Deployment.
Identifying Dependencies and Deployment Effects
The next two navigation links let you view all the dependencies related to the artifact and whether they’re currently deployed in the target environment. You can also see what impact the deployment might have on other artifacts.
Setting Environment Policies for an API Implementation
You’re almost ready to deploy the API implementation. Each environment has policies that govern the behavior of the implementation within that environment. Policies and policy values in one environment can differ from policies in another environment. For instance, if you’re deploying from a development environment to a runtime environment, you might want a higher degree of logging information in the runtime environment because your artifact will be thoroughly tested there prior to being made publicly accessible. The Policies page is where you can view the policies in both the source and target environments and edit policy values as needed.
Deploying the Implementation
Moving an API Implementation to the Trash
Remove an API implementation by moving it to the trash. If the implementation is needed later, you can restore it from the trash.
To find out how dependencies can affect moving an artifact to the trash, see Dependencies That Affect a Move to the Trash. To restore an API implementation that’s in the trash, see Restoring an API Implementation.
Restoring an API Implementation
- Make sure that you're in the environment containing the API implementation that you want to restore.
- Click
 and select Applications > APIs from the side menu.
 - Select the API associated with the implementation.
- Click Trash (
 ).
). - Select Implementations in the trash drawer.
- In the list of items in the trash, click
 by the implementation you want and select Restore from Trash.
 - Click Restore in the confirmation dialog if there are no conflicts.
Restoring an artifact can cause conflicts if a duplicate artifact already exists. To restore an artifact when a duplicate artifact exists, see Restoring an Artifact.
Connector Lifecycle
The lifecycle stages of all connectors are the same. Each type of connector goes through a design-time phase where each is created, tested, edited, and then published.
For all connectors, there are the creation phase, the testing and editing phase, the publishing phase, and the deployment phase. When you create a new connector, its version is automatically set to 1.0 and it’s considered to be in a Draft state. In the Draft phase, you can test and edit your API as often as needed. When you’re satisfied with your connector configuration, publish it with the understanding that a published connector can’t be changed.
As you develop your connector, you can change the version's major and minor values as you see fit, that is, creating a new version of your API or updating an existing version. After you've implemented, tested, and published your connector, you can deploy it to one or more environments (for example, you can deploy from a design time environment to one or more runtime environments if you have multiple environments). Eventually, a connector may become obsolete, and you can move it to the trash.
If you think you need a better understanding of how artifacts interrelate in the overall MCS lifecycle before exploring the lifecycle of connectors, see Lifecycle.
Publishing a Connector
Before you can deploy a connector, you must publish it first:
Updating the Version Number of a Connector
If you created a new version of a connector using the New Version dialog, you can update the version number of the connector if it’s still in a Draft state. This is particularly useful if you want to create an alternate version of the current connector or need to designate a different version number before you publish the connector.
Creating a New Version of a Connector
You can make a new version of a connector regardless of whether it’s in a Draft or Published state. When you create a new version of a connector, you’re basically cloning the connector configuration and making changes to it. You can make minor changes or expand upon already defined functionality to create a backward-compatible API. A major update, however, can result in a disruption of mobile services to your customers due to invalid values being requested or returned, an inability to read the same file formats as the previous version, and so on. Major changes, therefore, aren’t backward-compatible.
Deploying Connectors
To make your connector accessible for use, it needs to be deployed to a runtime environment. When a new version of a connector is published, it can be deployed to a target environment. The Deployment wizard takes you, the mobile cloud administrator, through the process of specifying your target environment, identifying any dependencies, and alerting you to any dependency issues, such as an API implementation that calls on the connector. You’ll have the opportunity to view any possible effects that deploying the API could have on other artifacts. Because you’re deploying from one environment to another, the policies applied to the API in the source environment may need to change in the target environment; you can view and modify these policies before you deploy your connector.
Select your published connector and click Deploy to open the Deployment wizard. Go to the links at the top of the wizard to complete these deployment steps:
To learn about deploying artifacts in MCS, see Deployment.
Identifying Dependencies and Deployment Effects
The next two navigation links let you view all the dependencies related to the artifact and whether they’re currently deployed in the target environment. You can also see what impact the deployment might have on other artifacts.
Setting Environment Policies for Connectors
You’re almost done with the deployment. Each environment has policies that govern the behavior of the artifacts within that environment. Policies and policy values in one environment can differ from policies in another environment. For instance, if you’re deploying from a development environment to a runtime environment, you might want a higher degree of logging information in the runtime environment because your artifact will be thoroughly tested there prior to being made publicly accessible. The Policies page is where you can view the policies in both the source and target environments and edit policy values as needed.
Moving a Connector to the Trash
Remove a connector by moving it to the trash. If the connector is needed later, you can restore it from the trash.
To find out how dependencies can affect moving an artifact to the trash, see Dependencies That Affect a Move to the Trash.
To restore a connector that’s in the trash, see Restoring a Connector.
Restoring a Connector
- Make sure that you're in the environment containing the connector that you want to restore.
- Click
 and select Applications > Connectors from the side menu.
 - Click Trash (
 ).
). - In the list of items in Trash, click
 by the connector you want and select Restore from Trash.
 - Click Restore in the confirmation dialog if there are no conflicts.
Managing a Connector
After you create a connector, you’ll want to edit it, publish it, see what artifacts are associated with it, in short, you want to be able to manage the connector and examine details of the connectors created by other service developers. The Connectors page gives you access to all these features.
When at least one connector exists, you’ll be taken to the Connectors page every time you click ![]() and select Applications > Connectors from the side menu. On the left side of the page, you see a list of all the connectors except for those in the trash. You can see which connectors are in the Draft or Published state. Every connector is listed by its name and version number.
and select Applications > Connectors from the side menu. On the left side of the page, you see a list of all the connectors except for those in the trash. You can see which connectors are in the Draft or Published state. Every connector is listed by its name and version number.
The right side of the Connectors page is where you can open, test, publish, or examine data about the connector:
On the right side of the page, you can perform the following actions:
-
Click Open to see details about the selected connector.
-
Click More to create a new version, update an existing version, or move an connector to the trash.
-
Expand Deployments to see the environments that contain the selected the connector. You are only shown the environments that you have permission to access.
Click on an environment to switch to it.
-
Expand Used By to see the list of the implementations that call on the connector.
-
Expand History to quickly see the latest activity for the connector.
Collection Lifecycle
The collection lifecycle involves moving from the Draft state to the Published state and finally deploying to the outside world.
Publishing is the prerequisite to deploying a collection. After you publish a collection, it can’t be modified. While you can publish a collection and also create a new version of a collection, you can also remove a collection as described in Moving a Collection to the Trash.
If you think you need a better understanding of how artifacts interrelate in the overall MCS lifecycle before exploring the lifecycle of collections, see Lifecycle.
Publishing a Collection
You create a collection within the context of a backend. When you’re satisfied with that collection, you can publish it.
-
Make sure you’re in the environment containing the collection that you want to deploy.
-
Click
 and select Applications > Storage from the side menu.
-
Select the collection you want to publish.
-
In the Details section on the right, click Publish.
Note:
You can publish a draft collection whenever you feel that it’s complete. After it's published, however, it can't be changed.A collection can also be published involuntarily when a backend associated with a collection is published. If the associated collection isn’t yet published, it will be published automatically to support the backend.
When a collection is published:
-
Its metadata (its description and access roles) are frozen. To update the collections metadata, you must create a new version.
-
The major version (given the version that you arbitrarily defined) is incremented.
-
It’s no longer in your personal development space. It’s available for anyone with the proper permissions to associate with a backend.
-
Instance data isn’t moved with the collection.
Note:
Instance data (such as actual user objects or actual collection objects stored in collections) is typically created at runtime, or by user scripts or code as part of a configuration. It isn't moved with the collection.
The published collection can be deployed to different environments.
Updating the Version Number of a Collection
When you update a version, the new number is backward-compatible and the collection history continues.
-
Make sure you’re in the environment containing the collection that you want to update.
-
Click
 and select Applications > Storage from the side menu.
-
Select a collection.
-
In the Details section, select More > Update Version Number.
-
Specify an optional comment and click Update.
The collection history reflects the incremented number.
Creating a New Version of a Collection
You can’t copy a collection, but you can save yourself some time by creating a new version of an existing collection. If you create a new version, you’ll have the same data. It is possible to rename the collection and reset the version as long as the collection is in a Draft state.
If you want a collection that starts with 1.0 and that has the same data as another collection, you must make a new collection and import the data.
When you create a new version number, an independent collection is spawned from that point with a new history that’s unrelated to the previous collection. Any data is carried forward to the new version.
Note:
A collection can’t have more than one version of an object.-
Make sure you’re in the environment containing the collection that you want.
-
Click
 and select Applications > Storage from the side menu.
-
Select a collection.
-
In the Details section on the right, select More > New Version.
-
Specify an optional comment and click Update.
Deploying a Collection
When a collection is published, it can be deployed to a target environment. The Deployment wizard takes you, the mobile cloud administrator, through the process of specifying your target environment, identifying any dependencies, and alerting you to any dependency issues, such as the realm the collection is associated with. You’ll have the opportunity to view any possible effect that deploying the collection could have on other artifacts. Because you’re deploying from one environment to another, the policies applied to the collection in the source environment may need to change in the target environment; you can view and modify these policies before you deploy your collection.
-
Make sure you’re in the environment containing the collection that you want to deploy.
-
Click
 and select Applications > Storage from the side menu.
-
Select the collection that you want to deploy.
-
In the right panel, click Deploy.
The Source Environment field is read-only and automatically defaults to the current environment of the collection.
-
Specify the target environment.
Only the environments for which you have deployment permission are listed.
If the artifact you want to deploy has dependencies, you’ll have to resolve those dependencies before attempting to deploy.
-
(Optional) Enter a comment about the deployment.
-
Skip Dependencies and move on to the Impact page.
The Dependencies page shows you the dependencies for the artifact being deployed. Because collections have no dependencies, you can skip this page.
-
Click Impact.
The Impact page lists artifacts in the target environment that are affected when the realm is deployed. The data displayed is for your information only. Assess the effects and determine whether or not to proceed with the deployment.
-
Click Policies.
-
Click Export to see a
difffile of thepolicies.propertiesfile showing the policies in both the source and target environments. -
(Optional) Edit a policy as needed.
The policies that you’ll want to set at deployment are:-
Logging_Level: Sets the logging level. -
Sync_CollectionTimeToLive: Sets the amount of time that data requested by a mobile application is stored in the cache.
For a description of environment policies and their default values, see Oracle Mobile Cloud Service Environment Policies. To learn about environment policies, including scope and naming formats, see Environment Policies.
-
-
If you modified the
policies.propertiesfile, click Import to load it into the target environment.
-
-
Click Confirm and view the deployment configuration, then click Deploy.
Moving a Collection to the Trash
Remove a collection by moving it to the trash. Moving a collection to the trash means it’s no longer listed but it’s still viable. If the collection is needed later, you can restore it.
-
Make sure that you’re in the environment containing the collection you want to remove.
-
Click
 and select Applications > Storage from the side menu.
-
Select the collection you want to remove.
-
In the Details section on the right, select More > Move to Trash.
-
Click Trash in the confirmation dialog if there are no dependency issues.
If you think you or someone else might restore it later on, enter a brief comment about why you're putting this item in the trash.
Although only a mobile cloud administrator can purge a collection (eliminate it permanently), you can delete an object in a collection using the command-line operation, DELETE.
To find out how dependencies can affect moving an artifact to the trash, see Dependencies That Affect a Move to the Trash.
To restore a collection in the trash, see Restoring a Collection.
Restoring a Collection
- Make sure that you're in the environment containing the collection that you want to restore.
- Click
 and select Applications > Storage from the side menu.
 - Click Trash (
 ).
). - In the list of items in the trash, click
 by the collection you want and select Restore from Trash.
 - Click Restore in the confirmation dialog if there are no conflicts.
Managing a Collection
After you create a collection, you’ll want to edit it, publish it, and in short, manage the collection and examine details of collections created by other mobile developers. The Storage page gives you access to all these features.
When at least one collection exists, you’ll be taken to the Storage page every time you click ![]() and select Applications > Storage from the side menu. On the left side of the page, you’ll see a list of all the collections except for those in the trash. You can see which collections are in the Draft state and which are in the Published state. Every collection is listed by its name and version number.
and select Applications > Storage from the side menu. On the left side of the page, you’ll see a list of all the collections except for those in the trash. You can see which collections are in the Draft state and which are in the Published state. Every collection is listed by its name and version number.
-
Click Open to see details about the selected collection.
-
Click Publish to change the state of your collection from Draft to Published.
-
Click Deploy to deploy your published collection to another environment.
-
Click More to create a new version, update an existing version, associate the collection with a backend, or move a collection to the trash.
-
Expand Deployments to see the environments that contain the selected the collection. You are only shown the environments that you have permission to access.
Click on an environment to switch to it.
-
Expand Used By to see which backends are associated with the collection. To disassociate the selected collection from an artifact that uses it, click X next to the artifact’s name.
-
Expand the History section to quickly see the latest activity for the selected collection.
