30 Lifecycle
Oracle Mobile Cloud Service (MCS) has a UI to simplify management of the lifecycle of your mobile backends, APIs, and other artifacts. As a mobile cloud administrator, you use these features to deploy mobile backends, APIs, and other artifacts and to manage the versions of these artifacts.
To this point in the guide, we’ve largely focused on the things that members of your team do to create and configure mobile backends and use and develop APIs. Now it's time to start talking about what you, as the mobile cloud administrator, need to do to get these artifacts into production (deployment) and the overall aspects of maintaining them and pushing out new versions (lifecycle).
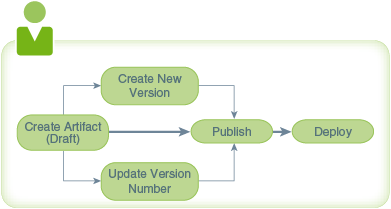
The artifacts you’ll be working with most often are mobile backends, custom APIs, connector APIs, collections, and realms. In general, the same lifecycle phases apply to all of these artifacts. Throughout the development and testing phases of a project, these artifacts can be created and edited in a Draft state, then published and deployed to various environments, or moved to the trash.
All of these artifacts are automatically assigned a version of 1.0 when they’re created. During their lifecycle, new versions can be created and updated. To manage your deployments most effectively, you’ll need to understand each of these lifecycle phases, how you can work with an artifact through each of its phases, and manage the interactions of associated artifacts within various environments.
Lifecycle Basics
There are some basic Oracle Mobile Cloud Service (MCS) lifecycle concepts that you should become familiar with as you design, create, examine, or manage artifacts:
If you’re a mobile cloud administrator, you can also permanently delete (that is, purge) an artifact from MCS. See Purging an Artifact
To help you better understand how these phases of a lifecycle affect artifacts in MCS, see Lifecycle Scenarios.
Draft State
When you create an artifact, whether it’s a client, a collection, a custom API or any other type, the artifact has a Draft status. With a Draft version of an artifact, you can edit, create a new version, update an existing version, or remove the artifact (move it to the trash).
While an artifact is in the Draft state, you can experiment with it, modify it as many times as you need to, and test it thoroughly. You publish the artifact when you’re satisfied with its configuration and can deploy it to another environment. See Deployment.
Published State
When a specific version of an artifact is final, you can publish it. After it’s published, that version of the artifact can no longer be edited. If you create a new version of an artifact that’s in a Draft or Published state, the new version is created in the Draft state.
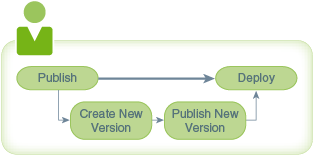
The following figure shows the basic lifecycle phases of a published artifact from becoming published to being deployed:
If there are no dependency issues, a published artifact can be deployed to another environment. If you need to modify the artifact, you can create a new version of it and modify the new version. Because the new version is in the Draft state, you’ll need to publish it before you can deploy it.
You can have multiple versions of an artifact in the same environment. To deploy it to another environment, an artifact must be in a Published state. You can deploy different versions of an artifact to different environments. For example, lets say you have a development environment called Development and two runtime environments, Staging and Production. You could have API_X version 1.0 in Development, API_X version 1.5 in the Staging, and API_X version 1.3 in Production.
If you’ve published an artifact by mistake or realize after it’s been published that you need to make a change, you can create a new version of the artifact and make your changes to it. When you’re satisfied with the configuration of the new version, you can publish it. Note that you can have multiple versions of an artifact within a single environment or across multiple environments. For API implementations, MCS automatically makes the latest version the default when the implementation is initially loaded. If the most recent version loaded isn’t the implementation that you want associated with your API, you must explicitly specify a previously loaded implementation as the default.
You have the choice of keeping the previous version of an artifact as long as it’s needed or moving it to the trash (removing the artifact from the main view). In the case of a mobile backend, you also have the option of changing its activation state to inactive. Artifacts in the trash are still accessible at runtime. For example, if you have a mobile backend that calls My_API and someone moves My_API to the trash, the mobile app can still call the mobile backend and My_API.
All artifacts can be published independently and some can also be published when you publish their associated artifacts. For example, you can publish an API independently or the API can be published when you publish its associated mobile backend.
When publishing an artifact, it’s checked for any dependencies and whether or not those dependencies are already published. You'll be able to see the list of dependencies and can decide whether or not to proceed with publishing your artifact. If you decide to publish, any unpublished dependencies may be published too.
The Lifecycle Comparisons table compares the Draft and Published states, behavior, and dependency considerations for mobile backends, collections, custom APIs, and connector APIs:
| Condition/Artifact | Actions permissible in Draft state | Actions permissible in Published state | Number of active versions per environment | Dependencies |
|---|---|---|---|---|
|
Mobile Backend |
Edit Create new version Update version Publish Manage activation Move to Trash |
Create new version Manage activation Move to Trash Deploy |
Multiple |
Realm Collection Custom APIs Connector APIs Roles |
|
Collection |
Edit Associate a mobile backend Create new version Update version Publish Move to Trash |
Create new version Move to Trash Deploy |
Multiple |
Roles |
|
Custom API |
Edit Create new version Update version Publish Move to Trash |
Create new version Move to Trash Deploy |
Multiple (Note: Only one API version per mobile backend version) |
Roles, Connector APIs, Custom APIs |
|
Connector |
Edit Create new version Update version Publish Move to Trash |
Create new version Move to Trash Deploy |
Multiple |
None |
|
Realm |
Edit Create new version Publish Move to Trash Make default |
Create new version Make default Move to Trash Deploy |
Multiple |
None |
Oracle Mobile Cloud Service assigns a version of 1.0 to every newly created artifact. You can change the version number of an artifact in the Draft state at any time.
Making Changes After a Backend is Published (Rerouting)
If you need to make backend fixes to your app, but the app’s backend is already in production, there is a way that you can incorporate those changes into your app without having to recompile it — reroute the call to the backend.
Using a policy, you can reroute the call your app makes to the backend to a different backend that contains the needed fixes. First, publish the backend that contains the fix. Then, set the Routing_RouteToBackend policy, which lets you specify the original backend and redirect the call to the target backend with the fixes. Because your app is calling the original backend, there's no change to the ClientID or ClientSecret, which would require you to recompile the app binary.
Rerouting the call to a backend is useful when you want to make a minor fix that requires a change to the backend’s metadata. Some instances where rerouting a published backend is useful:
-
Making modifications to an API or a connector, such as adding an endpoint that you forgot.
-
Changing the access permissions for an API.
-
Changing the access permissions for a storage collection.
-
Changing the offline sync property of a storage collection.
-
Adding a storage collection to a backend, such as when you want to include a more efficient API implementation that needs storage for caching purposes.
-
You have a change to the backend and you want to distribute the backend that has the fixes to other instances.
Note:
TheRouting_RouteToBackend policy should also be set when you’re exporting or importing a package containing the target backend.
You can set Routing_RouteToBackend to specify that any API calls within the context of any version of the original backend are routed to the target backend:
-
OriginalBackend
.*.Routing_RouteToBackend=TargetBackend(X.X) -
OriginalBackend(A.A)
.*.Routing_RouteToBackend=TargetBackend(X.X)
For example: FiF_Customer.*.Routing_RouteToBackend=FiF_Customer(3.2)
Any API calls sent to any version of FiF_Customer are sent to FiF_Customer, v3.2.
Note:
You can’t use wildcards (*) in version values when setting theRouting_RouteToBackend policy.
You can also specify a particular version of the backend to route to a specific version of it. For example: FiF_Customer(1.3).*.Routing_RouteToBackend=FiF_Customer(3.5)
Any API calls sent to FiF_Customer, v1.3 are sent to FiF_Customer, v3.5.
Note:
If more than one redirect policy is defined for the backend, the policy defined with the fully-qualified backend takes precedence.A call can be redirected to any backend, not just another version of the same backend. For example: FiF_Customer(1.3).*.Routing_RouteToBackend=RepairIt(1.0)
Any API calls to FiF_Customer, v1.3 are sent to the backend RepairIt, v1.0.
You can also create a chain of rerouted calls to a backend. For example, a call to backend_A can be rerouted to backend_B. A second routing policy could redirect any calls to backend_B to backend_C. This would result in a call to backend_A being redirected to backend_C.
Packaging a Rerouted Backend
If you are exporting or importing a backend that is being rerouted, the Dependencies page includes a "Redirect to" statement that specifies the immediate target backend. Using the previous example, if a rerouting chain exists, and backend_A is being exported, the Dependencies page indicates a reroute to backend_B. Also, the policies.properties file lists only the routing policy for the backend in the package (backend_A).
Conditions for Rerouting a Backend
The following conditions apply whenever you reroute a backend:
-
The original backend can be in an inactive state and be rerouted.
-
If the app calls the original backend, notifications are sent and devices are registered using the client credentials associated with the original backend. However, if the app calls the target backend directly, then the clients from the target backend are used to send the notifications and register devices.
-
If Social Identity is used to access an API and its associated backend is rerouted, the social authentication provider of the target backend should be selected and the access token from that provider should be entered in the Authentication section of the API Test page.
-
If the original backend is exported, the target backend is not considered to be a dependency of the original.
-
Generally, if either the original or target backend is included in an export or import package, the routing policy should be set when the export package is created or when the contents of the package are imported.
-
When a backend is rerouted, the system log records the event. You can see which backends are being redirected from the log messages.
Deployment
While creating and publishing artifacts can be performed by different roles, deployments are performed only by mobile cloud administrators. The ability to deploy presumes that you have a multi-environment instance of MCS. Deploying from a development environment to a runtime one enables your QA team to further test your artifact to ensure it’s ready for wide use internally or by customers. You may even have an environment that you specifically deploy artifacts to so they are accessible for real world use.
As a mobile cloud administrator, you must ensure that the environment that you’re deploying to is different from the environment that currently contains the published artifact (the source environment). To help you with deployment, Oracle Mobile Cloud Service verifies the following when you deploy an artifact:
-
The artifact has a Published status and all of its dependencies are published.
-
You have deployment permission in both the source environment and target environment.
-
All deployment-ready dependencies that aren’t in the target environment are identified and deployed along with your artifact.
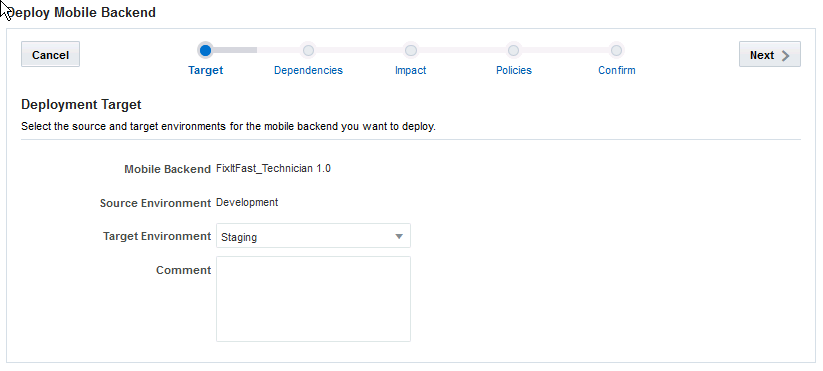
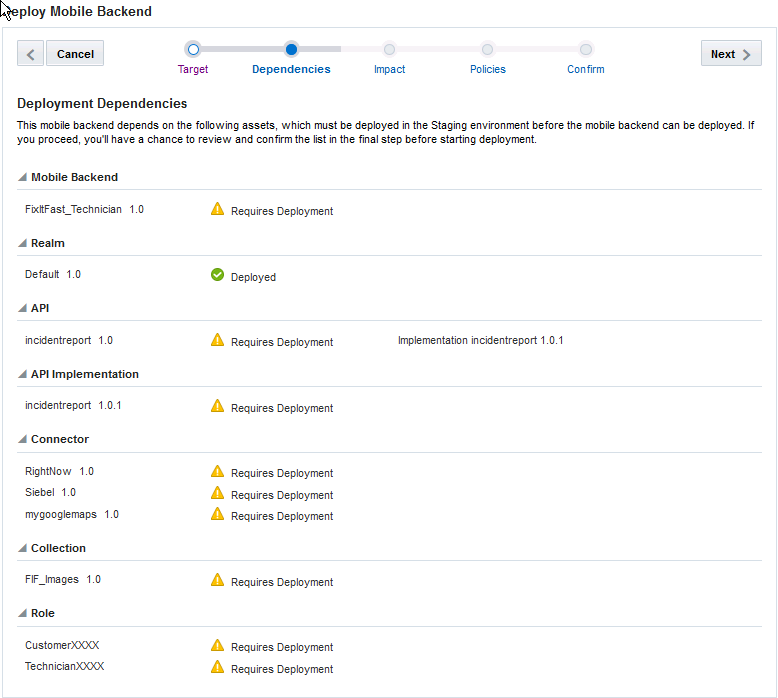
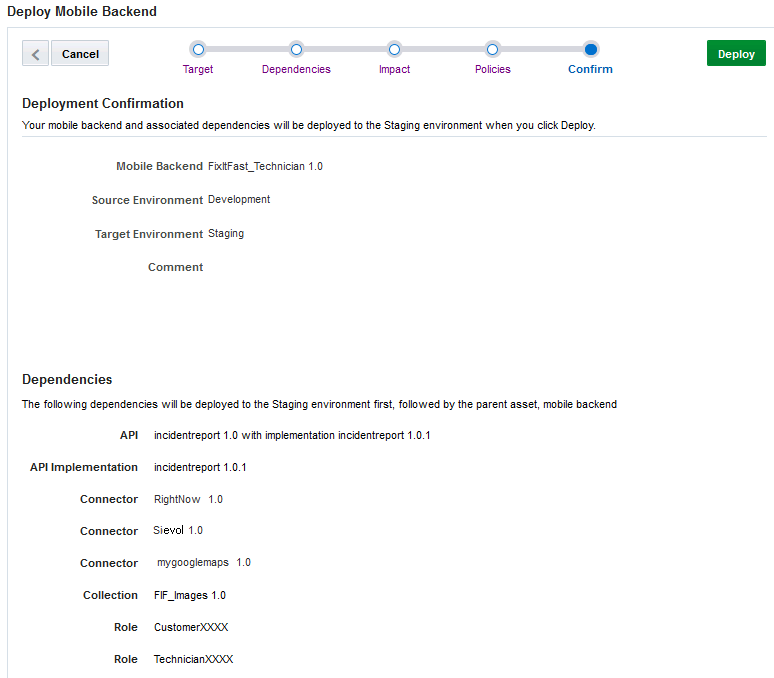
The Deployment wizard takes you through the following steps for any artifact that you deploy:
-
Specify the target environment
Note that when you deploy a custom API, you’ll also specify the implementation to deploy with the API on this page.
-
View any unpublished dependencies and whether the environment you’re deploying to contains those dependencies in the deployment wizard.
If no issues are found during the deployment checks, all the dependencies that aren’t already deployed in the target environment are deployed with the artifact.
Sometimes a conflict can occur such as when a duplicate artifact already exists in the target environment. You’ll have to cancel the deployment and resolve the conflict before you can try deploying again. For example, in the case where there is a duplicate artifact, you can cancel the deployment, create a new version of the artifact that you’re trying to deploy, publish it and then deploy again. Remember to resolve any dependency issues that might result from creating a new version before deploying again.
View the effect of your deployment.
You have the choice of whether to follow through with the deployment after reviewing possible issues, such as having multiple versions of an artifact existing in an environment. All artifacts are active in the target environment after being deployed.
-
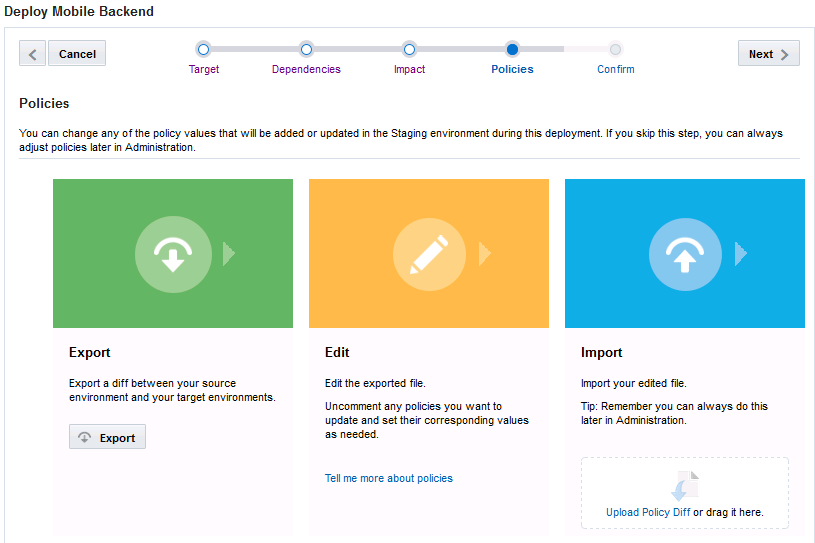
View and modify environment policies.
You can click Export to open the
policies.propertiesfile that you can modify as needed for the target environment. After you save the changes, you can upload the modified file on this page to import to the target environment when you complete the deployment. Alternatively, you can skip this step and modify the policies later through the Administration console. -
Complete the deployment.
For a walk through of each step of deployment process, see Initial Deployment of a Mobile Backend. For actual steps to deploy a specific artifact, go to the deploying section for that artifact in Managing an Artifact’s Lifecycle.
Artifact Deletion
When you have an artifact that you don't want or need anymore, you can move it to the trash where it's kept until you're sure you want to delete it permanently. Putting an artifact in the trash is considered a temporary deletion, the artifact is removed from the main view and is inaccessible to other artifacts.
Purging an artifact in the trash is a permanent deletion and is available only from the Administration view in the current release of MCS. See Purging an Artifact
You can move an artifact that’s in Draft or Published state to the trash. Depending on whether or not it’s needed later, you can restore it or ask your mobile cloud administrator to purge it. If you restore it, the draft artifact can then be published and deployed to another environment.
When you restore a published artifact, you can deploy it immediately.
You can’t use artifacts that are in the trash in runtime environments because they can’t be accessed, called, or executed. Those operations are available only in development environments. If you change your mind later or find you really do need an artifact in the trash, you can restore it depending on the settings for the deletion environment policies. Another thing to remember is that an artifact in Draft state that is in the trash can’t be published and any dependencies of the artifact that are in Draft state can’t be published regardless of whether or not those dependencies are in the trash.
What Artifacts Can I Move to the Trash?
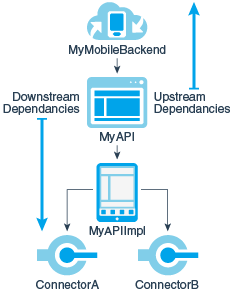
You can move an artifact that's in Draft or Published state to the trash, but there are some conditions based on whether dependencies are involved. An artifact that’s called by another artifact has an upstream dependency. An artifact that calls another artifact has a downstream dependency.
Let’s say you created an API called MyAPI. The mobile backend that calls it, MyMobileBackend, is the upstream dependency ofMyAPI. The API calls its implementation, MyAPIImpl. MyAPIImpl is the downstream dependency of MyAPI.
If an artifact has upstream dependencies and downstream dependencies, and those dependencies are active (that is, not in the trash), you’ll have to resolve the relationships to the dependencies before you can move the artifact to the trash. Here are the dependency scenarios you’ll run into that affect whether or not you can move an artifact to the trash and whether or not dependencies of the artifact are moved to the trash:
Case 1, Artifact is a dependency of a published artifact: If the artifact you want to remove is a dependency of a published artifact, you can't move the artifact in question to the trash because it would break its relationship with the published artifact. For example, you want to move MyAPI to the trash but you can’t because it’s a dependency of MyMBE, which is published.
If you really need to move the artifact to the trash, you must break the relationship between the artifacts first. For example, the custom API, MyAPI, is associated with the published mobile backend, MyMBE, and you want to move MyAPI to the trash. You have to break the relationship by moving MyMBE to the trash first, then moving MyAPI to the trash. If you need MyMBE, create a new version of it first before moving the previous version to the trash.
Case 2, Artifact has dependencies: If the artifact that you want to move to the trash has tightly coupled dependencies (such as an API that’s associated with a real implementation or a connector API and its implementation), clicking Trash moves the API with its implementations to the trash.
Note:
You can’t move a mock implementation to the trash. If the API is associated with a mock implementation, the relationship is broken and only the API is moved to the trash.Associated environment binding policies are removed along with the artifact and its dependencies. If the artifacts are restored, the environment policies are also restored.
Case 3, Artifact has dependencies: If the artifact that you want to move to the trash has dependencies that aren’t tightly coupled, you must disassociate the artifact from its upstream and downstream dependencies before you can move it to the trash.
Only first-level upstream and downstream dependencies are considered. If there are any second-level dependencies (for example, the API’s implementation calls a connector), you’ll have to be aware of those relationships and resolve them prior to moving the artifact to the trash.
If the artifact has a dependency on a role, the artifact can be moved to the trash but not the role. Rule of thumb: Roles can’t be trashed.
Asset_AllowTrash and Asset_AllowUntrash policies to one of these values:
-
All -
None -
Draft -
Published
To learn about environment policies, see Oracle Mobile Cloud Service Environment Policies.
For instructions on moving an artifact to the trash, see the topic for moving the specific artifact to the trash in Managing an Artifact’s Lifecycle.
Dependencies That Affect a Move to the Trash
The following table lists the dependencies that are moved to the trash with the artifact. The second column lists the possible dependencies that are associated with the artifact but are not moved to the trash with the artifact. Those dependencies are presented in the Move to Trash dialog as information only.
| Artifact | Dependencies Moved to the Trash With the Artifact | Dependency Not Moved to the Trash With the Artifact | Published Upstream Artifact That Prevents a Move to the Trash |
|---|---|---|---|
|
Realm |
None |
Mobile Backend |
Mobile Backend |
|
Client |
None |
Mobile Backend |
None |
|
Mobile Backend |
None |
APIs Realm Collections |
Client |
|
API |
API Implementation Note: mock implementations can’t be moved to Trash. |
Mobile Backend API implementations that invoke the API Roles – Any role associated with the API is revoked. Roles can’t be moved to Trash. |
Mobile Backend |
|
API Implementation |
None |
API that is implemented APIs that are called by the implementation |
API that lists the implementation as active |
|
Collection |
None |
Mobile Backend Roles – Any role associated with the collection is revoked. Roles can’t be moved to Trash. |
Mobile Backend |
|
Connector |
None |
Mobile Backend API implementations that call the connector. |
None |
Restoring an Artifact
You might find that you need an artifact that’s been moved to the trash. Restored artifacts retain the same state they had when they were moved to the trash. That is, an artifact in Draft state that was moved to the trash will still be in Draft state when restored.
As with moving an artifact to the trash, restoring an artifact has some considerations:
-
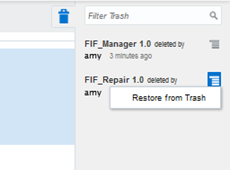
If the artifact has no naming or version conflict, you can restore it by simply clicking the Trash (
 ) and selecting Restore from Trash from the Trash drawer (
 ) and confirming the restoration action.
-
If duplicate artifacts exist (that is, artifacts with the same name and version) and one of these artifacts is in the trash, you can’t restore the artifact. You must resolve the conflict first in one of the following ways and then restore the artifact:
-
Move the active artifact to the trash and restore the one already in the trash.
-
Change the version of the active artifact and then restore the one in the trash.
-
The following table lists the types of artifacts that can be restored and which dependencies are restored from the trash with each type of artifact. The last column lists the possible upstream and downstream dependencies of the artifact that are not in the trash and that could be affected by the restoration. These items are displayed in the Restore dialog as information only.
| Artifact | Dependencies Restored With Artifact | Possible Artifact Dependencies Not in the Trash |
|---|---|---|
|
Realm |
None |
Mobile Backend |
|
Client |
None |
Mobile Backend |
|
Mobile Backend |
None |
APIs Realm Collections |
|
API |
Role |
Mobile Backend API Implementation (non-mock) API implementation that calls the API |
|
API Implementation |
None |
API that is implemented |
|
Collection |
Role |
Mobile Backend |
|
Connector |
None |
Mobile Backend |
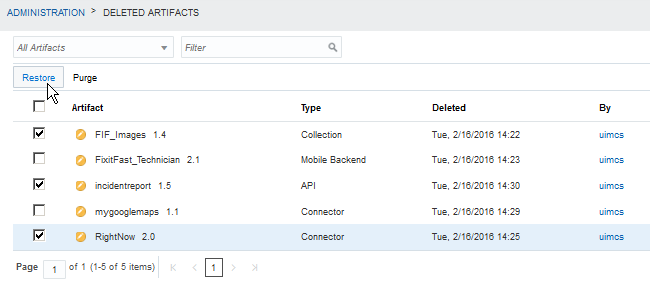
Detailed instructions for restoring an artifact in the trash are included for each artifact type in the chapters that follow.
Purging an Artifact
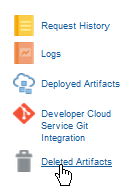
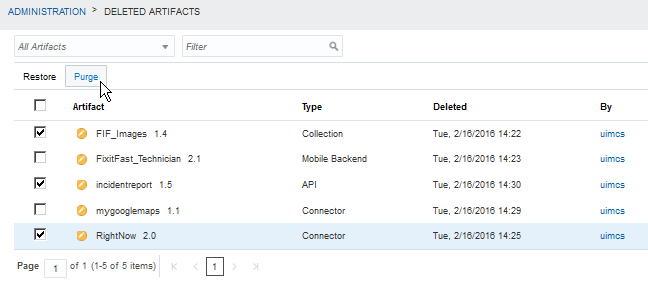
So how do you permanently delete an artifact? You must be a mobile cloud administrator and you purge it via the Deleted Artifacts tab from the Administration view. When an artifact is purged, it no longer appears in the list of trashed items and can’t be restored.
Just as dependencies can affect restoring an artifact, they affect purging an artifact from the trash. If the artifact you want to purge has downstream dependencies, those dependencies are deleted along with the artifact. For example, when you purge an API in the trash, its implementation is deleted as well.
If the artifact is a downstream dependency of another artifact, you need to resolve the dependency with the other artifact before you can purge it.
The following table shows you which dependencies will be purged with a each type of artifact.
| Artifact to Purge | Dependencies Purged with the Artifact | Dependencies Not Purged with the Artifact |
|---|---|---|
|
Realm |
None |
Mobile Backends |
|
Mobile Backend |
None |
APIs Realm Collections |
|
API |
API implementations Note: Mock implementations can’t be moved to the trash. Roles Note: Any role associated with the API is revoked. Roles can’t be moved to the trash. |
Mobile Backends API Implementations Note: Mock implementations can’t be moved to the trash. Roles Note: Any role associated with the API is revoked. Roles can’t be moved to the trash. |
|
API Implementation |
None |
API implemented by the implementation |
|
Connector |
None |
Mobile Backends |
|
Collection |
Roles Note: Any role associated with the API is revoked. Roles can’t be moved to the trash. |
Mobile Backends API implementations that call the connector |
