4 Set Up the OMCe Service

Here’s what you need to know to get your Oracle Mobile Cloud Enterprise (OMCe) service instance set up. You’ll learn how to create an account, activate the service, create a service instance, and assign team members.

Go through each set up task in this section carefully to ensure that you have fully provisioned the service for what your team needs.

Make sure you have the following information from setting up the Database and Storage instances. You should be able to find most these from the Oracle Cloud My Services dashboard:

  • The Cloud Storage Service URL

  • The Cloud Storage username and password

  • The service name for the database

  • The administrator password used by SYS and SYSTEM database users

Provisioning Workflow

Use this workflow as a guide when provisioning an OMCe instance from scratch.

Task Description
Create an OMCe stack Create the OMCe stack from the OMCe template, which is the blueprint for coordinating the creation of the service and the resources it uses. It can take a few hours to provision a stack.
Add users to the OMCe service Connect directly from the Stack Manager to IDCS to create user accounts. You can also use scripts to batch import user accounts.
Create users and assign them to roles Create groups and assign users to them.

Before You Start

Before creating the OMCe stack, ensure that the DBCS is provisioned, up and running. See Provisioning the Database Cloud Service. If this has not been done, complete it before moving ahead.

Finding the Storage Service URL

In most cases the storage service associated with the Oracle Cloud account you are using to create the OMCe stack is the one you want to use. However there may be occasions when you want to create an OMCe stack which uses a storage cloud service in a different cloud account. In this case, you will need to have the URL for the storage service ready when you create the OMCe stack.

This URL is a combination of the URL for your storage service, plus the storage container name you specify to store artifacts. In other words, <Cloud Storage Service URL>/<Name you assign to the OMCe storage container>.

To get the correct Storage Service URL:

  1. Sign in to the Oracle Cloud My Services application using the credentials for the Oracle Cloud account it belongs to.

  2. Find Storage Classic on the Dashboard. If it’s not on the dashboard, click Customize Dashboard, then click Show next to the Storage Classic entry, and close the Customize Dashboard window.

  3. Click the Storage Classic block. Do not click on the hamburger icon the hamburger icon to get to Storage Classic.

  4. Scroll all the way down in the Service: Oracle Cloud Infrastructure Object Storage Classic view. In the Additional Information section, find the REST Endpointfield:

  5. Record the value of the REST Endpoint field. Typically, this value has the format http://< Account Name>.storage.oraclecloud.com/v1/Storage-<Account Name>.

  6. Decide on the Storage Container Name; for example, dev1.

Example: Suppose your Cloud account name is mycloud and is provisioned in a US data center. Your Storage Service REST endpoint would typically be: https://mycloud.us.storage.oraclecloud.com/v1/Storage-mycloud. To get the Storage Container URL you need to provision OMCe, you simply add the storage container name to the end of the endpoint, as in: https://mycloud.us.storage.oraclecloud.com/v1/Storage-mycloud/dev1.

Note:

Be sure you have the correct value of the REST Endpoint field in hand before you try to provision OMCe. Provisioning frequently fails because this value is incorrect.

Now you’re ready to create the OMCe stack. Each OMCe stack is a standalone OMCe environment, so if you need dev, test, and production environments, you’ll need to create three stacks.

Create an OMCe Stack

OMCe uses service instances (also referred to as environments) to define the behavior of artifacts and control access to development and administrative features. As a service administrator, you’ll create an OMCe service stack , assign predefined team member roles, and configure environment policies.

A cloud stack is a collection of related cloud services that you’ve provisioned. A single OMCe stack represents a complete OMCe environment (OMCe core, custom code components, Analytics, and Bots). When you create a service instance with the Oracle Cloud Stack Manager, it provisions the Oracle Cloud resources by using each service’s public REST APIs. A cloud stack is created from a template. You’ll use the OMCe template, which is a blueprint for coordinating the creation of the service and the resources it uses. After you create the stack, use the Stack Manager to view and monitor the performance of the OMCe service instance.

Note:

Although you can make changes to the template for some Oracle Cloud services, it is important that you do not make any changes to the Oracle-Mobile-Cloud-Enterprise-Template template.
  1. Sign in to MyServices dashboard.
  2. Click Create Instance, then click the All Services tab.
  3. Scroll down until you find the Application Development category, then locate Mobile.
  4. On the My Services page, click Stacks:
  5. On the Oracle Cloud Stack Stacks page, click Create Stack.
  6. You’ll be prompted with the Create New Instance screen. In the Template field, select Oracle-Mobile-Cloud-Enterprise-Template. You should now see the Oracle Mobile Cloud Enterprise Stack Creation screen.
  7. Fill in the fields as follows. For the Stack Details section:
    • Name: Enter a name that reflects usage of the environment, for example, for a development environment, call it dev1.

      You can use a name of up to 20 characters. It must start with a letter, and can contain only letters, numbers and hyphens (-). It cannot end with a hyphen (-).

      Use a different name for each environment you create. Also, use a different name from previous attempts, if you are re-running a failed deployment, even if the previous attempts have been completely rolled back.

    • Description: Enter a brief description of the stack that describes what the stack is used for.

    • Notification email: The notification email address comes from the log in account. Status reports are sent to this email.

    • Tag: (Optional) Add tags and assign tags to this service.

    • On Failure Retain Resources: Controls whether to rollback resource creation on failure or not. It is recommended that you check this, as it will allow you to resume a partially completely OMCe provisioning process, which could greatly speed up provisioning re-try.

  8. Complete the Access section:
    • SSH Public Key: The Public Key value. You can re-use the DBCS SSH key or create a new one. If your DB and OMCe administrators are different, you’ll want to use different keys.

      Only use the keys generated from your Oracle Cloud account. Avoid using keys generated using external tools.

    • SSH Private Key: Browse to the Private Key file generated with the public key.

    • Administrator Username: The default is omceadmin. You can change this if you wish.

      The name must have no fewer than eight characters and cannot exceed 128 ASCII characters. You cannot use a tab, brackets, parentheses or the characters , < > & # | ?.

    • Administrator Password: Enter a password for the administrator and re-enter it to confirm.

      This password is used across all suite components for their respective administrative users, for example, the WLS admin user. The password must have no fewer than eight characters and cannot exceed 30 characters. There must be at least one lower case letter, one upper case letter, one number, and one special character, either _ or #, for example, Ach1z0#d.

  9. For Storage Container Configuration:
    • Change Default Cloud Storage Service URL: Leave unchecked unless you want to use a different storage cloud service in a different cloud account. This is something that is only rarely needed.

      If you do want to use a storage cloud service in a different cloud account, select Change Default Cloud Storage Service URL and enter the Cloud storage service URL. See Set Up the OMCe Service.

    • Cloud Storage User Name: Enter the name of the Storage Cloud Service admin user you created earlier. This user should only have the Storage Cloud Service admin role, and nothing else.

    • Cloud Storage Password: Enter the password for the Cloud Storage admin user.

  10. For Oracle Mobile Cloud Enterprise Configuration:
    • Hourly API Request Capacity: The number of requests per hour you want your OMCe environment to handle.

      OMCe metering/billing will be based on this number, regardless of actual usage. In other words, if this value is set to 2500 requests per hour, then OMCe will bill 2500 * OMCe price per hour (Say 0.0021) = $5.25 per hour. This will continue regardless whether there is any actual traffic/requests through OMCe.

      Note:

      Carefully review this number and do not accept default value. 2500 is considered high volume.

      For Dev/Test/Production environments, this is an average value of the requests per hour. Take the expected number of requests for the entire month, divide by 744, then enter this value.

      For trials, you can enter a relatively low number, like 10 or 50 requests per hour.

      Note that OMCe will continue to operate normally regardless of whether your actual usage is higher or lower than the value specified.

    • Region: Defines the data center within your data region where the OMCe instance will be provisioned. Select the data center location based on your actual location.

      Note:

      This is a mandatory field. You must specify a region. If you don’t, OMCe components may be provisioned to different data centers which would result in provisioning failure.

      The region you select must be the same one that you specified for the database service.

      Do not use the default No Preference.

      For a mapping between data center code (e.g. uscom-central-1) and the actual location, see About the Replication Policy for Your Account in Using Oracle Cloud Infrastructure Object Storage Classic.

  11. For Database Access:
    • Database Cloud Service Name: Name of the DBCS instance used for this OMCe stack/environment. This DBCS instance can be shared across multiple OMCe environments. Enter the name of the DBCS instance you want to use with this OMCe stack.

    • PDB — Pluggable Database Name: Accept the default of PDB1.

    • DBA Password: Enter the password you used when you created the DBCS. This password can’t start with a special character.

    • Schema Prefix: All schema objects (i.e. tables, etc.) are prefixed with this string to identify its use. Use a different prefix for each environment you create. If you are re-running a failed deployment, you must also use a new prefix, even if the previous attempts have been completely rolled back.

      Must be all upper case letters and numbers, with a maximum of 11 characters. It must be unique.

    • Force Schema Creation: Do not select this.

    • Enable High Performance Database Features for Advanced Analytics: If DBCS High Performance or Higher Editions are provisioned and are being used for this OMCe stack, check this box. If you only have Enterprise Edition or below, leave this box unchecked

  12. Before you proceed, carefully review the requirement for the schema prefix which must be in all uppercase. Most important, be sure to use a different prefix for each OMCe environment/instance you create. If you are re-running an OMCe instance creation that previously failed, you must use a different schema prefix to avoid unexpected naming conflicts.
  13. When you have finished entering the details, click Next.
  14. Click Confirm.

OMCe stack creation takes about 1-2 hours, and creates 22 resources. You can follow progress in the status pane which displays a list of the instances as they are created. You can click the name of the service to find more information.

When the stack creation is complete, you’ll get a confirmation email.

Create a Bots-Only Stack

If you only want to use Bots and you are not intending to use Mobile Core or Analytics you can create a Bots stack. Although this has the benefit of reducing resource consumption, you will ONLY get the Bots infrastructure—neither Core nor CxA will be provisioned. This means that you must host custom components, which are required for bots, in a separate ACC container, rather than in mobile core. If you subsequently decide that you do want to use Mobile Core and Analytics you will have to create a new stack. You cannot change a Bots stack into a full OMCe stack.

Note:

Although you can make changes to the template for some Oracle Cloud services, it is important that you do not make any changes to the Oracle-Mobile-Cloud-Enterprise-Template template.
  1. Sign in to MyServices dashboard.
  2. Click Create Instance, then click the All Services tab.
  3. Scroll down until you find the Application Development category, then locate Mobile.
  4. On the My Services page, click Stacks.
  5. On the Oracle Cloud Stack Stacks page, click Create Stack.
  6. You’ll be prompted with the Create New Instance screen. In the Template field, select Oracle-Mobile-Bots-Standard-Rel. You should now see the Oracle Bots Stack Creation screen.
  7. Provide information for the Stack Details:
    • Name: Enter a name that reflects usage of the environment, for example, for a development environment, call it dev1.

      You can use a name of up to 20 characters. It must start with a letter, and can contain only letters, numbers and hyphens (-). It cannot end with a hyphen (-).

      Use a different name for each environment you create. Also, use a different name from previous attempts, if you are re-running a failed deployment, even if the previous attempts have been completely rolled back.

    • Description: Enter a brief description of the stack that describes what the stack is used for.

    • Notification email: The notification email address comes from the log in account. Status reports are sent to this email.

    • On Failure Retain Resources: Controls whether to rollback resource creation on failure or not. It is recommended that you check this, as it will allow you to resume a partially completely OMCe provisioning process, which could greatly speed up provisioning re-try.

    • Tag: (Optional) Add tags and assign tags to this service.

  8. Complete the Database Configuration section:
    • Database Cloud Service Name: Name of the DBCS instance used for this OMCe stack/environment. This DBCS instance can be shared across multiple OMCe environments. Enter the name of the DBCS instance you want to use with this OMCe stack.

    • DBA Username: Enter the name of the DBCS user for this DBCS instance.

    • DBA Password: Enter the password you used when you created the DBCS. This password can’t start with a special character.

    • Schema Prefix: All schema objects (i.e. tables, etc.) are prefixed with this string to identify its use. Use a different prefix for each environment you create. If you are re-running a failed deployment, you must also use a new prefix, even if the previous attempts have been completely rolled back.

      Must be all upper case letters and numbers.

      Note:

      Do not use a very long schema prefix name otherwise stack creation may fail after it has been running for some time.

    • Force Schema Creation: Do not check this.

  9. For Oracle BOTS Cloud Service Configuration:
    • SSH Public Key: The Public Key value. You can re-use the DBCS SSH key or create a new one. If your DB and OMCe administrators are different, you’ll want to use different keys.

      Only use the keys generated from your Oracle Cloud account. Avoid using keys generated using external tools.

    • Administrator User Name: The default is omceadmin. You can change this if you wish.

      The name must have no fewer than eight characters and cannot exceed 128 ASCII characters. You cannot use a tab, brackets, parentheses or the characters , < > & # | ?.

    • Administrator Password: Enter a password for the administrator and re-enter it to confirm.

      This password is used across all suite components for their respective administrative users, for example, the WLS admin user. The password must have no fewer than eight characters and cannot exceed 30 characters. There must be at least one lower case letter, one upper case letter, one number, and one special character, either _ or #, for example, Ach1z0#d.

    • Hourly API Request Capacity: The number of requests per hour you want your OMCe environment to handle.

      OMCe metering/billing will be based on this number, regardless of actual usage. In other words, if this value is set to 2500 requests per hour, then OMCe will bill 2500 * OMCe price per hour (Say 0.0021) = $5.25 per hour. This will continue regardless whether there is any actual traffic/requests through OMCe.

      Note:

      Carefully review this number and do not accept default value. 2500 is considered high volume.

      For Dev/Test/Production environments, this is an average value of the requests per hour. Take the expected number of requests for the entire month, divide by 744, then enter this value.

      For trials, you can enter a relatively low number, like 10 or 50 requests per hour.

      Note that OMCe will continue to operate normally regardless of whether your actual usage is higher or lower than the value specified.

    • Install Sample: Select to indicate that you intend to install the Bots samples from OTN.

    • Region: Defines the data center within your data region where the OMCe instance will be provisioned. Select the data center location based on your actual location.

      Note:

      This is a mandatory field. You must specify a region. If you don’t, OMCe components may be provisioned to different data centers which would result in provisioning failure.

      The region you select must be the same one that you specified for the database service.

      Do not use the default No Preference.

      For a mapping between data center code (e.g. uscom-central-1) and the actual location, see Selecting a Replication Policy for Your Service Instance.

    • Production Level of POD configuration: Check if you are going to use Bots in a production environment.

  10. For Storage Container Configuration:
    • Cloud Storage Service URL: This is the URL pointing to the Cloud Storage Service Container that will be used for OMCe. See Set Up the OMCe Service.

      Note:

      The URL format must be correct or stack creation will fail. It has the form https://foo.storage.oraclecloud.com/MyService-bar/MyContainer.
    • Cloud Storage User Name: Enter the name of the Storage Cloud Service admin user you created earlier. This user should only have the Storage Cloud Service admin role, and nothing else.

    • Cloud Storage Password: Enter the password for the Cloud Storage admin user.

  11. Before you proceed, carefully review the requirement for the schema prefix which must be in all uppercase. Most important, be sure to use a different prefix for each OMCe environment/instance you create. If you are re-running an OMCe instance creation that previously failed, you must use a different schema prefix to avoid unexpected naming conflicts.
  12. When you have finished entering the details, click Next.
  13. Click Confirm.

OMCe stack creation takes about 1-2 hours, and creates a number of resources. You can follow progress in the status pane which displays a list of the instances as they are created. Click the name of the service to find more information.

When the stack creation is complete, you’ll get a confirmation email.

Examine Your OMCe Environment

After you can have created your OMCe stack and received the confirmation email, you can have a look at the OMCe environment.

  1. Log into MyService dashboard.

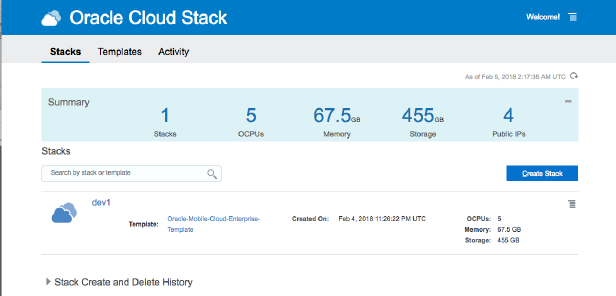
  2. Click Mobile, then click Open Service Console. This opens the PSM (PaaS Service Manager) UI, which looks like this:
    Description of psm.png follows
    Description of the illustration psm.png

    This is where you can stop and re-start your OMCe instance in the future.

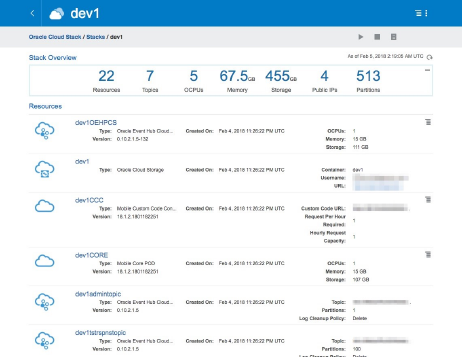
  3. Click the name of the stack to drill into it and take a look at all the resources provisioned for OMCe.

    These resources include combinations of JCS, ACCS, Big Data CS, and Event Hub CS, and so on, all of which were provisioned for you behind the scenes.

    Your starting point is the resource called <OMCe Name>CORE. This is the portal through which you can enter OMCe.
    Description of omce-core.png follows
    Description of the illustration omce-core.png
  4. Click the <OMCe Name>CORE resource and examine the CORE service details:

    Description of core-service-details.png follows
    Description of the illustration core-service-details.png

Log In to the OMCe UI

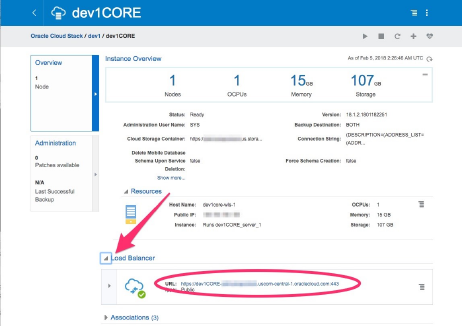
This is where you find the URL to log in to the OMCe UI.

  1. Navigate to the <OMCe Name>CORE Instance Overview page.
    Description of find-url.png follows
    Description of the illustration find-url.png
  2. Expand Load Balancer, and note the URL.

    To get to the OMCe home page, you need the URL <Load Balancer URL>/mobileui/.

  3. Copy and paste this URL into a new browser window.

    You should now see OMCe UI, which you should bookmark. At this point, you’ll probably want to refer to Developing Applications with Oracle Mobile Cloud, Enterprise to get started.

Use IDCS to Manage Users and Roles

You can connect to IDCS from the OMCe Service console.

When you create the OMCe stack, an application for the OMCe core is created in Oracle Identity Cloud Service (IDCS).

To log in to the IDCS app:

  1. On the Service Overview page of the Mobile Core POD for your OMCe service, expand Show more.

  2. Click the link next to IDCS App ID. An instance of the IDCS service opens.

  3. In the Identity Cloud Service console, click Applications to display a list of applications associated with the services in the OMCe suite.

  4. Identify the OMCe core application, which has MobileCorePOD next to the name. Click the link for it.

The IDCS application for the OMCe application has the following tabs:

  • Details - Displays high-level information about the app, it’s name and description, the icon for the app, the application URL, and whether or not the app is visible on the My Apps page.

  • Configuration - Displays configuration information about your app.

  • Application Roles - Displays the list of team member roles for your app. You can also import or export roles, assign or revoke users and groups to a role from this page. See Assign Roles.

  • Groups - Displays the groups that are assigned to this app. See Create Groups.

  • Users - Displays the users that are assigned to this app. See Add Users.

Add Users

Add OMCe team members by creating user accounts with Oracle Identity Cloud Service (IDCS). You can also use IDCS to provision mobile users of your apps and bots.

When you create an OMCe stack, an application is created in your identity domain for each service (OMCe core, Analytics, and Bots), and displayed on the IDCS Applications page. To enable a user to access a service, you must add the user to the associated application. For example, if a user needs to access OMCe core, Analytics, and Bots, then you must add the user to all three applications.

  1. Log in to Oracle Identity Cloud Service (IDCS).
    You can do this from the Service Overview page of your OMCe instance, or you can use the URL for Oracle Identity Cloud Service which was provided in the Welcome email you received when you activated the OMCe account. In this case, use your OMCe credentials.
  2. Click Users.
  3. Click Add.
  4. Enter the first name and last name of the user in the corresponding fields. Proceed to the next step to have the user log in with a user name or skip to Step 6 to have the user log in with an email address.
  5. If the user is going to log in with a user name, enter the user name in the User Name field and enter the user’s email address in the Email field.
    Be sure to clear the Use the email address as the user name option, which makes the user name the same as the user’s email address.
  6. If the user is going to log in using an email address, make sure the Use the email address as the user name option is checked and enter the email address for the user account in the User Name/Email field.

    Don’t use this option if the user name is currently in use or had been in use in the current domain. For existing (or previously existing) user names, a unique value will automatically be added to the email address to create a unique value for the user name.

  7. Click Next if you want to assign the user to a group or click Finish.

    To assign a group, just select the groups that you want to assign to this user account and click Finish.

    The Details page is displayed for the user. An invitation email is sent to the user containing log in credentials to OMCe.
  8. Assign the user to an OMCe application by clicking the Access tab on the Details page.
  9. Search for the application to assign the user to and click Assign.
  10. Repeat the previous step for each service that you want to assign to the user.
    If you have many users to assign, a faster method is to use groups, described in Create Groups.
After you’ve added users, you can create groups and assign a user to multiple groups. You or a service administrator can assign roles.

Batch Import Users

If you have a large number of users to add, you can batch import user accounts using a comma-separated values (CSV) file.

You can access the Bulk Loading Users and Groups Using CSV Files tutorial to see how to import user accounts into IDCS.

Before you can import user accounts, first create a CSV file that is properly formatted for the import process. To create and prepare a file for import, follow these steps.
  1. Use these sample files as a starting point.

  2. Extract the compressed file and then open the Users.csv file.

  3. Review and then delete any demo data in the Users.csv file.

    Tip:

    To familiarize yourself with the import process, consider importing just the demo data. You can then delete the unwanted demo data from IDCS before you begin importing live data.
  4. Create an import file using the Users.csv file. The Users.csv file is a simple text file in a tabular format (rows and columns). The first row in the file defines the columns (fields) in your table. At a minimum, the file must have these exact column headings.
    • User ID

    • Last Name

    • First Name

    • Work Email

    Tip:

    As a best practice, ensure that the fields in these columns are unique.
    For each account, you create a new row (line) and enter data into each column (field). Each row equals one record.

    Important:

    The names of the users that you want to import into IDCS must contain at least three characters. The names of the groups that you want to import into IDCS must contain at least five characters.

    The telephone numbers of the users that you want to import must meet the requirements of the RFC 3966 specification.

    To create a CSV file, you can use a standard spreadsheet application, such as Microsoft Excel or Google Sheets, or you can use a text editor, such as Notepad or TextPad.

  5. Save your file in a CSV format.

    Important:

    If you do not save the file in a CSV format with UTF-8 encoding, the import fails.
To import user accounts:
  1. In the Identity Cloud Service console, click Users.
  2. Click Import.
  3. In the Import Users dialog box, click Browse to locate and select the CSV file that contains the user accounts to import.

    Note:

    Click Download sample file in the dialog box to download a sample file.
  4. Verify that the path and name of the CSV file that you selected appear in the Select a file to import field.
  5. Click Import.
    If a user account is missing a required value, such as the user's first name, last name, or user name, then IDCS can't import it. If IDCS can't import a user account, then it evaluates the next account in the CSV file.
  6. After IDCS evaluates all user accounts, review the job results.
    • If the job can be processed immediately, then a dialog box appears with the Job ID link for your import job. Click the link and review the details that appear on the Jobs page.
    • If the job cannot be processed immediately, then a message appears with a Schedule ID in it. Copy that Schedule ID, and use it to search for the job on the Jobs page. The job will appear when processing completes. Go to Step 7.

    Tip:

    IDCS assigns a job ID to each file that's imported or exported, for auditing purposes.
  7. On the Jobs page, locate the job that you want to view, and then click View Details.
    A table displays the first names, last names, email addresses, user names, and statuses of the user accounts that you imported into IDCS.
  8. Review the details that appear on the Jobs page.
    This page shows how many accounts you imported, how many accounts imported successfully, and how many accounts can't be imported because of a system error.
  9. To make it easier to review and correct errors, you can export those errors to a CSV file on your local machine, In the Identity Cloud Service console, click Jobs.
  10. Locate the specific job for which you want to export errors.
    You can only export errors for a job with a Completed with Errors status. Jobs with a Failed status do not have errors to export.
  11. Click View Details.
  12. Click Export Errors.
    A comma-separated value (CSV) file downloads to your local machine. The CSV file contains a record for each error that includes the error type and the error description.

Create Groups

Create groups to grant access to OMCe services to multiple users.

Use the IDCS console to create groups and assign users.
  1. Log in to Oracle Identity Cloud Service.
  2. Click Groups.
  3. Click Add.
  4. Enter a name and a brief description of the group.
  5. Click Next.
  6. Select each user that you want to assign to the group and click Finish. (Use the Search field to locate a specific individual.)

Next, assign roles to the group to grant access to OMCe services.

Assign Roles

Use roles to grant permissions and capabilities to the users in your OMCe service. Roles are managed from Oracle Identity Cloud Service (IDCS).

The predefined OMCe Team Member Roles are used to grant permissions and capabilities to the team members in your OMCe service.

Mobile user roles can be assigned in the same way as team members, but mobile user roles are not predefined. Use OMCe to create roles for your mobile users, as described in Mobile Users and Roles in Developing Applications with Oracle Mobile Cloud, Enterprise.

A service administrator can also assign OMCe roles to existing users. The identity domain administrator role is required to create new users and groups.

  1. Log in to the IDCS console.
  2. Click the Applications tab.
  3. Locate and click the IDCS application for your OMCe service.
  4. Click the Application Roles tab.
  5. Open the role menu (role menu icon) for the role you want to assign and select Assign Users or Assign Group.
  6. Select the users or groups that you want to assign the role to and click Assign.
You can also use the role menu to revoke a role from a team member or group.

OMCe Team Member Roles

OMCe team member roles are predefined and can’t be created or customized. These roles determine which team members can develop backends, custom APIs, and use built-in services, such as Notification, Storage, and more. You can give team members wide access to features and user information or restrict them to a small set of permissions.

Note:

Team members must be assigned at least one of the roles in the table below to access the OMCe UI.

The common roles performed by team members in an OMCe instance are Administrator, Developer, Deployer, and Business User.

Role Name Team Member Role

Service Administrators

Performs administrative actions, including managing and overseeing the OMCe instance.

This role is used with OMCe core, Analytics, and Bots.

A specific type of administrator is the Entitlement Administrator. This role is assigned to the administrator when OMCe is first ordered, and it is the role used by the service administrator to create and manage OMCe.

OMCe Developer

Performs development and testing tasks, accesses MAX from within OMCe.

This role is used with OMCe core and Analytics.

Deployer

Performs configuration tasks as well as artifact and metadata export and import tasks. Publishes apps from the MAX production environment.

This role is used with OMCe core.

Business User

Creates apps only with Mobile Application Accelerator (MAX).

Note:

This role limits the user to the MAX UI. Do not assign this role to app developers. The ServiceDeveloper role grants app developers access to MAX from within OMCe.

This role is used with OMCe core.

You might see some other predefined roles in the list for OMCe in Oracle Cloud, but they are for internal use and shouldn’t be assigned to any team members.

View and Edit Users

From the IDCS Users page, you can view and edit profile information for all user accounts and all the groups to which a user is assigned.
  1. Log in to the IDCS console.
  2. For details about a user, click the Users tab.
    1. Enter all or part of a user name in the Search field to locate a specific user. You can also filter your search by selecting a user status: Active, Inactive, or Locked.
    2. Click a user name to see and edit details for that user, for example:
      • The user’s primary email address to which notifications are sent.

      • The user’s password recovery email address, to which notifications are sent if the user forgets the original password.

      • The user’s instant messaging address.

      • Whether or not the user has a federated single sign-on (SSO) account. With a federated account, the user can interact with IDCS through an identity provider by using a web site that’s external to IDCS.

      • Work information, including the user’s country, time zone, and preferred language.

    3. Click the Groups tab to see which groups are assigned to the user.
      You can also revoke group privileges by selecting a group and choosing Revoke from the menu.
    4. Click the Access tab to see a list of any applications assigned to the user.
  3. For details about a group, from the Home page, click Groups. All the groups that have been added are listed.
    1. Click a group to see its description.
    2. Click the Users tab to see who is assigned to the group.
    3. Click the Access tab to see all the applications assigned to the group.

Reset User Passwords

As the service administrator, you need to ensure that OMCe user information is kept up to date. You can do this through Oracle Identity Cloud Service (IDCS). When you request a password change for a user account, the user receives a notification to provide a new password.

You can reset the password for a single account or multiple accounts in an identity domain.

Note:

You can’t reset the password for deactivated user accounts. However, you can reactivate those accounts.
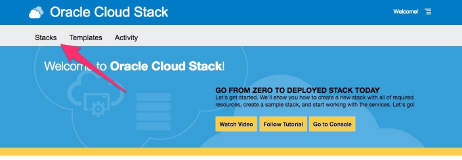
  1. Log in to the IDCS console and click Users.
  2. Select the user accounts for which you want to reset the password.
  3. Click More and perform of the following actions:
    • For a single or multiple user accounts, select Reset Password, then click Reset Password in the dialog.

    • For resetting the passwords for all user accounts, select Reset All Passwords, then click Reset Passwords in the dialog.