Configure an Oracle Cloud Infrastructure Load Balancer Post-Provisioning

Not Oracle Cloud Infrastructure Classic This topic does not apply to Oracle Cloud Infrastructure Classic.

You can configure an Oracle Cloud Infrastructure load balancer for an Oracle SOA Cloud Service instance after provisioning the instance.

Usage Notes:

  • You can configure an Oracle Cloud Infrastructure load balancer post-provisioning for an Oracle SOA Cloud Service instance of service types SOA with SB & B2B Cluster and MFT Cluster.
  • If you are provisioning a new Oracle SOA Cloud Service instance, then select None for Load Balancer in the Create Instance Wizard.
  • You can configure only one Oracle Cloud Infrastructure load balancer for one Oracle SOA Cloud Service instance.
  • The Oracle Cloud Infrastructure load balancer should be created in custom compartment, not within ManagedCompartmentForPaaS.
  • The Oracle Cloud Infrastructure load balancer has high availability (HA) features, spanned across different Availability Domains.
  • Unlike OTD, the Oracle SOA Cloud Service Console does not show the Oracle Cloud Infrastructure load balancer on the instance details page.
  • For existing Oracle SOA Cloud Service instances that use OTD:
    • If you have manually imported any certificates into Oracle Traffic Director (OTD), you must reimport these certificates into the new load balancer after it is created.
    • If provisioned with OTD, then ensure that OTD is in running state and then remove the OTD instance using REST API.
  • After completing the steps to add an Oracle Cloud Infrastructure load balancer:
    • If you are not using a DNS name and using an IP address (see Register a Custom Domain Name with a Third-Party Registration Vendor), and you replaced the OTD load balancer with the Oracle Cloud Infrastructure load balancer, make sure your runtime URLs use the Oracle Cloud Infrastructure load balancer IP address instead of the OTD public IP address.
    • URLs for all Managed Servers such as b2bconsole, mftconsole, and composer are accessible using the Oracle Cloud Infrastructure load balancer URL using https.
    • You must manually add or delete backends in the Oracle Cloud Infrastructure load balancer after scale out and scale in operations.
    • Deprovisioning of the Oracle SOA Cloud Service instance will not delete the Oracle Cloud Infrastructure load balancer. You must manually delete the load balancer from the Oracle Cloud Infrastructure Console.

    • Do not invoke the Add OTD component operation from Oracle SOA Cloud Service Console. If you do so, OTD will override the Oracle Cloud Infrastructure load balancer configuration.

Note:

This procedure uses the following example IP addresses:
  • WebLogic Server Public IP: 129.146.200.44
  • OTD Public IP if available: 129.213.147.163 (the steps below replace this OTD load balancer with the Oracle Cloud Infrastructure load balancer)
  • Oracle Cloud Infrastructure load balancer Public IP: 129.146.91.95

To configure an Oracle Cloud Infrastructure load balancer post-provisioning:

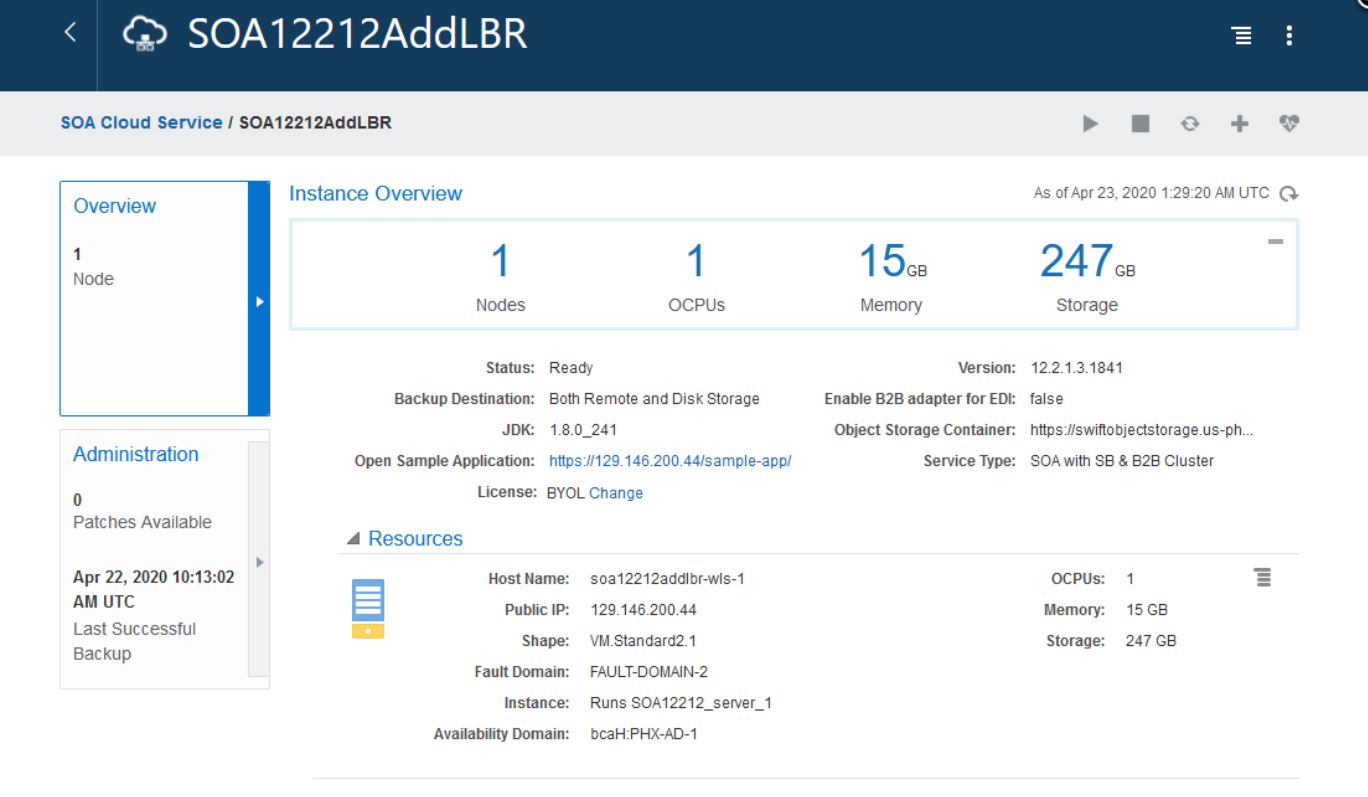
  1. As a prerequisite, create a database and create an Oracle SOA Cloud Service instance (without OTD) in Oracle Cloud Infrastructure regions.

    SOA Cloud Service Console Instance Overview page
  2. Remove the OTD load balancer. See Remove the Oracle Traffic Director Load Balancer from an Oracle SOA Cloud Service Instance.
  3. Create the MyCert certificate. This is a self-signed certificate and uses a private key that you generate. It is used for external clients to connect to the Oracle Cloud Infrastructure load balancer using port 443.
    1. As the oracle user, run the following command to generate the self-signed certificate:

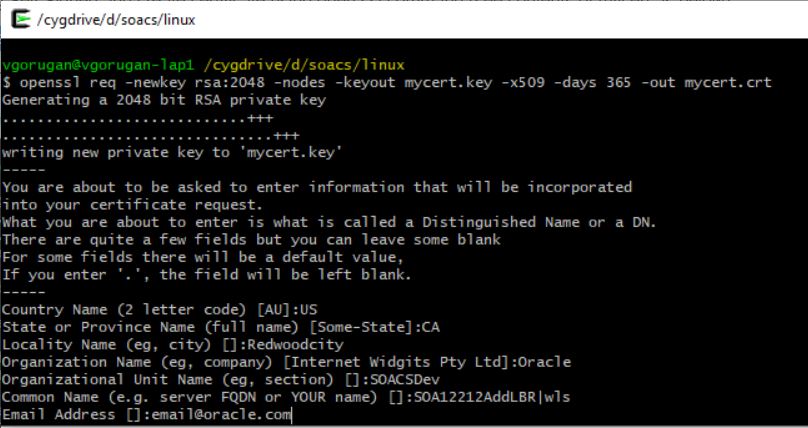
      openssl req -newkey rsa:2048 -nodes -keyout mycert.key -x509 -days 365 -out mycert.crt
    2. Provide requested input as shown in the following screenshot:


      openssl command output
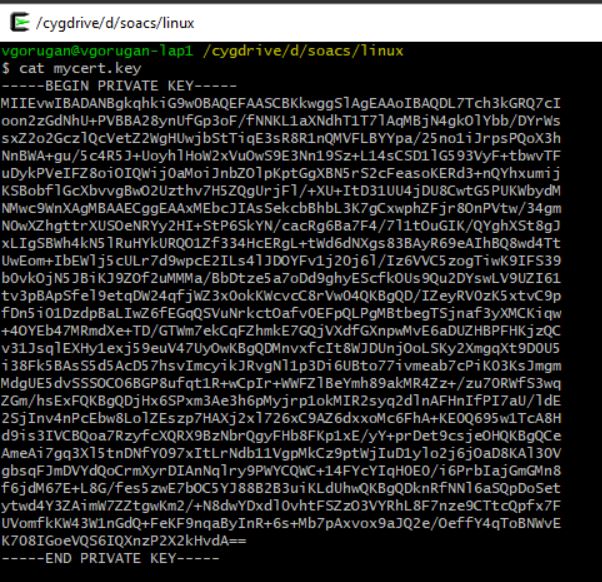
    3. Save the output to your local drive as mycert.key.
      mycert.key contents
  4. In the Oracle Cloud Infrastructure Console, create a load balancer:
    1. Sign in to your Oracle Cloud Service account and navigate to the Oracle Cloud Infrastructure Console.
      See Signing in to Your Cloud Account in Getting Started with Oracle Cloud.
    2. Open the navigation menu, click Networking, and then click Virtual Cloud Networks.
    3. In the left pane, click Load Balancers.
    4. Scroll down in the left pane and select the same compartment as your Oracle SOA Cloud Service instance uses.
    5. Click Create Load Balancer.
    6. In the Select Load Balancer Type dialog, click Create Load Balancer.
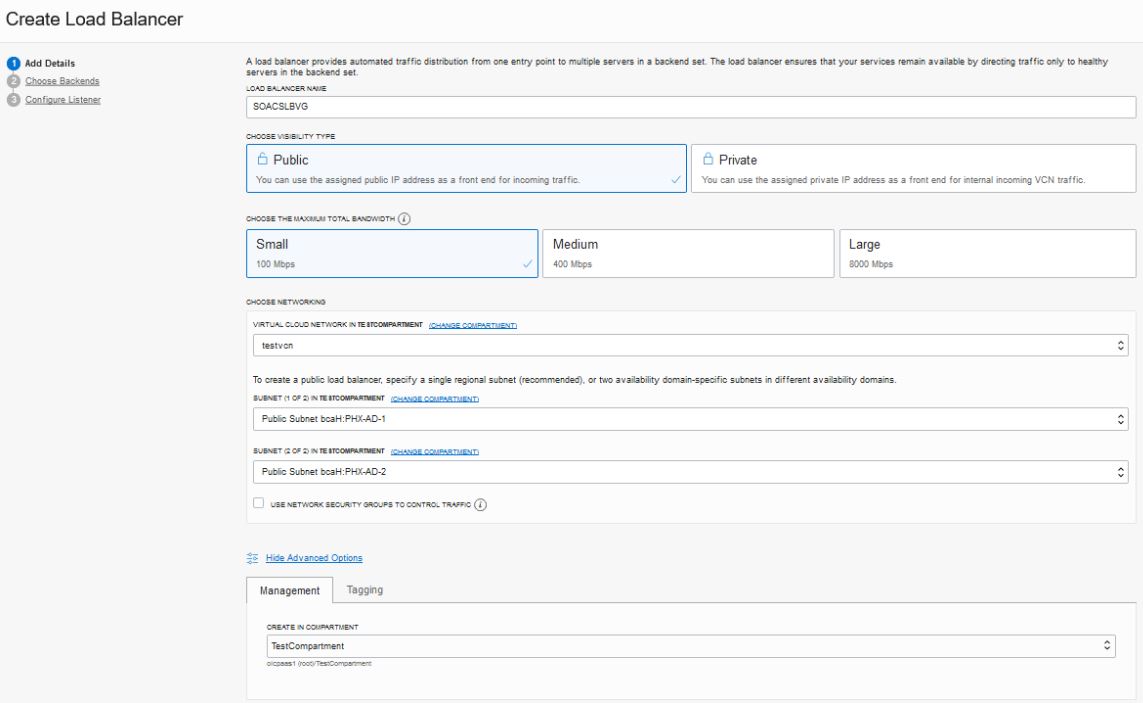
    7. In the Create Load Balancer wizard, on the Add Details page:
      • Load Balancer Name: Enter a name for the load balancer.
      • Virtual Cloud Network in compartment: Select the same VCN used by your Oracle SOA Cloud Service instance.
      • Subnet in compartment: Select subnet(s).
      • Click Show Advanced Options, and on the Management tab, select the same compartment used by your Oracle SOA Cloud Service instance.

      Create Load Balancer Add Details page
    8. Click Next.
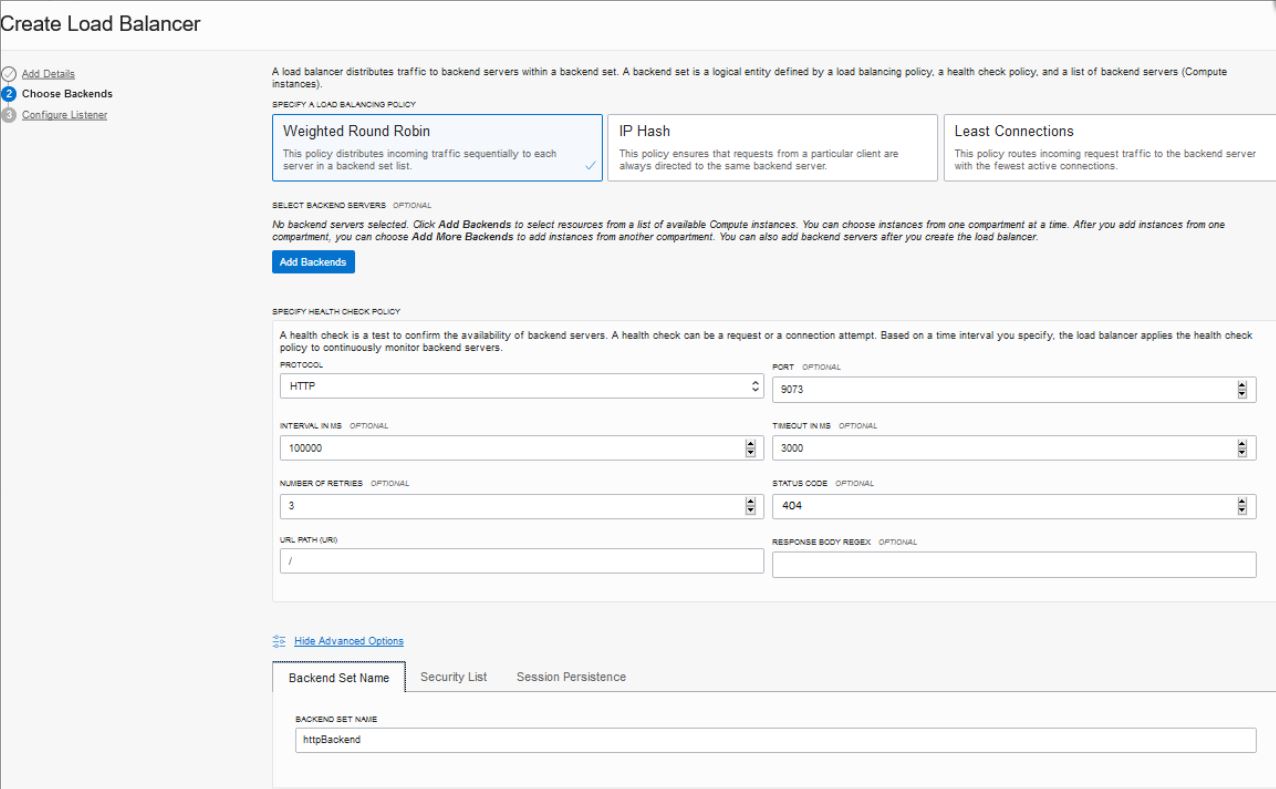
    9. On the Choose Backends page:
      • Port: Enter 9073.
      • Status Code: Enter 404.
      • Click Show Advanced Options, and set BACKEND SET NAME to httpBackend.

      Create Load Balancer Choose Backends page
    10. Click Next.
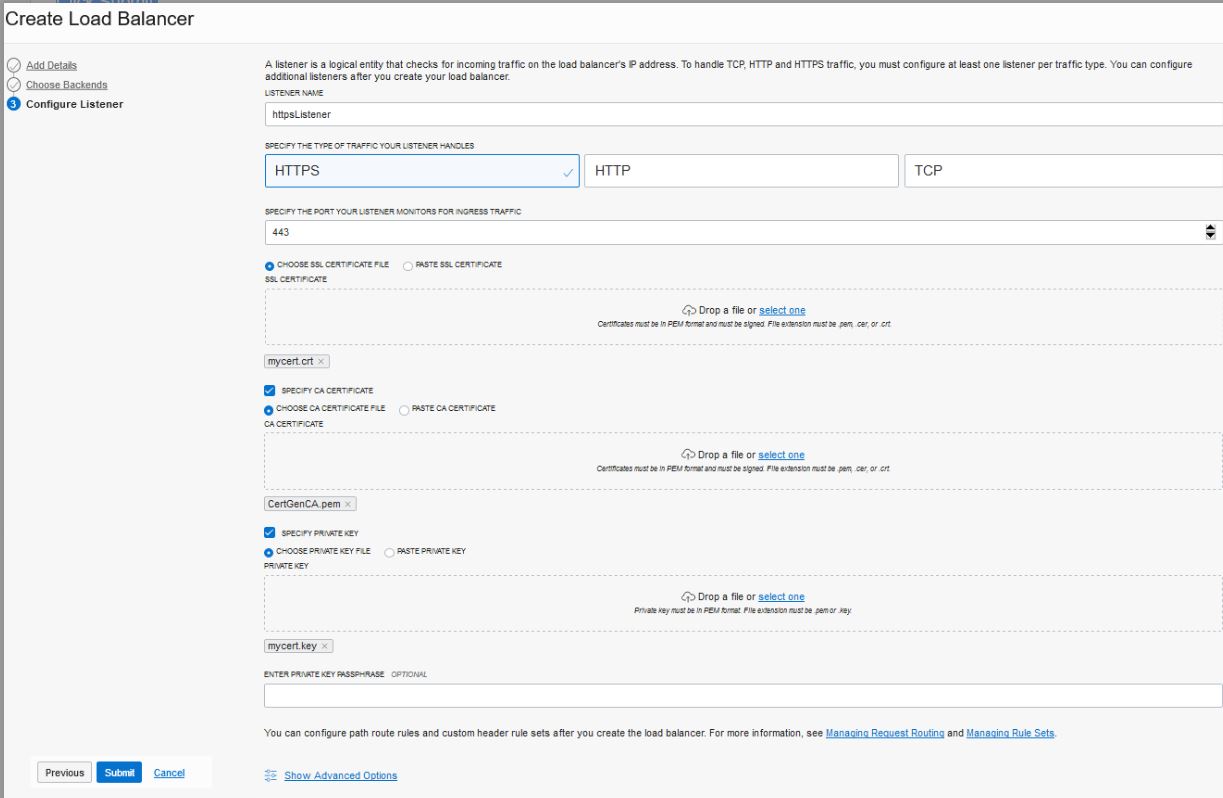
    11. On the Configure Listener page:
      • Listener Name: Enter httpsListener.
      • Specify the type of traffic your listener handles: Select HTTPS.
      • Specify the port your listener monitors for ingress traffic: Enter 443.
      • Import the mycert certificate and key as follows:
        • Select Choose SSL Certificate File, and add mycert.crt.
        • Select Specify Private Key, and add mycert.key.

      Create Load Balancer Create Listeners page
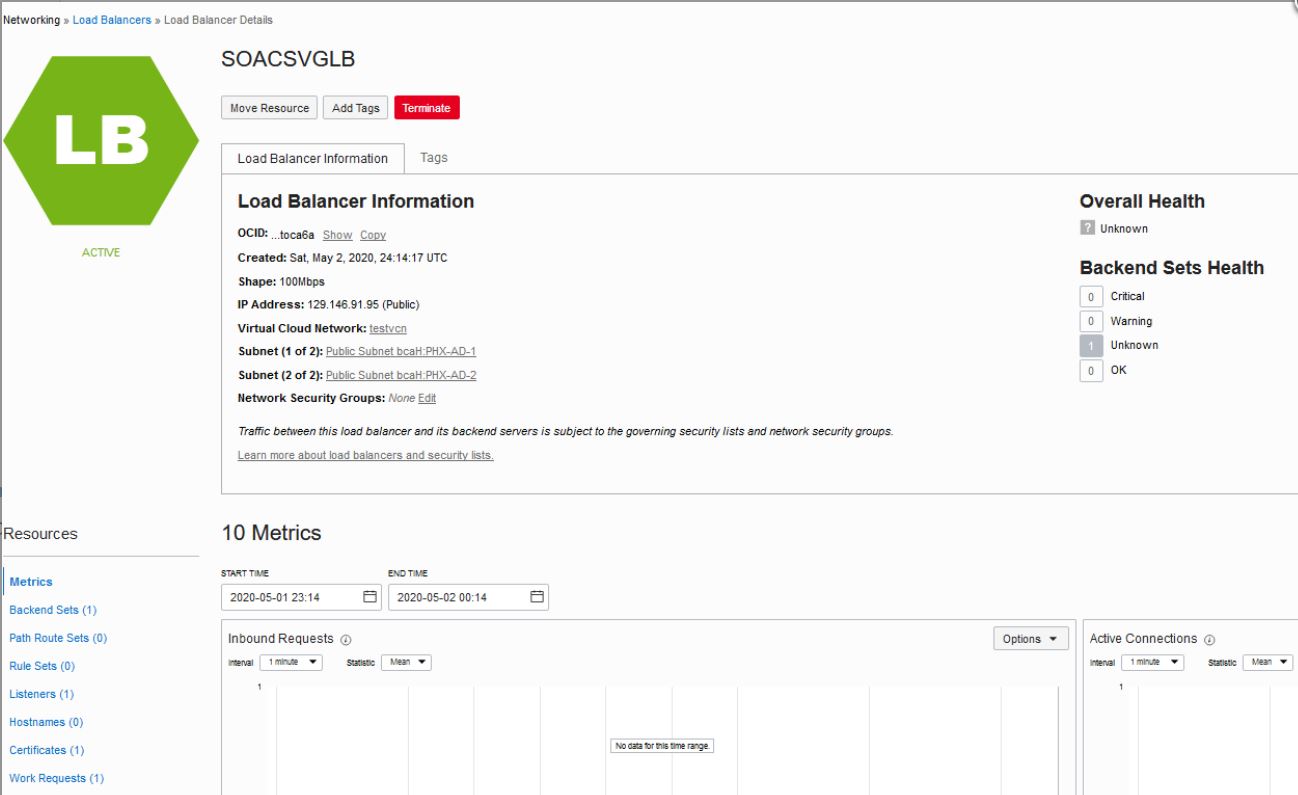
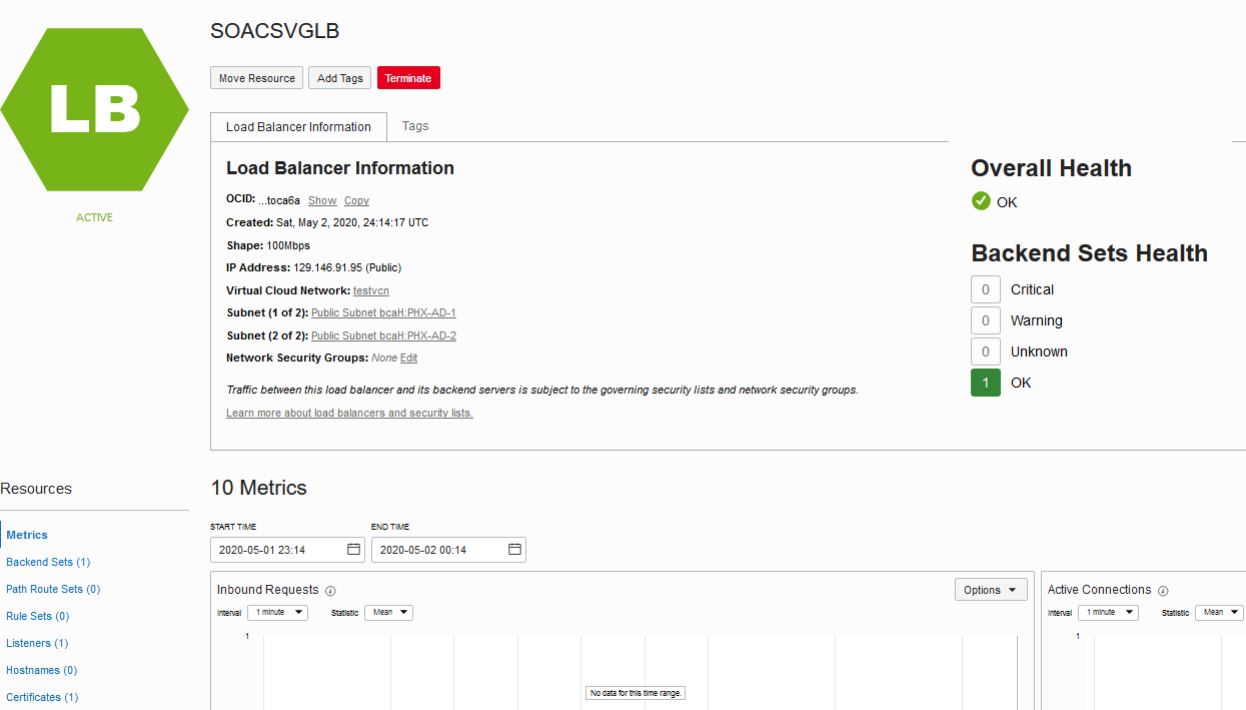
  5. Once the Oracle Cloud Infrastructure load balancer is created, note that the Overall Health and Backend Sets Health shows a status of Unknown. To resolve this, continue with the steps below.

    Load Balancer Details page

    Note:

  6. Add backends:
    1. In the left pane of the Load Balancer Details page, click Backend Sets, then click the link to the httpBackend backend set.
    2. In the left pane of the Backend Set Details page, click Backends, then click Add Backends.
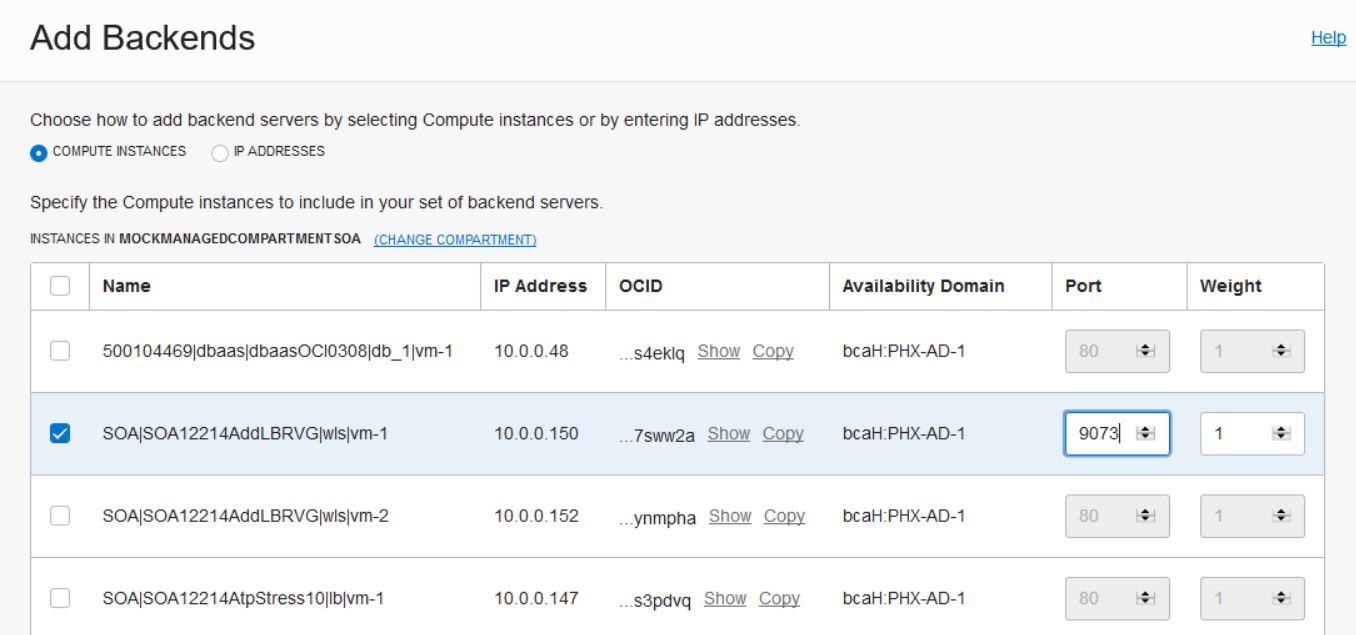
    3. In the Add Backends dialog, click CHANGE COMPARTMENT to select the compartment for your Oracle SOA Cloud Service instance if not already displayed, then select the checkbox next to the instance name, and enter a Port value of 9073.

      Add Backends page

      Note:

      If you have a multinode cluster, then choose all the instances in the cluster and enter the same Port value of 9073.

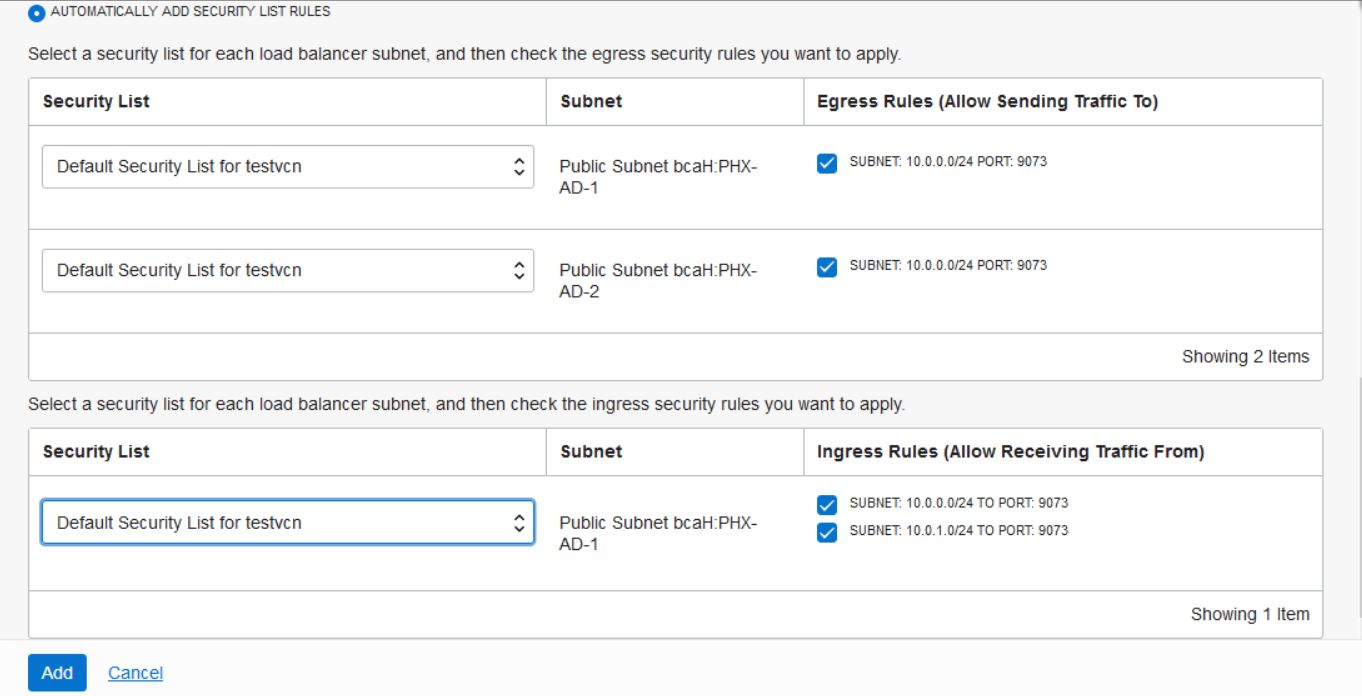
      Scroll down to view the security list rules that will be created.


      Add Backends page: security list rules
  7. Add a rule set:
    1. In the left pane of the Load Balancer Details page, click Rule Sets, then click Create Rule Set.
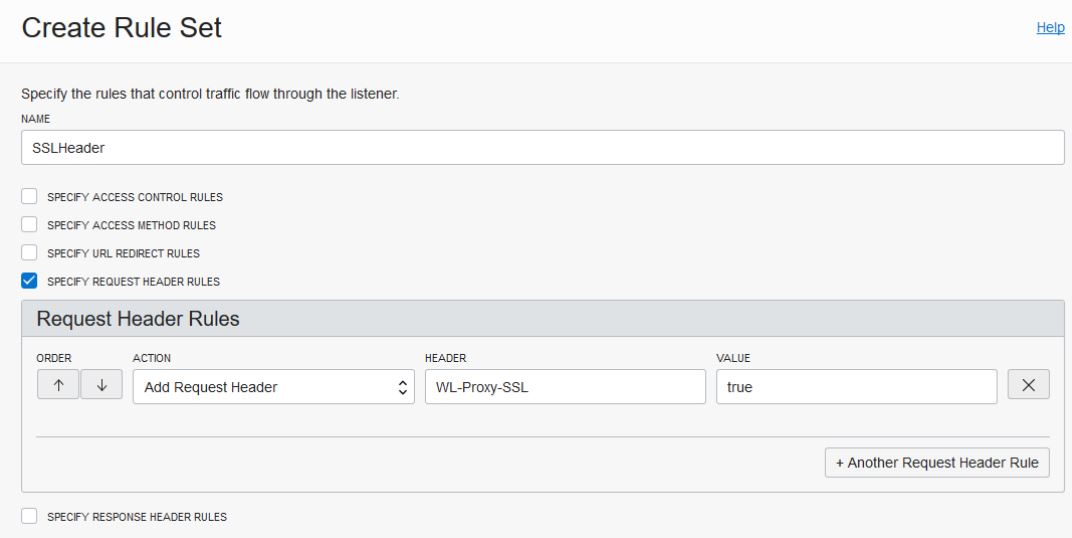
    2. In the Create Rule Set dialog, enter a name for the rule set, then select Specify Request Header Rules and enter the following information:
      • Name: SSLHeader.
      • Action: Select Add Request Header.
      • Header: Enter WL-Proxy-SSL.
      • Value: Enter true.

      Create Rule Set dialog
  8. Edit the listener:
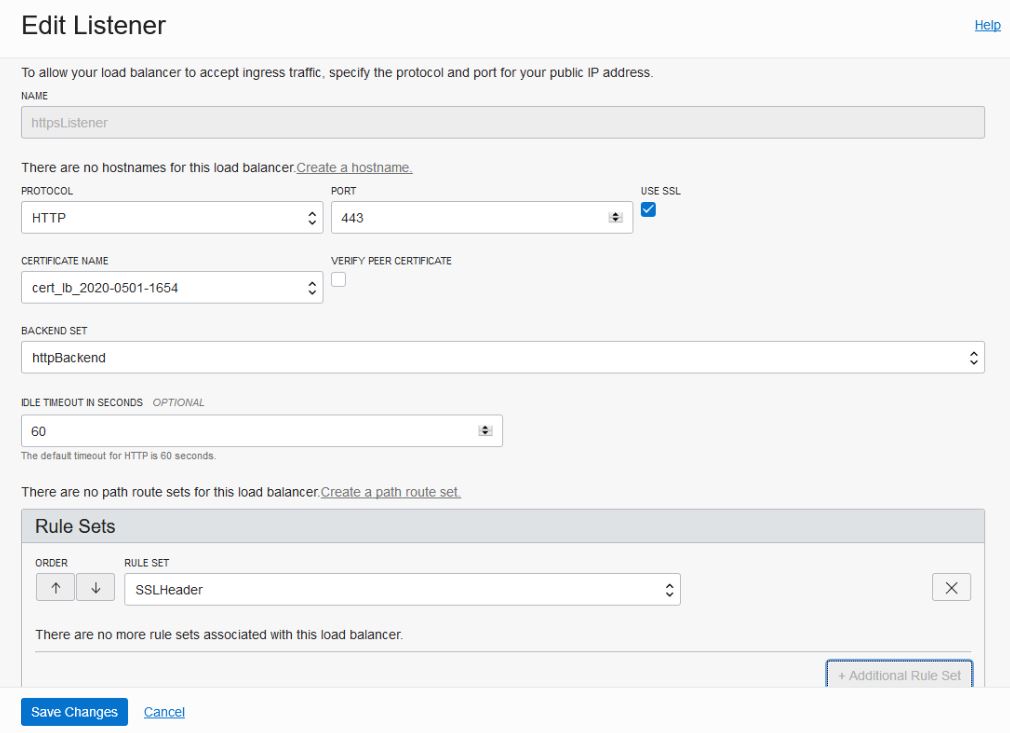
    1. In the left pane of the Load Balancer Details page, click Listeners, then click the actions icon icon at the far right of the row for the listener you created, and select Edit.
    2. In the Edit Listener dialog, select the rule set you created.

      Edit Listener dialog
    3. Click Save Changes.
  9. Update session persistence for the backend set:
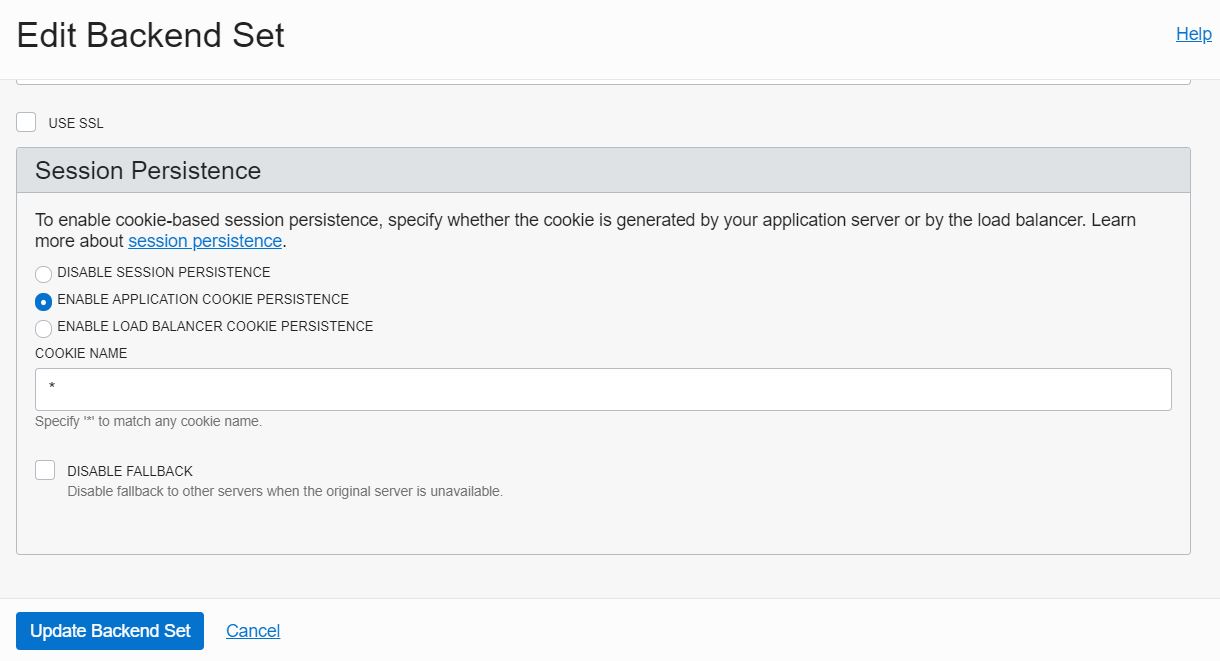
    1. In the left pane of the Load Balancer Details page, click Backend Sets, then click the actions icon icon at the far right of the row for the httpBackend backend set you created, and select Edit.
    2. In the Edit Backend Set dialog, select Enable application cookie persistence.
    3. In the Cookie Name field, enter *.

      Edit Backend Set dialog
    4. Click Update Backend Set.
  10. Import required certificates into the Oracle Cloud Infrastructure load balancer. If there are any inbound requests to Oracle SOA Cloud Service that require you to import SSL certificates into the Oracle Cloud Infrastructure load balancer, import them now.
  11. Update front end hosts:
    1. Sign in to the WebLogic Server Administration Console.
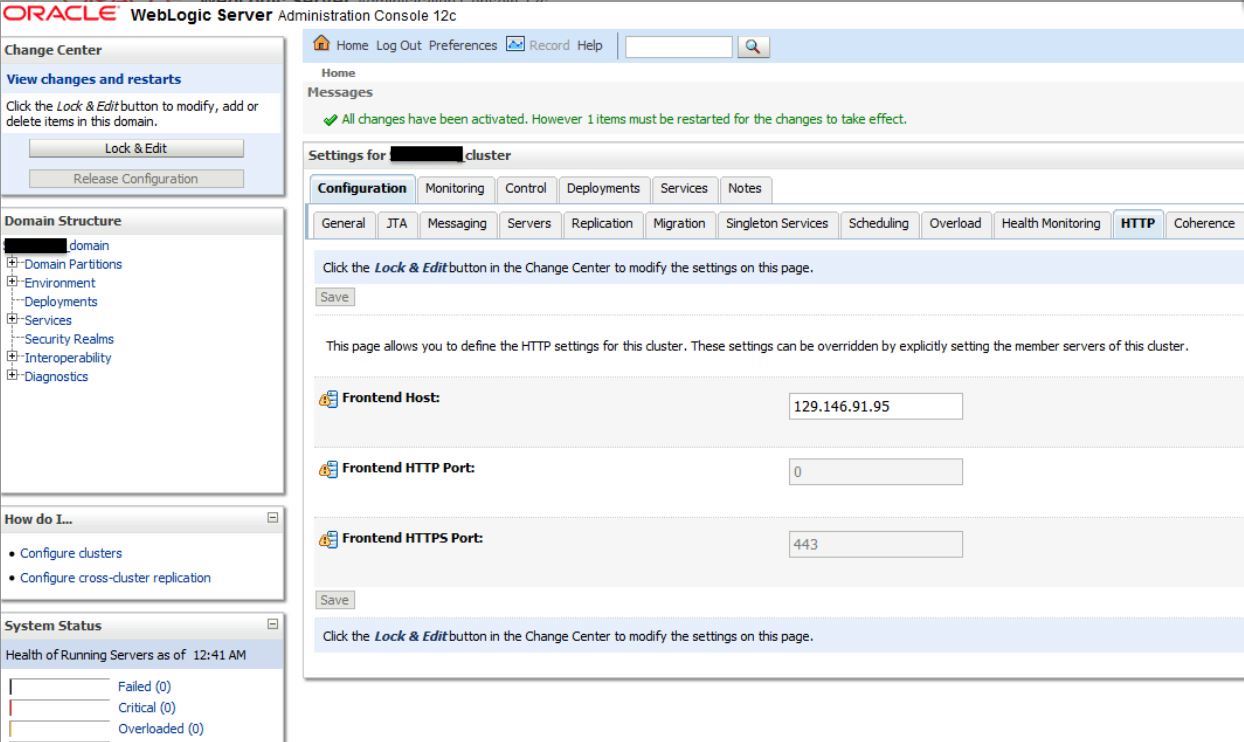
    2. Set the Frontend Host to the DNS server name. If the DNS server is not configured, then enter the IP address of the Oracle Cloud Infrastructure load balancer.

      DNS (domain name system) translates host and domain names into the corresponding numeric Internet Protocol (IP) addresses, and also identifies and locates resources on the Internet.

    3. Set Frontend HTTP Port to 0.

      WebLogic Server Administration Console
  12. Enable the WebLogic Plug-In at the cluster level:
    1. Sign in to the WebLogic Server Administration Console
    2. In the Domain Structure pane, expand the Environment node, then Clusters, and click the cluster name.
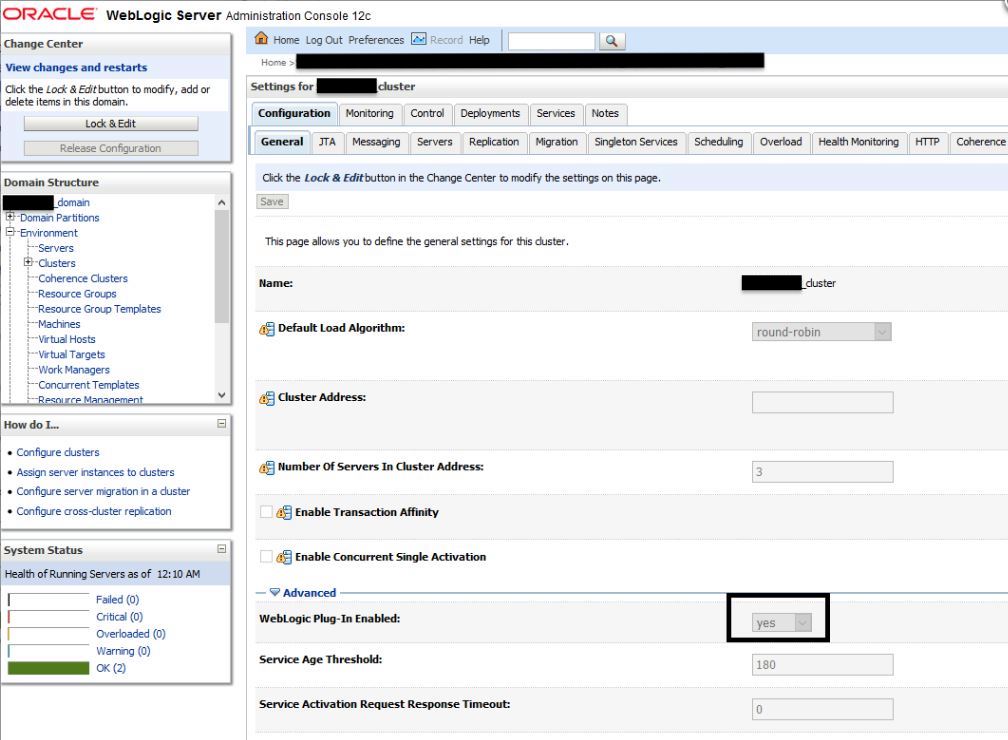
    3. On the Configuration: General tab, scroll down to the Advanced section and expand it.
    4. Click Lock & Edit, then set WebLogic Plug-In Enabled to Yes.

      WebLogic Server Administration Console Configuration General tab for cluster
    5. Click Save, then click Activate Changes.
  13. Restart the servers:

    From the Oracle SOA Cloud Service Console, restart the Administration Server and Managed Servers. See Stop or Start an Oracle SOA Cloud Service Instance and Individual VMs.

  14. Verify your configuration:

Troubleshooting Tips

If any steps in the configuration are missed or incorrectly implemented, the Oracle Cloud Infrastructure load balancer will not generate any error messages to alert you to issues. You can navigate to Oracle Cloud Infrastructure load balancer work requests and make sure the work requests have succeeded to confirm that the load balancer is working.

Use the following checklist to troubleshoot an Oracle Cloud Infrastructure load balancer that is not in Ready state:

  • In the Oracle Cloud Infrastructure Console, verify:

    • Healthcheck: port number is 9073 and status code is 404.
    • Https Listener: listen port is 443.
    • Security lists has rule defined with 0.0.0.0/0 for 443.
    • Backends are configured to use port 9073.
    • The WL-Proxy-SSL header is added to httpslistener.
  • In the WebLogic Server Administration Console, verify:
    • Frontendhost and port are configured for the cluster.
    • The WebLogic Plug-In is enabled.