12 Use Multiple Layouts for Multi-level Business Objects
When business objects in your REST service have a parent-child relationship, you can create a set of dependent layouts and then perform operations, such as downloading data and uploading your changes, to all your layouts at once.
Business Object Hierarchies
Consider an example hierarchy of business objects where purchaseOrders is the parent, lines is the child, and schedules is the grandchild.
In this hierarchy, purchaseOrders is a collection of top-level purchase orders each with one or more lines for managing the details of each order. Each of these lines may include one or more schedules for tracking shipping details.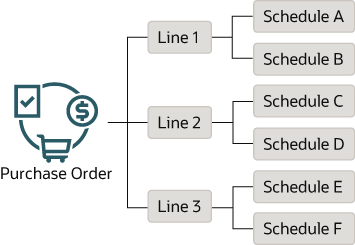
A hierarchy of business objects can go to even more levels ("great-grandchildren" and "great-great-grandchildren") or have more than one business object at each level ("siblings"). For example, the following hierarchy has "sibling" grandchildren (attachments and schedules) and a "great-grandchild" (distributions) under schedules. 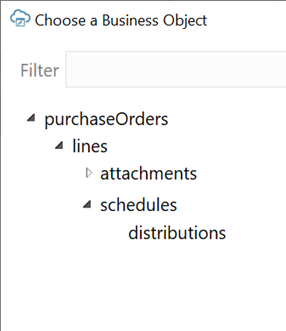
Configuring Dependent Layouts
To create a set of dependent layouts, create either a Form-over-Table or a Table layout as your top-level or "primary" layout on the first worksheet. Then create Table layouts for each subordinate level on separate worksheets. When you are done, link each dependent layout to its direct parent layout.
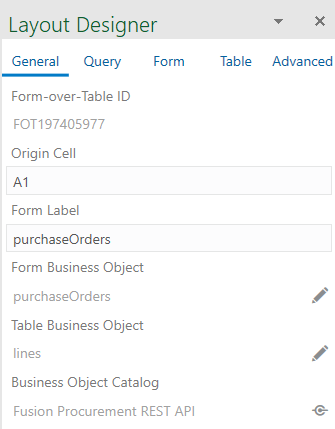
If you want to show a single purchase order and all its associated lines and schedules, create a Form-over-Table layout for the first two levels (purchaseOrders and lines) and a Table layout for the third level (schedules). You can then configure a search to prompt the user to enter a purchase order ID.
When the layouts are populated, the form part of the Form-over-Table layout displays details for the purchase order, the table part shows all the lines for the purchase order, and the dependent Table layout shows all the schedules for the associated lines.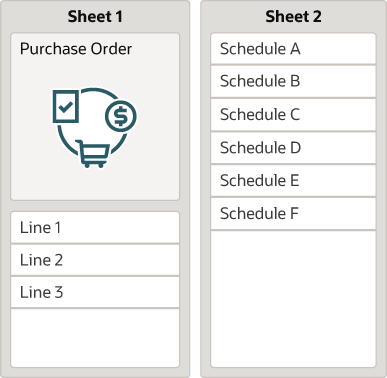
You can also use a Table layout as your primary layout instead of a Form-over-Table layout. In this case, create Table layouts for each level in the hierarchy (purchaseOrders, lines, and schedules) on separate worksheets. As before, link each dependent layout back to its parent.
In this configuration, you can display one or more purchase orders in the primary Table layout, and all associated lines and schedules in the subsequent Table layouts.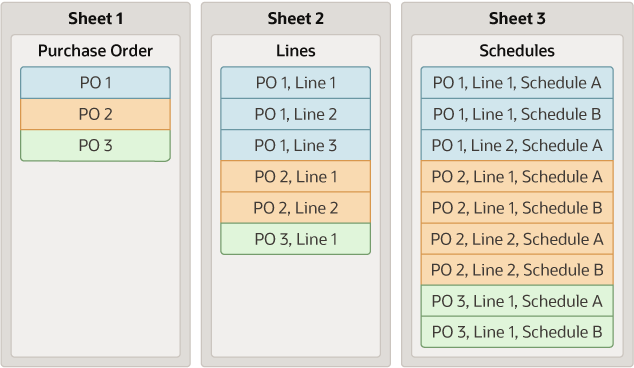
Note:
Keep in mind that a single parent may have multiple children with each of these having multiple grandchildren. Consequently, a large number of results in the primary layout may result in very large volumes of data in the subordinate layouts. To avoid performance issues when downloading and uploading data, Oracle recommends that you configure an appropriate query to limit the number of results in the primary layout. See Use Search Parameters to Limit Downloaded Data."Siblings" are business objects at the same level and can be at the second level or deeper in your hierarchy. For example, you may have a parent business object (Expenses) at the top level and two children (Itemizations and Distributions) at the second level. In this example, Itemizations and Distributions are siblings of each other.
To create a set of dependent layouts for this hierarchy, you have two options. You can create a Form-over-Table layout for the parent and one of the children (for example, Expenses and Itemizations) on one worksheet and a Table layout for the other child (Distributions) on a second worksheet. Or you can create Table layouts for each business object (Expenses, Itemizations, and Distributions) on separate worksheets. Again, use a Form-over-Table layout if you want to show a single purchase order in the form and list all associated lines and attachments in the tables.
When you've created all the necessary layouts, remember to link each dependent layout back to the parent.
Once the dependencies are established, download, upload, and clear operations act on all the linked layouts, starting from the parent layout, followed by the child layouts, the grandchildren layouts, and so on.
If you allow your users to create new rows in a layout (Create Enabled is selected in the Table's capabilities), you must add one or more columns from the parent layout to uniquely identify the parent of the new child item. To create a new distribution record, for example, the user must be able to specify the correct line and schedule for the new distribution.
Note:
You don't have to add columns to a second-level sibling layout if the parent is in a Form-over-Table layout since the sibling is linked to a unique parent in the form part of the layout.Create a Set of Dependent Layouts
Create a set of dependent layouts for a hierarchy of business objects and link the layouts together.
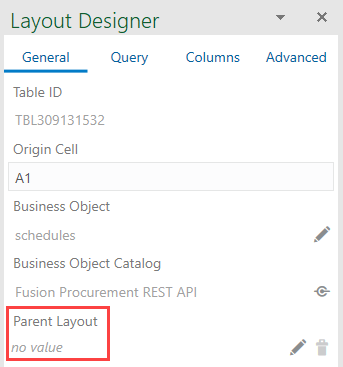
To create a set of dependent layouts, create either a Form-over-Table or a Table layout as your primary layout on the first worksheet and then create Table layouts for the other business objects in your hierarchy on separate worksheets. When you are done, link each dependent layout to its direct parent layout. Finally, configure an appropriate query to limit the number of results in the primary layout.
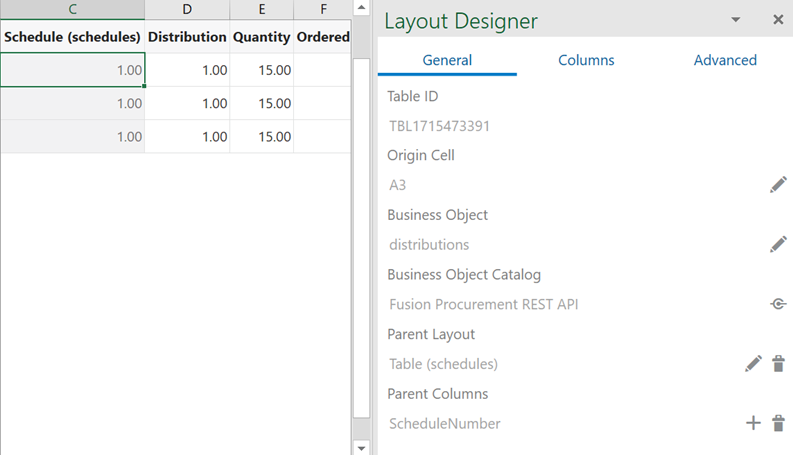
For each dependent Table layout you create, you can include a column from the immediate parent layout to help your users keep track of the parent record for each row in the table. For example, if "ScheduleNumber" is displayed as a column in the schedules layout, you can add it to the distributions layout to see which distributions are associated with this schedule.
To enable the creation of items in a Table layout, you may need to add one or more columns to the layout from the layout's immediate parent. Including parent columns in the layout allows your business users to specify a unique parent for any new items they create. See Support for Creating Items.
Let's use the example in this section to create a hierarchy of dependent layouts that mirrors your business object hierarchy.
Note:
The primary layout in a set of dependent layouts can be a Form-over-Table layout or a Table layout. This topic covers how to create a set of dependent layouts that uses a Form-over-Table as the primary layout, but the principle is the same for using a Table layout as the primary layout.Configuration for your dependent layout is complete. You can choose to configure the workbook further to limit the data that is downloaded to the primary layout. See Configure Search Options for Download.
Before you publish and distribute your workbook to users, test the workbook to ensure that download, upload, or clear operations work on all layouts in the hierarchy. See Manage Data in a Dependent Layout in Managing Data Using Oracle Visual Builder Add-in for Excel.
Download, Upload, and Clear Operations on Dependent Layouts
When you download, upload, or clear data for a layout in a dependent hierarchy, the operation takes effect on all layouts in the hierarchy, starting with the primary layout, progressing to the next layout in the hierarchy, and continuing down until the last level in the hierarchy.
If the layout is not part of a set of dependent layouts, the operation is performed on the active layout only.
Settings such as those for queries and macros only apply to the primary layout and are not enforced on other layouts in the hierarchy.
Note:
The "Download All/Stop Now" prompt also only applies to the primary layout. This prompt appears during download when the number of downloaded rows in the primary layout reaches the configured limit. Other pagination settings apply to all layouts in the hierarchy. For more information about the Limit Parameter settings, see Configure Pagination for a Business ObjectDownloading Data
On download, the add-in first checks all layouts in the hierarchy for any pending changes. If there are changes pending, the user is prompted to confirm the download operation. If the user chooses to proceed, all pending changes are lost.
During download, the add-in first retrieves the values for the primary layout from the REST service. After the primary layout is populated, the add-in makes the next worksheet in the hierarchy active and retrieves all the appropriate items.
All items for all rows from the parent layout are downloaded at each level. (Any search specifications, if configured, apply only to the primary layout.) For example, when Sheet 1 in your workbook contains Purchase Orders as the parent and Lines as the child (containing, say, 10 Lines) and Sheet 2 contains Schedules as the grandchild, the Schedules table is populated with all Schedule items for all Lines. If each of the 10 Lines had two Schedules, the Schedules table would download 20 Lines.
The download operation proceeds through the rest of the table layouts in the hierarchy, retrieving all items for all rows from the parent layout.
When the operation finishes, the primary layout becomes active and the Status Viewer shows results for the primary layout as well as a summary for each layout in the dependent hierarchy, as shown in this example for a download operation: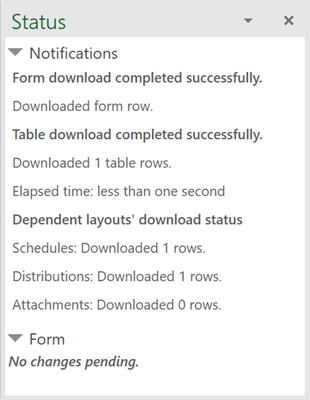
Description of the illustration dependentlayout_download.png
Following a download, you can edit data much as you would in a Table or a Form-over-Table layout.
Uploading Changes
On upload, the add-in makes the primary layout active and sends all updates. If the primary layout uses a Form-over-Table, changes are sent first from the form and then from the table. The add-in then moves to the worksheet with the first dependent table layout and uploads changes before proceeding to the next layout.
Pending changes may include creation of new items, update or deletion of existing items, and invocation of actions on items. For rows pending Update, values in the parent column cells are not uploaded.
For new items on layouts below the primary layout, values in the parent columns must match a row in the parent layout. For example, to create a new distribution, you must specify an existing line and schedule in the parent columns with which to associate the new item. Empty parent column cells in the dependent layout or in its immediate parent layout result in creation failing.
The match is performed across all parent column cells. If one row in the parent table matches, it is used as the parent row. If more than one row matches, the first matching row is used. If no rows match, then the row is marked as "Create Failed".
When the operation finishes, the primary layout becomes active and the Status Viewer shows results for the primary layout as well as a summary for each layout in the dependent hierarchy.
Clear
When the clear operation is invoked, data is cleared from all the layouts in the dependent hierarchy.
Support for Creating Items
To enable the creation of items on layouts below the primary layout, add one or more columns to the layout from the layout's immediate parent. Including parent columns in the layout allows your business users to specify a unique parent for any new items they create.
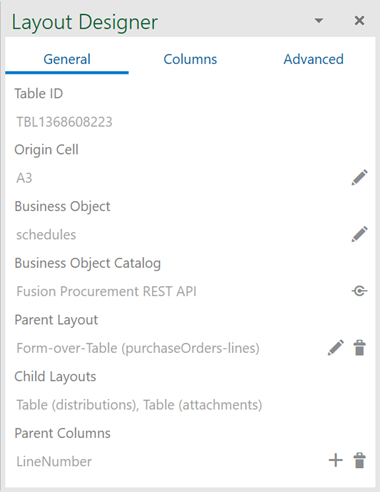
The parent columns you choose must uniquely identify the parent row and must be exposed in the parent table. For example, to create a new distribution, a user must be able to specify an existing line and schedule with which to associate the new item. Therefore, you would want to add columns such LineNumber and ScheduleNumber to both the distributions and schedules layouts.
If no parent columns are configured, the table cannot support item creation and rows inserted into the table are ignored during upload.
Note:
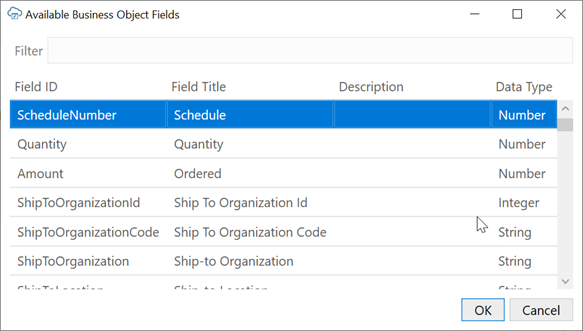
You don't have to add columns to a second-level sibling layout if the parent is in a Form-over-Table layout since the sibling is linked to a unique parent in the form part of the layout.Add a parent column to a dependent layout using the Add Parent Column icon (![]() ) in the Layout Designer's General tab.
) in the Layout Designer's General tab.
The field must be exposed as a column in the parent table. If you don't see the field you want to use in the Available Business Object Fields window, you'll need to add it as a column in the parent table.
Repeat the step to add additional columns from the parent layout and then redraw the layout when you're done. The parent columns appear after the Status column in the layout in the order you added them. The table header for the parent column uses the format "<field title> (<parent business object title>)" such as "Line Number (lines)".
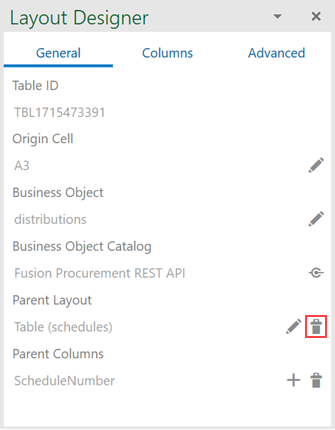
To clear the set of parent columns, use the Clear Parent Columns icon (![]() ) next to the Parent Columns property.
) next to the Parent Columns property.
