5 Manage Catalogs and Business Objects
When you edit the details of business objects in your workbook, you're only telling the add-in how the service operates, you are not telling the service what it should do. Service behavior cannot be changed from the workbook. So any changes you make to the catalog in the workbook must be compatible with the service.
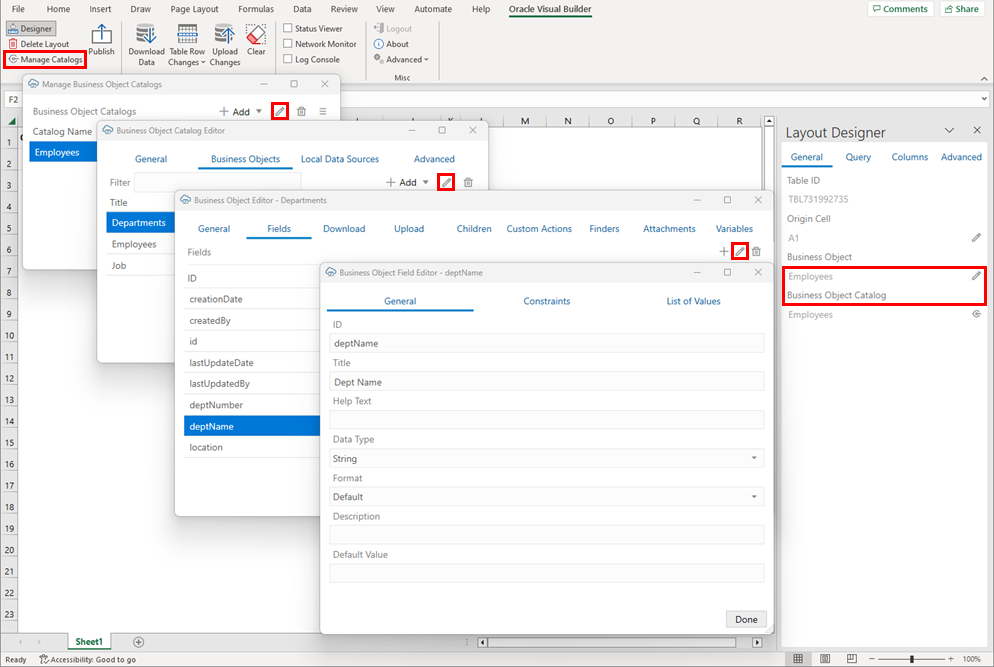
To view the editors progressively, start by clicking Manage Catalogs from the Oracle Visual Builder tab. This opens the Manage Business Object Catalogs editor. From here, you can choose a catalog and open the Business Object Catalog Editor, and so on.
You can also open the business object and business object field editors from the Layout Designer. Both options (using Manage Catalogs and the Layout Designer) are shown here:
Use these editors to perform tasks such as these:
- Manage Business Object Catalogs: Import, open, and refresh a catalog
- Business Object Catalog Editor: Configure the host and base paths for a catalog, as well as configure the business objects in the catalog. You can also configure more advanced settings such as authentication, GZIP, and the REST API Framework.
- Business Object Editor: Override the base path of the object, manage metadata path information, configure pagination, and configure row finders. You can also find Download and Upload tabs for configuring download and upload operations.
- Business Object Field Editor: Edit field titles, change when a field is editable, adjust the field data types (Advanced), and configure Help text. You can also configure the list of values for a field.
Note:
When reading through the topics in this section, you'll come across many terms such as OpenAPI, REST service, and path. Before you begin, refer to Key Concepts, Components, and Terms to familiarize yourself with some of these terms.Add Business Objects to an Existing Catalog
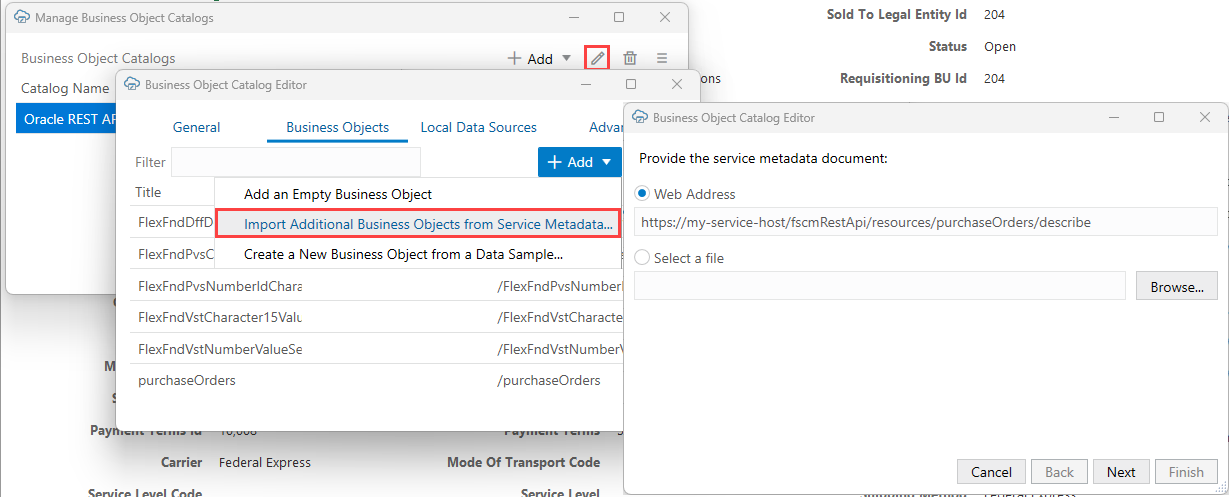
If your catalog is missing one or more business objects, you can add new business objects to the catalog using the Business Object Catalog Editor. These new business objects must be available at the same host as the other business objects in that catalog.
Note:
The REST API type of the new business object must match the catalog. For example, you can't add an ORDS business object to an ADF REST catalog.This is particularly useful when configuring a list of values.
Import a Business Object Catalog
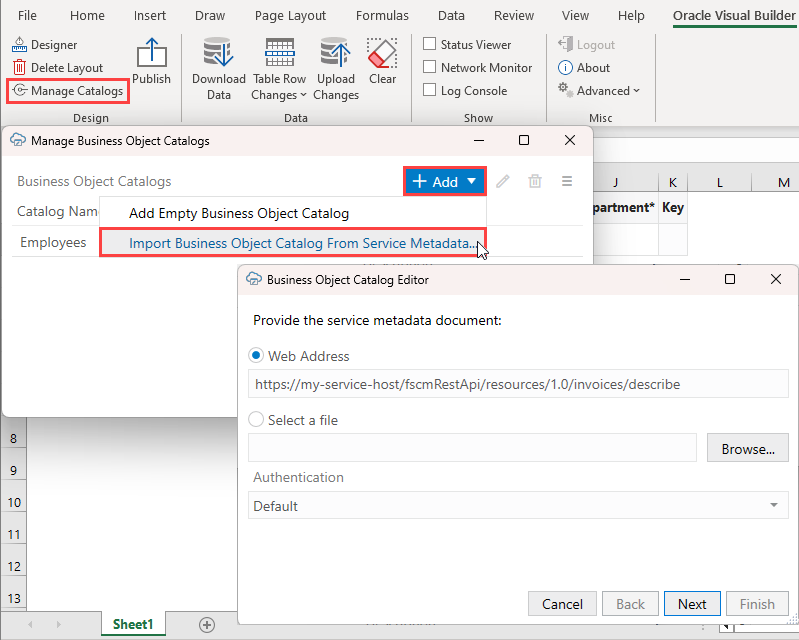
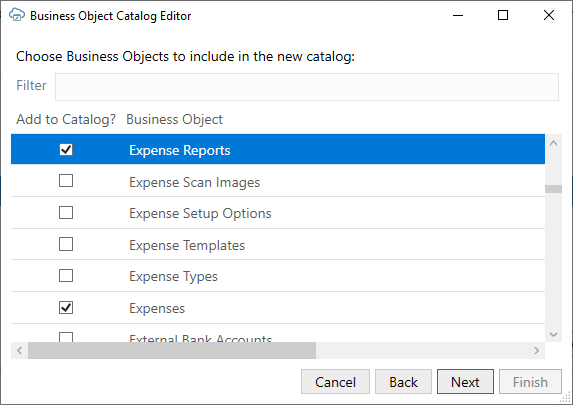
You can import a business object catalog by providing Oracle Visual Builder Add-in for Excel with the catalog's service metadata document.
You may also want to import an additional catalog if you need to use a different service at a different host or framework type.
Caution:
If you want to add an additional business object to your workbook, you should generally add it to your existing catalog. See Add Business Objects to an Existing Catalog for the steps.To import a catalog:
Once the catalog has been created, review other topics in this and other chapters to see how you can improve the catalog for your workbook's layouts. For example, you may want to add help text or lists of values to fields in the new catalog's business objects. See Add Help Text to Your Workbook or Use Lists of Values in an Excel Workbook.
You may also want to edit the name of the catalog in the Business Object Catalog Editor to make it easier to understand its purpose. Very often, the title that the add-in displays for the catalog in the Excel workbook is the name of one of the business objects that the service exposes. For example, this image shows a catalog in which the default value for the Title property is "Employees". This catalog exposes an Employees business object, so to avoid confusion, you can change the title that the catalog uses in the Excel workbook to something like Human Resources Services.

Description of the illustration excel-change-service-name.png
Note:
Certain OpenAPI document properties, such as Description, can contain formatting hints. The add-in displays the description text as is, with no interpretation of such hints.Create a Business Object Catalog from a Data Sample
Use Oracle Visual Builder Add-in for Excel to create a business object catalog from a data sample when you don't have an OpenAPI-compliant service metadata document.
If you have the host, base path, and resource name for the service metadata, the add-in can form the REST endpoint URL and send a GET request to the service to fetch a sample of data. The add-in can then use this sample to produce a list of fields available for that REST resource.
The add-in does this by first analyzing the JSON response to find the first JSON array available. It then selects the first JSON object in that array and, from this object, produces a list of business object fields. The add-in then creates a new business object in the catalog with that list of fields.
This new business object includes best guesses for the following:
- The Collection Path including GET and POST (create) operations
- Item Path including GET, PATCH (update), and DELETE operations
- Field properties such as data type
Note:
These guesses may not match the actual capabilities of the service. It is recommended that you review the business object definition and make sure it matches the service.- Click Manage Catalogs from the Oracle Visual Builder ribbon.
- Open the desired catalog or create a new one.
Make sure the Host and Base Path properties are set correctly.
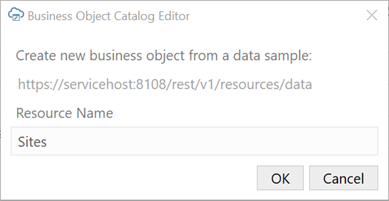
- From the Business Objects tab, click + Add, then select Create a New Business Object from a Data Sample from the list.
- Type in the name of the desired resource and click OK.
- Review the business object definition to ensure it matches the service.
Here are some things to watch for:
- If the service does not support delete, remove that operation from the item path or turn off delete in any layout that uses this business object.
- If a given field is required or read-only, update the field settings from the General tab of the Business Object Field editor. Date fields may appear as string fields. Adjust the data type of fields as needed.
- The add-in can't determine the data type of fields with null values. In these cases, the data type is set to "unsupported". These fields are not eligible for layouts, search, and so on. For these fields, correct the data type using the Business Object Field editor.
- The add-in guesses that the primary key field is named "id". If the primary key field has a different name, use the Business Object Editor to update the item path as well as the parameter on each operation in the item path.
Configure Business Object Fields
Use the Business Object Field Editor to view and modify field settings as required.
Many of these settings control the appearance and behavior of the fields in your workbook and can be modified as desired. For example, you can enhance the usability of your workbook by:
- Changing a field title to something more intuitive.
- Overriding the default format for a field.
- Adding help text to help your business users understand the purpose of the field.
- Defining custom field validation rules.
- Requiring the business user to provide a value for a field in the search prompt.
- Adding a list of values to ensure your business users can only enter a valid value for the field.
WARNING:
Some settings in the editor come from the service metadata and reflect how the REST service behaves. Changing these settings in the workbook cannot change the behavior of the service and may result in errors from your REST service. Refer to the notes in the table for recommendations for each field.To modify the settings for a business object field:
Set an Authentication Method for a REST Service
Configure authentication for Oracle Visual Builder Add-in for Excel when connecting to the REST service.
When you create a new catalog from a URL, you can configure the authentication method depending on the service. The add-in provides five authentication options: Default, Basic Access Authentication, Oracle Fusion Applications Token Relay, OAuth 2.0 Authorization Code (PKCE), and No Authentication.
At log in, the add-in uses this setting to determine how to log in. If required, you can change the authentication method using the Advanced tab of the Business Object Catalog Editor.
See Authentication Options for more information.
- Click Manage Catalogs.
- In the Manage Business Object Catalogs window, select your existing catalog and click the Edit Business Object Catalog icon.
- In the Business Object Catalog Editor, click Advanced.
- Select an authentication method from the Authentication list:
- Default: At login, the add-in pings an Oracle Cloud Application anti-CSRF servlet endpoint. If the ping succeeds, Token Relay is used. If the ping fails, Basic authentication is used instead.
- Basic Access Authentication: See Basic Authentication.
- Oracle Fusion Applications Token Relay: See Oracle Fusion Applications Token Relay Authentication.
- OAuth 2.0 Authorization Code (PKCE): See OAuth 2.0 Authorization Code Flow with PKCE.
- No Authentication: There is no prompt for credentials. No authentication-related headers are added to requests.
Caution:
Be sure to choose an authentication method that is compatible with your catalog. - If the authentication method includes configuration properties, the Edit Authentication Properties button is enabled. Click the button to edit those properties.
Override a Business Object's Base Path
You can configure a business object to use a different base path than the rest of the catalog. The Oracle Visual Builder Add-in for Excel then uses this base path when making REST requests for the business object.
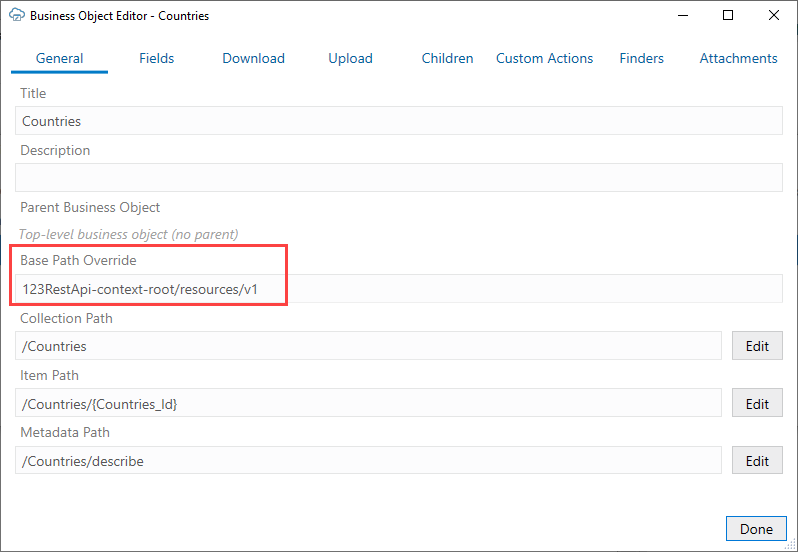
Typically, a business object catalog holds business objects that share a base path (say, /abcRestApi-context-root/resources/v1). But if a business object needs to use a different base path (for example, your list of values come from /123RestApi-context-root/resources/v1), you can provide a new base path for the business object through the Business Object Editor.
To configure a business object to use a base path different from the one shared by business objects in the Catalog:
- Add a business object to your Business Object Catalog. See Add Business Objects to an Existing Catalog.
- Click the General tab in the Business Object Editor, enter the different base path in Base Path Override to override the base path used by all business objects in the Catalog, and click Done.
The add-in assumes that no extra authentication is required by business objects with a base path override.
You can now use the newly created business object as the data source business object for a list of values if required. See Configure a List of Values with a Business Object.
Manage Metadata Path Information
When you provide a service metadata document, Oracle Visual Builder Add-in for Excel captures the path to the service metadata document relative to the service host and base path of the catalog. You can view this path and other path settings from the Business Object Editor.
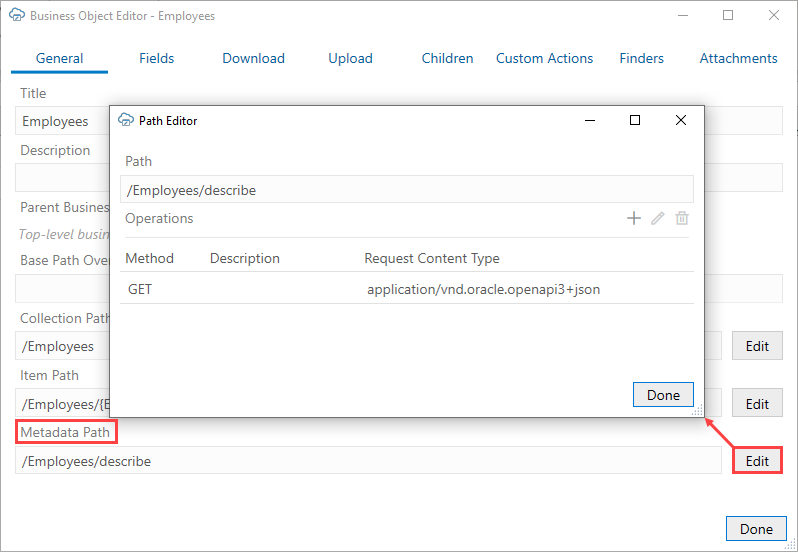
This relative path is displayed in the Metadata Path field on the General page of the Business Object Editor. The add-in uses this path when you refresh the business object catalog. See Refresh a Business Object Catalog.
The add-in also captures path information such as REST API methods and parameters and displays these details in a couple of editors: the Path Editor and the Operation Editor. Open the Path Editor by clicking the Edit button next to the Metadata Path field.
The Path Editor lists all the available methods. To view settings for a method, including headers and parameters, select a method from the list and click the Edit Operation icon (![]() ) to open the Operation Editor.
) to open the Operation Editor.
The values seen in this image are correct for an Oracle ADF REST Resource service. Other service frameworks may require other values. For example, Oracle REST Data Services (ORDS) might have a metadata path of "/open-api-catalog/employees" and a content type of "application/json". Refer to Oracle REST Data Services for more details.
Caution:
The metadata path should include a GET method that specifies the correct request content type that the service expects for a metadata request. If you need to modify these settings, be sure to provide values that will result in the service returning a proper OpenAPI service metadata document.
Consult the REST API owner for the required values.
Configure Pagination for a Business Object
If the REST service supports pagination, you can download a large number of rows using multiple requests.
Imagine you need to download 10,000 rows of data. Downloading one row at a time is too time-consuming, and attempting to download all 10,000 rows in one request might result in a timeout error. Instead, download one page at a time where the page contains, for example, 500 rows.
Note:
Pagination does not limit the total number of rows downloaded. All available rows are downloaded with or without pagination. Pagination controls how many rows are downloaded *per request*. In the example here, there would be 20 requests of 500 rows to download all 10,000 rows.You can configure the pagination behavior using the Download tab in the Business Object Editor.
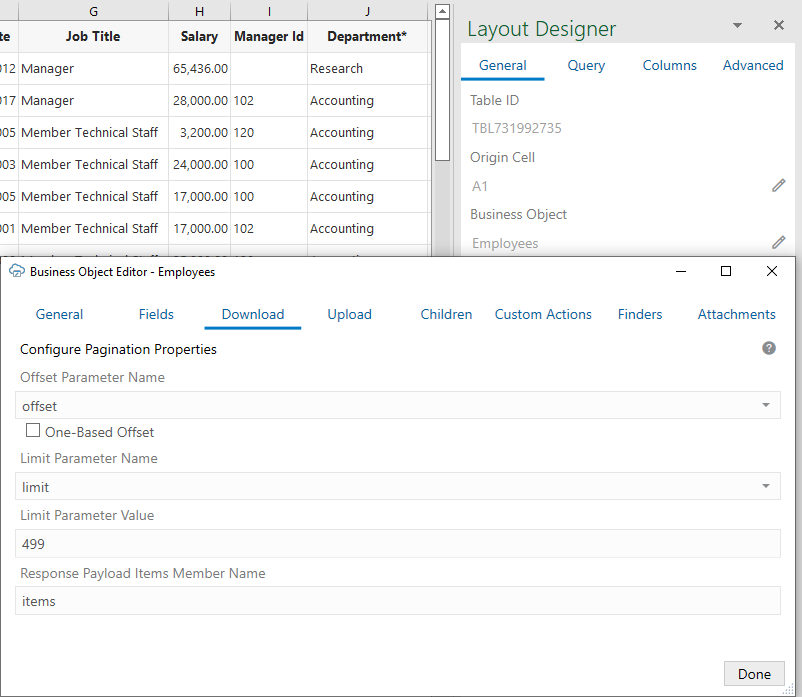
Description of the illustration vb-excel-download-prop.png
Configure the following as required:
- Offset Parameter Name: The name of the URL parameter that controls where to start the next page. When fetching the first page, the add-in uses a value of zero. When fetching the second page, the add-in uses a value of 499, assuming the limit value is 499.
- One-Based Offset: Controls whether the service starts counting from one. If this check box is unselected, the service assumes the service starts counting from zero.
- Limit Parameter Name: The name of the URL parameter that controls how many rows to fetch for each page.
- Limit Parameter Value: Controls the page size (number of rows that the add-in downloads).
For example, using the defaults for an ADF REST service, the add-in appends ?offset=0&limit=499 for the first download request.
For other service types, pagination may or may not be supported. If supported, the service may use parameter names like offset and limit or it may use other parameter names for the same purpose.
Consult the service API documentation to determine which parameters to use.
Refer to Download Data for more information.
Configure Row Finders for a Business Object
Row finders are predefined filters available through Oracle ADF REST Resource services that allow you to download a specific subset of records. If the service owner has included row finders with the service, you can view and configure them through the Finders tab of the Business Object Editor.
For example, if your service includes a row finder that filters expense reports by "unapproved" status and assigned to the "current user", you can use the row finder to download only those expense reports that require your approval. See Use Row Finders to Limit Downloaded Data.
Row finders are defined through the service. You can't add or configure them through Oracle Visual Builder Add-in for Excel. However, you can configure how they appear in the add-in. For example, you can
- Remove unwanted row finder variables so that they don't appear in the prompt at download time
- Give row finders or row finder variables a more readable title
- Add some help text to help your business users understand what a row finder does or what should go in a row finder variable
- Configure a list of values for a row finder variable
Note:
Any changes you make must be compatible with the service. If your changes are incompatible, you will likely see errors during a download.To configure row finders:
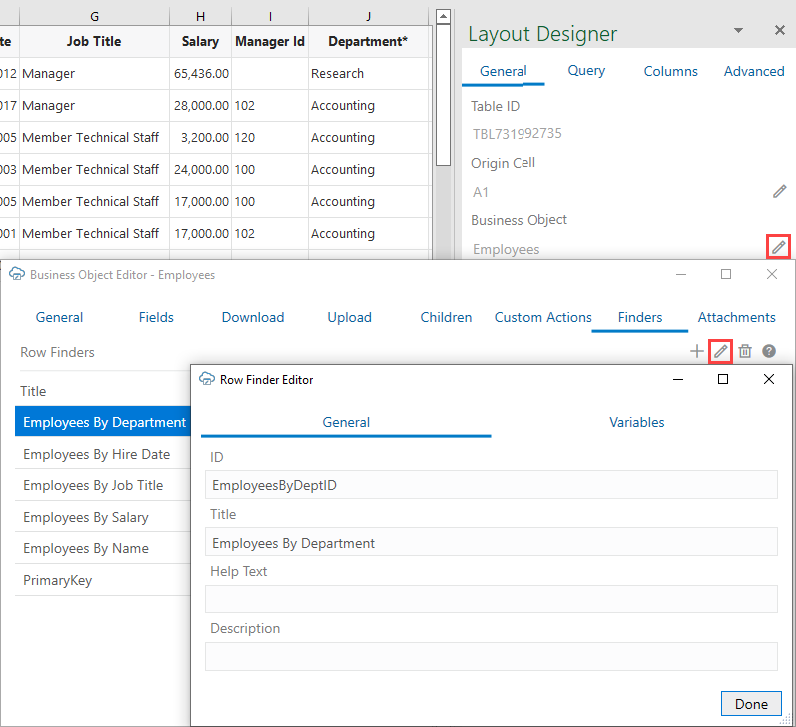
- In the Excel ribbon, click Designer.
- In the Layout Designer, click the Edit icon (
 ) next to the Business Object field.
- Click the Finders tab in the Business Object Editor to view a list of available row finders. Remove row finders if required.
Note:
The Finders tab is only displayed for Oracle ADF REST Resource services. - To edit a row finder's details, select it from the list and click the Edit icon (
 ).
). - Use the Row Finder Editor to edit the row finder.
Caution:
When editing a row finder, take care to not change the row finder's ID.You might want to change the value for the Title property to be more readable. You can also add descriptions of the row finder using the Help Text and Description properties.
The Help Text property is intended to give your business users more information about the row finder. This text is displayed in a popup next to the row finder title in the Search Editor. The Description property is intended for workbook developers. This text is displayed only in the designer UI, like the Finders tab of the Business Object Editor. You can use this property, for example, to provide technical details of the row finder to workbook developers.
Note:
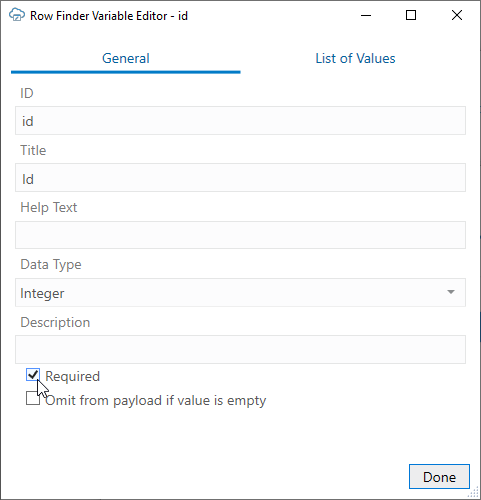
The values for the Title and Help Text properties can be translated. See Manage Workbook Translations. - If a row finder supports variables that act as arguments or parameters for the finder, click the Variables tab to update or delete variables. For example, you can change the row finder variable's title (but not the ID) or set the variable as required to force the user to provide a value at download time, as shown here:
As with a row finder, you can use the Help Text and Description properties to provide useful descriptions of the variable. The Help Text value is displayed as a popup next to the row finder variable in the Search Editor.
Note:
The values for the Title and Help Text properties can be translated. See Manage Workbook Translations. - If required, configure a list of values for a row finder variable from the List of Values page in the Row Finder Variable Editor.
Note:
A list of values is a drop-down list populated with values from a referenced business object or a local data source. Filters can also be defined to further limit the values to those required by the business user. These filters can contain expressions that are resolved at runtime. See Configure a List of Values with a Business Object and About Expressions. - Click Done until you return to the Layout Designer.
Once you are done making changes, the row finders become available to you as an option to limit downloaded data, as described in Use Row Finders to Limit Downloaded Data.
Use Row Variables for a Business Object
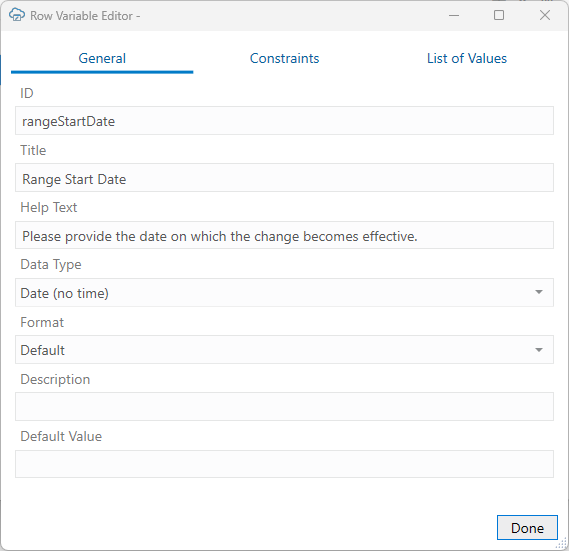
A row variable is a custom field you can add to a layout that allows business users to capture details for a row, such as a range start date for a date effective object. The row variable feature is intended to provide improved support for date effective objects.
When creating an integrated workbook for a date effective business object, you'll need to configure additional REST request headers of type Effective-Of. These headers may include a range attribute, such as RangeStartDate, that requires a date. See Support for Date Effective Objects.
The row variable feature provides a way for the business user to capture an appropriate date for a row that can be used in the header during upload.
Configure a Row Variable for a Layout
Unlike a business object field, a row variable is not defined in the service metadata and the value of a row variable isn’t included in upload request payloads.
This feature is intended to provide support for workbooks with date effective objects. If you create a layout for a date effective object, you may need to create a REST request header of type Effective-Of that includes a range start date. This header can use an expression to reference a date value stored in the row variable you create.
This task uses the example of a row variable to capture the RangeStartDate range attribute that will be referenced in an Effective-Of REST request header. See EffectiveOf Headers in Multi-Row Requests for more information.
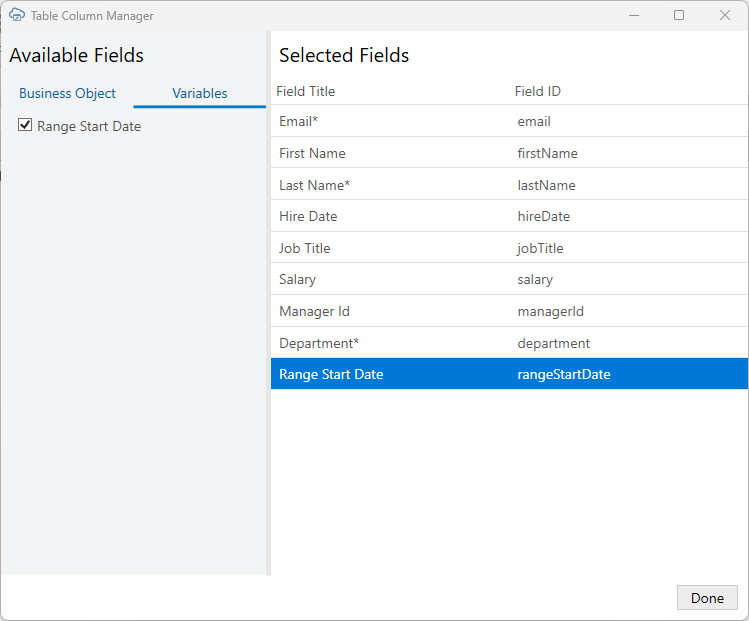
To configure a row variable for a layout:
Now that you've created a row variable and added it to your layout, your business users can use this row variable to select a range start date for an updated row.
If you've created the row variable for a date effective object, go ahead and configure a REST request header that references this row variable. See Configure a Request Header
Configure GZIP Compression for Request Payloads
For a POST, PUT, or PATCH request to the service that takes payloads, you can choose to compress the payload body using GZIP if the service accepts compressed request payloads.
When the Supports gzip compression for request payloads option is selected, the Content-Encoding: gzip header is added to the request. This option (found in the Business Object Catalog Editor's Advanced tab) is selected by default for Oracle ADF REST Resource services.
Refresh a Business Object Catalog
If a service owner makes significant changes to the service metadata–especially its business object definition–after the workbook is integrated with the service, you can refresh the workbook's business object catalog to take advantage of the latest changes.
Refreshing a catalog is useful when changes to the service metadata are extensive–for example, when new fields, custom actions, or row finders are added to the service–and updating the business objects to incorporate these changes would take considerable time and effort. You can also refresh the catalog when a new version of Oracle Visual Builder Add-in for Excel improves the metadata harvesting.
Your catalog might be based on a single service metadata document that defines one or more business objects. But a catalog can also include business objects that you have imported separately and that have their own service metadata documents. When you refresh a catalog, Oracle Visual Builder Add-in for Excel reads the metadata path for each business object and issues a request that returns the business object details from the service metadata document.
You can only refresh a catalog with URL-based service metadata documents. Catalogs with file-based service metadata documents cannot be refreshed from a file.
Caution:
A refresh overwrites any changes that you've made locally to the business object catalog. If you've spent a lot of time customizing the business object (especially field titles), consider whether it's worth redoing those changes; it might be simpler to manually add that new field or custom action. Before refreshing a catalog, back up the workbook in case you want to revert your changes.To refresh a business object catalog:
During the catalog refresh:
- Existing business objects are refreshed based on the response from the metadata path. New business objects are not added to the catalog. No business objects are removed.
- For existing business objects, new fields, finders, custom actions, and so on are added and existing items are refreshed. No existing items are removed.
- When an existing item is refreshed, the item's new properties replace the older properties. For example, a field's title, required, and editable properties are copied from the newer version to the older version, except when a new property is empty. If a field's newer version has a list of values configured, the newer list of values replaces the older list of values. If the newer version doesn't have a list of values, the previous list of values is left unchanged.
- A refresh does not change any field formats, as those are always set manually.
- In the Layout Designer, click Columns.
- Click Manage Columns (
 ) and select the new field. Click Done.
Configure the REST-Framework-Version
You can change the value of the REST-Framework-Version request header, set to version 6 by default for Oracle ADF REST Resource services. The REST framework version determines functionality for accessing business objects.
