9 Use Lists of Values in an Excel Workbook
You can configure a list of values (LOV) for a field in your workbook to allow business users to select a valid value from a drop-down list. You can also allow users to enter a search term in a search box to filter this list to find the value they want.
Oracle Visual Builder Add-in for Excel supports LOVs on business object fields including custom action payload fields and descriptive flexfields with parameter and segment type client binds. The add-in also supports lists of values for search fields and row finder variables.
Lists of values also manage the conversion of internal ID or code values to and from user-friendly display values.
About Lists of Values
When you configure a list of values in your workbook, Oracle Visual Builder Add-in for Excel displays a drop down list of values when a business user selects the field.
If a filter with a search term parameter is configured, a business user can also search for values in the list by typing a search term in the search-and-select window and clicking the Search icon.
In this image, the search-and-select window on the left is populated with a list of values drawn from a Jobs business object. The search-and-select window on the right shows the result of entering S in the search box and clicking the Search icon.
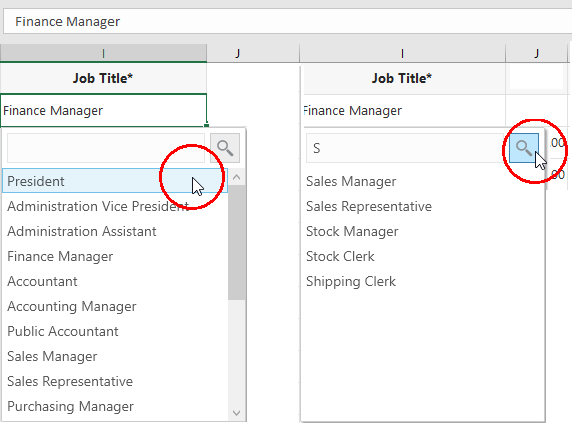
When a business user clicks the Search icon, the list of values displays only job titles that begin with S such as "Sales Manager", "Sales Representative", and so on. Business users can also enter the full value in the search box, assuming it's a valid value such as "Sales Manager".
Lists of values can also be configured to show more than one display field in the search-and-select window. The add-in shows all the display fields, in separate columns, in the search-and-select window but concatenates those values configured for display when shown in the Excel cell.
In this image, the search-and-select window on the left shows separate columns for first and last names. The search-and-select window on the right shows the result of entering Jo in the search box and clicking the Search icon.
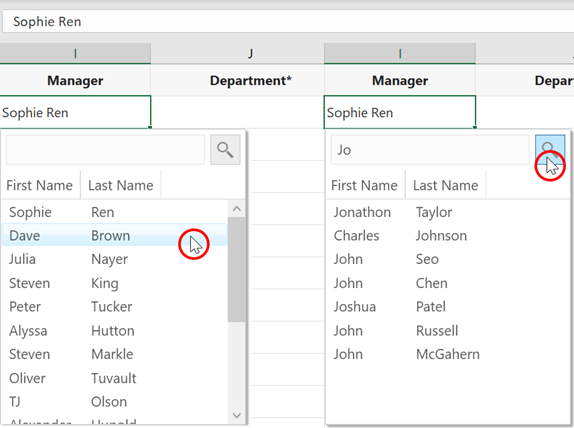
The list of values displays all first or last names that match the string. In this example, the add-in matches the search string "Jo" to the first name "Joshua" but also the last name "Johnson".
Each item in the list of values has a display value (which appears in the Excel workbook) and an identity value that is retrieved and posted to the business object field. For example, the Jobs business object used for the list of values might contain these display and identity values:
| Display value (jobTitle) | Identity value (jobId) |
|---|---|
| President | PRES |
| Finance Manager | FIN_MGR |
| Sales Manager | SAL_MGR |
On download, the identity values are replaced by the display values; On upload, the display values are replaced by the identity values.
Configure a List of Values with a Business Object
Configure a list of values that uses values from another business object. List of values are supported for business object fields, custom action payload fields, and row finder variables.
When you create a list of values, you can associate the selected field with the values from another business object. For example, you may have two business objects: Employees and Jobs. If the Employees layout includes a JobId column, you may want to add a list of values that references the jobId field from the Jobs business object.
When a business user selects a cell from the Job Title column in the Employees layout, a search-and-select window shows a list of values drawn from the Jobs business object for the user to choose from.
You can configure a list of values to show more than one display field in the search-and-select window. The add-in shows all the display fields, in separate columns, in the search-and-select window but only those you configure are shown in the Excel cell. If you choose to show more than one field in the cell, the values are concatenated.
For business object sources, you can configure a filter to restrict the results to a given subset of values. You can also configure it to let business users filter the list based on a search term they type in a search box. See Configure a Filter for a List of Values.
If the catalog is missing the desired business object, you can add a new business object to an existing catalog (see Add Business Objects to an Existing Catalog).
If you want to reference a business object with a different base path, you can create or import a business object into the current catalog and then override the base path (see Override a Business Object's Base Path).
Note:
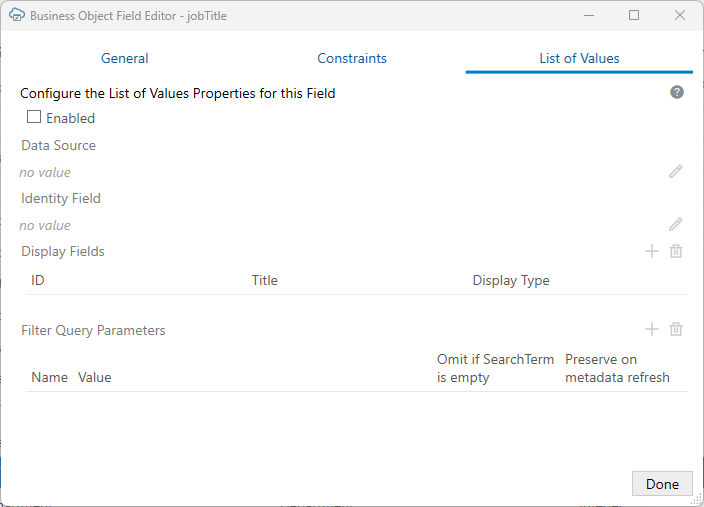
This procedure takes you through the steps to create a list of values for a business object field used in a form, table, or search. The steps are the same for custom action payload fields and row finder variables except for the navigation. To open the List of Values page for a custom action payload field or row finder variable, open the Business Object Editor and go to the Custom Action or Row Finder page. From there, select the appropriate field or variable.
To create a list of values based on a local data source instead, see Configure a List of Values with a Local Data Source.
To create a list of values:
- From the Layout Designer, click the Edit (
 ) icon next to the Business Object field.
- From the Business Object Editor, click the Fields tab, then select the business object's field.
-
Click the Edit (
 ) icon to open the Business Object Field Editor, then click the List of Values tab.
- Select the Enabled check box on the List of Values page.
- Click the Edit (
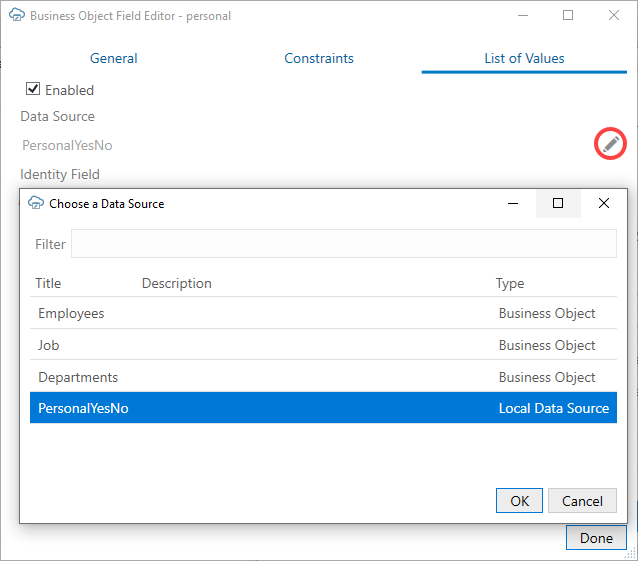
 ) icon next to the Data Source field, then pick an appropriate data source. Only business objects from the current catalog are displayed in the Choose a Data Source window.
This data source provides the display values for the corresponding identity values.
- Click the Edit (
 ) icon next to the Identity Field field, then choose the appropriate identity field from the data source.
This is the field used to look up the display values for the identity values in the current field.
- Click the Add Field (
 ) icon to open the Available Business Object Fields Editor, then choose the desired display field.
These fields come from the data source and are shown instead of the identity values where this field is used in a layout.
You can choose multiple display fields for one list of values. Repeat this step to add additional display values.
- For each display field, select either Picker and cell or Picker only from the Display Type list.
If you configured only one display field, use Picker and cell to display the value in both the Excel cell and the search-and-select window. For additional display fields, use Picker only if you don't want to display the value in the Excel cell.
Note:
When configuring the display values, make sure the information in the cell is unique and meaningful for your business users. Take for example a Contact field in your layout. To ensure your business users have enough information to determine the right contact for a purchase order, you may want to include the contact name, company, and email as display fields in the Excel cell. In this case, ensure that the display type for these display fields are set to Picker and cell. - To configure a filter, click the Add Query Parameter (
 ) icon next to Filter Query Parameters, then set a name and parameter value.
If the parameter requires a search term, select Omit if SearchTerm is empty.
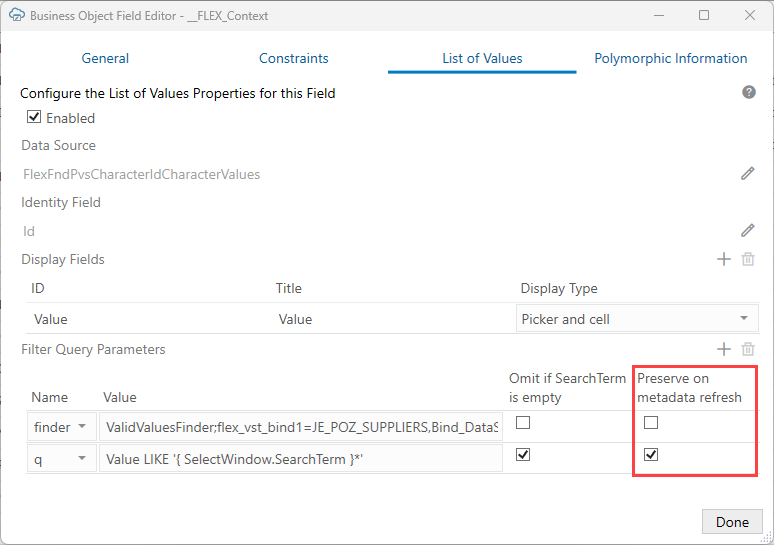
If you want the add-in to retrieve the latest query parameter definitions from the service metadata on refresh, deselect Preserve on metadata refresh. See Refresh Parameter Definitions for a Lists of Values.
Repeat this step to create additional parameters.
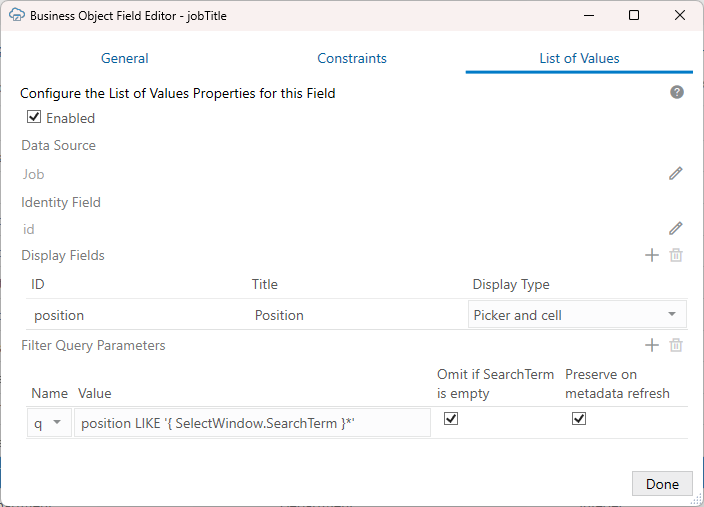
In this image, a list of values is configured for the jobTitle field that is populated with values from the
positionfield of the Job business object. A filter query parameter has been configured that allows a business user to return positions that start with the business user's search term. - Click Done.
Once you define a list of values, the choice list will appear wherever that business object or payload field appears. For the row finder variable, the choice list will appear wherever that row finder variable appears during download.
On first download and before showing all or filtered values in the search-and-select window, the add-in may send requests to download data from the data source. This downloaded data is cached.
After you modify the configuration of any list of values, clear the cached data by clicking Clear List of Values Cache from the Advanced menu. See Clear Cache for a List of Values.
Configure a Filter for a List of Values
Configure a filter for your list of values to determine which items from the business object used as the data source are included in the list. A filter is a set of one or more URL query parameters that are appended to a REST request to the referenced business object.
Filters are not available for lists of values that use a local data source.
The filter query parameters are added to all requests to the referenced business object. These include the request to fetch the initial set of values as well as the one sent when the business user clicks the Search icon after entering a search term.
You should always configure a filter with a search term parameter since the search option is always available to the business user.
There are a few basic filter scenarios you may want to consider when configuring a list of values:
- Search term parameter only: You don't need to use a filter parameter for the initial set of values if you want your business users to access all values from the referenced business object. In this case, just configure a search term parameter and let your business user filter the list based on a search term. See Configure a Filter for a Search Term Only.
- Filter and search term parameters: To limit the choices available from the referenced business object, consider using a filter parameter such as a finder. Also, add a search term parameter to let your business user search from within the list. See Configure a Filter to Limit Available Choices.
- Dynamic and search term parameters: A dynamic filter parameter limits the number of values in a list of values based on a field value in the current layout or search box. For example, you may filter a Job Title list of values based on the selected employee's department so that only job titles for this department are displayed. See Configure a Filter with a Dynamic Parameter.
- Cascading lists of values: A cascading list of values uses dynamic filters where the value selected in one list determines the range of values that users can select from subsequent lists. See Configure a Cascading List of Values.
See About Expressions for more information about expressions in lists of values.
Consult the API documentation for your service to determine the appropriate search syntax to use in the Value column. For example, if you use an Oracle ADF REST Resource service, consult Understanding Framework Support for Query Syntax in Accessing Business Objects Using REST APIs.
Configure a Filter for a Search Term Only
Configure a filter with a search term parameter to allow your business users to search for values using a search term.
For example, let's say you have a list of values that displays job titles for your company. To allow the business user to filter this list, you can use a "q" parameter value to return job titles that start with the business user's search term:
Note:
Select Omit if SearchTerm is empty to ensure this parameter is only applied when there is a value in the search box.In this example, a business user can type "ma" in the search box and click the Search icon to display job titles such as "Manager" and "Marketing Specialist".
You should always configure a search term parameter for your filter since the search option is always available to your business users.
If you have more than one display field in your list of values, you can use the "OR" operand to search on each of the fields. For example, to match text to either the employee's first or last name, create a parameter like this:

When a user types in the search box and clicks the Search icon, the add-in displays all first or last names that match the string. In this example, the add-in would match the search string "Jo" to the first name "Joshua" but also the last name "Johnson".
Note:
The syntax for the filter query varies based on the REST service type and expected query syntax for a business object.Configure a Filter to Limit Available Choices
Configure a filter with multiple query parameters to limit the choices that are fetched from the referenced business object.
For example, you may have a referenced business object that stores values for a number of different lists of values and you need a way to retrieve only the values for the current field.
Let's consider a business object, StandardLookupsLOV, that stores immigration details for a company's employees such as immigration status (I_Status) and type (I_Type).
You may want to use a finder, for example, to return just the immigration status (I_Status) values, such as "Not Applicable", "Pending", "Accepted" and so on, for your list of values.
You'll also want to create a search term parameter to allow your business users to find the value they are looking for.
To do this, configure your filter as shown here:
In this case, the initial set of values is determined by the finder configuration. If the business user types a search term and clicks the Search icon, the list is further limited to status values whose DisplayValue starts with the search term.
Configure a Filter with a Dynamic Parameter
Referencing Business Object Fields in a Dynamic Filter
Let's say you have a Table layout for an Employees business object that includes two columns: "Department" and" Job Title". You may want to configure a list of values on the Job Title column that includes a filter that filters the list based on the value in the Department cell in the same row. When configured, your business users will see only those job titles that are relevant for the department that they have selected.
Of course, you can also use these fields in a search. Again, when a business user selects a department, Oracle Visual Builder Add-in for Excel shows only relevant job titles in the Job Title field.
As you can see on the left in this image, the list of values (in this example, "Job Title") is based on the value of another field ("Department"). When used in a search as shown on the right, the Job Title list is filtered based on the value in the first search field ("Department").
To configure a dynamic filter for the Job Title list, use a parameter that filters based on the department Id. If you have a row finder that filters job titles by department, you can use an expression like this:
The expression in the form, { this.BusinessObject.Fields['FieldId'].Value }, where FieldId is the ID property of another field in the current business object or search—in this case, DepartmentId.
Since this expression refers to another field in the currently selected row or search, make sure this field ("DepartmentId", in this case) has been added to your layout or added before the field with the dynamic filter when it is used in a search. See Use Search to Find Required Data for information about how to use these lists of values in a search.
The Oracle Visual Builder Add-in for Excel replaces this expression with the corresponding field value (specifically, the identity value) when sending the request for the referenced business object's list of values. When business users select the Job Title field for an employee in the marketing department, the list includes only job titles associated with Marketing.
Likewise when using a dynamic list of values in a search. When business users select the Job Title field, the list includes only job titles associated with the department they first chose from the Department field.
If the corresponding field value is missing or invalid, the expression evaluation fails and an error is reported.
Tip:
Remember to include a search term parameter, such as jobTitle LIKE '{ SelectWindow.SearchTerm }*', to allow your business users to filter the list to jobs based on a search term they provide.Referencing Ancestor Business Object Fields in a Dynamic Filter
For a list of values that you plan to use in a layout, you can also refer to a parent or higher ("ancestor") business object in your expression using one or more Parent terms. For example, to create a list of values that refers to a field in the parent business object, you would use ByDeptFinder;DepartmentId={ this.BusinessObject.Parent.Fields['DepartmentId'].Value }.
To refer to a grandparent business object, use two Parent terms instead: this.BusinessObject.Parent.Parent.Fields['DepartmentId'].Value.
Note:
Do not refer to an ancestor business object if you plan to use your list of values in a search. Such a configuration will result in an error at runtime.Tip:
When using a dynamic filter in a layout, it is recommended that you add an ancestor column for the field ("DepartmentId", in this case) to the current layout. The ancestor field must be positioned before the column ("Job Title") that references it. This makes it easier for the add-in to find the correct value during runtime and improves performance.
If there is no matching ancestor column in the current layout, the add-in uses other ancestor columns to map the current row to its parent row. It repeats this process until it finds the ancestor row and reads the field value. This can take some time if there are a large number of parent rows. See Add a Parent Column to Support Row Creation.
Referencing Row Finder Variables in a Dynamic Filter
Just as you do for a business object field, you can also define a list of values on a row finder variable and use it in a search. Like our business object field example, you can also define a parameter that filters the list of values based on the value selected from another variable in the same row finder.
Consider a row finder, "Employees By Country, State, and City", that filters employees by country, state, and city. This row finder includes three row finder variables: CountryId, StateId, and CityId.
You may want to configure lists of values on the each of these variables. For the first one, CountryId, you don't need a dynamic parameter. But for the other two, you would want to configure a parameter that filters the list of values based on the value selected in the previous variable. So, the values in the StateId variable would be based on the value of CountryId and those of the CityId variable would be based on the value of StateId.
Here's how this would look when configured:
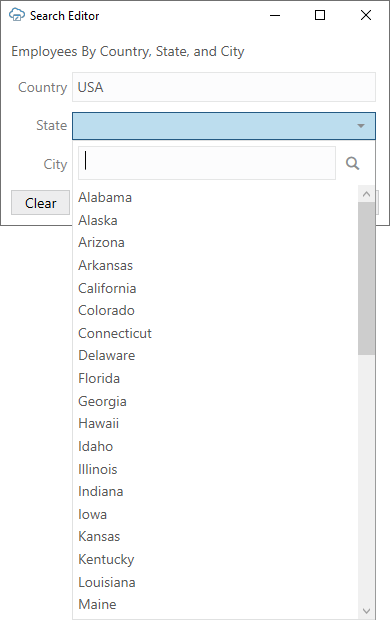
In this image, the Search Editor uses our sample row finder and includes three fields for the row finder variables. The list of values in the State field is filtered based on the value entered in the Country field. In this case, the business user has selected "USA" from the Country list, and so the add-in is displaying only US states in the State list.
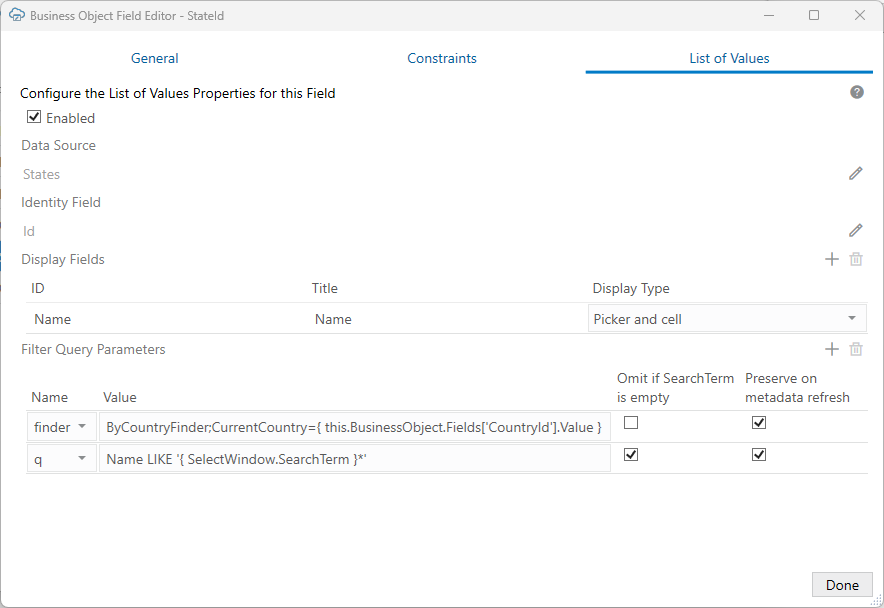
To configure a list of values on the StateId row finder variable, use a States business object as your data source, then define a "q" query that filters based on the value in CountryId variable, like this:
The first filter parameter uses the expression, CountryId={ this.Finder.Variables['CountryId'].Value }, where:
thisrepresents the currently selected row finder variable (StateId, in our example);Finderis the row finder to which this finder variable belongs (EmployeesByCountryStateCity);Variables['CountryId']is the finder variable (CountryId) whose value determines the available choices of the current finder variable; andValueis the value of the field.
This expression sets the value of the variable, CountryId, used in the q query to the value of the CountryId row finder variable—"USA" in our example. See About Expressions.
This value is then used to filter values from the States business object and populate the list of values with just US states.
Note:
A finder variable can only depend on the values of variables from the same finder. It cannot depend on values from the Form-over-Table or Table layout.To use the row finder in a download filter, use the row finder as part of a search as described in Use Row Finders to Limit Downloaded Data. When configured, the business user will see the Search Editor when they click Download Data where they can select values for each finder variable.
Tip:
By default, row finder variables are added to the Search Editor in the alphabetical order (City, Country, and State in our example). For a better user experience, consider changing the order so that the dependent ones appear after those they depend on (Country, State, and City).Configure a Cascading List of Values
Let's suppose you have an Employees layout with three columns to capture an employee's location: Country, State, and City. To make sure only appropriate values are entered for an employee, you decide to use dynamic parameters to filter the State list of values based on the Country value, and the City list of values based on the Country and State.
Note:
Keep in mind that you can define dynamic parameters on business object fields used in a layout or search, as well as on row finder variables. The principle is the same when you define parameters for a cascading list of values but, in this scenario, you create additional lists of values each one dependent on the previous one(s). For more information about dynamic parameters, see Configure a Filter with a Dynamic Parameter.Here's how you configure the lists of values to do this:
- Start by creating a list of values for the first field, "CountryId", with just a search term filter (Name LIKE '{ SelectWindow.SearchTerm }*'). See Configure a Filter for a Search Term Only.
This filter allows the business user to type in the CountryId field to find the country they want.
- Then, create a list of values for the second field, "StateId", that filters the list of values by the current country, as shown in this image:
This example uses a finder query, "ByCountryFinder", that filters based on the value in the CountryId field in the row. If the business user selects "USA" from the CountryId list, Oracle Visual Builder Add-in for Excel displays only US states in the StateId list.
As with the first list of values, this list also includes a search term filter so that the business user can type in the field to find the state they want.
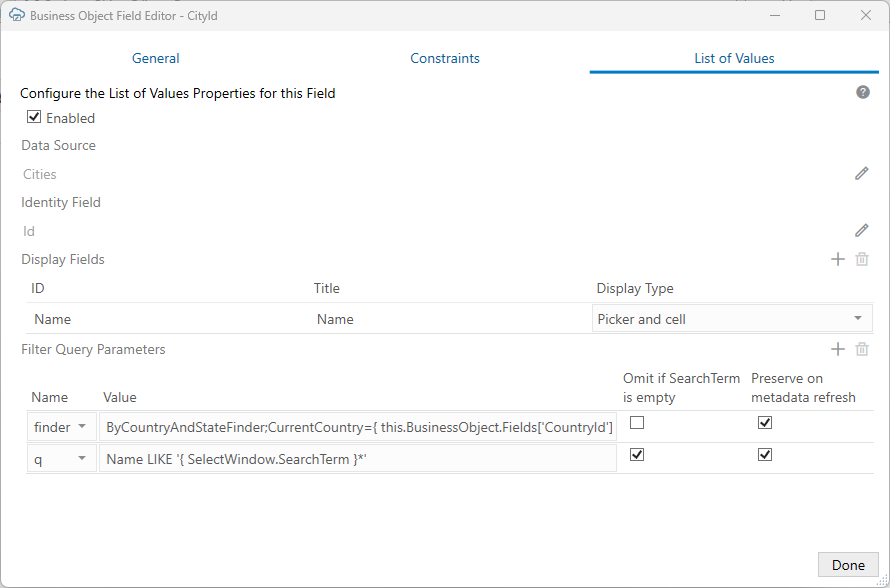
- Finally, create a list of values on the third field, "CityId", and filter the list of values by CountryId and StateId, as shown in this image:
This example uses another finder query, "ByCountryAndStateFinder", that filters based on the values in both the CountryId and StateId field in the same row. Now, if the business user selects "California" from the StateId list, the add-in displays only cities in California in the CityId list.
In a scenario like this with three fields ("fieldA", "fieldB", and "fieldC"), remember that fieldC depends on both fieldB and fieldA. So when you create the filter for fieldC's list of values, also include fieldA's value expression. In general, all of fieldB's dependencies must also be fieldC's dependencies.
Note the following name-value parameters under Filter Query Parameters:
Table 9-1 Example Name-Value Parameters in Filter
Field Name Value StateId finder ByCountryFinder;CurrentCountry={ this.BusinessObject.Fields['CountryId'].Value } CityId finder ByCountryAndStateFinder;CurrentCountry={ this.BusinessObject.Fields['CountryId'].Value },CurrentState={ this.BusinessObject.Fields['StateId'].Value } - If you need to add business object fields to your layout, you can open the appropriate tab in the Layout Designer, then click the Manage Form Fields or Manage Columns button (
 ) to add and reorder fields.
For a Form-Over-Table layout, open the Form or Table tab. For a Table layout, open the Columns tab.
Note:
If the service is an Oracle ADF REST Resource service and has complete metadata for a cascading list of values, the filter query parameters of the corresponding field's list of values are automatically configured.
If the service does not have complete metadata for a list of values but you know it supports search syntax that makes for a cascading list of values, you can manually configure a list of values by adding filter query parameters. See Configure a Filter for a List of Values.
Notes on Filters
- Oracle Visual Builder Add-in for Excel does not validate your filter configuration. If you provide invalid information, the add-in will make invalid requests that return errors.
- The query parameters are applied in the order that they are configured.
- The add-in applies URL encoding to the final resolved value of each filter query parameter before sending the request.
- Expressions like { this.BusinessObject.Fields['FieldId'].Value } can't be used in the filter for:
- Row finder variable's list of values
- Custom action payload fields if the field referred to is not added to the layout
- If your list of values includes more than one display field, you can configure a search query that returns matches from any of the display fields. See Configure a Filter for a Search Term Only for an example of a search term parameter that includes the OR operand.
- If you configure multiple values with the same parameter name, the last value that is not "omitted" (Omit if SearchTerm is empty is enabled) is used by default.
For example, in this filter configuration, the first query parameter is used if there is no search term; the second parameter is used if there is a search term.

- Filters are not available for list of values based on local data sources
Create a Local Data Source for a List of Values
You can create local data source that provides the values for the list of values (LOV). This data source stores these values in your integrated workbook as a set of name-value pairs.
Local data sources have a couple of key benefits. They convert field codes to user-friendly display values automatically to improve the user experience. They also provide the business user with a drop-down list that restricts the choices to a fixed set of appropriate values.
Let's consider an example. You may have a business object, Computer, with a Boolean field, personal, that captures whether the device is a business or personal one. In this case, the field expects only "True" and "False" values.
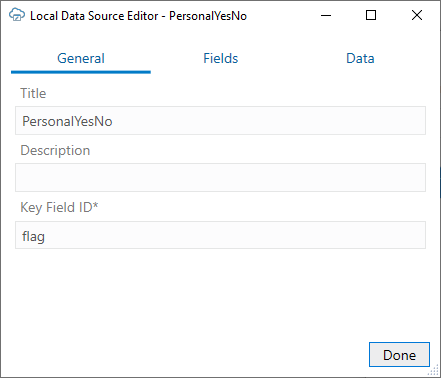
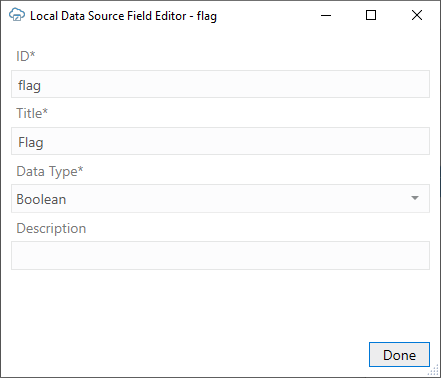
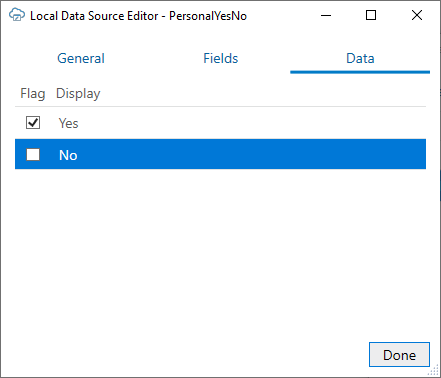
You may want to create an LOV on the personal field that displays "Yes" and "No" values in the list. To do this, create a new local data source in the catalog that includes these values, then configure an LOV for the personal field that uses this data source.
To create a local data source for a list of values:
Now that you have created a local data source, you are ready to use it as the data source for an LOV. See Configure a List of Values with a Local Data Source.
Configure a List of Values with a Local Data Source
Configure a list of values that references a local data source. List of values are supported for business object fields, custom action payload fields, and row finder variables.
A local data source is a set of name-value pairs stored in the workbook that can be used in a list of values. These local data sources can be created by Oracle Visual Builder Add-in for Excel to store enums, if the service includes these. You can also create your own local data sources if required. See Create a Local Data Source for a List of Values.
Let's consider an example. Suppose you have a layout for a computer business object that includes a "personal" column for indicating whether the device is the employee's personal property. You may want to create an LOV on this field that displays "Yes" and "No" values in the list. To do this, create a new local data source in the catalog that includes these values, then configure an LOV for the personal field that uses this data source.
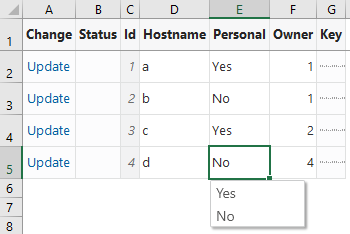
When a business user selects a cell from the personal column in the Computer layout, a popup window shows a list of values drawn from your local data source for the user to choose from.
You can configure a list of values to show more than one display field in the popup window. The add-in shows all the display fields, in separate columns, in the popup window but only those you configure are shown in the Excel cell. If you choose to show more than one field in the cell, the values are concatenated.
Note:
Lists of values based on local data sources do not support filters or search in the drop-down list.To create a list of values with a local data source:
During runtime, the business user sees the user-friendly values from the display field of the data source in the LOV, as shown here:
The choice list will appear wherever that business object or payload field appears. For the row finder variable, the choice list will appear wherever that row finder variable appears during download.
The add-in caches the data of list of values in the workbook. After you modify the configuration of any list of values, click Clear List of Values Cache from the Advanced menu.
List of Values for Descriptive Flexfields
Oracle Visual Builder Add-in for Excel supports lists of values (LOV) for descriptive flexfields (DFF) in ADF REST services in some scenarios.
About DFFs
DFFs are a feature of ADF REST polymorphic business objects. A DFF is a set of fields for a particular record that differs based on the value of a discriminator field (also known as a context segment). There are three types of fields in a DFF field set:
- Global fields. Global fields are available for all values of the discriminator field.
- The discriminator field or "context segment". The discriminator field determines which context-sensitive fields are displayed in the layout.
- Context-sensitive fields. Context-sensitive fields are dynamic based on the value of the discriminator field.
Let's suppose you have an Employee polymorphic business object that you are using in a layout and that this business object includes a DFF for the employee's location. This DFF may include a couple of global fields ("Site" and "Time Zone"), a discriminator field ("Region"), and context-sensitive fields ("Zip Code", "Postal Code", "State", and "Province").
The global fields are available for all values of the discriminator field but the context-sensitive fields are either available or unavailable depending on this value. If the business user selects "United States" from the Region field, only "Zip Code" and "State" are available.
LOVs and DFFs
LOVs are supported on all three field types—global, discriminator, and context-sensitive fields—and for both LOV types—independent and dependent—with some restrictions. Dependent LOVs are based on a dynamic filter so that the values in the LOV depend on the value of another field. For example, a dependent LOV may display a list of cities based on the U.S. state selected in another field. Independent LOVs do not have a dynamic filter.
Independent LOVs are supported for all three types of fields and are automatically configured based on the service's OpenAPI service metadata document. However, only LOVs for the discriminator field are visible in the designer and configurable by the workbook developer.
Dependent LOVs are supported in these scenarios:
- On a global field based on the value in another global field. These LOVs are automatically configured based on the OpenAPI service metadata document.
- On a context-sensitive field based on another context-sensitive field. These LOVs are automatically configured based on the OpenAPI service metadata document.
Typically, these LOVs use segment-type client binds.
Client Binds
There are two types of client bind: segment-type and parameter-type.
Segment-type client binds are supported automatically as long as the service's OpenAPI service metadata document provides all the proper metadata. If the metadata is present, the add-in configures the list of values at runtime.
Parameter-type client binds must be configured from the Polymorphic Information tab of the Business Object Field editor before they become available. See Configure the Bind Parameters for a Descriptive Flexfield's List of Values.
Keep in mind these limitations:
- Client binds are only supported for context-sensitive fields and not global fields.
- Only binds of data type string and number are supported. Binds of other date types are not supported.
- The add-in uses client binds if and only if the OpenAPI service metadata document provides proper metadata.
Configure the Bind Parameters for a Descriptive Flexfield's List of Values
Configure parameter-type client binds used by fields in a descriptive flexfield (DFF) using the Business Object Field Editor.
Oracle Visual Builder Add-in for Excel currently only supports configuring the polymorphic bind parameters (also known as "flex bind variables"). Other details of the list of values for DFFs must come from the metadata and are not configurable.
To configure a bind parameter:
- From the Layout Designer, click the Columns tab and then select the polymorphic field set (the Context Value column in this example).
- Click the Edit icon (
 ) to open the Business Object Field Editor.
- From the Polymorphic Information tab, configure the bind parameters, as shown in the following image:
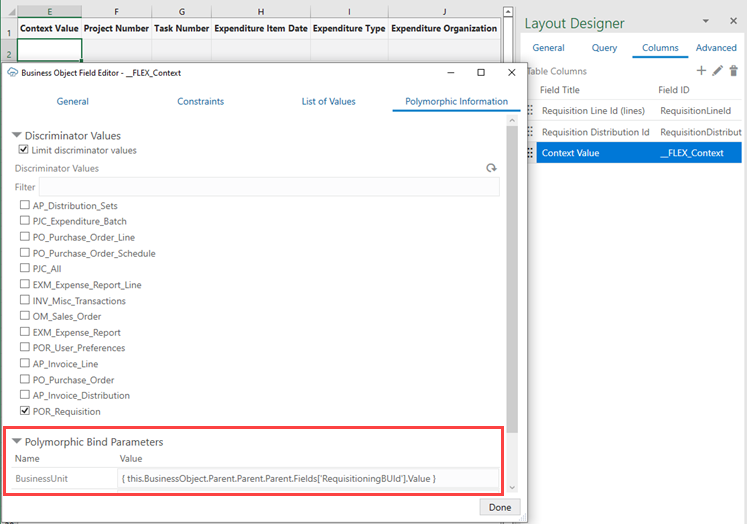
This example uses a bind parameter, BusinessUnit, for the list of values based on the value of the
RequisitioningBUIdfield.
The value of a bind parameter can be a literal value like 100001, Requisition001, or a string that contains one or more expressions surrounded by curly braces ({ }).
An expression can refer to the value of a field in any business object in the current business object hierarchy. The field referred to must be exposed in an existing layout.
In this example, the value is a single expression, where
- this is the polymorphic field set
- this.BusinessObject is the business object that owns the polymorphic field set (the DFF business object)
- Parent gets the parent business object in the hierarchy (bottom-up:
RequisitionDistributions/projectDFF,RequisitionDistributions,RequisitionLines,PurchaseRequisitions) - this.BusinessObject.Parent.Parent.Parent is the PurchaseRequisitions business object that owns the field. RequisitioningBUId
- Fields['<field ID>'].Value gets the current field value of the field with the given field ID. Note the single quotes (required) around the ID.
Note:
Expression syntax is limited to what's shown in the example (key parts: this, BusinessObject, Parent, Fields[<field ID>].Value). See About Expressions for more information.Clear Cache for a List of Values
A list of values' choices are always cached in the workbook.
The cache for a list of values based on a business object can contain up to 300 items, plus all used items. It is populated during the first download or the first time the search-and-select window is used. The search-and-select window shows the cached list of values, if available. An upload also uses cached data.
- Whenever you change any list of values configuration, and always when you publish the workbook
- When the service host is changed.
- When cached data is not what the user expects.
Refresh Parameter Definitions for a Lists of Values
When you create a list of values (LOV), you can configure whether or not Oracle Visual Builder Add-in for Excel refreshes the LOV's query parameter definitions used in an LOV filter.
The add-in refreshes service metadata, including LOV query parameter definitions, when you refresh a catalog from the Manage Business Object Catalogs window. See Refresh a Business Object Catalog.
It also refreshes polymorphic metadata, including LOV query parameter definitions on polymorphic fields, on the first download after opening a saved workbook. See Refresh Polymorphic Business Object Metadata.
Whether this metadata is maintained or discarded on refresh is controlled by the Preserve on metadata refresh check box on the List of Values tab.
If Preserve on metadata refresh is enabled, the add-in keeps the existing LOV query parameter definition during the refresh.
If Preserve on metadata refresh is disabled, the add-in instead discards the existing definition in favor of the new version from the service. Keep in mind that any changes you have made to the parameter definition—such as the Value and Omit if SearchTerm is empty settings—is replaced by a copy from the service.
Note:
If the Preserve on metadata refresh check box is deselected but there is no parameter definition defined in the service metadata, the add-in removes it from the LOV.Preserve on metadata refresh is enabled by default when you configure a filter query parameter for an LOV.
Notes and Limitations for Lists of Values
Review the notes and limitations listed here when planning to use lists of values (LOV):
- For Oracle ADF REST Resource services, "row context" lists of values are not supported. A row context list of values is one whose data source is a child resource instead of a top-level resource.
- Only one identity field is supported in a list of values.
- LOVs support strings, Boolean values, and integers. Decimal numbers, dates, and date-time values are not supported.
- Excel drop-down lists using data validation may not be compatible with the add-in.
- For Oracle ADF REST Resource services, if the catalog includes metadata for an LOV, the add-in reads the metadata and configures the LOV automatically. Supported ControlTypeHints: "combo_lov", "choice", and "input_text_lov".
- For any read-only field (column or form), the add-in still swaps identity values for display values. However, the search-and-select window does not appear when the cell is selected.
- When using an expression that refers to a field in an ancestor layout, ensure:
- The referenced field is present in the ancestor layout.
- The ancestor column in the current layout is configured properly so that the add-in can map a row to its ancestor row.
- A field's LOV can be dependent on an ancestor field as long as that ancestor field does not have an LOV that is dependent on another field.
- Dependent LOVs are not supported on ancestor columns.
- When creating a cascading set of LOVs, you can use a "local" LOV (one based on a local data source) as the initial list, but not as one of the subsequent lists. A "remote" LOV (one based on a business object as the data source), however, can depend on a value in a local LOV.
In a cascading list of values, the value selected in one list determines the range of values that users can select from subsequent lists.
