OAuth 2.0 Authorization Code Flow with PKCE
This authentication method is required by some services such as NetSuite.
The easiest way to configure OAuth is to fill in and import a JSON configuration file with the required OAuth properties. See Configure OAuth 2.0 Authorization for a Catalog for the steps to configure OAuth for your workbook.
To configure your workbook to use OAuth 2.0 Authorization Code flow, you'll need to obtain some authentication details from your REST service owner. See OAuth 2.0 Authorization Properties.
OAuth 2.0 Authorization Properties
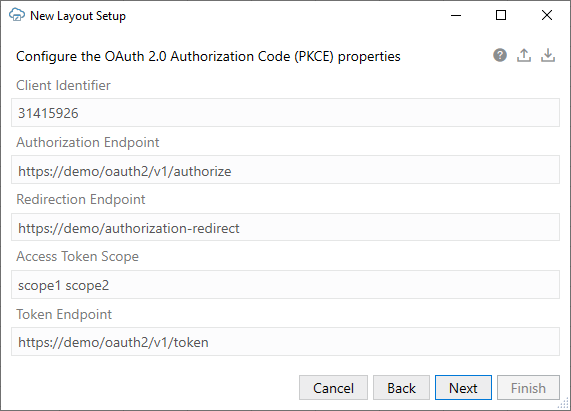
In order to configure your workbook to use OAuth 2.0 Authorization Code flow, you'll need to obtain a client identifier from the security administrator for the service you are using. You'll also need to provide other details such as required endpoint URLs. Consult with the REST service owner for help.
Here are the required OAuth properties:
- Client Identifier: The identifier set up for the add-in to use when executing the authorization flow. Obtain this value from the security administrator for your service.
- Authorization Endpoint: The authorization server endpoint used by the client to obtain authorization from the resource owner via user-agent redirection.
- Redirection Endpoint: The client endpoint used by the authorization server to return responses containing the authorization code to the client using the resource owner user-agent.
- Access Token Scope: The authorization and token endpoints allow the client to specify the scope of the access request using the "scope" request parameter.
- Token Endpoint: The authorization server endpoint used by the client to exchange an authorization grant for an access token, typically with client authentication.
Note:
The add-in does not require the Client Secret.For more information on these properties, see OAuth 2.0 Authorization Framework.
OAuth 2.0 Authorization Code Flow Steps
The authorization flow follows these steps:
- The add-in starts the login sequence by validating the OAuth2 configuration properties. If the properties are valid, the flow proceeds.
If the properties are missing or otherwise invalid, then the login attempt is aborted and an error is reported. For example, an endpoint property that is not an absolute URL is invalid and results in an aborted login.
- The add-in constructs a Uniform Resource Identifier (URI) using the Authorization Endpoint property, along with Client Id and other values saved in the OAuth 2.0 Authorization Code (PKCE) screen.
- The add-in displays the login browser window and instructs the browser to navigate to that authorization Uri. See The Embedded Browser.
- The add-in watches for page transitions and redirects in the browser. All other browser and user interactions are governed by the logic and configuration of the authorization server.
There could be multiple pages and steps necessary for the user to provide credentials, get consent, and so on.
- When the authorization server redirects the browser back to the Redirection Endpoint, the add-in closes the browser.
If the Redirect indicates an error, the add-in reports it and aborts the login flow. On a successful redirect, the add-in performs some validation on the returned values. If that succeeds, the add-in proceeds with the flow.
- After a successful redirect, the add-in harvests the authorization code and sends it, along with other key values, in a POST request to the Token Endpoint.
The Token Endpoint returns an access token, which the add-in then includes in the Authorization header using the Bearer scheme, when making subsequent REST requests.
Refer to Authorization Code Grant for information on authorization code flow. See also Proof Key for Code Exchange by OAuth Public Clients for information on PKCE.
Configure OAuth 2.0 Authorization for a Catalog
You can configure your integrated workbook to authenticate with the REST service using OAuth 2.0 Authorization code flow. You can provide the required authentication properties when you create a catalog during the creation of a layout.
You can also configure an existing catalog to use this authentication method from the Business Object Catalog Editor.
The easiest way to configure this authentication method is to export a blank JSON file from Oracle Visual Builder Add-in for Excel, fill in the required values, and import the completed configuration file.
Before you proceed, obtain the required properties from the REST service owner. See OAuth 2.0 Authorization Properties.
To import a configuration file during new layout creation:
OAuth Limitations and Known Issues
Before configuring OAuth 2.0 for an integrated workbook's catalog, review the limitations here:
- PKCE support is required. See RFC 7636.
- There is currently no support for token Refresh logic.
- For the first step in the OAuth2 flow, the
code_challengeis set usingcode_challenge_method=S256. "Plain" is not supported.
