Create Your Own Login Pages
To customize an application's login screen beyond basic styling and logo changes, you'll need to replace the default login page with custom-built login capabilities. This way, you can provide a more tailored and branded experience for the user's initial interaction with your app.
Alternatively, you can use the sample login and password recovery pages that VB Studio provides, a ready-made solution that embeds a Redwood-themed login flow within the default application shell. The sample login pages provide everything you need—the Login Form and Forgot Password Form components with built-in authentication logic, variables, action chains, and event listeners—to seamlessly integrate custom login into your application with minimal configuration. Additionally, you can fully customize the Login Form’s appearance and layout to suit your needs.
Here's how to replace your app's default login page with a custom login page:
- Create the web app whose login you want to customize.
- Click Menu in the upper right corner and select Settings.
- Click Security, then select Enabled under Custom Login Page.
- From the Custom Login App list, select the web app meant for custom login. If you're looking to create sample login pages and an app isn't selected, the first app in the Navigator's list is used for custom login.
- Decide if you want to create a sample login page or use your own login page.
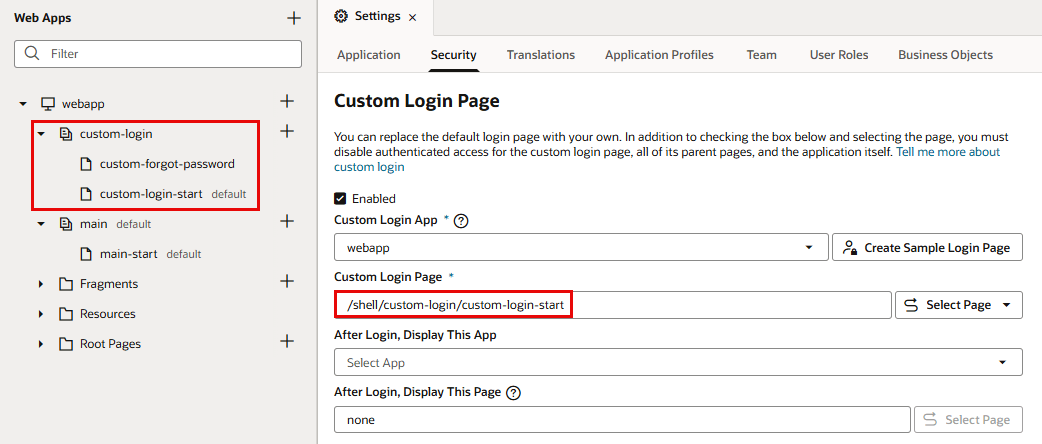
- To create sample Redwood-themed login and password recovery pages that embed into your existing web app, click Create Sample Login Page next to Custom Login App.
When you select this option, a new
custom-loginflow, which includes thecustom-login-startandcustom-forgot-passwordpages, is generated in your web app. During this process, the Login Form and Forgot Password components are installed from the Component Exchange, and the variables, action chains, and event listeners required to make everything work are set up within these pages. Thecustom-login-startpage is then designated as your Custom Login Page.
Description of the illustration create-sample-login-page.pngNote:
You have the flexibility to customize the sample login page to use your own CSS, add other UI elements, or extend its functionality (for example, to implement a pop-up login dialog). By doing this, you define the UI but allow the logic built into the Login Form and Forgot Password Form components to handle authentication. Refer to component documentation for information on how you can set this up. To view this documentation for the Login Form (for example):- Switch to the Components tab in the Navigator.
- Under Installed, click Login Form to open the component in the canvas area.
- Click Description to view general usage information. Click the Documentation link to open the API reference in a separate browser tab.
- To use your own login page, click Select Page next to Custom Login Page and navigate to the page you've built from scratch.
Remember in this case, it's your responsibility to set up the page's layout and authentication. It's recommended that you use the Login Form (and optionally, the Forgot Password Form) to handle authentication. To install the Login Form and Forgot Password Form components to your visual application:
- Switch to the Components tab in the Navigator.
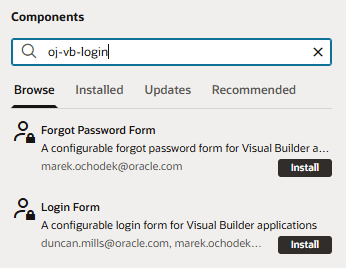
- Enter oj-vb-login in the Search field to locate the Login Form and Forgot Password Form.
- Click Install.
- Click the component to open it in the canvas area and view documentation on how to configure the component in your pages: Click Description to view general usage information. Click the Documentation link to open the API reference in a separate browser tab.
- To create sample Redwood-themed login and password recovery pages that embed into your existing web app, click Create Sample Login Page next to Custom Login App.
- Optional: With custom login set up, users are taken to the page they were on previously after logging in. If that page doesn't exist because they accessed the login page directly (for example, by clicking on a bookmarked page), you can specify the page you want them to be taken to:
- From the After Login, Display This App list, select the app whose pages you want users to see after logging in.
- To direct users to the app's default page, leave After Login, Display This Page set to none. To direct them to some other page, click Select Page next to After Login, Display This App, and navigate to the desired page.
- Before using your custom login page, ensure that authenticated access is disabled for the login page, all its parent pages, and the application. This step is especially important if you're setting up your own page rather than using the sample login page.
- Select the custom login page for your web app. If you created the sample page, this is the
custom-login-startpage under the newly createdcustom-loginflow. - Click Settings, then Security.
- Deselect Require authenticated access.
- Select the flow used by your custom login page and repeat steps b and c. In the case of the sample pages, this is the
custom-loginflow. - Select the web app and repeat steps b and c.
- Select the custom login page for your web app. If you created the sample page, this is the
- Now share or publish the visual application, after which your users will be directed to the custom login page for sign-in.


