Use the Conflict Editor to Resolve Conflicts
When you open a file with conflicts in the conflict editor, you can use the available controls to navigate between conflicts and resolve them.
- Right-click the file with conflicts in the Git panel, then select Open in conflict editor. You can also double-click the file, especially if the type of conflict doesn't give the option to open the file in the conflict editor.
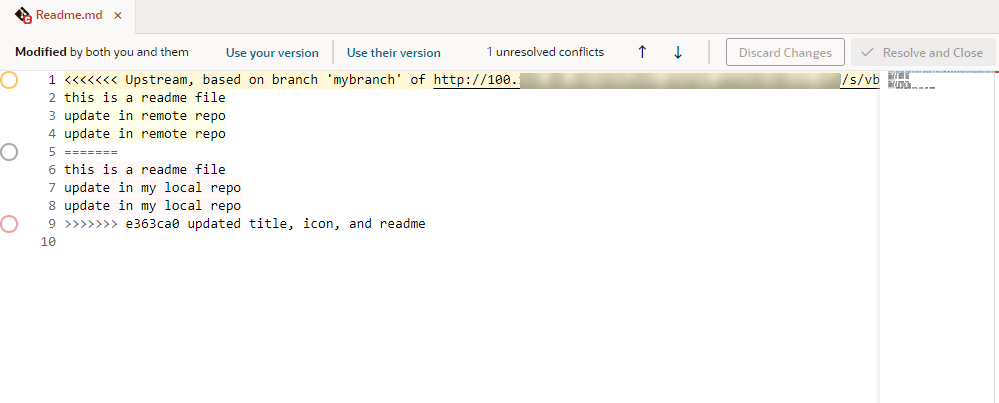
When the file opens in the conflict editor, conflicts between your local version of the file and the remote version are highlighted. For example, here's an example
readme.mdfile (with a single unresolved conflict) that was modified by you and someone else:
Description of the illustration vbs-git-panel-code-conflict.png - Decide how you want to resolve the conflict. You can use the options in the toolbar or the markers that appear next to a conflict in the editor.
The options available to you depend on the type of conflict you are resolving. For example, if you deleted a file in your local branch and someone modified the same file in the remote branch, you might see Delete File (Your Version) and Keep File (Their Version). (It's worthwhile to note that the content of deleted files shows in read-only mode and cannot be edited until the conflict is resolved. Note also that non-text file content won't show in the conflict editor.)
For demo purposes, we'll use the example of a file that's been modified by you and someone else. Here are the options available to you for this use case:
Action Step To keep changes in the remote branch - Select Use their version in the toolbar, or
- Click
 in the canvas and select Their Version.
To keep your changes in the local branch - Select Use your version in the toolbar, or
- Click
 in the canvas and select Your Version.
To keep changes from both branches Click  in the canvas and select Use Both Changes.
Note:
You can also ignore these options and update the file as you would any text file, to keep the lines you want and delete the rest. You do this when you want to incorporate changes from both branches, for example, to keep some of your changes and some of theirs.The lines between
<<<<<<<and>>>>>>>represent a conflicting change, with changes from each ref separated by=======. Remember to delete these markers as well as Git-related comments when resolving a conflict. - If the file has more than one conflict, click
 in the toolbar to go to the next conflict and take steps to resolve it.
 - Optional: Click Discard Changes and confirm when prompted to revert all the updates you've made to resolve conflicts in the file.
Once you discard your changes, resolve the conflicts again to proceed.
- When you see the No unresolved conflicts message in the toolbar, click Resolve and Close to mark the file as resolved.