Automatically Create and Wire a Fragment Variable on Its Container

You can mark fragment variables or constants that are enabled as input parameters to be automatically created in the container that uses the fragment. This way, when a page is created from the fragment or the fragment is dropped onto an existing page or container, VB Studio creates the variable (or constant) on the page and wires it back to the fragment variable's (or constant's) value.

This option is especially useful when input parameters must be passed from a page for the fragment to work. By automatically wiring the required input parameters, you won't have to create and configure those variables on the page when the fragment is added to it, though you'd still need to assign values. Further, if the autowired variables include customizations to display an enhanced UI in the Properties pane, those customizations are also carried over to the container.

Note:

Only fragments tagged as pageContent (default) or page in its Used For setting (either from its Properties pane or Settings editor) can be autowired on their containers.
  1. Open the fragment that contains the variable or constant you want to be created on the parent container.
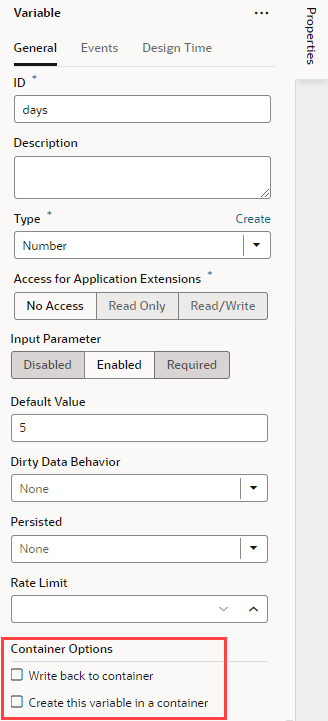
  2. On the Variables tab, select the variable or constant to view its Properties pane. When the variable or constant is enabled as an input parameter (with either Enabled or Required selected under Input Parameter), you'll see more properties under a Container Options section:

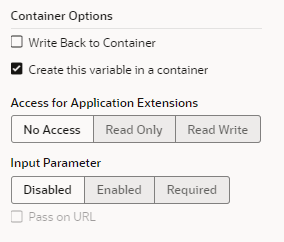
  3. Select Create this variable in container or Create this constant in container:

    When this option is selected, the @dt.createOptions metadata is added to the fragment's JSON definition; for example:
      "variables": { 
        "days": {
          "type": "number",     
          "input": "fromCaller",
          "defaultValue": "5",
          "@dt": {       
            "createOptions": {}
          }  
        },
  4. Optional: By default, constants are created as constants and variables as variables in the container (Auto under Create As). In most cases, you can keep this setting, but in some scenarios—say, when fragments accept page-level properties as input parameters whose values are expressions that are evaluated within the scope of the page—you may want to switch one for the other: a constant for a variable, or a variable for a constant.
    For example, assume your fragment defines title as a variable, whose value is passed from a page based on an expression like this:
      "title": {
         "defaultValue": "[[ 'Edit Employee: ' + $variables.data.firstName + ' ' + $variables.data.lastName ]]",
       },

    In such a scenario, the firstName and lastName values come from data fetched internally by the fragment when the page loads and are made available to the page as part of the $variables.data variable, so that the fragment can actually resolve the expression on the page. Now if the page-level title isn’t likely to change at all, you can choose to autocreate title as a constant (instead of a variable) on the page. This way, title stays a variable in the fragment (allowing $variables.data changes on the page to reflect in the fragment) while it can be autocreated on the page as a constant.

    Further, it's useful to switch a variable to a constant when you want extension authors to be able to customize fragment input parameter values on a page.

  5. Optional: If you want to make the variable or constant in the container available to App UIs in another extension:
    • Under Access for Application Extensions in the variable's Properties pane, select Read Only to allow other App UIs to read the variable's value; select Read/Write to allow other App UIs to read and modify the variable's value.
    • Under Access for Application Extensions in the constant's Properties pane, select Read/Override to allow other App UIs to read or override the constant.
  6. Optional: If you want to make the variable or constant in the container an input parameter of the container:
    • Under Input Parameter, select Enabled to make the container variable or constant an optional input parameter, or select Required to make the container variable or constant a required input parameter.
    • Select Pass on URL if you want to pass this input parameter to the container as part of the URL.
  7. Optional: Set Binding to Page to On if you want to add binding metadata to the variable or constant in the container to retrieve the input parameter's data definition from the fragment and display it on the page. With this setting enabled, the variable or constant displays customized input values on the page just as it does in the fragment. So if you defined an enumerated list for a constant on the fragment, those same values show on the page as part of the fragment's properties.
After you add the fragment to a page or a container, you'll see your variable or constant created on the page or container's Variables editor with the settings you specified.
If you were to look at your page's code, you'll see the parameters wired in HTML, for example:
  <oj-vb-fragment bridge="[[vbBridge]]" name="welcome" class="oj-flex-item oj-sm-12 oj-md-12">
    <oj-vb-fragment-param name="avatar" value="[[ $variables.avatars ]]"></oj-vb-fragment-param>
    <oj-vb-fragment-param name="days" value="[[ $variables.days ]]"></oj-vb-fragment-param>
    <oj-vb-fragment-param name="title" value="[[ $variables.title ]]"></oj-vb-fragment-param>
  </oj-vb-fragment>