Enable Variables as Input Parameters

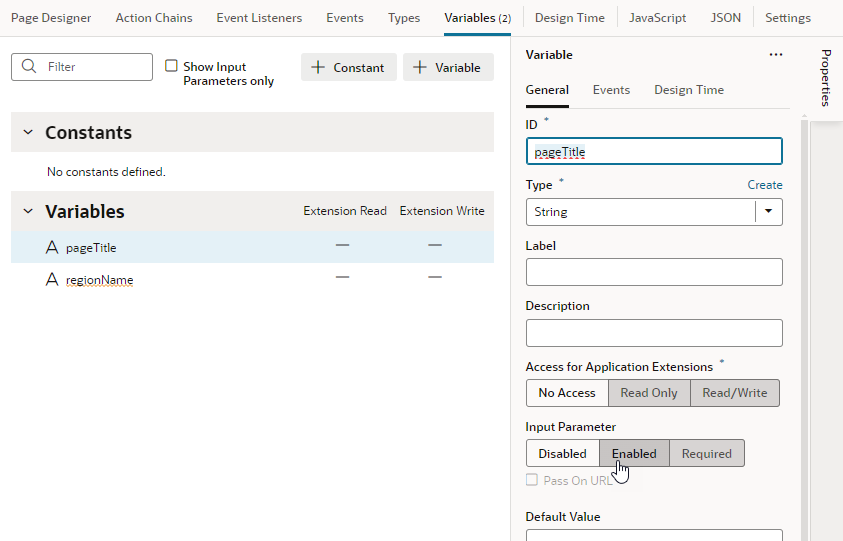
You can use a variable to pass a parameter between pages by marking the variable as an input parameter, specifying how it becomes part of the contract to navigate to that page. You can also mark it as required, implying that it must be set in order to navigate to that page.

  1. Create your variable or constant on the Variables tab for your scope.
  2. In the variable or constant's properties, select an Input Parameter option (default is Disabled):
    • Click Enabled to pass the variable's value as an input parameter.
    • Click Required to require that the variable's value must be passed as an input parameter.
  3. To pass the parameter on the URL of the pages or flows you're invoking (by adding ?paramName=Value to the end of the URL), select Pass on URL. This option allows you to bookmark pages that will show specific data based on the parameter.
  4. Optional: To make the input parameter easier to use on a page, enter a Label or Description to show within a Help icon icon, which page users can then click to get a more meaningful identifier and some context on how best to set the parameter's value.

    Consider adding a Label if your users work in Express mode, where the variable's label, when defined, is used instead of the ID to display the input parameter as a page property.

  5. Optional: Set a Default Value to initialize the variable or constant.
  6. Optional: To display a list of values retrieved from a service (like a REST endpoint) for a string-type variable or constant enabled as an input parameter:
    1. Switch to the Design Time tab in the variable's Properties pane.
    2. Select the Subtype as LOV.
    3. Click Select Endpoint and choose the REST endpoint whose response is used to provide the list of values. The endpoint must already be set up and available to your App UI. The endpoint response must also be in JSON format.
    4. When the REST call requires input and URI parameters, click the associated Assign or Not Mapped link and map the parameters to the value they should be replaced with. The value can be a VB Studio constant.
      If the path and URI parameters depend on other constants (for example, your REST service uses the result of an earlier selection as part of its own request), use expression notation in the parameter values to indicate which constant values to use. You'll need to do this in the source JSON. For example, you would use the following expression to instruct a service request to use the current value of the "dept" constant as the value for the path parameter "department":
      "pathParameters": {
        "department": "[[ $constants.dept ]]"
      }
      When writing the expression:
      • Use simple direct references. Calculated expressions such as "[[ $constants.dept + "_" ]]" do not work as expected.
      • Use constants; variables cannot be used.
      • Make sure the referenced constants are accessible to the extension making the LOV service call.
    5. If your endpoint response is not an array, in the Items Path, specify a dot-separated path from the root of the response object to the array containing the list of values. You can leave this field empty if your response is an array.
      For example, you would enter results when the response is not an array, as shown here:
      {
         "now": {
           "type": "string",
           "description": "wow",
           "defaultValue": "505642",
           "input": "none",
           "@dt": {
             "label": "Films Now Playing",
             "subtype": "lov",
             "valueOptions": {
               "service": {
                 "request": {
                   "endpoint": "site_myappuiExtension:movies/getNowPlaying",
                   "uriParameters": {
                       "api_key": "4174b7d9a7b4bf87342c98e2289c6ee6"
            }
                 },
                 "response": {
                   "itemsPath": "results",
                   "mapping": {
                     "value": "id",
                     "label": "title",
                     "description": "overview"
                   }
                 }
               }
             }
           }
         }
      }
    6. In the Value field, specify the field from the response object to use as the actual value of the variable or constant, for example, id.
    7. Optional: In the Label field, enter the field from the response object to use as the primary display name of the item, for example, title. It can also be an array of field names, for example, ["firstName", "lastName"].
    8. Optional: In the Description field, enter the field from the response object to use as the item description, for example, overview.

Tip:

If you have a large number of variables defined, click Filter icon and select Input Parameters Only to filter and view only those variables used as input parameters.
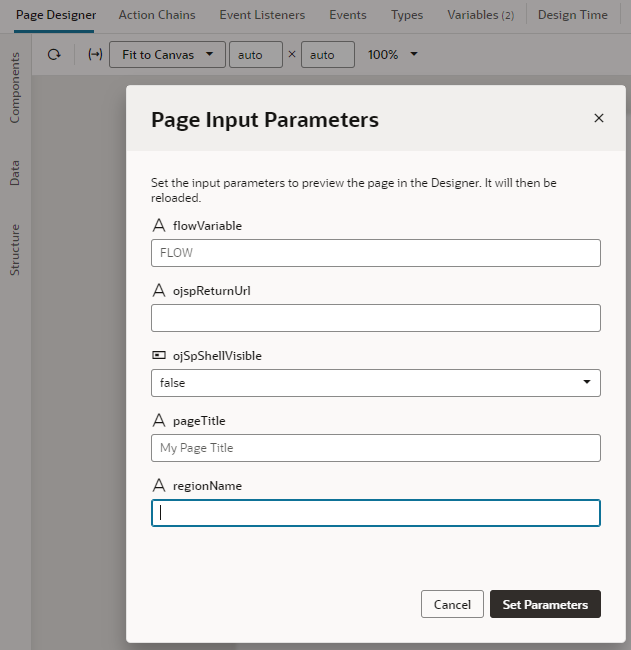
When a variable marked as an optional or required input parameter is used in your app, you can set its value on a page to see how the page displays:
  1. Switch to the Page Designer tab.
  2. Click Page Input Parameters icon in the toolbar to open the Page Input Parameters dialog. You'll see a list of input parameters for the page, including those from its parent flows and pages (if defined).

    If the variable is marked as a required input parameter but a value isn't assigned to it, you'll see a red dot on the Page Input Parameters icon, like this: Page Input Parameter icon. Click the icon then to set the missing parameter. Required parameters appear at the top in the Page Input Parameters dialog and are marked with an asterisk (*).

  3. Set the parameter value and click Set Parameters.

    If you set up the list of values for a parameter, you should be able to select its value from a drop-down list, like this:
    Description of lov.png follows
    Description of the illustration lov.png

    When a default value is set for the variable used as an input parameter, it will show when a value is yet to be assigned to the parameter. Deleting an assigned value will automatically apply the default value.