Introduction
This 30-minute tutorial provides a basic-level understanding of Oracle Fusion Cloud EPM Account Reconciliation.
Background
Reconciliations ensure that a company's financial accounts are validated by checking to see if the balance in the account is correct. Oracle Fusion Cloud EPM Account Reconciliation makes this process simpler and faster for companies by automating the process and helping users involved in the process collaborate effectively.
Prerequisites
Before starting this tutorial, you should have:
- A working knowledge about Oracle Fusion Cloud EPM applications.
- Access to Oracle Fusion Cloud EPM Account Reconciliation.
Creating a new application
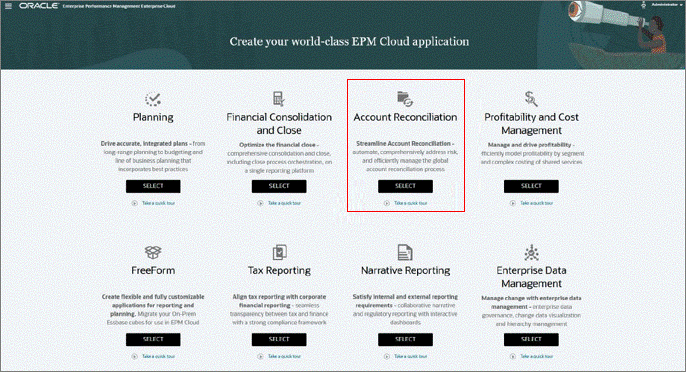
To create a new application for Oracle Fusion Cloud EPM Account Reconciliation, perform the following steps:
- Log in to your instance.
- Under Account Reconciliation, click Select.
- Click OK.
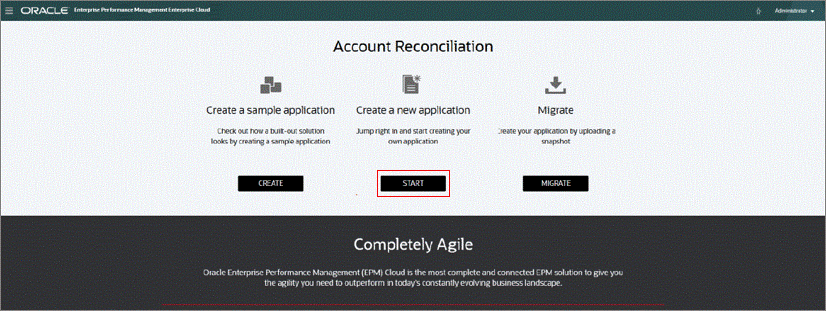
- After 15-20 minutes, log in to the instance. Under Create a new application, click Start.
An information message is displayed.

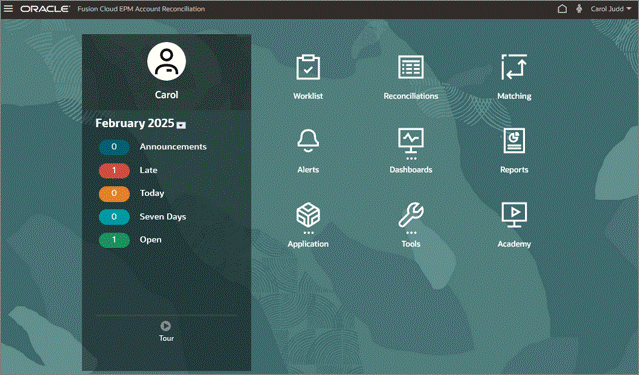
The Oracle Fusion Cloud EPM Account Reconciliation home page is displayed.
Configuring Profile Segments
Note:
This is the most important configuration for your application. Ensure that you design your segments well. The fewer the segments, the better the design.Profile Segments are the components of the Account ID used to uniquely identify profiles and reconciliations. To configure Profile Segments, perform the following steps::
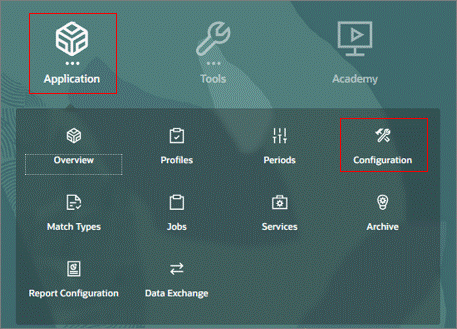
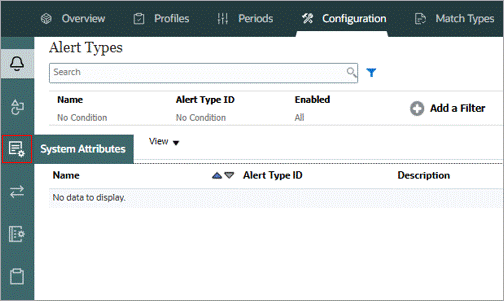
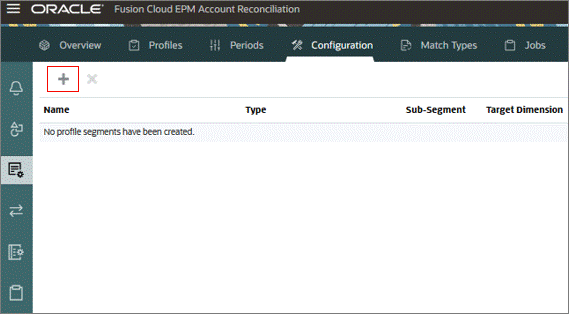
- From the Account Reconciliation home page, click the Application card, and then select Configuration.
- Click the System Attributes tab.
- The Profile Segments tab is open by default. Click
 (New).
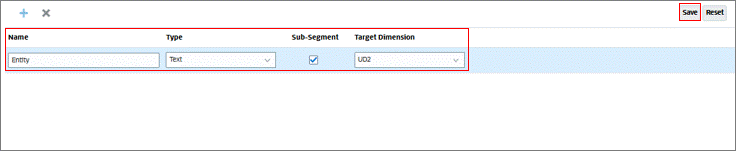
 - Create an Entity segment:
- For Name, enter Entity.
- For Type, select Text.
- Select Sub-Segment.
- For Target Dimension, select UD2.
- Create an Entity segment:
- Click (New).
- For Name, enter Account.
- For Type, select Text.
- Select Sub-Segment.
- For Target Dimension, select UD3.
Click Save.
Click Save.

Configuring Risk Ratings
Risk Ratings are associated with profiles and reconciliations, and enable classification of profiles and reconciliations according to risk level. To configure risk ratings, perform the following steps:
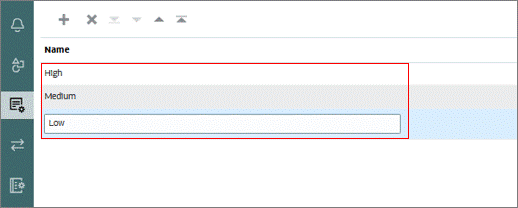
- Select the Risk Rating tab, then click (New).
- For name, enter High. Click Save.
- Repeat steps 1 and 2 to create Medium and Low risk ratings.


(Optional) Adding Frequencies
Frequencies determine how often reconciliations are prepared. In this section, you add daily, quarterly, and annual frequencies. On the Frequencies tab, within System Attributes, Monthly frequency is available by default, with Enable Amortization/Accretion selected. You can add frequencies by using the following steps:
- In the Frequencies tab:
- Click (New)
- For Name, enter Daily.
- Deselect Enable Amortization/Accretion.
- Click Save.

- Click
- Click
 (Move up), and then click Save.
 - Repeat step 1 and 2 to create frequencies named Quarterly and Annually.

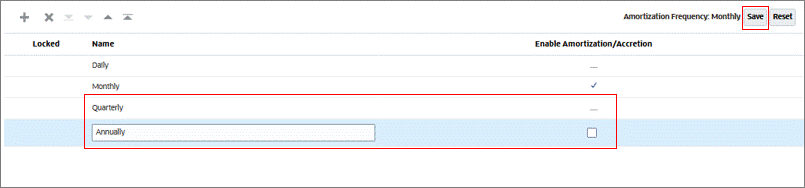
Note:
The frequency order matters. Ensure that your frequencies are ordered from highest to lowest (Daily, Monthly, Quarterly, Annually), and that Amortization/Accretion is enabled only for the Monthly frequency.Configuring Account Types
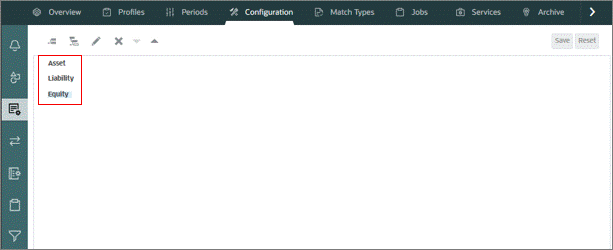
Account types enable classification of profiles, reconciliations, and adjustments according to a hierarchical structure. In this section, you configure account types for Assets, Liabilities, and Equity accounts:
- Select the Account Type tab, and then click
 (Add Siblings).
 - Add an account type for assets:
- Enter Asset, then click
 (Submit)
 - Click Save.
- Click (Add Siblings) and repeat step 2 to create account types for Liability and Equity.


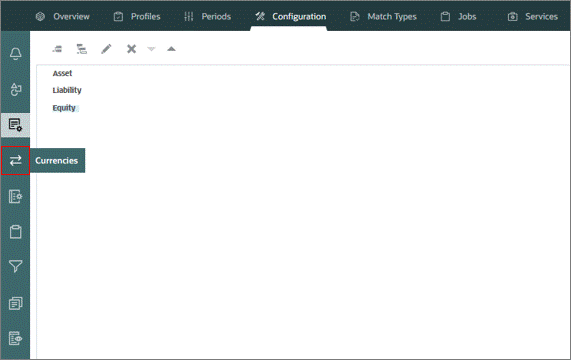
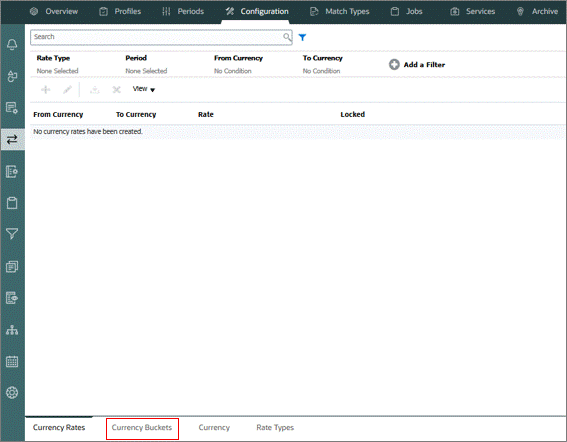
Setting default currencies
The currency buckets setup options determine how many currency buckets are set up for your company. In this section, you set the default currency for the Functional currency bucket:
- Click the Currencies tab.
- Click the Currency Buckets tab.
- For the Functional bucket, select EUR (Euro) as the default currency. Click Save.

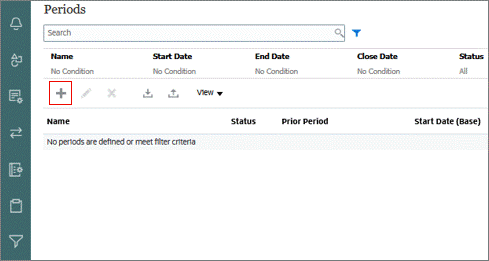
Configuring periods
Periods are associated with reconciliations and determine the as-of date of the reconciliation. You can configure periods by using the following steps:
- Click the Periods tab.
- Click (New).
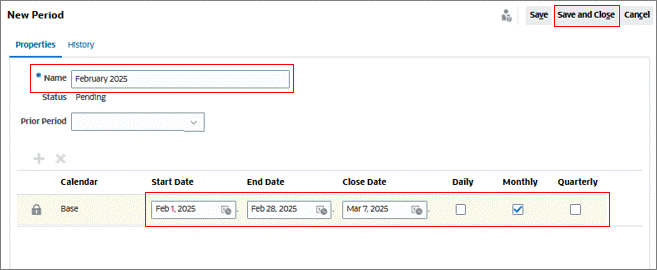
- On the Properties tab, enter the following details, and then click Save and Close:
- Start Date: Feb 1, 2025
- End Date: Feb 28, 2025
- Close Date: Mar 7, 2025
- Daily: uncheck
- Monthly:
 (Check)
- Quarterly: uncheck

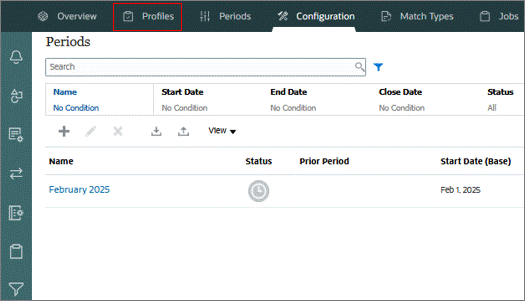
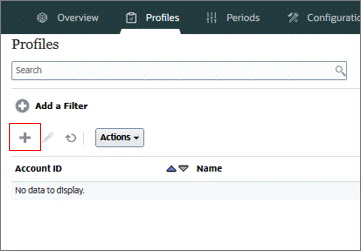
Configuring profiles
Profiles contain functions like the current preparer and reviewer assignments, account descriptions, instructions, format assignments, risk ratings. You can configure profiles by using the following steps:
- Click the Profiles tab.
- Click (New).
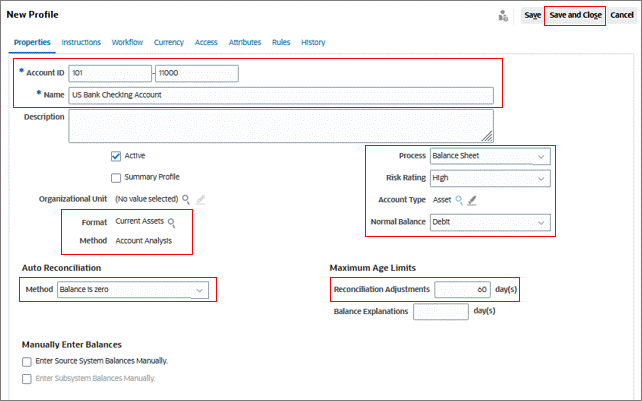
- On the Properties tab, define properties for the new profile:
- Account ID: 101 11000
- Name: US Bank Checking Account
- Process: Balance Sheet
- Risk Rating: High
- Account Type: Asset
- Normal Balance: Debit
- Format: Current Assets
- Auto Reconciliation Method: Balance is zero
- Reconciliation Adjustments: 60
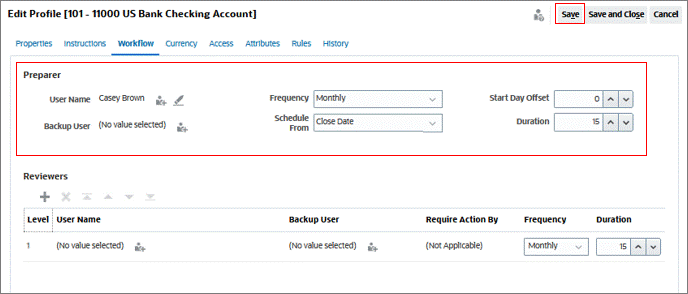
- Select the Workflow tab. Define the preparer for the profile
- User Name: preparer’s user name (for this practice, use your own user name)
- Frequency: Monthly
- Start Day Offset: 0
- Duration: 15
Leave all other fields as the default setting, then click Save.
Click Save and Close. Your profile should be visible with a ![]() (Valid) icon.
(Valid) icon.
Note:
Optionally, add Reviewer details by clickingSetting up Data Integration for balance loads (One-time configuration)
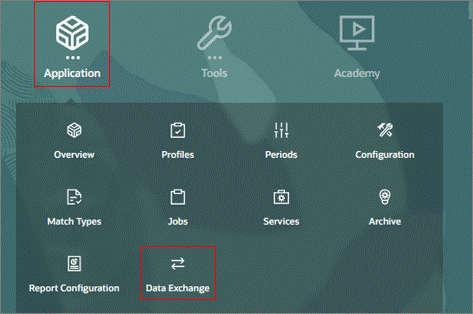
Data Integration is the mechanism by which integration processes are performed in Oracle Fusion Cloud Enterprise Performance Management. For balance loads with Data Integration, a one-time configuration is needed for the Reconciliation Compliance Balances target application. Perform the following steps:
- On the home page, navigate to Application > Data Exchange.
- On the Data Integration page, click the Actions drop-down list and select Applications.
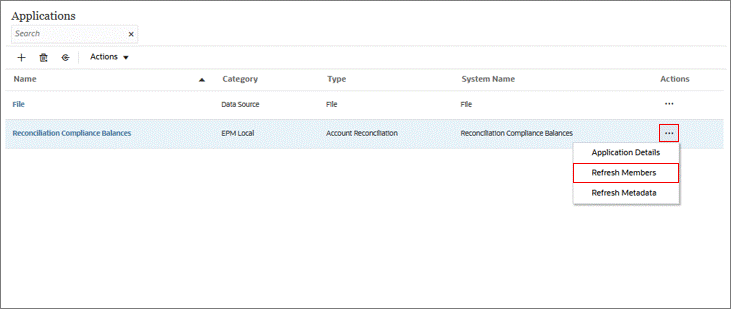
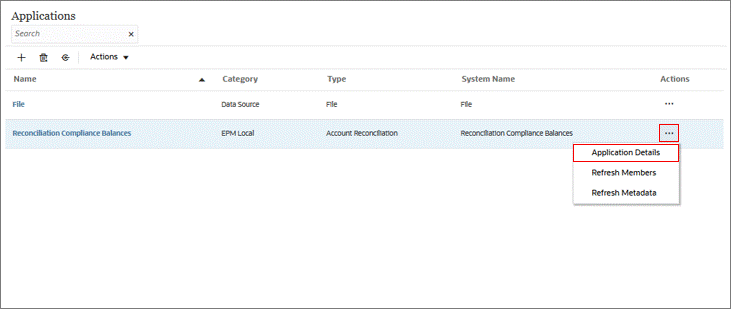
- In the Reconciliation Compliance Balances row, click
 (Actions), and then select Refresh Members. A message is displayed when the process is complete.
 - In the Reconciliation Compliance Balances row, click (Actions), then select Application Details.
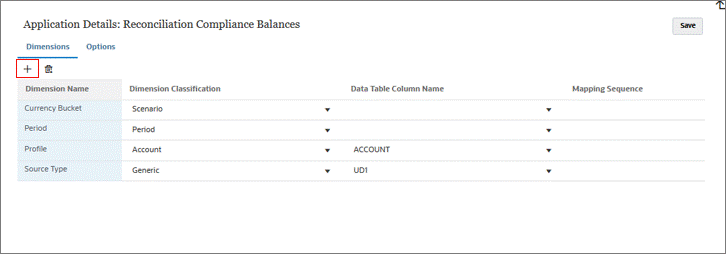
- Click (Add).
- Define the dimension:
- For Dimension Name, enter Entity.
- For Dimension Classification, select Generic.
- For Data Table Column Name, select UD2.
- Click Save.
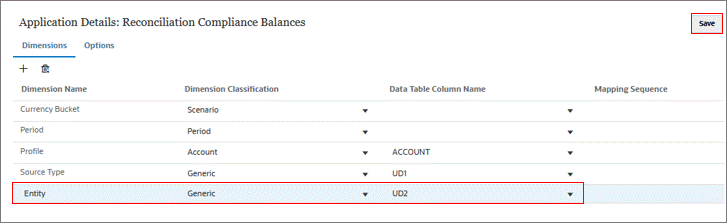
- Repeat steps 5 and 6 for the Account segment. Data Table Column Name for Account segment is UD3.
- Click
 (Return) and then click
  (Close).

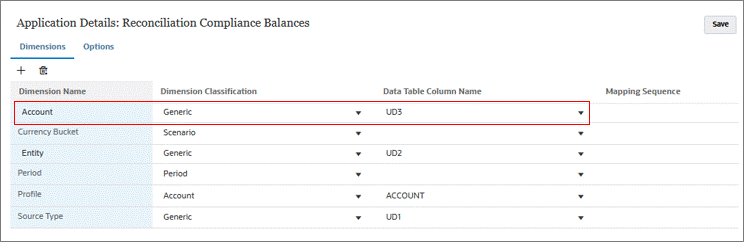
Note:
The Data Table Column Name should match with the Target Dimension option configured for the respective Profile Segments.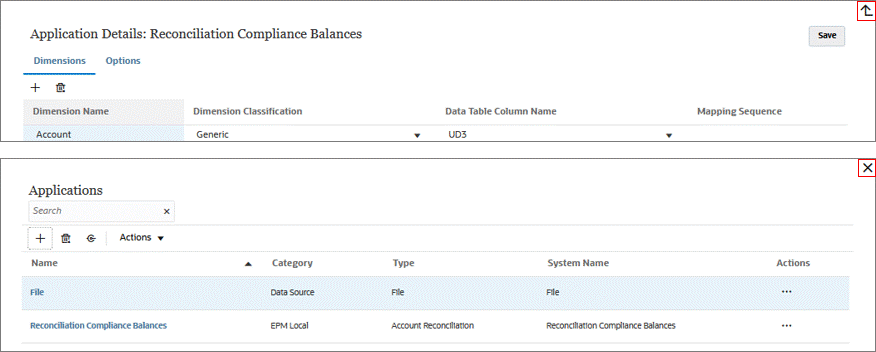
Configuring Data Integration periods
Account Reconciliation uses periods as a fundamental building block for managing reconciliations, allowing for open, close, and lock periods. You can configure data integration periods by using the following steps:
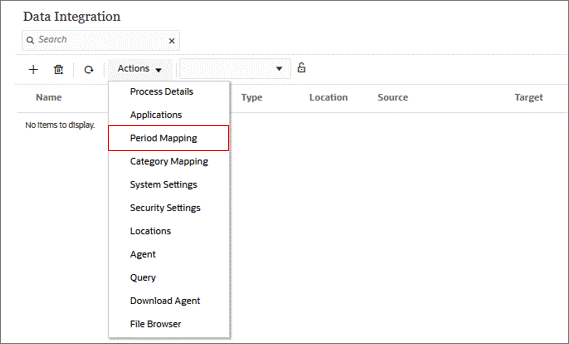
- On the Data Integration screen, click the Actions drop-down list and select Period Mapping.
- On the Global Mapping tab, click (Add Mapping), enter the required details as shown below:
- Period Key: 02/28/2025
- Prior Period Key: 01/31/2025
- Period Name: Feb-25
- Target Year: 2025
- Target Period - Month: February 2025
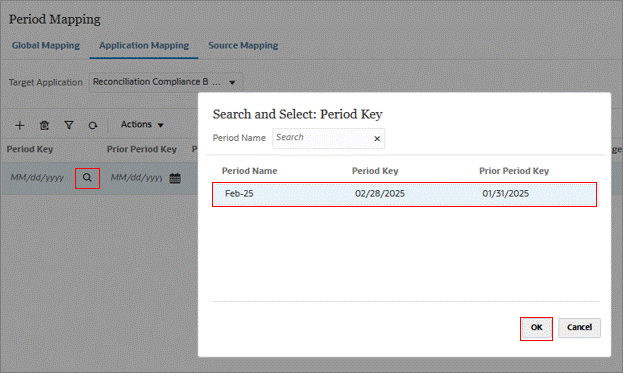
- On the Application Mapping tab, with Reconciliation Compliance Balances as the target application, click (Add Mapping).
- Click the
 (Search) icon under Period Key, select Feb-25, and click OK.
 - Click Save. Click (Close) at the top right corner of the Period Mapping screen.
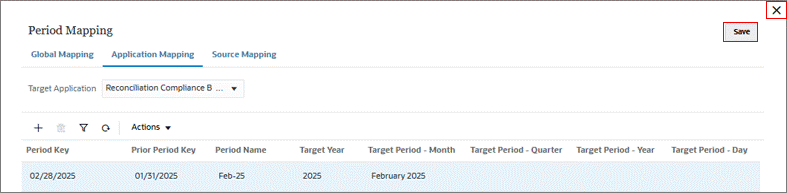
Note:
The Period (February 2025) configured under Target Period – Month should match with the corresponding period configured earlier with Account Reconciliation.
Click Save.

Note:
The Period (Feb-25) configured under Period Name will appear within the POV Period drop-down in Data Integration.
Creating an integration
An integration specifies how data is extracted from the source system and loaded into the target system. You can create an integration by performing the following steps:
- Copy the text below on to a Notepad, and save the file as GL_Balance.csv:
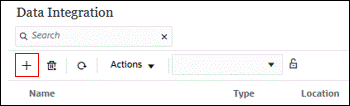
- On the Data Integration page, (New) to open the Create Integration wizard.
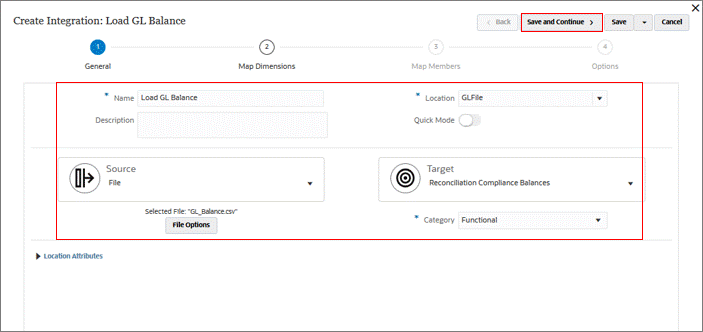
- On the General tab, define the general settings for this integration:
- For Name, enter Load GL Balance.
- For Location, select GLFile.
- For Source, select File.
- In the File Browser dialog, click Upload, then browse to select
GL_Balance.csv. - For Target, select Reconciliation Compliance Balances.
- For Category, select Functional.
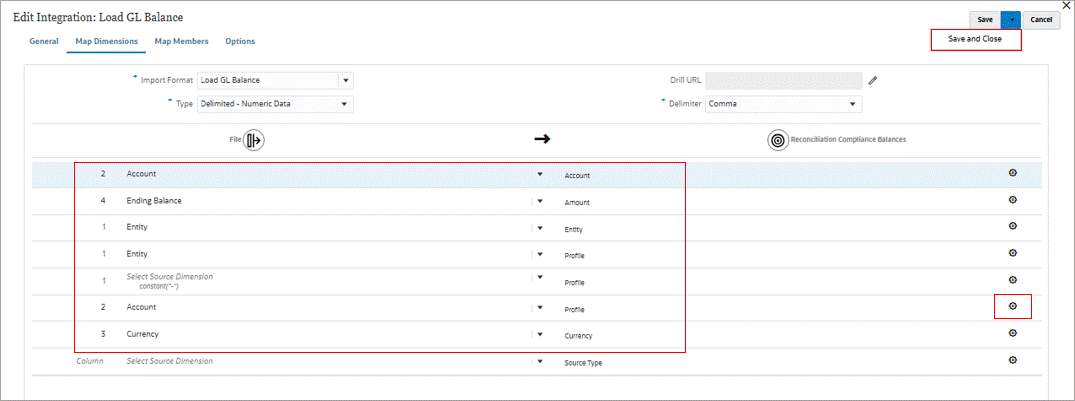
- In the Map Dimensions tab, you can specify how source columns map to the dimensions in the target application. Enter the details provided below:
- Account - Account
- Ending Balance - Amount
- Currency - Currency (Use to gear icon against any target dimension to add Currency)
- Entity - Entity
- Entity - Profile
- constant("-") - Profile
- Account - Profile
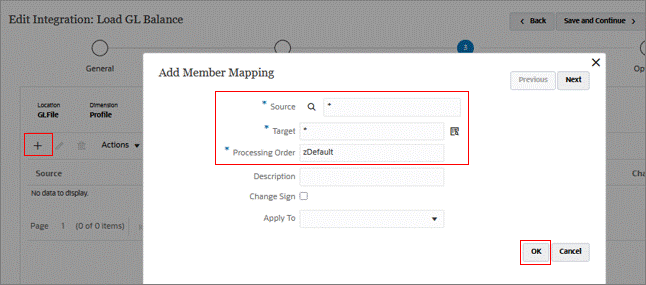
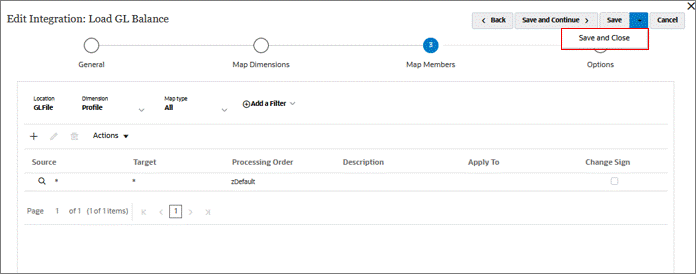
- In the Map Members tab, click the (Add) and enter the following details, then click OK:
- Source==: *
- Target: *
- Processing Order: zDefault
- Source==: *
- Target: source system
- Processing Order: SRC
- To save the integration, click the Save drop-down and select Save and Close.
Entity,Account,Currency,Ending Balance
101,11000,EUR,200000
Click Save and Continue to proceed.
Click Save and Continue to proceed.
Member Mapping for Profile, Entity and Account:
Member Mapping for Source Type:
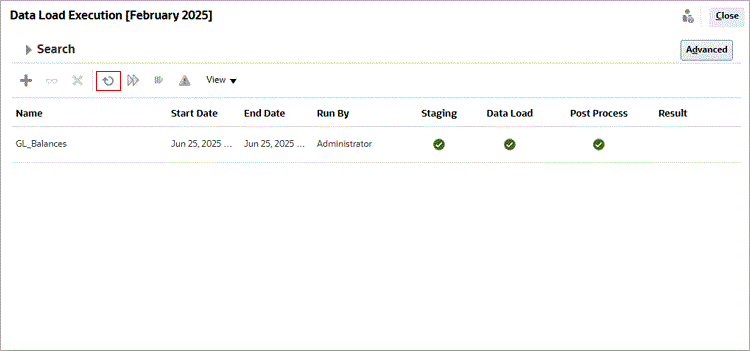
Importing balances into Account Reconciliation
You can import balances by following these steps:
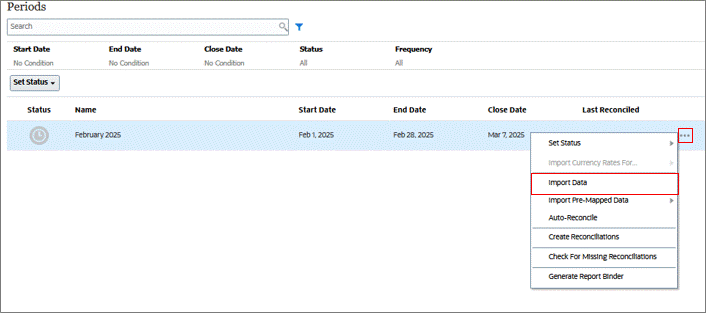
- Click Applications, then select Periods.
- For February 2025, click (Actions) and then select Import Data.
- To add new balances, click (New).
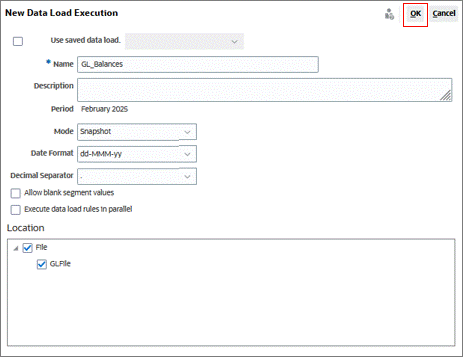
- The New Data Load Execution window is displayed. Enter the required details, select the correct location, and then click the OK button.
- Click
 (Refresh) to check if the balances have been imported successfully.
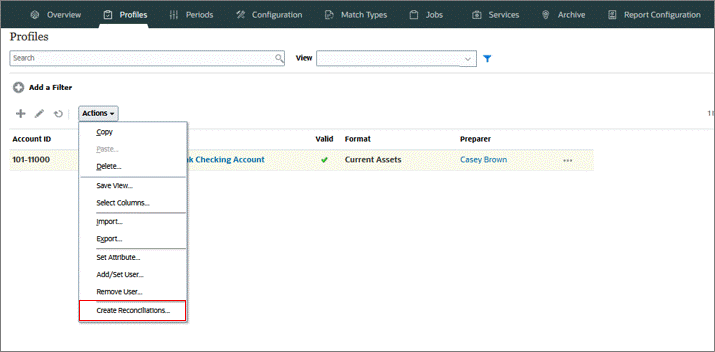
 - Select the Profiles tab. Click Actions, then select Create Reconciliations.
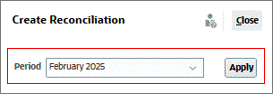
- Select February 2025, then click Apply.
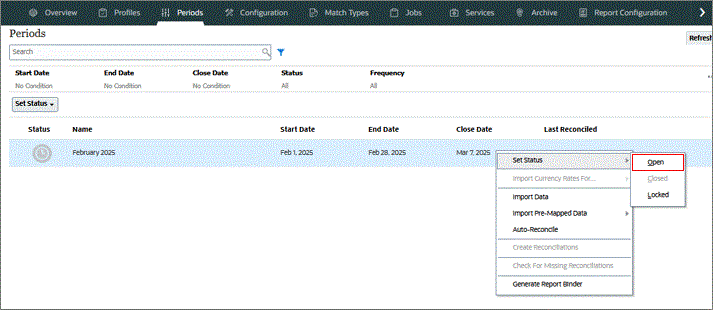
- Select the Periods tab. For February 2025, (Actions), then select Set Status, then select Open.

Note:
You can also create reconciliations directly from the Periods page. For this example, we are using the Profiles page.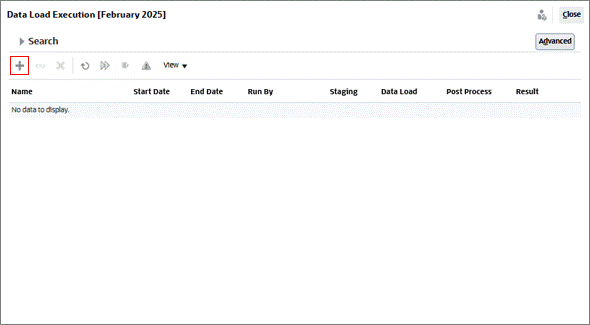
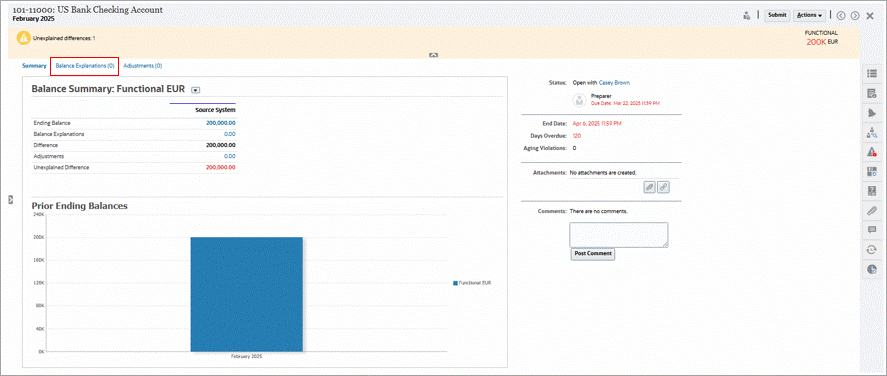
Preparing a reconciliation
You prepare reconciliations by reconciling differences between source system and subsystem balances, by explaining account balances, and by monitoring period-to-period variances in account balances. In this section, you will prepare the reconciliation by explaining account balances, through the following steps:
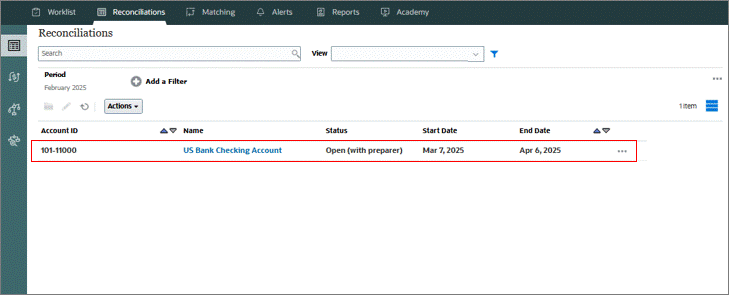
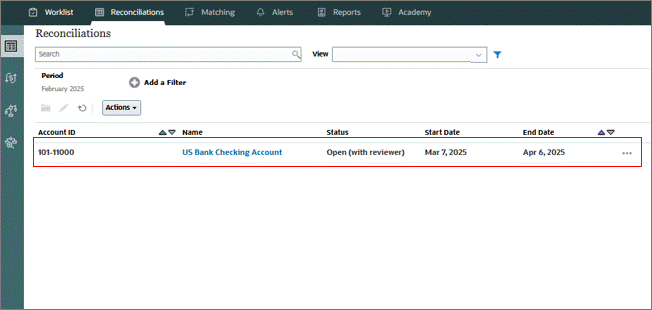
- From the home page, click Reconciliations. Click US Bank Checking Account to open the account.
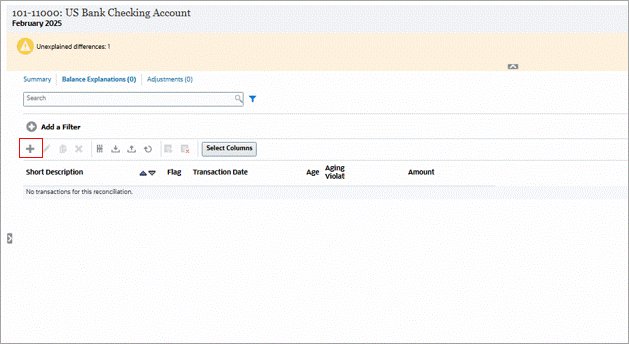
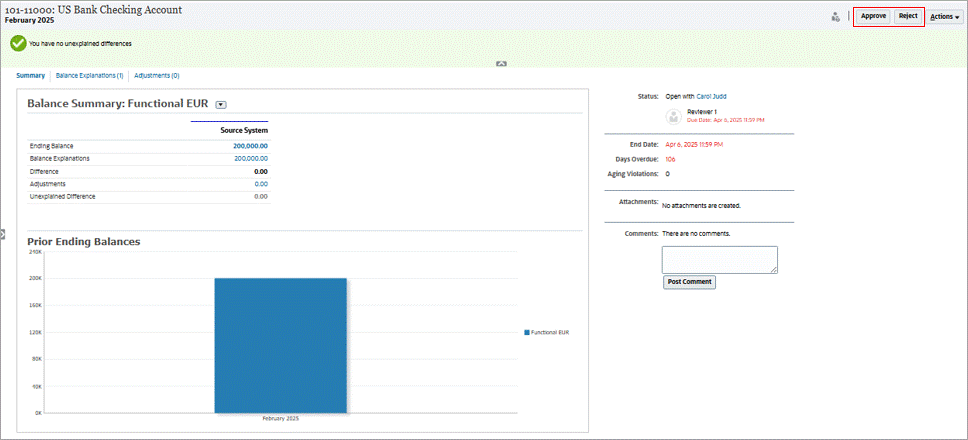
- Click the Balance Explanations tab.
- Click (New).
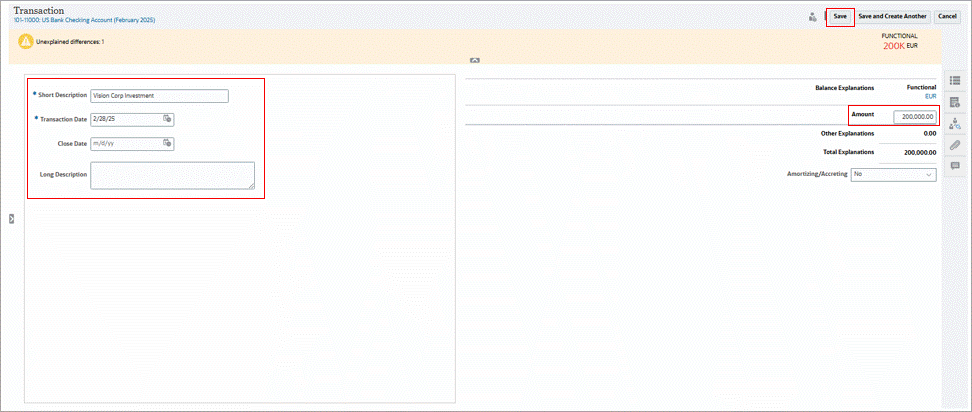
- Enter the following details:
- Short Description: Vision Corp Investment
- Transaction Date: 2/28/25
- Amount: 200000
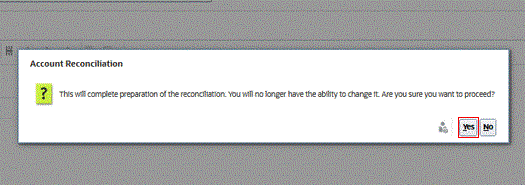
- At the confirmation message, click Yes.
Click Save, and then click Submit.
(Optional) Reviewing a reconciliation
If you added a reviewer user to your profile, follow these steps to review the reconciliation:
- Log in as the user you added as a reviewer.
- From the home page, click Reconciliations. Click US Bank Checking Account to open the account.
- Review the reconciliation for unexplained differences.
(Optional) Click Approve to approve the reconciliation or click Reject to reject it.
Related Links
- Documentation: About Profile Segments
- Documentation: Defining Risk Ratings System Attribute
- Documentation: Defining Frequencies
- Documentation: Defining Account Type System Attribute
- Documentation: Defining Currency
- Documentation: Configure Periods
- Documentation: Managing Account Reconciliation balance load
- Documentation: Data Integration for Balance Loads
- Documentation: Integration for Account Reconciliation Demo
- Documentation: Dashboards Demo
- Documentation: Links to all previous Webinars
- Oracle EPM Tutorials YouTube Channel
Oracle Fusion Cloud EPM Account Reconciliation Basics
G37099-01
June, 2025