Exporting Transactions to CSV or Excel Format
To review transactions offline in more detail, you can export transactions to a comma-separated value (.csv) format or Excel format (.xlsx) which can be opened in Microsoft Excel.
It is recommended that you use the comma-separated value (.csv) format when exporting a large number of rows.
Note the following about the exported transactions:
-
Export of transactions uses your filtered list of transactions, not the selected or highlighted transactions.
-
The data source attributes are used as column headers.
-
Calculated attributes are exported but system attributes such as Reconciliation ID are not.
-
The Transaction ID is included in the exported data.
-
The Unmatched Date and Supported Date are displayed in the user’s time zone. However, in the export file, these dates are in UTC (Universal Time Zone).
You can export from various locations:
- Unmatched transactions can be exported from the Unmatched Transactions dialog as shown in this example below.
- In the Overview, you can drill down and then export all transactions.
-
You can also export transactions from the Transactions tab available from the Matching card. See Searching Transactions in Transaction Matching
Note:
A maximum of one million rows is the limit in Excel.Here's an example of exporting transactions to a .csv file using the Unmatched Transactions dialog as an example:
-
From the Unmatched Transactions dialog, make your selection of the transactions you want to review. You can select one or more transactions or filter the transactions.

-
Click Export
 .
.
- On the Export dialog, choose either csv or xlsx and then click Export.
-
A progress bar displays while the job is processing. You receive a message, such as "Export transactions for <
DATA SOURCE NAME> is in progress.".Note:
You can either wait while the export processes, or go ahead with other work and download the export file from the Jobs dialog. - Once the export is complete, you see a message such as, "Export transaction(s) for <
DATA SOURCE NAME> has been completed successfully."Click Download to save the file locally.
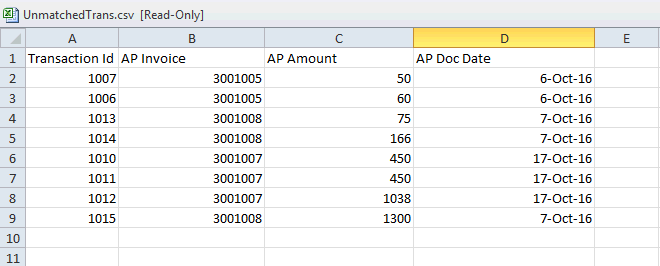
Here is an example of a .csv file.
Obtaining the Downloaded File from Jobs
You can also perform view job details and obtain the downloaded transactions file from the Jobs for Transaction Matching.
- From Home, select Application, then Jobs, and then Transaction Matching.
- From Jobs , locate the job you performed, and the name of the exported transactions .csv file is shown.

-
Click the file name link to save that file locally.