After you add states and functions for an object type,
you can add rules.
Before you start
Caution: An extremely high number of complex rules can cause the application to run out
of memory and cause errors. Let's say, for example, you’ve more than 675 highly
complex rules. Each complex rule has 20 conditions, 20 Then actions, and 20 Else
actions. In this scenario, memory errors are likely to occur. You can run more than
1,000 rules of moderate complexity, that is, three conditions, five Then actions,
and three Else actions, without error. However, it might take more than a minute to
save the rule base.
The basic steps for adding a rule are similar for all types
of rules, although the condition and action options available vary
by rule type. The procedure shown here uses opportunity rules as an
example.
Here's what to do
- Click Configuration on the navigation
pane.
- Expand Site Configuration, then
double-click Rules.
- Click Opportunity on the ribbon
to view active opportunity rules.
- Click Edit on the ribbon to enter
the edit mode.
- Right-click the state or function to which you want to add the rule, then select New Rule.
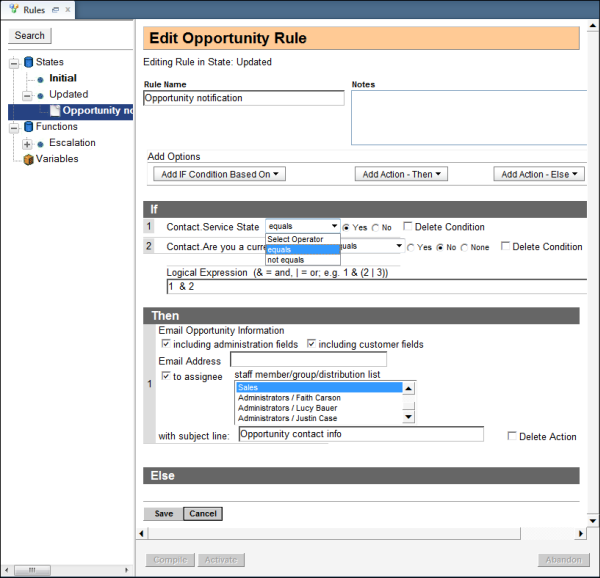
The Edit Opportunity Rule window
opens.
- Enter the name of the rule in the Rule Name field.
- To add a note about the rule, enter comments in the Notes field. Add any information or special instructions
that may be helpful when staff members hover over the rule in the
Rules tree.
- To add a condition, click Add IF Condition Based
On.
Opportunity rule conditions include Opportunity, Contact, and Organization. It can also
include Rule Variables if you added variables. Each one has a drop-down list
containing the fields for the condition. Rules for other object types have
different menus for selecting conditions. See
Business Rule Conditions for a description of the conditions for each object.
Note: You might decide you want the rule actions to apply to all
opportunities. In that case, you can create a rule that has only actions,
but no conditions. You must add the actions to the Then
clause.
-
Select Opportunity,
Contact, Organization,
or Rule Variables to display the drop-down list
of fields. You then select the field for the condition.
For example, select the Contact field with the Service State to
identify contacts who have entered the application through customer
support.
- Click Select Operator and select
the operator that applies to the field you selected.
Let's use the example from the previous step. If the operator is “equals,” different operators
appear in the Select Operator drop-down menu when you select different
fields.
- Enter the value.
- To add another condition to the rule, repeat the previous
step.
You can require that only one of the conditions be met before the rule action is executed,
that all conditions are met, or that some combination is required. To understand
the relationships when a rule contains multiple conditions, see
Business Rule Logical Expressions.
In our example, add
a second condition using a contact custom field called “Are you a current
customer?” and set the field to equal No. This identifies customers who have
expressed enough interest to call customer support, but who aren’t yet
contacts.
-
To delete a condition after you’ve added it to a rule, select the
Delete Condition check box.
The editor is refreshed.
- Click Add Action–Then to choose
the action that will be executed if the conditions are met. In this
example, the action is sending an email to a sales manager.
-
Select the To Assignee check box. You’ll also need to
select a staff member or group from the drop-down list. For example, to send the
opportunity email to Sales, scroll down and select
Sales.
-
To add an action to the Else clause, click Add
Action–Else and select an action. For example, contacts that
don’t match the rule conditions have an Opportunities or Outreach state or are
already contacts. In that case, you might want to add an action that sends these
contacts a survey to determine customer satisfaction.
- To delete an action after adding it to a rule, select the Delete Action check box.
The editor is refreshed.
-
To add more actions to the rule, repeat step 10 or 11, depending on whether you
want to add the action to the Then clause or the Else clause.
- Click Save.
Rule validation prevents saving meaningless rules. For example, a rule with no condition
automatically executes the actions in the Then clause. If the rule also contains
an Else clause, the rule is invalid because a nonexistent condition can’t be
unmatched. Rules with no action are also invalid.
If the rule is successfully saved, it appears in the Rules tree under the appropriate
state or function. If the save isn’t successful, a message prompts you to
replace an invalid value or add a missing value.