Create a Rule that Sets the Escalation Level
This procedure shows you how to create a rule that sets an escalation level when the escalation level is applied to an incident, but the procedure is the same when applied to answers, opportunities, and tasks.
Before you start
Escalation rules always come in pairs. This procedure creates a rule that sets the escalation level for an incident that matches the rule conditions. It tells the Dbstatus utility to set the escalation to the defined level when the time for escalation has passed. The next rule must specify what you want to happen after the incident reaches this escalation level.
Here's what to do
- Enter the values in the escalation action fields.
Escalation Action
Field Description Escalate to Level Enter a name for the escalation level you are creating in this field. Relative Select this check box to trigger escalation at a time relative to a day or event, which you select from the drop-down list to the right of the check box. In the drop-down list to the left of the check box, select a value to establish the time relationship to the event. For example, you might select a relative time such as +4 hours relative to Time Created.
Clear this check box to base escalation on absolute time.

This field lets you schedule the escalation using absolute time. That is, you set the specific time you want rather than scheduling escalation relative to another time. Click the drop-down list to open the current month calendar and select the escalation date. To change the date or time, click the value you want to change, then enter a new value.
Click anywhere in the date or time to set the exact date and time you want the answer, incident, opportunity, or task to escalate to this level.
This option appears only if the Relative check box is cleared.

Click the arrow to open a window for selecting the direction, offset, and units for the relative time value. +1 Hours is the default. Enter the direction, offset, and unit for this field, then click Save. This option appears only if the Relative check box is selected.
Direction Select + (future) or – (past) to indicate the direction of the offset for the escalation time from the relative time you define. For example, you might want to escalate an incident 8 hours after (+8 Hours) the time of the last response or an opportunity 4 hours before (– 4 Hours) the Forecast Close time.
Offset Select this field and enter a new value to change the number of minutes or hours before or after the relative time. Unit Click the drop-down list, then select minutes or hours. 
Click the arrow to display the drop-down list and select Now, Today, Tomorrow, any day of the week, or any of the answer, incident, opportunity, or task options listed below. This establishes the base time to which Dbstatus applies the relative escalation time. You must select the Relative check box to display the menu.
If you select Today, Tomorrow, or any day of the week, the time associated with that date field is midnight. Therefore, if you create a rule to escalate an answer or an opportunity +3 hours relative to Wednesday, then the escalation would be scheduled for the next Wednesday at 3 A.M.
The same scenario holds true for incident escalation only if the Use Response Intervals check box is cleared. If the Use Response Intervals check box is selected, the schedule for escalation depends on the work hours that have been set since only work hours are counted.
If, for example, work hours on Wednesdays begin at 6:00 A.M., then escalation for the incident would be scheduled for Wednesday at 9:00 A.M.
Answers Select one of these escalation options based on the time the answer was added or updated or is scheduled to be reviewed or published. Answers.Created Select this option if you want the escalation time to be calculated from the time the answer was added. Answers.Updated Select this option if you want the escalation time to be calculated from the time the answer was updated. Answers.Review On Select this option if you want the escalation time to be calculated from the time the answer is scheduled to be reviewed. Answers.Publish On Select this option if you want the escalation time to be calculated from the time the answer is scheduled to be published. Incidents Select one of these escalation options based on the time the incident was added, updated, or responded to, or the time it is due. Incident.Created Select this option if you want the escalation time to be calculated from the time the incident was added. Incident.Updated Select this option if you want the escalation time to be calculated from the time the incident was updated. Incident.Date Last Responded Select this option if you want the escalation time to be calculated from the time the incident was last responded to. If the database contains no value for this field (because only the initial response has been recorded with no subsequent responses), the escalation action will not occur. Incident.Date Initial Solution Response Select this option if you want the escalation time to be calculated from the time of the initial solution to the incident. If the value for this field in the database is null (because the incident has not been responded to yet), the escalation action will not occur. Incident.Date Due Select this option if you want the escalation time to be calculated based on the relative time due set in your default response requirements. Opportunities Select one of these escalation options for opportunities. Opportunity.Created Select this option if you want the escalation time to be calculated from the time the opportunity was added. Opportunity.Updated Select this option if you want the escalation time to be calculated from the time the opportunity was updated. Opportunity.Initial Contact Select this option if you want the escalation to be calculated from the date the customer for the opportunity was initially contacted by a sales representative. The time associated with this date field is midnight. Therefore, if you create a rule to escalate +3 days relative to Time Initial Contact and the initial contact occurred on Monday morning, the escalation would be scheduled for midnight on Thursday.
If the value for this field in the database is null (for example, if the customer for the opportunity has not been contacted yet), the escalation action will not occur.
Opportunity.Forecast Close Select this option if you want the escalation to be calculated from the date the opportunity is forecasted to close. The time associated with this date field is midnight. Therefore, if you create a rule to escalate 12 hours before the forecasted close (that is, –12 hours relative to Time Close Forecasted) and the opportunity was forecasted to close on Friday, the escalation would be scheduled for Friday at noon.
If the value for this field in the database is null (for example, the opportunity does not have a forecasted close date yet), the escalation action will not occur.
Opportunity.Date Closed Select this option if you want the escalation to be calculated from the date the opportunity closes. The time associated with this date field is midnight. Therefore, if you create a rule to escalate 6 hours after the close date and the opportunity closed on Tuesday, the escalation would be scheduled for 6:00 A.M. Wednesday.
If the value for this field in the database is null (for example, the opportunity has not closed yet), the escalation action will not occur.
Opportunity.Lost Date Select this option if you want the escalation to be calculated from the date the opportunity was lost. Opportunity.Recall Select this option if you want the escalation to be calculated from the date the customer for the opportunity should be called again. Tasks Select one of these escalation options for tasks. Tasks.Completed Date Select this option if you want the escalation time to be calculated from the date the task was completed. Tasks.Created Select this option if you want the escalation time to be calculated from the date the task was added. Tasks.Due Date Select this option if you want the escalation time to be based on the task due date. Tasks.Planned Completion Date Select this option if you want escalation to be based on the planned completion date of the task. Tasks.Start Date Select this option if you want escalation to be based on the task start date. Tasks.Updated Select this option if you want escalation to be based on the date the task was updated. Use Response Interval Select this check box to use the work hours defined in the default response requirements set up for your organization. If you clear this check box, incidents meeting the conditions might escalate during non-working hours and holidays. This check box applies only to incident escalation and does not appear with escalation actions for tasks, answers, and opportunities.
Revalidate Select this check box to revalidate the answer, incident, opportunity, or task, which means that if it is edited and no longer matches the conditions of this rule, the escalation action is removed from the scheduled escalations queue. After an escalation that requires revalidation has been scheduled, the conditions of the rule must continue to match when the object is updated. If they do not, the pending escalation is canceled.
Recalculate Select this check to recalculate escalation time for the answer, incident, opportunity, or task when it is updated. The rules engine reschedules escalation based on the relative time value, such as four hours after Time Updated. You must select a relative time value that is not static in order for the Recalculate feature to be meaningful. If you select a static value, for example, Time Created, escalation is not rescheduled because Time Created remains static even when the object is updated. If, however, you select Time Updated, escalation is rescheduled because the Time Updated value changes when the object is updated.
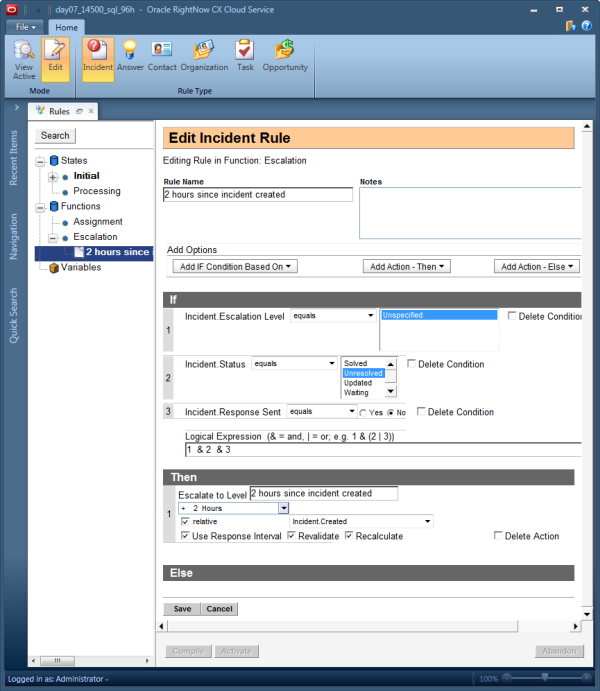
This image shows a rule that sets an escalation level.
What to do next
The next rule must specify what you want to happen after the incident reaches this escalation level. To do this, you create another rule in the escalation function, as described in Create a Rule that Triggers Actions on an Escalated Object.