Activating a new Oracle Unity subscription
Overview
During the purchase process of Oracle Unity, your organization must designate a point of contact (POC), or this is generally the person who signed the contract. This individual will be assigned the following roles:
-
Oracle Cloud Account administrator
-
This administrator can activate Oracle Unity subscription from Oracle Cloud Account. They can also manage services, add users and perform other activities within Oracle Cloud and receive emails from Oracle Cloud.
-
-
Oracle Unity instance administrator
-
This administrator can add users and perform any activity within Oracle Unity and receive emails from Oracle Unity.
-
When you purchase Oracle Unity, you are provided with a tenancy in Oracle Cloud Infrastructure (OCI), where you create and maintain your Oracle Unity environment.
During the order activation process (Step 1 below), you can create a tenancy, or if already have a tenancy, you can add your Oracle Unity subscription to an existing one. After the subscription is added, you are ready to create the environment where your Oracle Unity application will run.
If you are the designated POC, proceed to the Next Steps section below to activate Oracle Unity order.
Next Steps
The following workflow describes the main tasks to get started:
Step 1: Order activation
To begin using your Oracle Unity, you need to activate your order. You'll also need to create the environment in the next step.
Order activation adds the subscription to an Oracle Cloud Account. If you don't have an account, you will be guided to create one. If you already have an Oracle Cloud Account, you can choose to add this order to an existing account.
After your order is processed, you (the POC) receive an email with the subject line:
Action Required: Welcome to New Oracle Cloud Service Subscription(s)

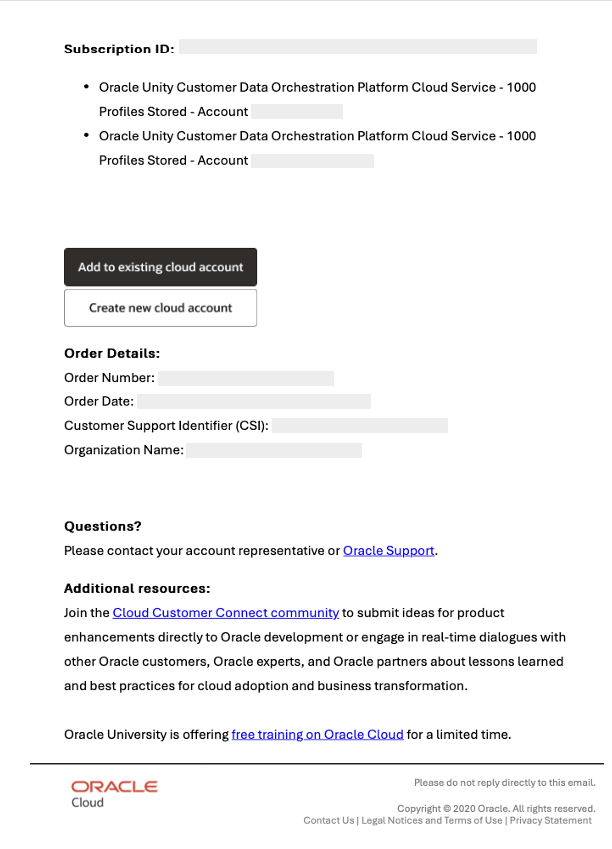
You can forward this email to a colleague within your company who can serve as the Cloud Account administrator. However, the process will vary depending on whether your organization:
-
Already has an existing Cloud Account and will activate the Oracle Unity subscription into it.
-
Needs to create a new Cloud Account and activate the Oracle Unity subscription.
If you need to activate into an existing Oracle Cloud Account, but you are not a Cloud Account administrator for that account, you must request that level of access before proceeding or you can forward this email to someone who is an Oracle Cloud administrator.
If you need to activate into a new Oracle Cloud Account but you will not be the Cloud Account administrator, you can either forward this email to a colleague within your company who can serve in that role, or you can enter the intended administrator’s details yourself in Step 5 under Create New Cloud Account.
For more information refer to the following:
-
How do I decide whether to create a new account or use an existing account?
-
How do I know if my company already has an existing account?
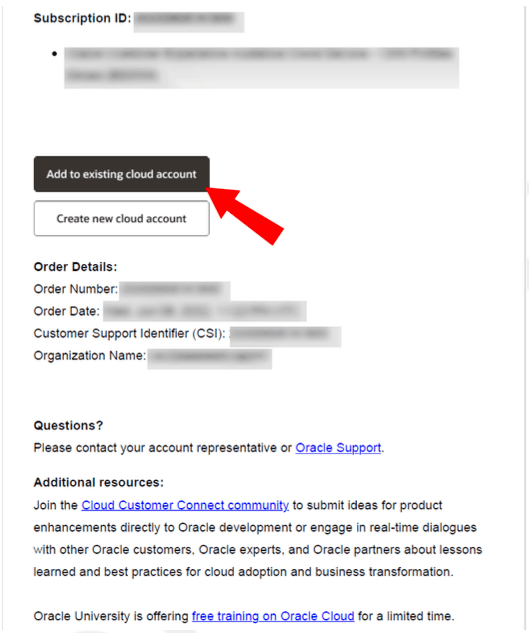
Add Subscription to an Existing Cloud Account
If you are already an Oracle Cloud customer with a Cloud Account and would like to activate the service into an existing tenancy, perform the following steps:
-
Open the email you received from Oracle Cloud.
-
Review the information about adding your subscription in the email.
-
Click Add to existing cloud account at the bottom of the email.

-
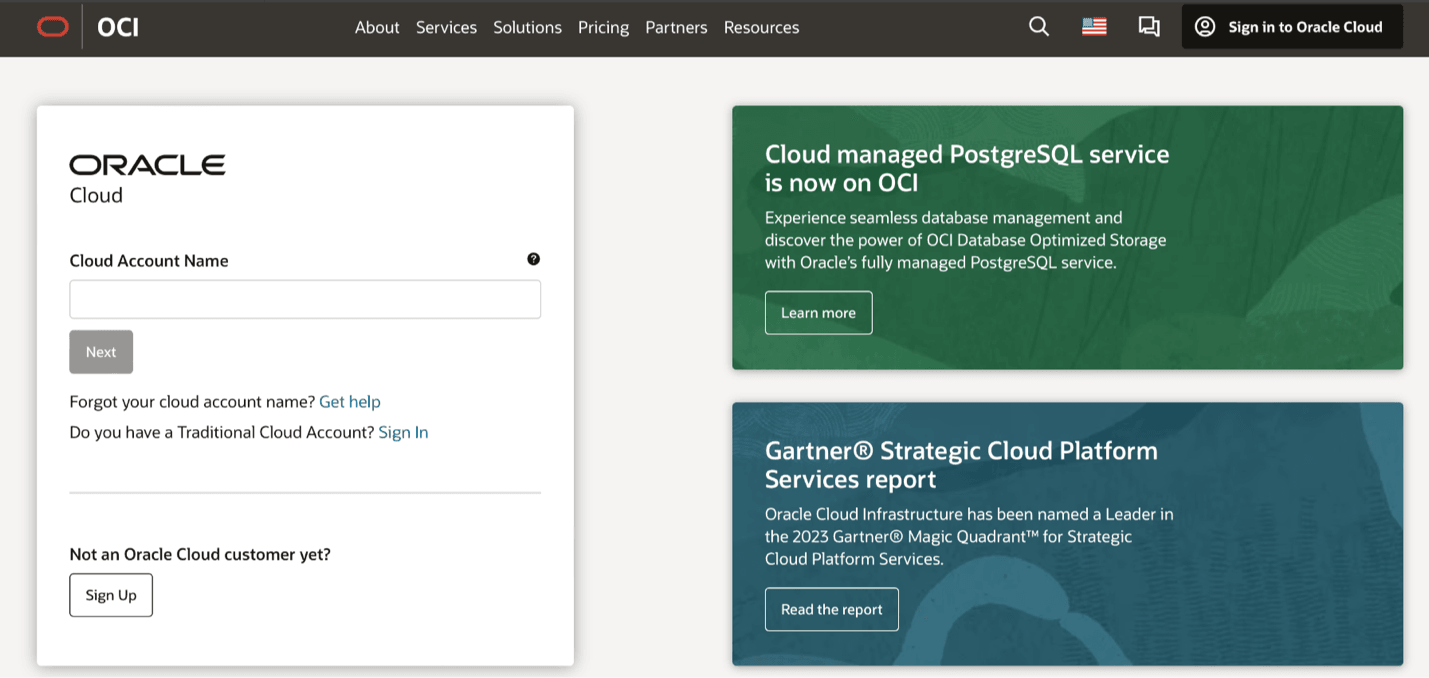
Your web browser opens, where you can sign in: Enter your exiting Cloud Account name and click Next.

-
Enter your username and password and click Sign In.

-
The Add Subscription page is displayed, where you can add the new subscription to your tenancy. The page indicates the subscription name, subscription ID, and subscription description (with product SKU).
-
Click Add subscription


Important: Adding a subscription to a tenancy cannot be undone
The subscriptions are added to the tenancy, and the Applications Console home page is displayed.
To verify that the subscriptions are added, you can click the application name under My Applications. The overview page for the application opens and the subscriptions are listed under Service details.
Now you are ready to provision your environment.
Create New Cloud Account
If you are a new cloud customer, perform the following steps:
-
Open the email you received from Oracle Cloud.
-
Review the subscription details in the email.
-
Click Create new cloud account at the bottom of the email.

-
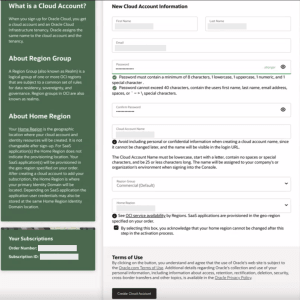
Your web browser opens, displaying the New Cloud Account Information sign up form.
-
Enter your First name, Last name, and Email address. The email address is also the username for signing in to the account. The person you specify here will be the first administrator to access the account and can create other users. This person also has full administrator permissions in your account.
-
Enter a Password and confirmation.
-
Enter a Tenancy Name. This is also called your cloud account name. When choosing a tenancy name, be aware of the following:
-
The tenancy name or cloud account name is used to identify your account. The name is also used to create the URLs to access your cloud services. For example, if you call your tenancy "abccorp", an application URL might look like:
https://abccorp-oracleservice.service.us.phoenix-1.ocs
-
The tenancy name must be unique, start with a lowercase letter and have no more than 25 lowercase letters or numbers. You can't use spaces or special characters.
-
-
Region Group, use the default setting, as it represents the logical group of OCI.
-
Select a Home region where your services will be hosted.
Note: Your home region is the geographic location where your account and identity resources will be created. You can’t change this after signing up. If you are not sure which region to select as your home region, contact your sales representative before you create your account. Refer to the table below for selecting a home region.

-
Read the Terms of Use.
-
Click Create Tenancy.


The tenancy provisioning step can take from several minutes to an hour, depending on your service subscriptions.
Step 2: Create Unity environment
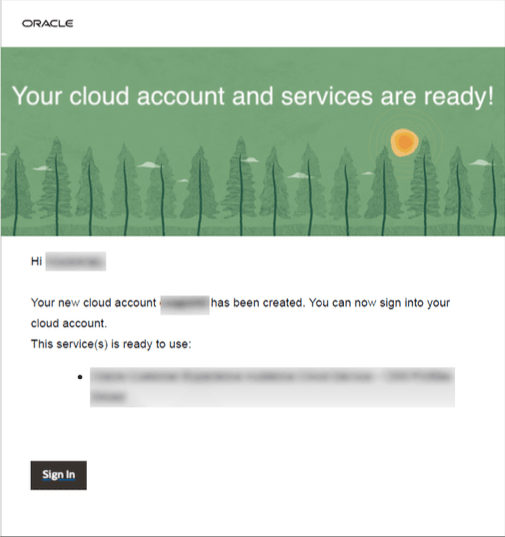
When your new tenancy is created or your Oracle Unity subscription is added to your existing Oracle Cloud account, you will receive an email notifying you that your Cloud account and services are ready.
-
Click the Sign In button in the email to sign in for the first time with the credentials you set up.

After you sign in, the Oracle Cloud home page for applications is displayed. To verify that the subscriptions are added, click the application name under My Applications. The overview page for the application opens and the subscriptions are displayed.
-
From the Oracle Cloud homepage, click Create environment for the Oracle Unity application.


-
Enter the details for the Oracle Unity instance.


-
Name: Enter a unique name for your Oracle Unity instance
-
The instance name identifies your service only within your “Oracle Cloud - My Services” identity domain on the Oracle Cloud Portal. Oracle does not use it to name your Oracle Unity account.
-
The instance name must start with a letter, and it can have up to 20 lower case letters and numbers. You cannot use spaces, upper case letters, special characters, or non-English characters or numbers.
-
-
Admin email: Enter your email address
-
Type of instance: Based on the Unity subscription purchased, you would see options Unity, B2C Orchestration or B2B Orchestration. Select the option that’s applicable based on your purchase.
|
Your company purchased |
Type of instance to select |
|---|---|
|
Unity Customer Data Orchestration Platform Cloud Service |
Unity |
|
Unity Customer Data Orchestration Platform Cloud Service + Oracle B2B Orchestration Cloud Service |
B2B Orchestration |
|
Unity Customer Data Orchestration Platform Cloud Service + Oracle B2C Orchestration Cloud Service |
B2C Orchestration |
-
Industry: Use the default
-
Hostname: The host name you enter here will be used as the host name for your Oracle Unity instance URL. We recommend you use your company/department name. It must start with a letter, and it can have up to 25 lower case letters and numbers. You cannot use spaces, upper case letters, special characters, or non-English characters or numbers.
-
Time zone: Use the default
-
B2C – Default customer hosted reply-to address: Enter the email address your company uses as the default reply-to for customer communications, even if it is marked as optional.
-
Oracle Full Service Messaging Cloud Service - Each:
-
if Type of instance selected is B2C Orchestration
-
Enter 1
-
-
if Type of instance selected is B2B Orchestration
-
No input required
-
-
-
Oracle Automatic Failover for Transactional Messages Cloud Service – Account:
-
if Type of instance selected is B2C Orchestration
-
No input required
-
-
if Type of instance selected is B2B Orchestration
-
Enter 1
-
-
-
Oracle HIPAA for B2B Orchestration Cloud Service – Each:
-
if Type of instance selected is B2C Orchestration
-
No input required
-
-
if Type of instance selected is B2B Orchestration
-
Enter 1
-
-
-
Oracle Full Service Maintenance Messaging Cloud Service – Maintenance Unit:
-
if Type of instance selected is B2C Orchestration
-
Enter 1
-
-
if Type of instance selected is B2B Orchestration
-
No input required
-
-
-
Confirm the details for the instance and click Create
You can track the progress of the environment creation by viewing the status of the work request. After the Create environment work request succeeds, a welcome email with sign-in instructions is sent to the Admin email address entered during environment creation. Note that this could take 1-2 hours.
Step 3: Log into Oracle Unity application
After your environment is provisioned, the administrator can start using the application. You'll receive an email (Welcome to Oracle Unity) with instructions for accessing your Oracle Unity environment.

To log in to Oracle Unity:
-
After receiving the email, visit https://cloud.oracle.com.
-
Enter your Oracle Cloud account credentials and log in.
-
On the Oracle Cloud page, click the hamburger menu, navigate to Identity & Security, and then click on Domains.
-
Select your current domain. Then, click on the Oracle Cloud Services tab. You will see the Oracle Unity instance you created—click on the instance name.
-
On the Provisioning tab, copy the host name—this is the Oracle Unity URL.
Paste the copied URL into a browser window and log in to Oracle Unity with your Oracle Cloud account credentials.
Once you are in the application, visit the Admin page and confirm that you have the Instance admin user role.
If your Unity environment was provisioned after May 20, 2025, you can skip steps 4 through 6. These steps are not required for Unity environments provisioned after this date.
Step 4: Update instance admin credentials for synching users
The Oracle Unity admin user's credentials are used to synchronize users from Oracle Identity and Access Management (IAM) to Oracle Unity. By default, this user is the first admin user created in Unity. However, the synchronization user can be changed to another admin user (referred to as a service user), as outlined in Step 6 below.
If the admin user's credentials are changed or reset, you must repeat these steps to ensure credentials are updated for the continued synchronization. This is necessary because any user management changes in IAM will not sync to Oracle Unity if the credentials are invalid.
Since the first admin user must reset their password after logging in with the temporary password, these steps will need to be completed after the password reset.
Prerequisites:
Note: This step requires working knowledge of JSON and Postman.
Retrieve Required Parameters
To update the admin credentials for syncing users, retrieve the following parameters:
-
IDCS_URL: Your Domain URL will look like the following: https://idcs-[IDCS number].identity.oraclecloud.com/.
-
Client ID
-
Client Secret
-
Username
-
Password
To collect these parameters, you'll need administrator access to Oracle Cloud Service. Complete the following steps to retrieve these Identity Domain parameters from Oracle Cloud Infrastructure, Identity and Access Management (IAM).
-
Log in to your Oracle Cloud account by visiting https://cloud.oracle.com.
-
Open the navigation menu in the top-left and click Identity & Security.
-
Under Identity & Security, click Domains.

-
Click the current domain to select it. The page for the domain opens

-
Under Domain information, copy the Domain URL.

-
Add /oauth2/v1/token to the end of the Domain URL. This is the Token URL. For example, if the Domain URL is
https://idcs-example.identity.oraclecloud.com, the Token URL ishttps://idcs-example.identity.oraclecloud.com/oauth2/v1/token. -
Go to Integrated applications tab, and select the Oracle Unity application.
-
On the OAuth configuration, under General Information, copy the Client ID
-
For Client Secret, click Show Secret and copy the client secret.


Update Admin Credentials via Postman
-
Save and Import the Postman Collection.
-
Save and import the following Postman collection into your workspace.
-
Edit the Postman Collection.
-
Go to the Variables tab in Postman.
-
Update the Current Value column for the following variables.
-
IDCS_URL: Your Domain URL will look like the following: https://idcs-[IDCS number].identity.oraclecloud.com/.
-
Client ID
-
Client Secret
-
Username
-
Password
-
-
Save the changes.
-
-
-
Run the Requests.
-
First, run the POST request to obtain the access token.
-
Then run the PATCH request to update the admin credentials.
-
{
  "info": {
    "_postman_id": "0c1c3909-13b1-4a85-8534-01e5ee496754",
    "name": "ReplaceCXUnityScimConnectorAdminCredentials",
    "schema": "https://schema.getpostman.com/json/collection/v2.1.0/collection.json"
  },
  "item": [
    {
      "name": "1. Obtain access_token (client credentials)",
      "event": [
        {
          "listen": "test",
          "script": {
            "exec": [
              "var jsonData = JSON.parse(responseBody);",
              "pm.collectionVariables.set(\"access_token\", pm.response.json().access_token);",
              ""
            ],
            "id": "c5730837-7ae0-4060-b617-b96368c8a498",
            "type": "text/javascript"
          }
        },
        {
          "listen": "prerequest",
          "script": {
            "exec": [
              ""
            ],
            "id": "b94dfc22-ba60-450b-98d4-dd74c0bac9f1",
            "type": "text/javascript"
          }
        }
      ],
      "request": {
        "auth": {
          "type": "basic",
          "basic": [
            {
              "key": "username",
              "value": "{{CLIENT_ID}}",
              "type": "string"
            },
            {
              "key": "password",
              "value": "{{CLIENT_SECRET}}",
              "type": "string"
            },
            {
              "key": "saveHelperData",
              "value": true,
              "type": "boolean"
            },
            {
              "key": "showPassword",
              "value": false,
              "type": "boolean"
            }
          ]
        },
        "method": "POST",
        "header": [

        ],
        "body": {
          "mode": "urlencoded",
          "urlencoded": [
            {
              "key": "grant_type",
              "value": "client_credentials",
              "type": "text"
            },
            {
              "key": "scope",
              "value": "urn:opc:idm:__myscopes__",
              "type": "text"
            }
          ],
          "options": {

          }
        },
        "url": {
          "raw": "{{IDCS_URL}}/oauth2/v1/token",
          "host": [
            "{{IDCS_URL}}"
          ],
          "path": [
            "oauth2",
            "v1",
            "token"
          ]
        }
      },
      "response": [

      ]
    },
    {
      "name": "2. ** USE WITH CAUTION ** Update admin credentials",
      "request": {
        "method": "PATCH",
        "header": [
          {
            "key": "Content-Type",
            "value": "application/json"
          },
          {
            "key": "Authorization",
            "value": "Bearer {{access_token}}"
          }
        ],
        "body": {
          "mode": "raw",
          "raw": "{\n  \"command\": \"enableNextFedSyncModes\",\n  \"SyncConfig\": {\n    \"bundleConfigurationProperties\": [\n      {\n        \"name\": \"username\",\n        \"value\": [\n          \"{{username}}\"\n        ]\n      },\n      {\n        \"name\": \"password\",\n        \"value\": [\n         \"{{password}}\"\n        ]\n      }\n    ]\n  }\n}\n",
          "options": {

          }
        },
        "url": {
          "raw": "{{IDCS_URL}}/sm/v1/AppServices/Me",
          "host": [
            "{{IDCS_URL}}"
          ],
          "path": [
            "sm",
            "v1",
            "AppServices",
            "Me"
          ]
        }
      },
      "response": [

      ]
    }
  ],
  "event": [
    {
      "listen": "prerequest",
      "script": {
        "id": "8f5bbe0a-bc82-49d0-a681-f731639c14e1",
        "type": "text/javascript",
        "exec": [
          ""
        ]
      }
    },
    {
      "listen": "test",
      "script": {
        "id": "d0c26ecf-285b-4862-a8bc-1ca37ed7756a",
        "type": "text/javascript",
        "exec": [
          ""
        ]
      }
    }
  ],
  "variable": [
    {
      "id": "69a857bb-9b9f-4f67-91a7-073a32e8819d",
      "key": "IDCS_URL",
      "value": ""
    },
    {
      "id": "1870a354-29c2-4a46-bfb6-fadba7bb7a4d",
      "key": "CLIENT_ID",
      "value": ""
    },
    {
      "id": "f4b48c72-a6c4-48d0-b55e-1a63250da245",
      "key": "CLIENT_SECRET",
      "value": ""
    },
    {
      "id": "c98b850a-7b42-4291-a971-2a6c73e494e5",
      "key": "access_token",
      "value": ""
    },
    {
      "id": "868007d7-2967-4d68-a144-07eb8ccfb230",
      "key": "username",
      "value": ""
    },
    {
      "id": "f4decf84-0157-42a2-b1b6-ebb20da11fd1",
      "key": "password",
      "value": ""
    }
  ]
}
You can now follow the steps below to test your connection to confirm admin credentials were successfully updated.
Test Your Connection
-
Login to Oracle Identity and Access Management (IAM)
If you are unsure of your IDCS URL, you can find it using one of the following methods:-
Check the Welcome Email:
The email sent to you upon setting up your Oracle Unity account contains the IDCS URL. -
From the Oracle Unity Application:
-
Log in to the Oracle Unity application.
-
Open the navigation menu, then click on your account profile in the top-right corner, and select Log out.
-
Your IDCS URL will be visible in the browser’s address bar, formatted as:
https://idcs<IDCS URL>. -
Copy the URL and enter it in your browser:
https://idcs<IDCS URL>/ui/v1/adminconsole.
-
-
From Oracle Cloud Sign-In Page:
-
Visit the Oracle Cloud Sign-In page.
-
Enter your cloud account name (the account name you created when signing up, which is not your username or email).
-
You will be redirected to the IDCS login page for your cloud account.
-
Log in using your credentials.
-
-
-
Go to Oracle Unity instance
-
After logging into the Cloud console,click the hamburger menu, navigate to Identity & Security, and then click on Domains.
-
Select your current domain. Then, click on the Oracle Cloud Services tab. You will see the Oracle Unity instance you created—click on the instance name.
-
Click on the Provisioning tab.
If you cannot find the Provisioning tab, contact Oracle Support for assistance.
-
-
Test the Connection
-
Click the actions icon for the Provisioning field on the Provisioning tab.
-
Click Test Connectivity.
-
A confirmation dialog will appear. Click OK to proceed.
-
Wait for the connection test result, which will either show Connection Successful or Connection Failed.
-
If the connection was successful, try creating an Oracle Unity user in the IAM portal (Refer Oracle Cloud Infrastructure documentation on Creating Users), refreshing the Admin page in Oracle Unity, and checking that the user is provisioned.
-
If the connection failed or if the user is not provisioned, contact Oracle Support.
-
-

Step 5: Sync users with a service user
After updating the admin credentials, you may want to create a generic service user to facilitate the sync between IAM and Oracle Unity, rather than relying on your personal credentials.
To Specify a New User for Sync:
-
Create the Service User:
-
Log into your Oracle Cloud account
-
Open the navigation menu in the top-left and click Identity & Security
-
Under Identity, click Domains
-
Under Compartment, select the appropriate root compartment for Oracle Unity. (The one that has (root))
-
Select the domain which has (Current domain)
-
Go to Users and click Create User.
-
Add a name and a valid email address for your service user, then click Create. Refer Oracle Cloud Infrastructure documentation on Creating Users
-
An email will be sent to the specified address. Open the email and follow the instructions to set the password for the service user.
-
-
Assign the Service User to the Unity application:
-
Open the navigation menu in the top-left and click Identity & Security
-
Under Identity, click Domains
-
Under Compartment, select the appropriate root compartment for Oracle Unity. (The one that has (root))
-
Select the domain which has (Current domain)
-
Go to Users
-
Click the user account that you want to modify.
-
Click Assign applications
-
In the Assign applications window, click the Actions menu and select Assign for the Unity application that you want to assign to the user account. Refer to the Oracle Cloud Infrastructure documentation on Assigning Applications to a User.
-
-
Assign Instance Admin role to Service User in Oracle Unity:
-
Log in to Oracle Unity using your user credentials (not the new service user's credentials).
-
Follow the steps for Editing User Roles and assign the service user the role of Instance Admin.
-
-
Update Admin credentials of Service user for synching
-
Repeat Step 5: Update Unity Instance Admin Credentials for Syncing Users with the service user's username and password.
-
This will update the IAM to use the credentials of the service user when syncing users.
-
Step 6: Add group-specific password policy
This step allows you to implement a different password policy for a specific set of users (e.g., extending the time allowed between password resets).
In many cases, it is appropriate to have different password policies for different users. For instance, you might want your regular users to re-set their passwords more often than your service user. You can use groups to assign different policies to different users.
To add a group-specific password policy:
-
Log in to your Oracle Cloud account and create a group. Refer to the Oracle Cloud Infrastructure page on Managing Groups and review the section on Creating a Group.
-
Add the user you created in the previous steps to this group. Refer to the Oracle Cloud Infrastructure page on Managing Groups and review the section on Adding Users to a Group.
-
Add a password policy to the identity domain > Settings. Refer to the Oracle Cloud Infrastructure page on Manage Policies and review the section on Adding a password policy.
-
If you do not see Add for creating a policy, clear your browser cache or use an incognito/private browser window.
-
If you still don't see Add, contact Oracle Support
-
Click on the password policy just added and specify a priority and any necessary custom rules for the new password policy
-
Click on groups and add the group you created earlier to this password policy
-
When you are finished, click Finish to save your changes
-
Review the list of password policies to confirm that your new policy is correctly listed
-


Contacting Oracle Support
-
Click the Help icon located on any Oracle Cloud - My Services portal page to access online help.
-
From this tab, you can use one of the following methods to get help:
-
Access online help for OracleCloud-MyServices portal pages.
-
Call Oracle at the 800 number shown on the Help tab, or click Global Contacts to lookup contact information for Oracle offices worldwide.
-
Click Technical Support to access the My Oracle Support website.
Add users to the Oracle Cloud Console
View details about your environment and subscription in the Oracle Cloud Console
What is an Oracle Cloud Account?
An Oracle Cloud Account allows you to centrally view and manage all your company's Oracle Cloud subscriptions. Typically, a company will have a single cloud account with multiple administrators—at least one primary and one backup—or several individuals with delegated responsibilities for specific cloud services.
Tip: The only reason to create multiple Cloud Accounts is if your company operates separate business units that need complete independence, or if you want to run certain SaaS services in a different identity domain from others.
You might also encounter the term "tenancy." Your Cloud Account and the Oracle Cloud Infrastructure tenancy share the same name.
How do I decide whether to create a new account or use an existing account?
Best practice is to use one Cloud Account for all the Cloud services your order from Oracle. If your company already has a Cloud Account, use it unless you have a technical reason to want to separate those services.
How do I know if my company already has an existing account?
It is important not to create a new Oracle Cloud Account if your company already has one unless you have specific reasons for doing so.
In some cases, you can determine whether your company already has a Cloud Account by checking if your email is associated with it. From the email, click Add into Existing Cloud Account.
On the Cloud Sign In page, find Forgot your Cloud Account name? and click Get Help. You are taken to a page where you can enter your email address, and if there are existing Cloud Accounts you will receive an email listing them.
If you do not have any existing Cloud Accounts associated with your email but know your company might have an existing Oracle Cloud Account, reach out to the other admins in your company or contact Oracle Support for help.