Developing an App
You can become an Oracle Data Cloud platform app partner by creating an app in the self-serve app development tool . When you submit the app for testing and approval, Oracle performs end-to-end testing and then publishes it to the app catalog. The app then becomes available to clients to use for data delivery.
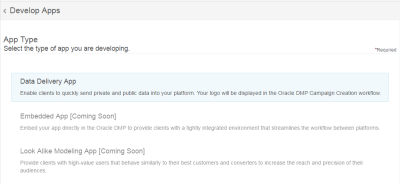
Important: Data delivery is the only app type currently supported by the self-serve Develop Apps tool. For other app types, contact My Oracle Support (MOS) and request an integration.
Before you start
Before you begin developing your app, make sure that you have completed the following tasks:
- Become an app partner.
- Complete the Oracle Data Cloud European Union (EU) General Data Protection Regulation (GDPR) Right to Use agreement if you plan on receiving EU data. Check with your Oracle Data Cloud account representative if necessary.
- Review the revenue recognition reporting requirements and ensure that you can comply with them.
- Develop and successfully test a data delivery integration with the Oracle Data Cloud platform.
Developing a data delivery app
The Oracle Data Cloud platform provides a self-serve app development tool to guide you through the process of developing your app. You need the following information to complete the process:
- Log-in credentials for your Oracle Data Cloud platform seat
- The app name and a short description
- A logo file to brand your app in Oracle Data Cloud catalog
- The type of app, such as media targeting
- A list of email addresses of team members who should be notified about app activity
- The type of data delivered by your app, such as first- or third-party and data linked to cookies or mobile advertising IDs (MAIDs)
- Configuration details, such as the data delivery method and endpoints
Note: The instructions in this document include mentions of campaigns and campaign IDs. Although users do not explicitly create campaigns, the platform creates them automatically and uses them to manage data delivery. Each campaign corresponds to an audience delivery and has a unique campaign ID.
To develop your data delivery app:
- Log in to partner.bluekai.com.
-
Select Apps > Develop Apps.
The Develop Apps page is displayed.
-
Click Create.
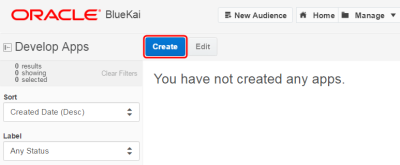
The Basic Information section is displayed.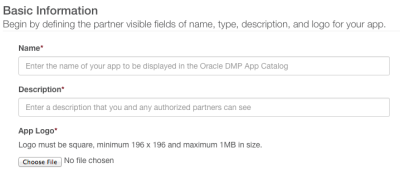
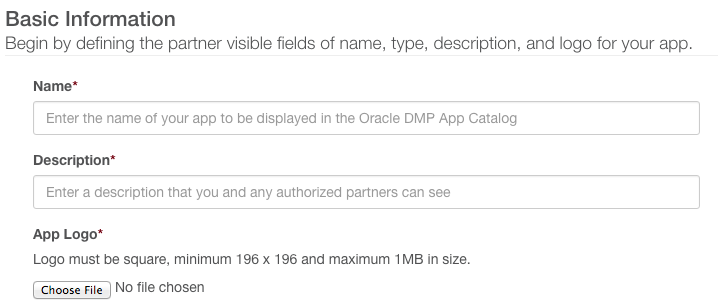
- Enter the name of the app as it should appear in the app catalog.
- Enter a short description (up to 300 words).
- In the App Logo section, click Choose File and upload a logo file. The logo can be up to 200 X 200 pixels with a maximum file size of 1 MB.
- In the Additional Contact Emails box, enter a comma-separated list of email addresses for recipients of any notifications regarding your app. For example, you could include the product owner and a member of your operations team.
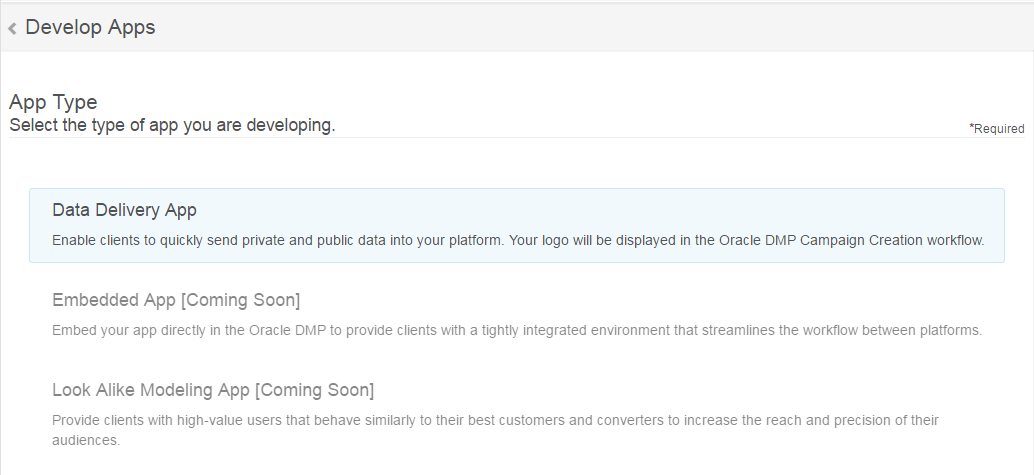
- In the App Type section, select Data Delivery App.
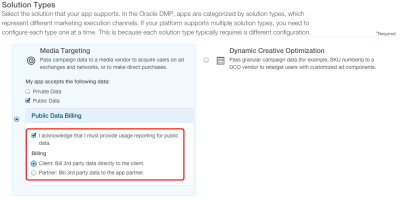
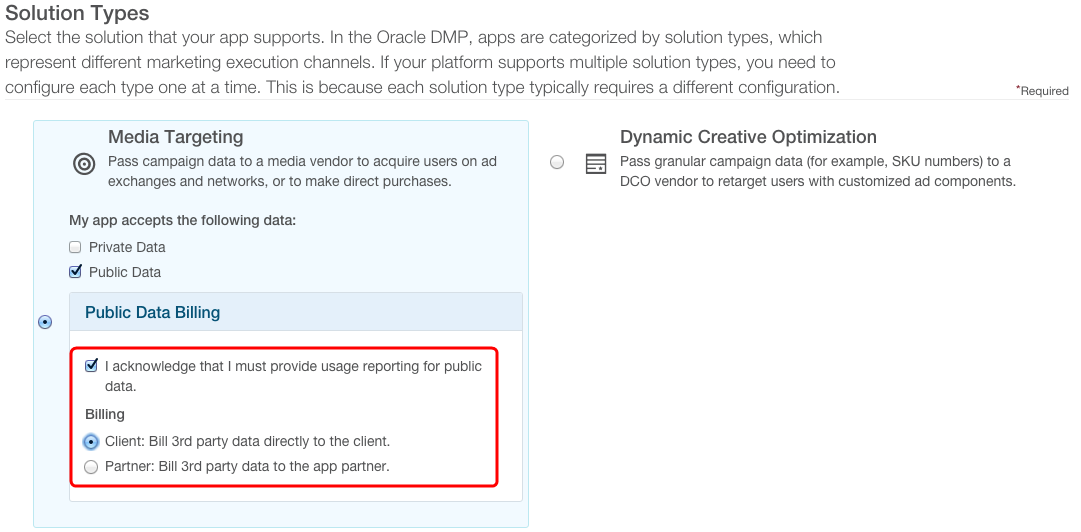
- In the Solution Types section, select the solution that your app supports. Solution types represent different marketing execution channels. If your platform supports multiple solution types, configure an Oracle Data Cloud platform app for each type because each solution type requires a different configuration.
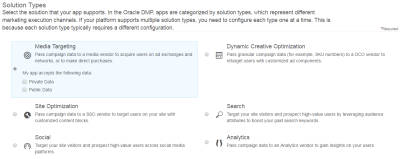
- In the My app accepts the following data section of the selected solution type, select the type of data to be delivered into your platform:
- Private Data: First-party online, offline, mobile, and look-alike data stored in clients' private DMP taxonomies.
- Public Data: Third-party data made available to DMP clients for purchase in the Oracle Data Marketplace. If you select this check box, select Acknowledge to agree to provide data usage reports to Oracle Data Cloud platform according to the AudienceON reporting requirements and select whether you (the app Partner) or the client is to be billed for the third-party data.
- In the Delivery Method section, select the data delivery method to use for receiving data from the platform and specify any additional data items that need to be included in your data delivery.
- JSON return: Transfers user data from Oracle Data Cloud platform to a web page hosting an Oracle Data Cloud JavaScipt tag. If you select the JSON return method, enter your pixel endpoint in the Pixel URL box, including any macros. When a qualifying user visits the page, the platform returns a
bk_resultsobject that contains JSON-formatted data, including the external audience ID and the categories for the user. JSON return is typically used by site optimization and dynamic creative optimization app partners. - Pixel: Fires an image pixel to your endpoint. If you select the pixel method, enter your pixel endpoint in the Pixel URL box. You can specify the type of data to be passed in the pixel by appending macros to the pixel URL. You can then store the data passed via the pixel in the user’s cookie or your profile store for later targeting. The pixel delivery method is not supported for audience injection apps.
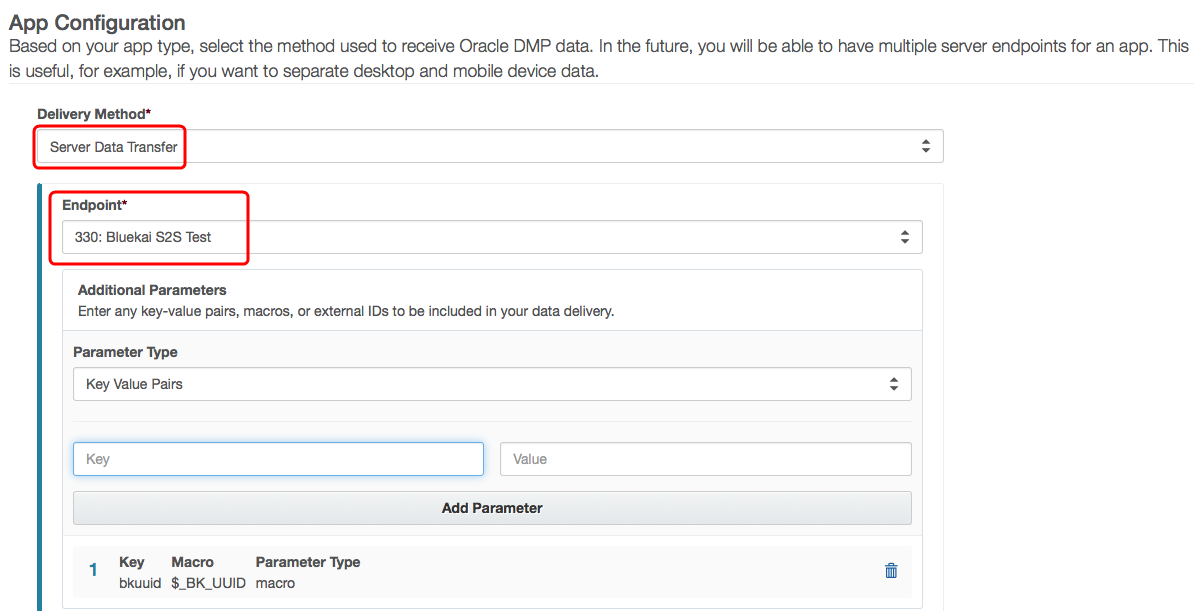
- Server data transfer (SDT): Transfers user data from the Oracle Data Cloud platform into your server-side profile store. If you select the SDT option, choose one of your SDT configurations from the Endpoint list. The ID types that may be delivered to the selected server endpoint are displayed.

- JSON return: Transfers user data from Oracle Data Cloud platform to a web page hosting an Oracle Data Cloud JavaScipt tag. If you select the JSON return method, enter your pixel endpoint in the Pixel URL box, including any macros. When a qualifying user visits the page, the platform returns a
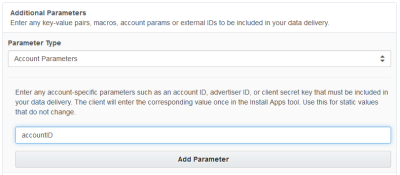
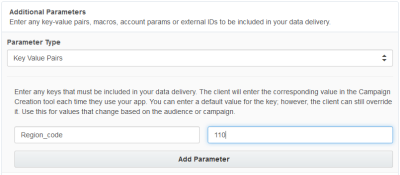
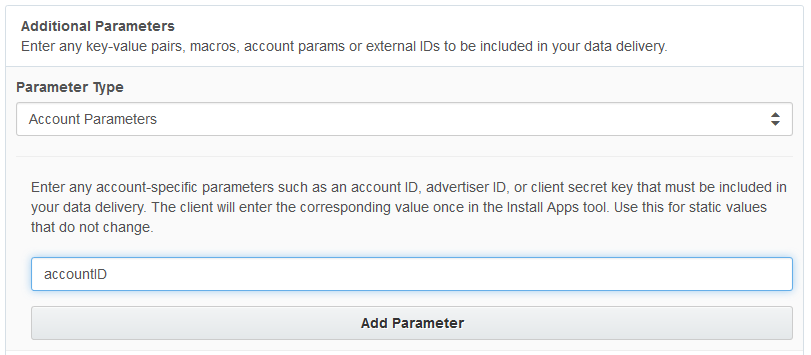
- (Optional) In the Additional Parameters section, do one of the following:
Select Account Parameter and then enter an account-specific parameter, such as an advertiser ID or account ID, that must be included in your data delivery. During installation, clients enter the corresponding values for their account parameters. The account parameters are then appended to the pixel URL generated when clients use your app.
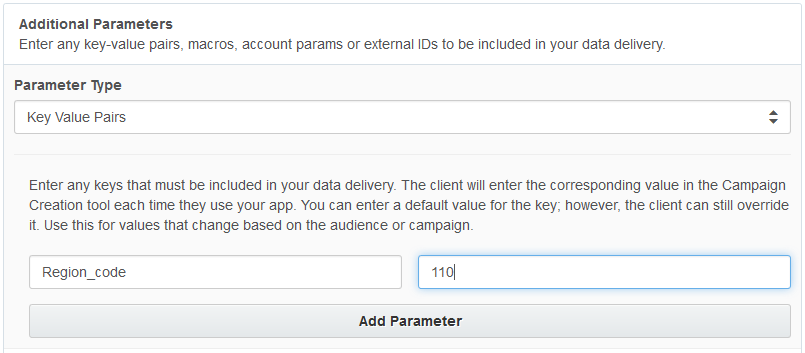
Select Key Value Pairs and then enter a key and (optionally) a default value pair to include in data delivery. During audience delivery, the client enters a value for the key. If you entered a default value, the client can override it.
Select Macros and then enter a key. Select one of the available macros to include in your data delivery.
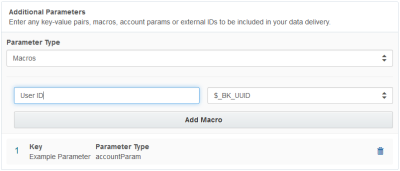
- Click Add Parameter.
- Repeat steps 12 and 13 for each parameter you want to add to the app.
- (SDT only) If you have separate endpoints for receiving data linked to different ID sources (such as cookies and MAIDs), click Add Another Endpoint and add your other endpoints to your app. Having a single app with multiple endpoints makes it easier for clients to deliver their data to your platform in a single audience delivery
- (SDT only) To enable ID swaps to be executed automatically on the client's site once every seven days, enter your ID Swap Pixel URL, which should be an endpoint that the Oracle Data Cloud platform can call to get your users' cookie IDs via a redirect.
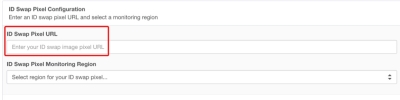
Note: The ID Swap Pixel URL is mandatory for SDT apps. If you do not provide one, your app will not be approved.
Example ID swap pixel URL with redirect:http://YOUR_SITE.com/?redir=https://stags.bluekai.com/site/YOUR_SITE_ID?id=PUUID
If you need your site ID, contact your Oracle Data Cloud representative.ID Swap Tag Protocol:If your ID swap tag uses HTTP protocol, it will only be fired on non-secured (HTTP) sites; it will not be fired on secure (HTTPS) sites. If a mutual client has a secure site and your ID swap tag uses HTTP, it may affect the amount of overlap between the Oracle Data Cloud platform and your platform. This may affect the amount of the client's 1st-party data that can be delivered to you.
If your ID swap tag uses HTTPS protocol, it will be fired from both non-secure and secure sites.
If you use a protocol-relative URL, the protocol used to fire your tag is based on the protocol used on the site. - From the ID Swap Pixel Monitoring Region list, select the region closest to where your endpoint is located.
- In the Delivery Instructions for Client box, enter instructions to be displayed in the install an app UI so that clients know how to deliver data into your platform. You can use the following template to prepare your data delivery instructions.
Oracle Data Cloud platform steps:
- Create your target audience.
- Deliver your target audience to <partnerName>
- (If necessary) Enter your <partnerAccountID> when you configure audience delivery. For details, see instructions for getting your <partnerAccountID>.
- Once you deliver the audience, <partnerName> receives an email notification with your name, campaign ID, and the category IDs delivered. <partnerName> will use this information to map your Oracle Data Cloud platform data to a segment object in their platform.
<partnerName> steps:
- Log in to the <partnerName> platform (<partner_URL>).
- <Navigation steps for how client find Oracle Data Cloud platform audience/data in your platform>
- <Steps for linking client's Oracle Data Cloud platform audience/data with media campaign in your platform>
- For further support, contact <support_URL>.
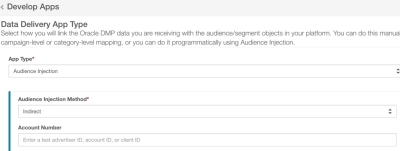
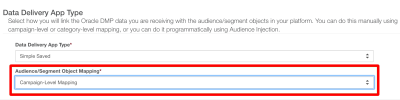
- In the Data Delivery App Type section, select one of the following types of data delivery apps:
- Audience Injection: The Oracle Data Cloud platform programmatically creates audience objects in your platform using your APIs. Your APIs return the synchronized object so that the platform can deliver user data into your platform via SDT, SDT batch, or JSON return.
- Simple Saved: Manually link the Oracle data you are receiving with the audience segments in your platform at the campaign or category level. The managed mapping method provides real-time email notification and a UI for tracking and managing mapping requests.
- Publish your app.


Developing an audience injection app
Audience injection is an automated method for creating and mapping audience objects between the Oracle Data Cloud platform and execution systems. The Oracle Data Cloud platform programmatically creates audience objects in your platform via your APIs and your APIs return the object used in your system for storing and targeting users. The object is typically referred to as a user audience, a segment, or a list. Once this mapping is complete, you can add the users you receive via server data transfer (SDT) to your audience objects.
Note: Audience injection can be used for apps that use the SDT or JSON return delivery methods. Audience injection does not support image pixel delivery.
To develop an audience injection app:
- Complete the steps in developing an app.
- In the Data Delivery App Type section, select Audience Injection from the App Type list to programmatically link the Oracle Data Cloud platform data you are receiving with the audience segments in your platform.
- In the Audience Injection Method section, select how Oracle Data Cloud audiences are passed into the client seat within your platform:
- Direct: The Oracle Data Cloud platform creates the audience object directly in the client's seat within your platform.
- Indirect: The Oracle Data Cloud platform creates the audience object and then provisions it in the client's seat in your platform based on the client's account identifier provided when they install your app (advertiser ID, account ID, or client ID).
- If you selected Indirect, enter a test advertiser ID, account ID, client ID, or other identifier in the Account Number box so that the platform can test your indirect audience injection integration.
- In the Authentication section, select how clients will authenticate into your platform:
- Access Token: Provide an access token that can be used to inject audiences into all client seats or into a single seat. Your platform must support HTTP authentication to use an access token.
- OAuth 2.0: The Oracle Data Cloud platform creates the audience object directly in the client's seat within your platform.
- If you selected the OAuth 2.0 option, enter the following authorization code grant type components, which allow the Oracle Data Cloud platform to access a client's seat within your platform via OAuth 2.0
- Authorization provider URL: The URL where the platform should direct clients to enter their credentials for your platform and grant the Oracle Data Cloud platform access to their audience resources in your platform.
- Client ID: Enter the unique client ID to be passed by the Oracle Data Cloud platform in requests to your authorization provider.
- Redirect URL: Accept the default redirect URL, which is
https://publisher.Oracle-BlueKai.com/rails/oauth2/finish. Do not change this or you will not be able to validate your app. - Scope: Enter a comma-separated list of authorization grants for the Oracle Data Cloud platform to access clients' audience resources in your platform.
- Secret: Enter the unique secret key for the platform to include in requests to your authorization provider.
- In the Audience JSON Objects > Request section, enter your audience schema in the JSON Schema for Audience Request box. The Oracle Data Cloud platform uses your schema to send audience objects to your platform. For details, see schema for the audience objects.
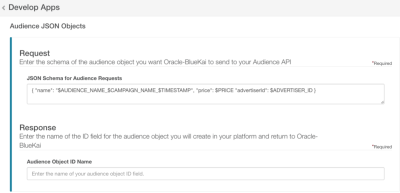
- In the Audience JSON Objects > Response section, enter the name of the ID field in the Audience Object ID Name box. This is the ID of the audience object you will create in your platform and return to the platform, such as
external_audience_id. When the platform creates an audience object in your platform (via a POST request to your audience API), your API will return a JSON object with the audience ID that was created in your platform, such as"external_audience_id": "123". - In the Audience API box, enter the audience service endpoint that the platform will call to create, verify, and update objects to you platform. Your audience API must support the following calls:
- A GET request with your external audience ID in the URL that returns a 200 success code or a 4xx bad request code. For example,
partner.com/rest/audiences/external_audience_id. - A POST request that returns the name and ID of the external audience created in your platform back to the platform in JSON format. For example,
partner.com/rest/audiences. - A PUT request with your external audience ID and a JSON body that includes the updated CPM of the audience. For example,
partner.com/rest/audiences/external_audience_id. The audience CPM may change when the data provider updates their rate card or a client updates the audience composition.
(Optional) You can include supported macros in your audience API call. For example:
partner.com/rest/audiences/$ADVERTISER_ID/segments
Where:
$ADVERTISER_IDis a app macro included in your call that will insert the client's unique account identifier. Passing the$ADVERTISER_IDmacro is useful if your audience API requires the client's account identifier in the POST request. - A GET request with your external audience ID in the URL that returns a 200 success code or a 4xx bad request code. For example,
- Publish your app.


Learn more: Becoming an audience injection partner
Schema for audience objects
The Oracle Data Cloud platform uses your audience schema to send audience objects to your platform. Enter your schema in the Audience JSON Objects section of the Develop Apps page.
The JSON Schema for Audience Request box shows the default schema:
{ "name": "$AUDIENCE_NAME_$CAMPAIGN_NAME_$TIMESTAMP", "price": $PRICE "advertiserId": $ADVERTISER_ID }.
Audience fields
| Field | Type | Description |
|---|---|---|
advertiserId
|
integer | A list of advertiser IDs for the given customer account
This field is required if you are using the indirect injection method. You may also include it if you are using an access token for authentication. |
name
|
string | The name of the external audience object to be created in your platform
This field's default syntax includes the audience name, campaign name, and a timestamp when the audience was injected into your platform: <campaign_name>_<audience_name>_<timestamp> Alternatively, you can insert macros in the name. A custom name must include the audience name or the campaign name in the audience macros table below. For example, you can enter the following in the JSON Schema for Audience Request box to prepend "Oracle Data Cloud" to the name of all audiences passed into your platform: Oracle Data Cloud Audience: $AUDIENCE_NAME |
price
|
float | The cost per thousand impressions (CPM) of the audience
This field is required if your platform accepts third-party data. If you are receiving Oracle Data Cloud third-party data, you must provide data usage reports to Oracle Data Cloud. For details, see AudienceOn reporting requirements. |
You can include the following macros in your audience object input schema:
| Macro | Type | Description |
|---|---|---|
$ADVERTISER_ID
|
string |
The client's unique account identifier |
$AUDIENCE_ID
|
integer | The unique ID assigned to the audience |
$AUDIENCE_NAME
|
string | The name of the audience passed into your platform |
$CAMPAIGN_ENDDATE_MM/DD/YYYY
|
timestamp | The campaign end date in MM/DD/YYYY format |
$CAMPAIGN_ENDDATE_YYYY/MM/DD
|
timestamp | The campaign end date in YYYY/MM/DD format |
$CAMPAIGN_NAME
|
string | The name of the campaign |
$CAMPAIGN_STARTDATE_MM/DD/YYYY
|
timestamp | The campaign start date in MM/DD/YYYY format |
$CAMPAIGN_STARTDATE_YYYY/MM/DD
|
timestamp | The campaign start date in YYYY/MM/DD format |
$DATETIME
|
date | The time when the audience was injected into your platform in YYYY/MM/DD HH:MM:SS format. For example: 2016/05/20 14:05:27. |
$PARTNER_ID
|
integer | The client's partner ID |
$PRICE
|
float | The CPM of the audience |
$TIMESTAMP
|
timestamp | The Unix timestamp when the audience was injected into your platform (for example, 1432131627) |
Sample JSON schema of an audience object to be sent to your platform:
{
   "name": "Oracle Data Cloud Audience: $AUDIENCE_NAME",
   "price": $PRICE,
   "advertiserId": $CUSTOM_CLIENT_ID
}
Developing a simple saved app
The Simple Saved app type allows you to link the Oracle data you are receiving with the audience segments in your platform at the campaign level or category level. There are two ways to map audience data for simple saved apps:
- Managed mapping: Provides a UI for tracking and managing clients' mapping requests and real-time email notifications. For details, see becoming a managed mapping partner.
- Manual mapping: Manually link the Oracle data you are receiving to the audience segments in your platform at the campaign or category level.
Managed mapping
To develop a simple saved app that uses managed mapping:
- Contact your partner manager and request managed mapping to be enabled in your partner seat.
- Complete the steps in developing an app.
- In the Data Delivery App Type section, select Simple Saved from the App Type list to manually link the Oracle Data Cloud platform data you are receiving with the audience segments in your platform.
- Select one of the following mapping methods from the Audience/Segment Object Mapping list:
- Campaign-level mapping: You create a single audience object in your platform for each unique campaign ID and connect clients' Oracle Data Cloud platform data to your audience objects via the campaign ID. Campaign-level mapping is recommended for apps that deliver clients' audiences containing first- or third-party data because clients typically compose audiences that include multiple categories that are combined with Boolean operators (AND, OR, NOT). The campaign ID provides a single object that encapsulates the audience composition.
- Category-level mapping: You create segment objects in your platform for each unique category ID and connect clients' Oracle Data Cloud platform data to your segment objects via the category ID. Category-level mapping is only recommended for channel partners receiving syndicated third-party data. This is because it enables you resell data so you must report usage of the individual categories.
- Publish your app.

Learn more: Becoming a managed mapping partner
Manual mapping
To develop a simple saved app that uses manual mapping:
- Complete the steps in developing an app.
- In the Data Delivery App Type section, select Simple Saved from the App Type list to manually link the Oracle Data Cloud platform data you are receiving with the audience segments in your platform.
- Enter instructions in the in the Delivery Instructions for Client box for the following types of mapping:
- Campaign-level mapping: Campaign-level mapping typically requires the client to manual create and name the audience/segment object in your platform and then specify their campaign ID to be associated with that audience. Enter instructions in the Delivery Instructions for Client box so that clients know where to enter their campaign ID in your platform. For example: "In the {app partner name} platform, enter your Oracle Data Cloud platform campaign ID in the {audience mapping page}."
- Category-level mapping: The category-level mapping method typically entails getting the audience name or human readable names of the category IDs included in your SDT data. Enter instructions in the Delivery Instructions for Client box so that clients know how to share their categories with you, which depends on which of the following methods they must use:
- Audience sharing using the taxonomy API: The client shares their audience so you can get the audience name and composition from your Oracle Data Cloud platform seat. Alternatively, you can use the categories API to do the following:
- Pass category IDs into the
parentIdfield to limit the response to the specified category and its child nodes. - Enable the
showReceivedAudienceCategoriesflag to return the categories in the shared audiences. - Enable the
fullpathflag to return the full taxonomy path of the categories in the shared audience.
Adjust the following sample instructions: "Audience sharing: Contact your Oracle Data Cloud account manager to share your audience with {app partner name}. This will enable {app partner name} to display your category names."
- Pass category IDs into the
- Audience sharing using the audience API: The client shares their audience so you can get the audience name and composition from your Oracle Data Cloud platform seat. Alternatively, you can use the audiences API to do the following:
- Make a GET list call with the name of the audience you received from the client passed into the
name_or_idfield. The audience API will return the audience ID. - Use the audience ID to make a GET read call. The audiences API response will include a segments object that includes the audience composition.
- Make a GET list call with the name of the audience you received from the client passed into the
- Category whitelisting: The client works with their account manager to whitelist the categories included in your data delivery, which enables you to get the names and IDs of their categories. Adjust the following sample instructions: "Category Whitelisting: Contact your Oracle Data Cloud account manager to use taxonomy provisioning in order to whitelist your categories to {app partner name}. This will enable {app partner name} to display your category names."
- Audience sharing using the taxonomy API: The client shares their audience so you can get the audience name and composition from your Oracle Data Cloud platform seat. Alternatively, you can use the categories API to do the following:
- Publish your app.
Publishing your app
Once you configure your app, you can save and submit it to Oracle Data Cloud for review.
Important: When you save an audience injection app, Oracle Data Cloud validates your authentication method and audience API. If you are using OAuth 2.0, you are redirected to an authentication login where you enter credentials to authenticate into your platform. Once validated, you can save your app and submit it for review. If your app has not been validated, saving it is not yet an option.
To submit your app for review:
In the bottom right-hand corner of the Develop Apps tool, select one of the following options:
- Save as Draft: Saves your app's configuration even if you have not completed the fields marked as required. You can later complete the required fields and submit your app for review.
- Save for Testing: Saves your app without submitting it. This enables you to install the app in your seat so you can test it. This option is only available if you have completed all the fields marked as required.
- Save and Submit for Review: Saves your app and sends an email notification to Oracle Data Cloud that your app is ready for review. After you submit your app, Oracle tests your app. Once validated, the app is approved and added to the Oracle Data Cloud platform app catalog. You can check the status of your app from the Develop Apps page.