Managing Audiences
You use the Audiences page to view a list of all your audiences and get detailed information about them. You can see information about audience composition as well as delivery details
You also use the Audiences page to perform management tasks such as copying, editing, sharing, and deleting audiences.
In this topic
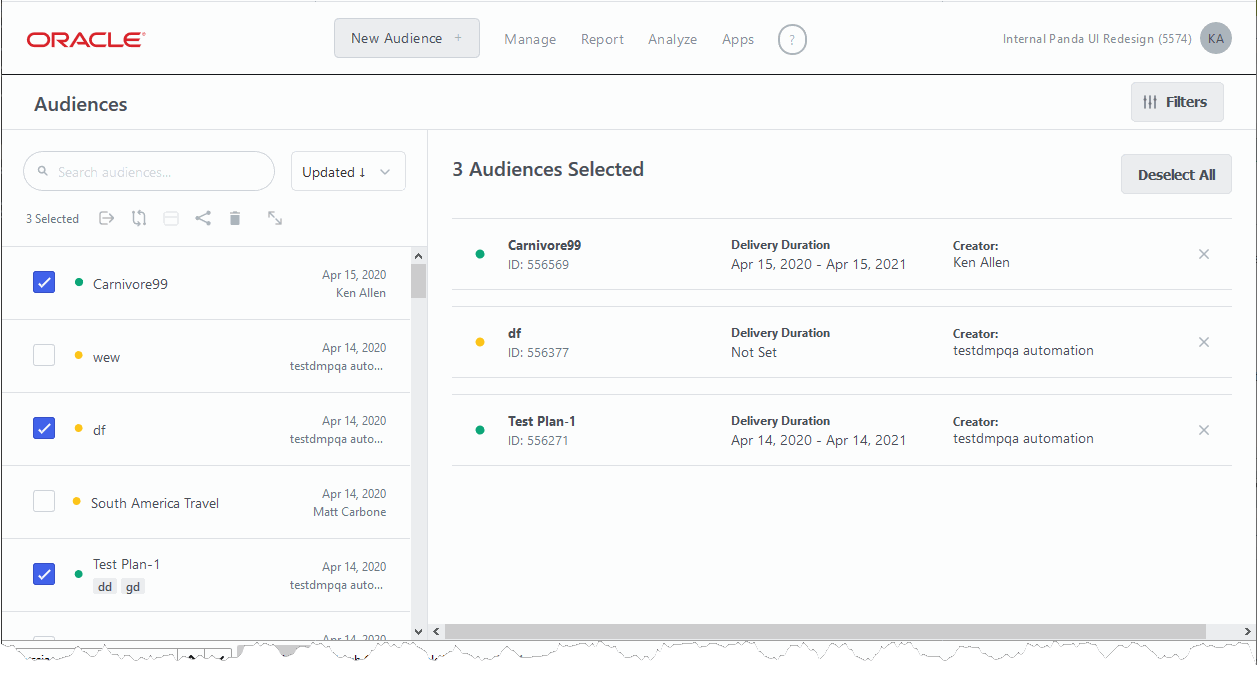
Audiences page overview
The following screenshot and table provide an overview of the features of the Audiences page.
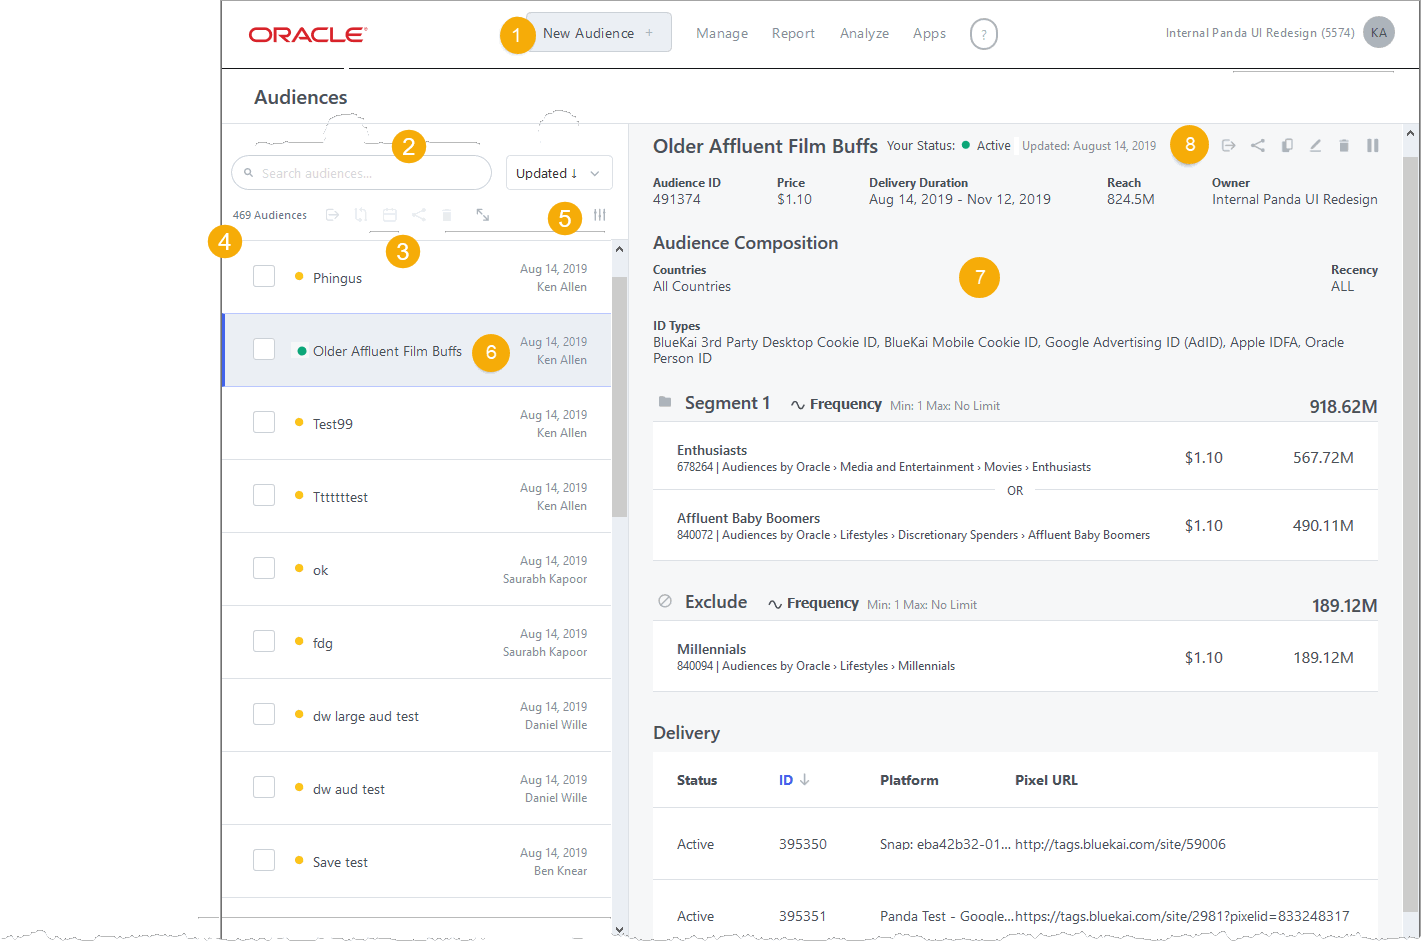
| Item | Name | Action |
|---|---|---|
| 1 | New Audience button | Create a new audience. |
| 2 | Search field | Enter search text to find the audiences you want. |
| 3 | List toolbar | Click an icon to export audiences, view audience overlap, edit delivery dates, share audiences, delete audiences, or adjust the width of the list. |
| 4 | Audience list | View and select audiences. You can Filtering and sorting the audience list of the list. |
| 5 | Filters button | Click to Filtering and sorting the audience list to the audience list. |
| 6 | Audience | Displays the audience name, creation date, and creator. Select to see details in the pane to the right. A blue dot indicates an active audience; a yellow dot indicates a draft or inactive audience. |
| 7 | Audience pane | View details about the selected audience, including its identifying information, settings, segments, and delivery platforms. |
| 8 | Audience toolbar | Click an icon to export, share, duplicate, edit, delete or pause the selected audience. |
Opening the Audiences page
To open the Audiences page:
- Select Manage > Audiences in the platform UI toolbar.
Viewing audience and delivery information
The list on the left side of the Audiences page displays all the audiences available in your partner seat. If the full name of an audience is too long to be displayed in the list, you can hover over the name to see the full text. The list includes icons to indicate the status of the audience.
When you select an audience in the list, you see detailed information about it in the pane on right side of the page. The upper part of the pane includes basic information about the audience.

The Audience Composition area of the pane includes information about the audience's settings and segments. You can see the reach for each segment and the categories they include. Icons represent the ID sources for the segments. Hovering over the audience name opens a tool tip that shows the full text of the name.
If cross-device is provisioned for your account, you also see information about the ID graph used for the audience.
- Disabled indicates that cross-device is not enabled for the audience.
- Oracle ID Graph indicates that the standard Oracle ID graph is used.
- Any other value indicates the use of a private ID graph.
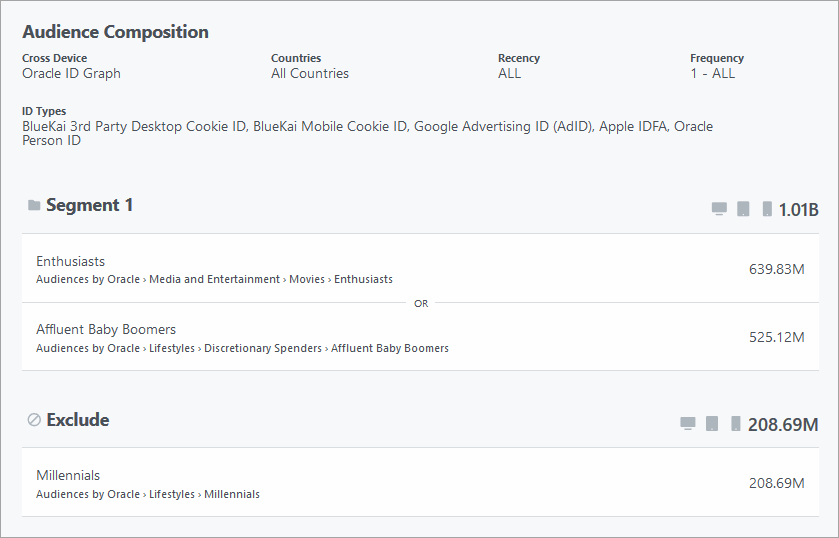
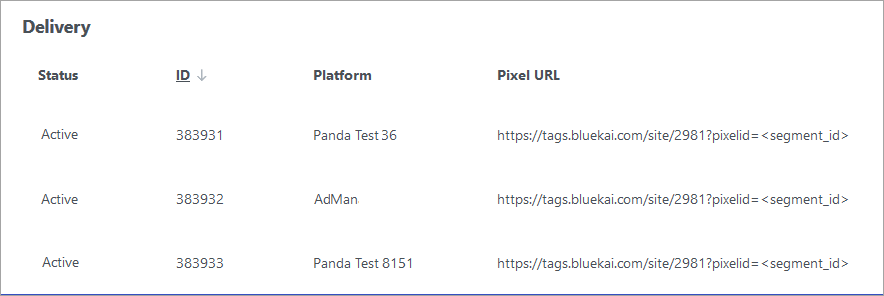
The Delivery area displays information about where and how the audience is being delivered. It includes lines for delivery platforms and for JSON deliveries. You see the status, ID, platform name, and pixel URL for each delivery.
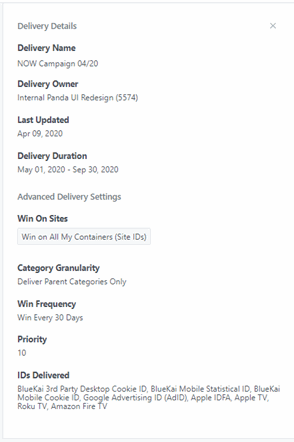
Viewing delivery details
You can see the details of the deliveries for an audience. Both basic identifying information and advanced settings are included. The information is read-only.
To view delivery details:
-
Select a delivery on an Audiences page.
Delivery information appears in a new pane on the right of the page.
Understanding the audience status
Icons and text in various parts of the Audiences page indicate the status of audiences. The following list shows the possible statuses and their icons.
-
 : The audience has been saved but does not yet have delivery platforms assigned.
 -
 : The audience has been sent to a mapping partner. The delivery is paused until the partner marks the audiences as Mapped.
 -
 : An audience that is currently being delivered.
 -
 : An audience that is outside its fulfillment date range or whose delivery failed.
 -
 : An audience whose delivery has been paused.
Note: The audience status you see is relative to the account that you are logged into. For example, a shared audience could be Active in the account that created and owns it, but Inactive in an account to which it was shared. The status you see depends on which account is viewing the audience information.
Working with the audience list
The audience list includes all of the audiences created in you partner seat. You select audiences in the list to see details and to perform actions, such as editing and sharing. The list can be quite long, so you can search, filter, and sort to find audiences more quickly. You can also adjust the width of the column that includes the list.
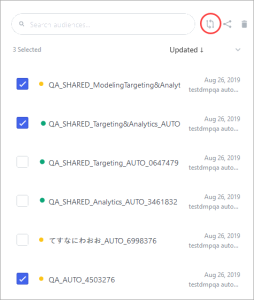
Selecting audiences
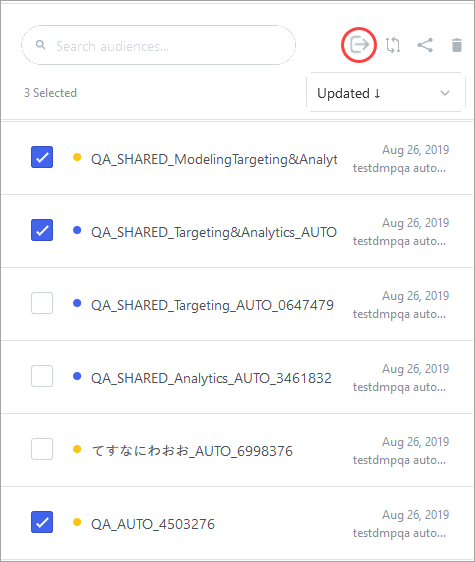
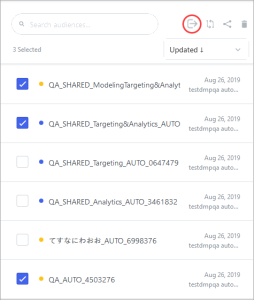
You can select one or more audiences in the audience list. When you select a single audience, its details are displayed in the workspace area to the right. When you select multiple audiences, a list appears in the workspace . You can take actions on the selected audiences, such as exporting, sharing, comparing, and deleting.
To select audiences:
-
Click check boxes to the left of audience names.
Check marks appear as you select. Audience details appear when you select the first audience; a list appears after subsequent selections.
Searching for audiences
You can search for audiences based on three attributes:
- Characters in audience name. Enter characters that must be in the name. The search returns all audiences whose name includes those characters, in any order.
- Audience ID. Enter a complete audience ID and the search returns the matching audience.
- Delivery (campaign) ID. Enter a complete delivery (campaign) ID. You can enter multiple IDs, either comma-separated or space-separated. The use of a leading equals sign is optional. The search returns audiences included in the deliveries you specified.
To search for audiences:
-
In the search field above the audience list, enters search text and then press the Enter key.
The audience list redisplays to show the results of the search. If no results are found, you see a message to that effect.
Filtering and sorting the audience list
You might have a large number of audiences, so you can filter and sort the list in the Audiences page. This capability enables you to quickly find the audiences you need. You can use any of the following filters:
- Status Select from Active, Inactive, Draft, or Any.
- Delivery Platform Select from the platforms available in your seat are displayed.
- IDs Delivered. Select an ID source targeted by the audiences.
- Start Date/End Date Select date ranges.
- Labels. Enter an audience label.
To sort and filter the audience list:
- In the upper right of the audience list, select one of the sorting options. By default, the list is sorted in descending order by date.
-
On the right of the audience list tool bar, click theFilters icon.
The Filter Audiences dialog appears.
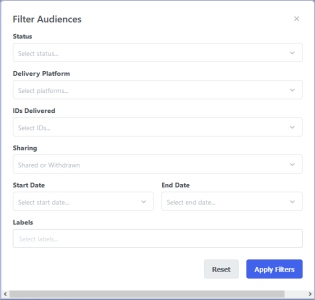
-
Enter or select filter criteria, then click Apply Filters.
The dialog closes and the audience list redisplays to reflect your criteria. Your criteria appear in the upper right of the page, near the Filters button.

- Reset individual filter criteria by removing them from the upper right of the page.
-
To reset all filters:
- Click Filters to open the Filter Audiences dialog.
- Click Reset.
- Click Apply Filters.

Widening the audience list
Audience names can be too long to fit in the default width of the column that contains the audience list. You can temporarily widen the column to reveal the complete names. The expanded width makes the Audience pane narrower, so the default width is best for normal use.
To widen the audience list:
-
Click the width adjust icon in the Audience list toolbar.
The list column widens. Click the icon again to restore the default width.
Comparing audiences
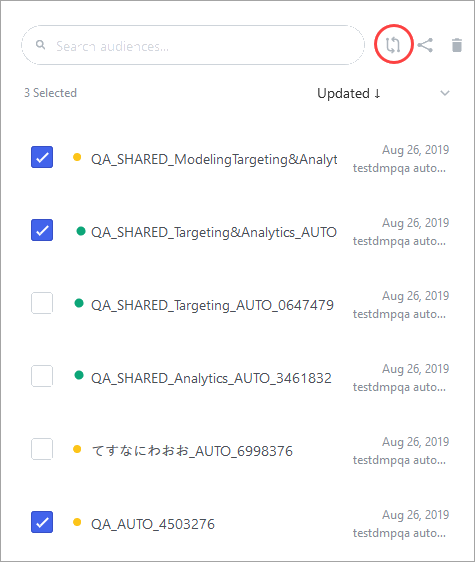
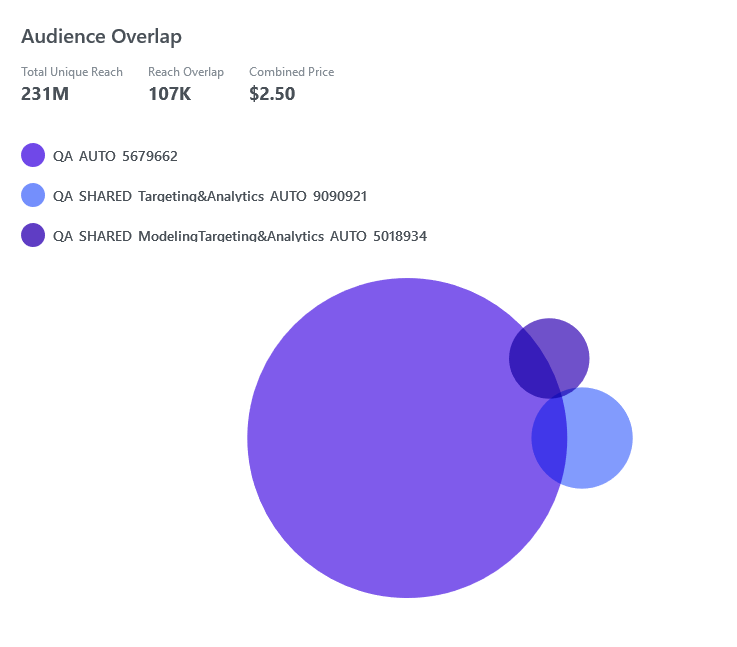
You can compare two or three audiences to determine how their reach overlaps. For example, targeting one audience that overlaps another significantly may be an effective strategy for broadening a media campaign.
For each comparison, you can see the total unique reach of the combined audiences, the reach overlap, and combined price. A Venn diagram illustrates the reach and overlap of the audiences. You can mouse over the segments of the diagram to see the reach unique and common reach.
To compare audiences:
-
On the Audiences page select two or three audiences.
-
Click the View Audience Overlap button above the audience list.
The Audience Comparison dialog box displays Venn diagrams that illustrate the overlap among the selected audiences.,

Editing audiences
You can edit audiences after you have created them. You can:
- Change the existing composition of an audience, including its categories, filters, and ID sources. You can also update the audience name, but if the audience has already been delivered, downstream platforms do not update the name. You can't edit audiences that you share or received through sharing unless they are withdrawn first.
- Change an audience's delivery options, including delivery destinations such as apps, JSON return, and custom pixel URLs. You can also edit fulfillment dates. You can't edit delivery options for audiences you receive that were shared with the Analytics Only option.
To edit an audience:
-
On the Audiences page, select an audience to display its information.
-
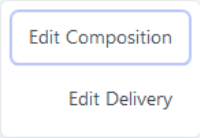
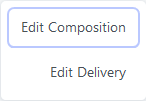
Click the edit icon in the upper right of the page.
-
Do one of the following:
- Select Edit Composition to edit the audience configuration in the audience builder page.
- Click Edit Delivery to change delivery platforms and dates. in the Delivery tab.
- Make changes to the audience.
- Click Save & Update.
- Click Go Back to Audiences to return to the Audiences page.
Duplicating audiences
You can create a new audience by duplicating an existing one. The new audience has the same composition and configuration as the source. You use an audience as a template for creating new audiences with similar characteristics. For example, you could create multiple similar audiences based on different ID sources.
To duplicate an audience:
- On the Audiences page, select an audience.
-
Click the duplicate icon above the information area.
The audience builder appears, containing the configuration details of the original audience.
- Enter a new name for the audience.
- Edit the audience as needed. For details, see editing audiences.
- Click Save.
Deleting audiences
You can delete audiences to remove them from your account.
To delete an audience:
- On the Audiences page, select one or more admittance
-
Click the delete icon in toolbar above the audience list.
-
Click Yes in the confirmation dialog.
The dialog closes and the audience is deleted.
Sharing audiences
You can share your audiences with a media partner who can use them in their own campaigns. The media partner sees shared audiences on their Manage > Audiences page as if they had created them.
Note: If audience sharing is not already enabled for your account, contact your Oracle representative to request this feature.
You can share both first-party and third-party audiences. You choose how much information about the audience to share with your partner by choosing from the following options. You set the sharing configuration separately for first- and third-party data.
| Option | Shared Information | Example |
|---|---|---|
| Private (Category ID) | The category ID | 6737 |
| Full | The full taxonomy path | In-Market > Autos > Makes & Models > Chevrolet > Camaro |
| Category Name | The last node in the taxonomy path | Camaro |
Tip: Most partners select Private for first-party categories and Full for third-party categories. These selections protect proprietary data private while providing maximum access to third-party data.
You also determine how your partner can use the shared audience by selecting one of these options:
- Modeling, Targeting, and Analytics: The partner can use the shared audiences to create look-alike models, deliver your audiences to media execution platforms, and run audience analytics reports.
- Targeting and Analytics: The partner can use the shared audiences to deliver your audiences to media execution platforms and to run audience analytics reports.
- Analytics Only: The partner can only include the shared audience in audience analytics reports. They cannot deliver the shared audience.
- Targeting Only: The partner can deliver the shared audience to media execution platforms.
When you configure sharing, you set a withdrawal date for the audience. You can also withdraw an audience before the original date.
To share an audience:
-
On the Audiences page, select the check box for one or more audiences to be shared, and then click the Share icon.
The Share Audience dialog appears.
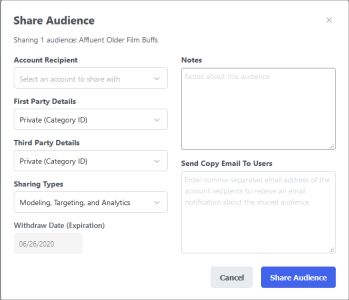
- In the Account Recipient list, select a partner to share the audience.
- Repeat step 2 for each partner you want to share with.
- In the First-Party Details list, select the sharing level for first-party data.
- In the Third-Party Details list. select the sharing level for third-party data.
- In the Sharing Type list, select how your partner can use the shared audience.
-
(Optional) In the Send Copy Email to Users box, enter the email address of a partner that you want to receive an email notification about the shared audience.
-
(Optional) In the Notes box, enter any notes or messages to be included with the shared audience.
-
(Optional)In the Withdraw by Date field, enter or select the date on which the audience will no longer be shared. By default, the date is set to one year from the current date.
After the audience is withdrawn, your media partners will no longer be able to view the audience or use it in a campaign. In addition, the status of the audience changes to Withdrawn in the Audiences page.
-
Click Share Audience.
The Shared Audience Details area appears in the details pane.

The recipient of the shared audience receives a notification.


Viewing shared audience delivery information
You can see information about the delivery of audiences you have shared with other accounts. When you have shared an audience, and additional column, Delivered By, appears in list of deliveries on the Audience page. This column shows which account delivered the audience. In this example, the first two deliveries came from the account that owns the audience, while the second two are from accounts to which the audience was shared.
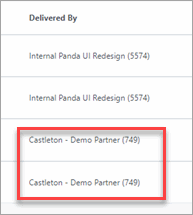
This information is read-only. You cannot control the delivery of a shared audience by another account. You can withdraw sharing of the audience, however. Withdrawal of sharing causes delivery by the receiving account to pause.
Withdrawing audience sharing
You can withdraw an audience to stop sharing it with media partners. After you withdraw an audience, all active deliveries of the audience are suspended and cannot be re-activated. If you share the audience again, your media partners must re-configure it for delivery.
To withdraw audience sharing:
-
On the Audiences page, select the audience to be withdrawn.
-
In the Shared Audience Details area. click the trash can icon.

-
Click Yes in the confirmation dialog.
The platform withdraws the audience from sharing. This process may take up to 90 minutes to complete.

Exporting audience composition and delivery details
You can export one or more audiences to a spreadsheet file in .xlsx format. You can select up to 50 audiences for export at the same time.
The spreadsheet file includes three tabs: Audience Composition, Audience Deliveries, and Audience Sharing. Within each tab, information audiences is separated by colored bars.
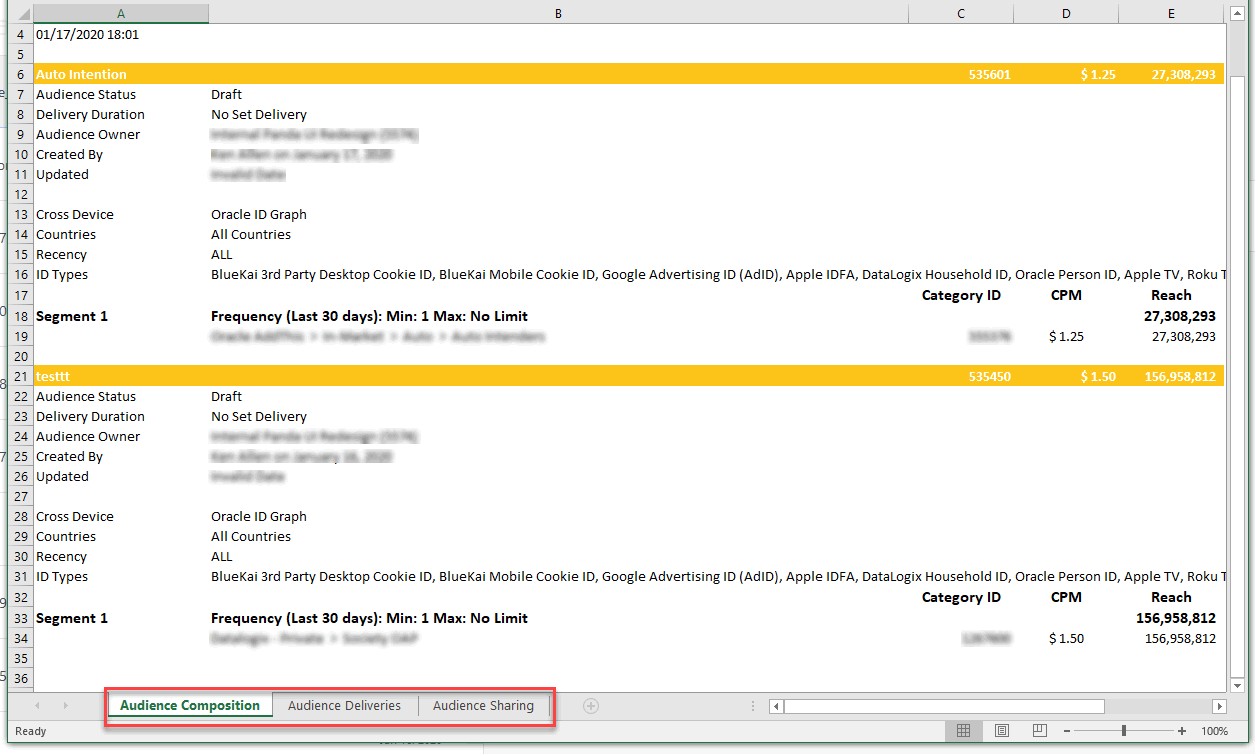
The exported information for each audience includes:
- Audience Composition. A full display of the audience details from the selected audiences, including the Audience Name, Audience ID, Audience CPM, Audience Status, Audience Delivery (if applicable), Audience Owner (Partner Account), Audience Creator & Date, Audience Updated Date, Audience Composition Filters, and the Audience Category Composition (including Category Path, CPM, and Description).
- Audience Deliveries. A grid providing high-level audience details along with all delivery details including Delivery/Campaign ID, Delivery/Campaign Name, Delivery/Campaign Status, App Name, Delivery Start Date, Delivery End Date, Delivered IDs, Pixel URL, and any specified Advanced Delivery Settings. Advanced Delivery Settings include Win on Sites, Macros, Category Granularity, Win Frequency, Categories Per Delivery, and Priority.
- Audience Sharing. A grid providing high-level audience details along with all audience sharing or receiving details including Account Recipient, First Party Details, Third Party Details, Sharing Types, Withdraw Date (Expiration), and Notes.
You can also export an audience that is being configured, even before it has been saved. See Exporting audience composition.
To export the current audience:
-
On the Audiences page, select an audience.
-
Click the Export button in the toolbar above the audience details area.
The platform generates a file and prompts you to save or open it.
- Save or open the file.
To export selected audiences:
-
On the Audiences page one or more audiences.
-
Click the Export button in the list toolbar.
The platform generates a file and prompts you to save or open it.
- Save or open the file.