Creating Audiences
The Oracle Data Cloud Platform enables you to create, configure, and deliver audiences in a single, straightforward workflow. You can configure audiences to target exactly the users you want and then select delivery platforms to deliver the audiences to media execution partners. The modern, intuitive user interface makes the process fast and simple.
You no longer deliver audiences in campaigns. Delivery is now treated as an integral part of the audience creation process. Similarly, you now view and manage in-flight deliveries as part of the audience workflow, not in separate campaign pages.
After you have created an audience, you select delivery partners and options.
In this topic
Opening the audience builder
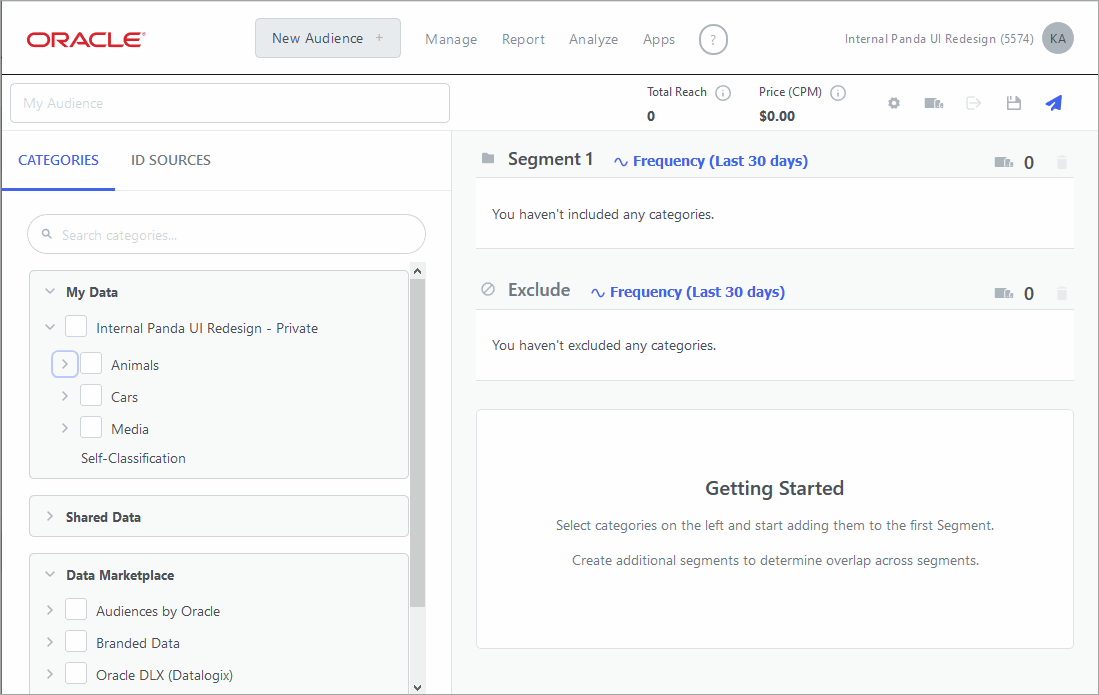
You use the audience builder to create and deliver audiences. You open the audience builder directly from the platform UI toolbar.
To open the audience builder:
-
Click New Audience in the platform UI toolbar.
The audience builder opens with a new, untitled audience. The audience includes one segment, but that segment is not populated.

Understanding the audience builder interface
The following illustration shows the audience builder page populated with example data. A table follows to explain the features of the page called out in the illustration.
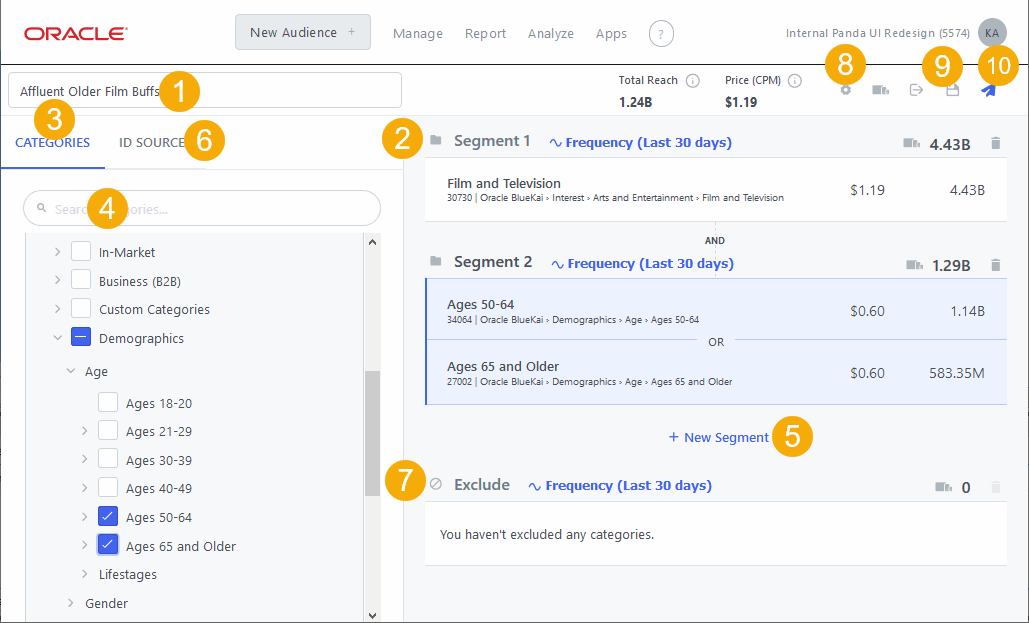
| Item | Description | Action |
|---|---|---|
| 1 |
Audience name |
Enter the audience name. |
| 2 | Segment |
The audience can include one or many segments. You populate segments by selecting from the category tree. |
| 3 |
Categories tab |
Open the Categories tab to display the category tree. You select from the tree to populate segments in the audience. |
| 4 |
Search field |
Search for categories in the category tree. |
| 5 | New Segment button |
Click to add a new segment. |
| 6 |
ID Sources tab |
Open to view and select ID sources. |
| 7 | Exclude segment |
Add categories to this segment to exclude them from the audience. |
| 8 | Toolbar |
Includes the Settings button, Cross Device button, and Export button. |
| 9 | Save Audience button |
Click to save the audience. |
| 10 | Delivery button |
Click to select delivery platforms and fulfillment settings for the audience. |
Naming audiences
You must name an audience before you can save it. Special characters are not allowed in the name. It's a good practice to Identify the ID source in the name so that you can distinguish similar audiences with different sources. You can Editing audiences only when they are inactive; after they are active (delivering data), you cannot change the name.
To name an audience:
- Enter a name to replace the gray My Audience text in the upper-left of the audience builder page.
Populating audience segments
Every audience you create has one segment by default. You can Adding segments to an audience as needed.
Each segment can include one or more categories. Multiple categories in the same segment have an OR relationship. The OR relationship means that a user needs to be tagged in only one of the categories in the segment to be included in the audience you are creating.
You add categories to segments by selecting them in the category tree in the Categories tab.
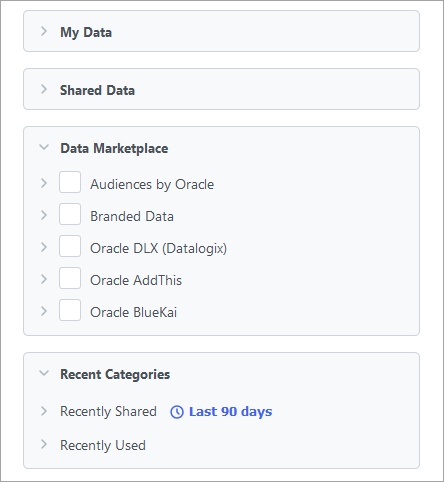
The tree is divided into several groups:
- My Data.Categories that you have defined in the Taxonomy Manager based on data you ingest from your account (first-party data). The order is based on what you define in the Taxonomy Manager.
- Shared Data. Categories shared from other accounts (second-party data). This groups include categories from modeling, Audience Insights custom keywords, and Oracle country-specify audiences. The contents of the group are ordered alphabetically.
- Data Marketplace. Third-party taxonomies including Branded, Oracle, AddThis, BlueKai, and Datalogix. The contents of the group are ordered alphabetically.
-
Recent Categories. Categories that you have used recently or were shared with you recently. The Recently Shared list displays the categories shared with you in the specified time period (30, 90, or 270 Days). Click the time period to cycle through the options. The Recently Used list includes the last 20 categories added and saved to your audiences. Categories are displayed in order with the most recent at the top.
Categories included in the Recent Categories group continue to be displayed in their main locations in the taxonomy.
You see only the groups that apply to your account. For example, if you do not have any first-party categories, the My Data group does not appear in the tree. The My Data group is expanded by default if it is present. The Data Marketplace group is expanded by default if My Data is not present.
Categories belong to taxonomies that are hierarchical and based on parent-child relationships. Parent categories are conceptually broader while children are more precise. For example, the In-Market > Autos category is a parent for more specific make and model categories. When a user is tagged and assigned to a child category, they are also are automatically assigned to the parent category. But a parent category is more than the sum of its children. Parent categories can also have user profiles directly assigned to them.
To add a category to a segment:
- Select a segment in the audience builder. If there is only one segment, it is selected automatically.
-
Expand the category tree to display the category you want, then select its check box.
The category is added to the selected segment and the audience builder updates the reach figures for the segment and the audience.
Adding segments to an audience
Every audience includes one segment automatically. You can add more segments if needed.
If an audience includes more than one segment, the segments have an AND relationship. For a user to be included in the audience, they must be included in at least one of the categories in each segment.
To add a segment to an audience:
-
Click the New Segment link below the current segments.
An area appears for the new segment. You can start adding categories to the segment.
Searching for categories
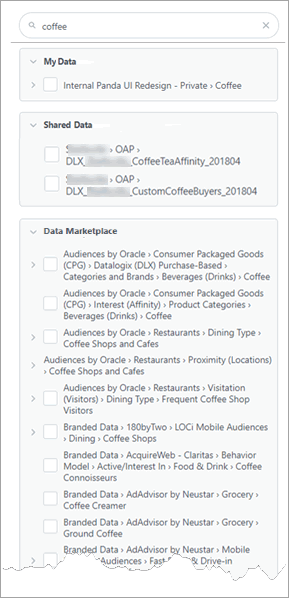
Because the taxonomy can be quite large, it is often faster to search for categories than to browse for them.
You search for categories by entering keywords. A keyword search returns any category that includes the keyword in its name, along with all of its children. For example, if you search for coffee, all categories with that word in their names are returned, along with all of their child categories. Child categories are returned even if their names do not include the keyword.
Search results are organized into the My Data, Shared Data, and Data Marketplace groups that you see normally in the category tree. Only groups that include search results are displayed. Groups are expanded automatically when they appear.
To search for categories:
-
In the search field above the category tree, enter a keyword, then click the search icon.
Categories that match the search term appear below the search field.
Viewing category details
After you have added categories to segments, you can view detailed information about them. Details include the full taxonomy path, the category ID, reach, and a description. You can see full information about all categories by using the Taxonomy Viewer page.
To view category details
-
Click the information icon on the right side of a category entry in a segment.
The Category Details dialog appears.
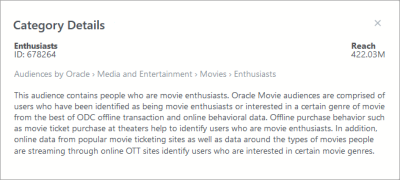
- Close the dialog when you are finished.
Excluding categories
You can exclude one or more categories from an audience that you create. Excluding an audience creates a NOT condition. User profiles that appear excluded categories cannot be included in the audience. For example, suppose you include users in the In-Market > Travel > Cruises audience but exclude users in the Demographic > Premium Demographic > Income > $0-$14,999 and Demographic > Validated Demographic > Income > $15,000-$19,999 categories. In this scenario, users who are in-market for a cruise but who are also in the specified lower income brackets cannot be included in the audience.
To exclude categories:
- In the audience builder, select the Exclude panel.
-
In the category tree, select categories to exclude.
The categories are added to the excluded list and the audience reach is updated to reflect the exclusions.

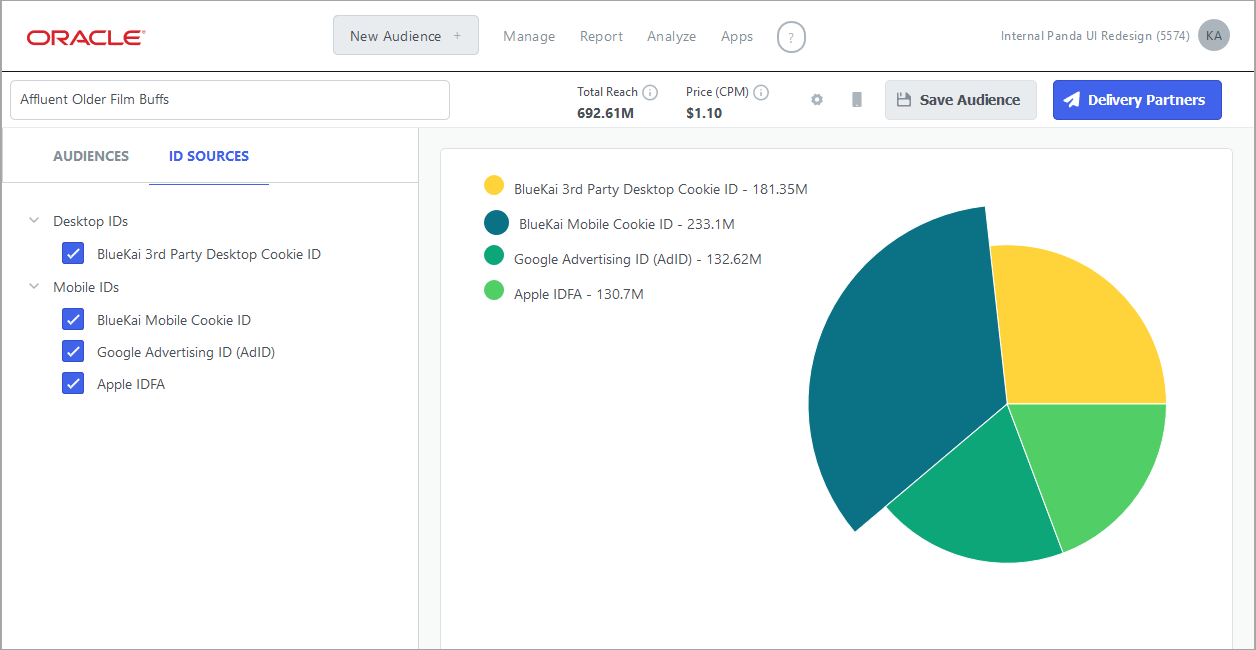
Selecting ID sources
An ID source represents the way a user was identified, such as from a mobile browser session or a third-party desktop cookie. You can limit audience reach to include only particular ID sources, such as mobile advertising IDs (MAIDs). Using this feature, you can create a separate audience with different delivery platforms for each ID source.
ID sources include:
- Desktop IDs:Users whose data was collected from desktop web browsers and are linked to an Oracle Data Cloud third-party cookie ID
- BlueKai 3rd Party Desktop Cookie ID: Users whose data was collected from desktop web browsers and are linked to third-party cookie IDs.
- Mobile IDs: Users whose data was collected from mobile web browsers or mobile apps.
- Mobile Web IDs: Users whose data was collected from mobile web browsers.
- BlueKai Mobile Cookie ID: Users whose data was collected from mobile web browsers and are linked to an Oracle Data Cloud third-party cookie ID.
- Mobile Advertising IDs: Users whose data was collected from mobile apps.
- Google Advertising ID (ADID):Users whose data was collected from Android apps and are linked to specific ADIDs.
- Apple IDFA:Users whose data was collected from iOS apps and are linked to an IDFA.
- Mobile Web IDs: Users whose data was collected from mobile web browsers.
- Private IDs: Users whose data is linked to the Oracle Data Cloud platform to by using a Private ID graph.
The ID Sources tab in the audience builder displays the ID sources included in your audience and enables you to include and exclude ID sources. The ID sources for the audience are displayed on the left. By default, all ID sources are enabled. The reach for each source appears in the list. A pie chart displays the proportion of the audience reach from each source.
 .
.
To select ID sources:
-
In the audience builder, click ID Sources tab .
-
De-select check boxes next to ID sources to narrow your audience to specific ID types. For example, to narrow targeting to MAIDs, de-select all sources except Mobile Advertising IDs:
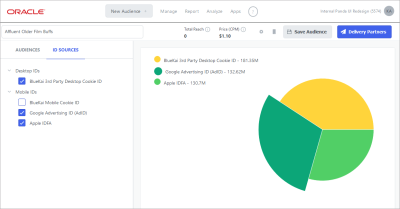
The reach figures and pie chart update as you select and de-select ID sources.

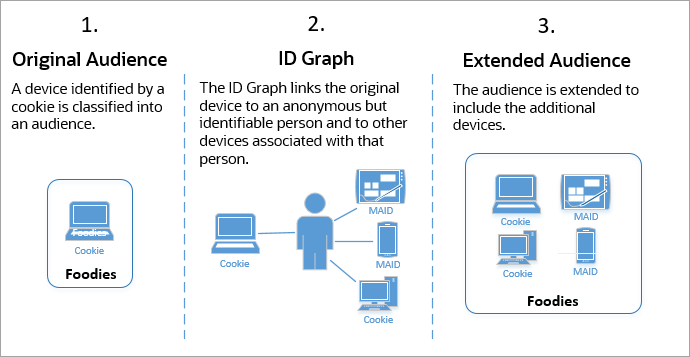
Extending audiences across devices
You can expand the reach of your audience by using the cross-device capabilities of the Oracle Data Cloud platform. Cross-device extension is powered by Oracle ID Graph, which enables you to extend an audience by including devices associated with a user. (Some partners also have private id graphs.)
Note: Cross-device extension is in controlled availability. Contact your Customer Success Manager to request this capability.
For example, if a customer is added to an audience as the result of a visit to your product page on their work laptop, you can expand the audience to include the customer's personal laptop and smartphone. Oracle ID Graph makes device associations anonymously; no personally identifiable information is stored.
Cross-device extension results in greater scale across all digital ID spaces that you can use for branding, direct response, or media suppression.
Use cases include:
- Targeting website visitors on their smartphone apps by delivering cookie-based attributes to your DSP on linked mobile advertising IDs
- Targeting app downloaders on the web by delivering mobile advertising ID-based attributes to your DSP on linked browser cookies
- Suppressing converters across all their devices by sharing the conversion event attribute to all the customer's devices
The following illustration outlines how cross-device extension works.
About cross-device and reach
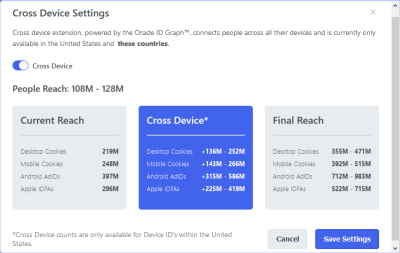
Cross-device extension increases the reach of your audience based on the device associations made by Oracle ID Graph. When you configure cross-device, you can see the current reach and the extension provided by cross-device.

People Reach
People reach is an estimate of the number of people to whom you can deliver your audience, with and without cross-device. The platform matches all device IDs classified in the audience (cookies and MAIDs) to an Oracle Person ID(OPID) which represents a validated but anonymous consumer. The platform also uses an equation to estimate the number of people on unmatched devices who actually use the matched devices. People reach is displayed as a range with the lower value showing the actual people matched and the upper value including the estimated additional matches.
Current Reach
Current reach includes the devices classified into the categories in the audiences without cross-device extension. Reach broken down by ID type.
Cross Device
Cross device reach reflects the increase in devices provided by cross-device extension, broken down by ID type. Because extension is based on association of devices with people, it does not increase the number of persons in the audience. Rather it extends the number of devices. This extension makes targeting more effective because you can reach all the devices a person uses.
Final Reach
Final reach is the sum of the current reach and the extension provided by cross-device. Final reach is displayed as a range with the lower range reflecting the current reach plus the cross-device reach based on actual matches. The upper range includes the estimated additional unmatched reach.
Geographic availability
Cross-device extension is available only in the US and these countries:
- Australia (AU)
- Canada (CA)
- India (IN)
- Indonesia (ID)
- Japan (JP)
- Malaysia (MY)
- Mexico (MX)
- Singapore (SG)
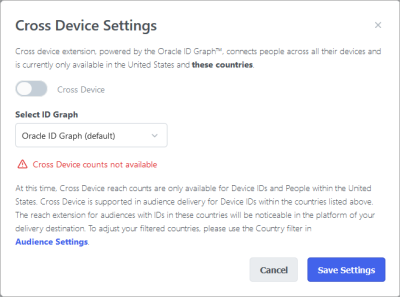
Note: Cross-device extension is available for all the countries listed above, but counts are available only for US audiences. If your audience includes non-US data, you will not see an estimate of reach when you enable cross-device extension. You will notice the extension in the actual data delivery, however.
Configuring cross-device extension for an audience
To configure cross-device extension:
-
Click the Cross Device button in the audience builder page.
-
If your audience includes US data only, the Cross Device Settings dialog displays the current reach, the extension provided by cross device, and the final reach.
-
If your audience includes non-US data that supports cross-device extension, the Cross Device Settings dialog alerts you that audience counts are not available:
-
-
(Optional) If a private ID graph is available to you, select it in the Select ID Graph list.
-
Click Save Settings.
The dialog closes. The audience now includes cross-device extension.

Recency and frequency
For a user whose data is ingested online (from the Oracle Data Cloud core tag, API calls, or SDK code), a user profile maintains a record of when and how often a user is classified into categories. For example, the profile knows that user ID 555777999 has made multiple visits to a page that includes container/site ID 333444. Because of those visits, the user has been classified into the Food & Drink > Coffee > Espresso category 11 times, most recently on November 29, 2019. The platform records each time a user is classified into a category and stores a count of these events in the profile. The profile does not include every event that caused a user to be classified, only a count and the most recent timestamp.
Classification into categories occurs when a user visits a web page that includes an Oracle Data Cloud container/site ID. The container/site ID enables the platform to identify incoming data and classify it into categories by using rules. See Creating Containers for more information.
The platform uses profile data to calculate recency (how long ago a user was classified into a particular category) and frequency (how often a user has been classified into that category), When you create an audience, you can configure recency and frequency settings that filter the users who can be included in or excluded.
Note: Recency and frequency are used primarily with first-party data, If you use only third-party data, these settings are not normally available in the platform UI. Because of the nature of third-party data, anonymous sources often classify data into third party categories with the acceptance and quality assurance of the Oracle Data Cloud taxonomy team. Data sources and volume changes over time, so are not always reliable when setting recency and frequency filters.
There are unusual circumstance where you might use these settings with third-party. Contact your Customer Success Manager if you need to enable recency and frequency in your partner seat.
About recency
Recency describes how long ago a user was classified into a category, measured in days. You can set the maximum days of recency permitted for a user to qualify for your audience. For example, you can specify that a user be classified into the Food & Drink > Coffee > Espresso category within the last seven days to qualify for your audience.
Limiting recency increases the probability that you are targeting users who are still in-market for a particular product or service. For example, if you are targeting travelers, it is advisable to set the recency to a maximum of seven days because users typically book their trips soon after starting their travel search.
The default recency is All, which represents 180 days and guarantees that you see all available data. You can choose from a number of other pre-defined recency periods.
You configure the recency setting for the audience as a whole, so a user must meet the recency value in each audience segment to qualify. Within each segment, however. a user must meet the recency value for only one category.
For example, if your audience has two segments, one including categories that indicate interest in movies and another that indicates interest in coffee, a user must meet the recency value in both segments to qualify for the audience. On the other hand, if your coffee segment includes Food & Drink > Coffee > Espresso, Food & Drink > Coffee > French Press, and Food & Drink > Coffee > Mokka Pot categories. the user must meet the recency value for only one category for the segment to qualify.
About frequency
Frequency describes how often the user has been classified into a category in the last 30 days.
When you are creating audiences, you can configure minimum and maximum frequency values to determine whether a user can be included in the audience. For example, you can specify that a user must have been classified into a category at least twice but no more than five times. By default, there is no minimum or maximum frequency, which means that users qualify if they are categorized at least once.
You set configure frequency settings individually for segments within an audience. You can also configure frequency for the audience as a whole. A frequency setting in a segment overrides the setting for the audience as a whole.
Keep the following points in mind when you are configuring frequency settings:
- Frequency is calculated separately for each container/site ID. Frequency requirements can be met as the result of visits to multiple web pages, but only if they share the same container/site ID.
- Visits to pages that do not share the same container/site ID are not cumulative for the purposes of meeting frequency requirements. For example, if you set a minimum frequency of five, the user must be classified into a category five times by the same container/site ID to meet the criteria. Being classified by multiple different containers/site IDs for a total of five times does not qualify.
- Frequency resets every 30 days, starting on the day when a user was first classified. For example if a user has been classified into the Home Decorating > Wall Finishes > Paint category 13 times at the end of 30 days, the frequency resets to 1 the next time the user is tagged.
How frequency and recency interact
Frequency and recency settings interact with each, but in a possibly unexpected way. You might assume that if you set both a recency and a frequency, the events that satisfy the frequency requirement must fall entirely within the recency period. This is not the case, however. To satisfy the frequency setting, only the classification that qualifies or disqualifies the user must fall within the recency period, In other words, you cannot use recency and frequency to limit the audience to users who have been classified into a category a particular number of times entirely within a particular time period.
You can use recency and frequency together, but you need to understand the limitations of doing so. For example, suppose you create an audience that has a recency setting of 30 days and a single segment with a minimum frequency of 5, In this situation, a user must have been classified at least five times, but only the fifth and any subsequent classification must have taken place within the last 30 days. Similarly, if you set no minimum frequency and maximum frequency of 5, the user is disqualified by a sixth classification, but only if it occurs during the recency period.
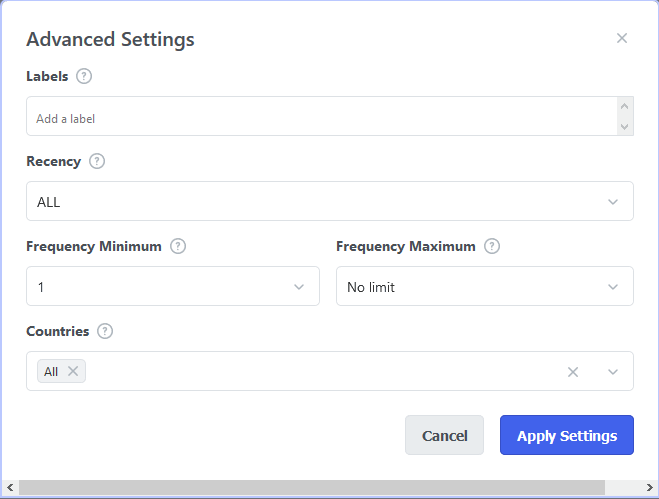
Configuring recency and frequency settings
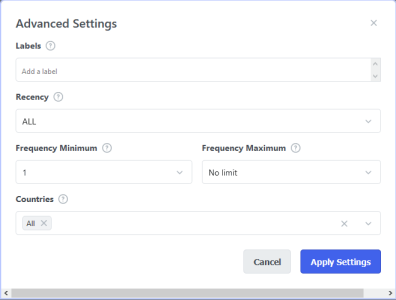
To configure recency and frequency settings:
-
Click the Settings icon in the audience builder toolbar.
The Advanced Settings dialog appears.
-
In the Recency field, select a recency option.
If you selected Custom:
- Enter the number of days of recency.
- Click Apply.
-
In the Frequency Minimum and Frequency Maximum fields, select frequency values.
You can set frequency separately for each segment. See Setting frequency for segments for more information.
-
Click Apply Settings.
The dialog closes and the reach values for the audience and its segments are updated to reflect the settings.
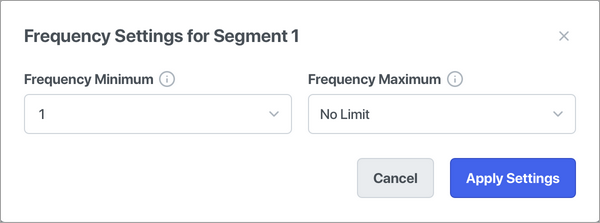
Setting frequency for segments
You can set frequency values individually for segments in an audience. You may want to have more inclusive frequency settings for certain segments, for example. A frequency setting for a segment overrides a frequency setting for the audience.
To set segment frequency:
-
In the audience builder, click the Frequency link in the title area of a segment.
The dialog appears.

- In the Frequency Minimum and Frequency Maximum fields, select frequency values.
-
Click Apply Settings.
The dialog closes and the reach values for the audience and segment are updated to reflect the settings.
Specifying countries for audiences
You can limit the countries from which an audience draws users. For example, you could create an audience restricted to France, Belgium, Canada, Niger, Côte d'Ivoire and other Francophone countries. Keep in mind that categories themselves may be geographically defined. So if you include a category for US consumers in the Francophone audience mentioned previously, the reach would be zero.
The default is all countries.
Note: The cross-device feature is available only for the US and some other countries.
To specify countries:
-
Click the Settings icon in the audience builder toolbar.
The Advanced Settings dialog appears.
-
In the Countries field, enter or select the countries you want to include. Countries are listed by their ISO country codes.
Remove the default All value in the field to limit countries to you selections. You can include multiple countries by making repeated selections.
-
Click Apply Settings.
The dialog closes and the reach values for the audience and its segments are updated to reflect the settings.
Adding labels to audiences
You can add labels to audiences so that you can categorize them according to your business needs. For example, you could add a label to all the audiences that you use in a particular media targeting effort. You can apply any number labels to the same audience.
The labels you add are display in the Audiences page, You can filter the list to display only audiences with particular labels.

To add labels:
-
Click the Settings icon in the audience builder toolbar.
The Advanced Settings dialog appears.
- In the Label field, enter a label, the press the Enter key.
-
Repeat step 2 for each label you want to add.

-
Click Apply Settings.
The dialog closes and the labels are applied to the audience.
Exporting audience composition
You can export the composition of an audience as you are building it, even before it is saved. The audience composition is exported to a spreadsheet file in .xlsx format. You can also export one or more audiences after you have saved them.
The information reflects the state of the audience when exported. Depending on what you have configured when you export, the spreadsheet can include the following:
- Audience information
- Audience name and ID
- Audience CPM and reach
- Audience status (Active, Draft, or Inactive)
- Audience owner
- Audience creator
- Date created
- Date updated
- Audience composition
- Cross-device ID graph (if enabled)
- Countries
- Recency (if specified)
- ID types
- For each segment
- Segment number
- Minimum and maximum frequency over the last 30 days (if specified)
- Segment reach
- For each category in the segment: ID, taxonomy path, CPM, and reach
- For the excluded segment
- Minimum and maximum frequency over the last 30 days (if specified)
- Segment reach
- For each category in the segment: ID, taxonomy path, CPM, and reach
You can also export audiences after they have been saved and are being delivered. See Exporting audience composition and delivery details.
To export audience composition:
- While you are working in the audience builder, click the Export button
Saving audiences
You can save an audience at any time after you give it a name and add at least one audience to a segment. You must save an audience before you assign its delivery platforms.
To save an audience:
- Click Save Audience in the upper-right of the audience builder page.