Delivering Audiences
After you have created and configured an audience, you can deliver to it to media execution platforms for targeting, optimization, and analytics. The Oracle Data Cloud platform includes integrations with top technology partners that enable you to power your media targeting campaigns with your first-party data. Many partners also allow you to target third-party data purchased from the Oracle Data Marketplace. Different partners support different ID sources ranging from desktop and mobile web cookies to mobile advertising IDs (MAIDs).
In this topic
Setting the delivery method
You can choose from three methods to deliver audience data:
Data delivery platform (app)
Data delivery platforms are developed by media partners. You must Installing an App into your partner account before you can use them.
Because delivery platforms are preconfigured to connect partner endpoints and use specific data transfer methods, they make it fast and simple to configure audience delivery. In most cases, you can deliver the same audience to multiple delivery platforms at the same time.
A data delivery platform can use one of several data transfer types to send data to partners. You do not configure the data transfer type; it is configured in the delivery platform. Similarly, data delivery platforms can use several methods to map your data to the partner's data. See About apps for more information.
To deliver an audience by using data delivery platforms:
-
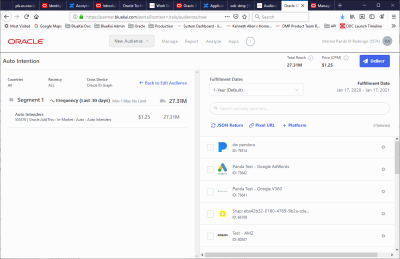
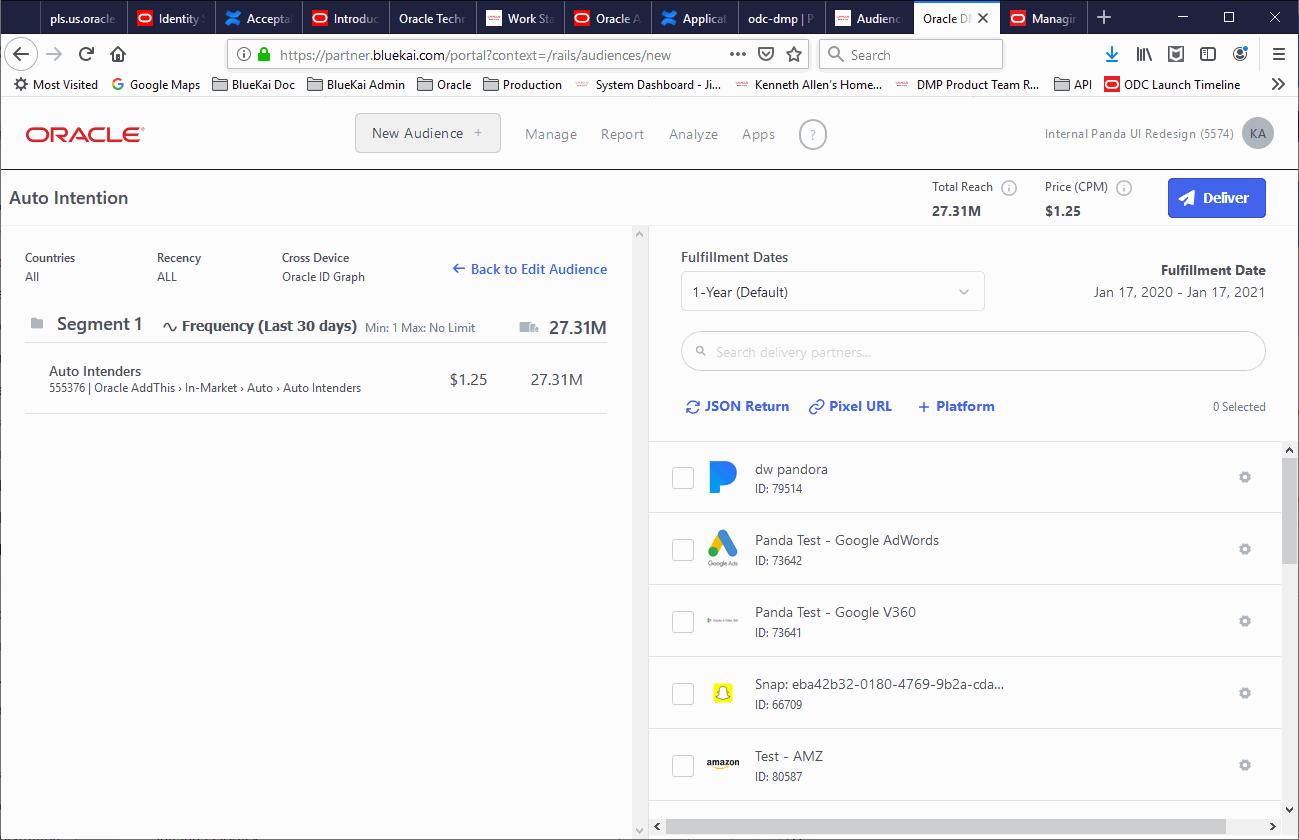
On the audience builder page, click the Deliver button in the upper-right of the audience builder page.
The audience delivery page appears. The platforms available to you are listed in the scrolling area on the right.
-
(Optional) To change the default fulfillment dates, do one of the following in the Fulfillment Dates field:
- Select 30 Days.
- Select Custom, then enter dates in the Date Range fields that appear. The data range can be no longer than one year. You can edit the end date after delivery begins.
-
Select delivery platforms by clicking their check boxes. You can find platforms in two ways:
- Scroll in the list.
- Type characters in the text field above. As you type, the list filters to match you entry. The search applies to the vendor name (as shown in the App Catalog), app Name (as defined during installation), and app ID.
-
Click the Deliver button.
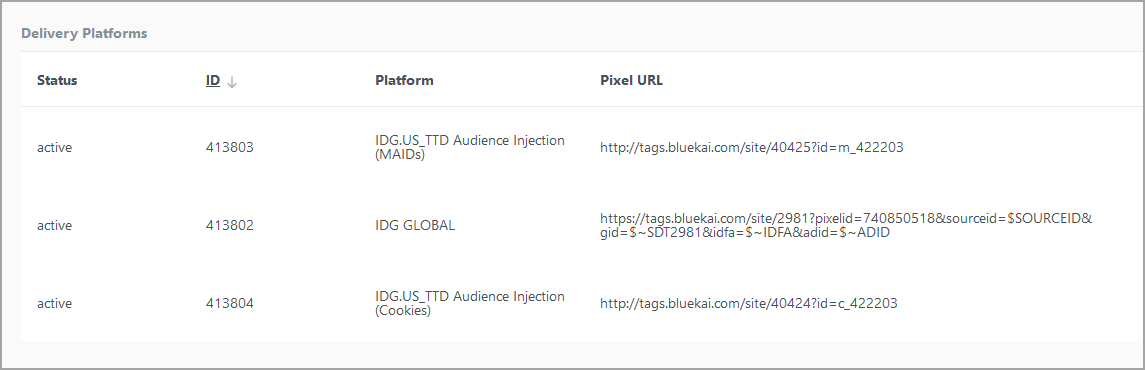
The Audiences page appears, with information about the audience displayed. Delivery information appears at the bottom of the page.
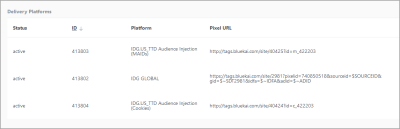
See Managing Audiences for more information about the Audiences page.
Pixel URL delivery
If you want to deliver data to a partner that does not have an app, you can use pixel URL delivery. You specify a pixel URL to which you deliver the audience. To use pixel URL delivery, you must deploy an ID swapping on your site except if the ID source is MAIDs. You can use pixel URL delivery and data delivery platforms for the same audience.
To deliver an audience to a pixel URL:
-
On the audience builder page, click the Delivery Partners button in the upper-right of the audience builder page.
The audience delivery page appears.
-
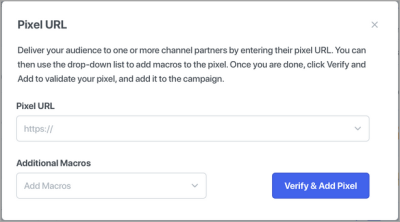
In the Audience Delivery page, click Add PIxel URL.
The Pixel URL dialog appears.
-
Enter the partner URL into the Pixel URL field.
The URL appears at the bottom of the dialog.
-
(Optional) Select a macro from the Additional Macros list.
The macro is appended to the pixel URL at the bottom of the dialog.
- (Optional) Repeat step 4 for each macro you want to include.
- Click Verify & Add Pixel to validate the pixel URL and add it to the audience delivery.
JSON return delivery
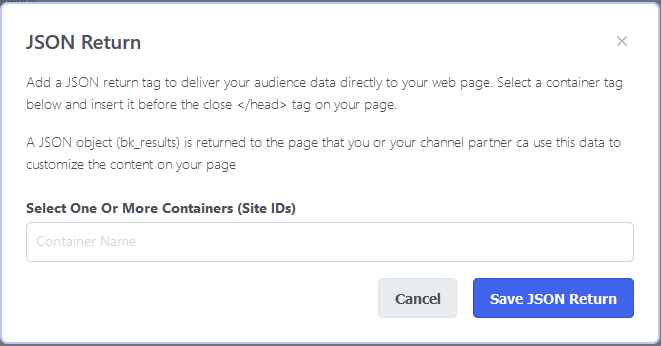
You can deliver data directly to a web page by using JSON return. When you use JSON return, the audience data is not sent to the Oracle Data Cloud platform, it is sent directly to a web page where it can be used to customize content.
To use this delivery method, you must create a container tag in Javascript format and insert the before the closing </head> tag on your page. (Creating the container tag in Javascript format ensures that it accepts JSON data.) When the container tag is fired, a JSON object (bk_results) is returned to the page. It includes each audience delivery that has won the user and the categories that qualified them for the audience.
To deliver data by JSON return:
-
On the audience builder page, click the Delivery Partners button in the upper-right of the audience builder page.
The audience delivery page appears.
-
.In the JSON Return dialog, enter or select the containers (site IDs) to which data should be returned.

- Click Save JSON Return.
Specifying advanced settings
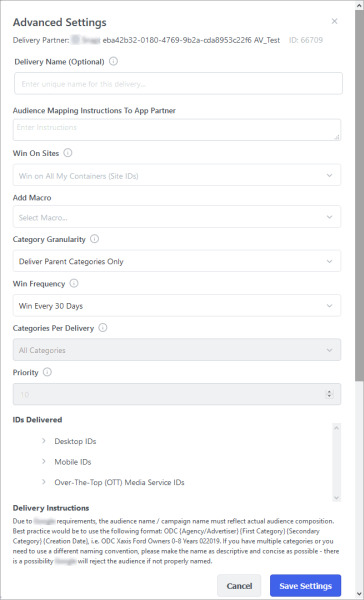
You can optionally configure advanced settings for delivery platforms. You configure settings separately for each platform. Not all settings appear for all delivery platforms.
These are the advanced settings:
- Delivery Name: (Optional) Specify a name for this audience delivery. If you do not specify a custom name, the audience name is used. Specifying a custom name may make it easier to track delivery data.
- Audience Mapping Instructions to App Partner: For managed mapping delivery only. Specify email addresses who should receive the request to complete managed mappings.
- Category Granularity:Select whether to deliver parent or parent and child categories in your audience. By default, only parent categories are delivered.
- Deliver Parent and Child Categories: Delivers users whose profiles contain either the category selected in the audience or any of the child categories underneath that category. For example, if your audience is targeting the In-Market > Autos category, the audiences deliver users whose profiles contain that category and In-Market > Autos > Condition > Used Cars. Selecting this option increases the amount of granular category data that is delivered.
- Deliver Parent Categories Only: Delivers only users whose profiles contain the exact category selected in the audience.
- Categories Per Delivery (pixel URL delivery only): Specify the number of categories included per pixel delivery.
- All Categories: Includes all categories. This is the default value.
- One Category per Site Visit: Categories are queued. Each time a user is seen online, a pixel is delivered and includes the next category in the queue.
- Win Frequency: Specify how often data is delivered.
- Win Every X Days (delivery platform and pixel delivery only ) Delivers data once every 30, 15, or 7 days after a user is tagged with a category for the first time. (The default value is 30 days.) If a user is tagged with a category that is already in their profile before the selected interval has elapsed, they are not delivered. If an audience includes multiple categories and a user has been tagged with category A but not category, the user is re-delivered when they are tagged with category B. The delivery interval is also reset.
- Win Every Time (JSON return delivery only): Delivers data every time a user is tagged with a category. This setting ensures that customized site content is displayed to users every time they visit your web page.
- Win on Sites:
Select which containers (site IDs) data can be delivered on.
- Win on All My Containers (Site IDs): Returns data for on all site IDs in your account.
- Win on Selected Container (Site ID): Returns data only on the selected site IDs. This setting is typically used for JSON return tags to restrict which site IDs can be used to return data. For example, if you select site ID 1 and a JSON return tag is called with site ID 2, this data is not included in the JSON object returned to your web page. If you select this option, a separate field appears where you select site IDs.
-
Priority: You can rank deliveries from 1 (lowest priority) to 100 (highest priority) to specify which one has the priority for winning auctions.
-
Macro: Optionally select a macro from the list and enter an appropriate value. The macro is appended to the pixel URL created for the campaign. See Pixel URL macros for more information.
-
IDs Delivered: Specify which ID sources are delivered. The dialog box displays the ID source types supported by the delivery platform (app) you are using. You can expand the list to see more specific ID sources and select the ones you do not want to use.
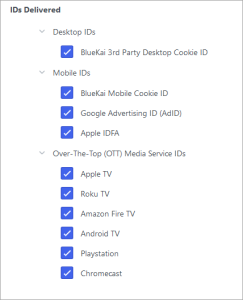
For example, you could clear the Mobile check box to send only users linked to desktop cookie IDs. For an app that can deliver users for both apps and mobile web cookies, you could clear the Mobile Cookie ID check box to deliver only Apple IDFAs and Google Ad Ids.
-
Custom Parameters: If you see additional fields not mentioned here, they represent custom parameters that you enter during app installation. If one or more of these fields are empty, enter appropriate information.
Important! Do not change any values that appear by default.
- Delivery Instructions: Platform-specific information and instructions. This information is read-only.

To configure advanced settings:
-
In the audience delivery page, click the Advanced Settings icon next to a delivery platform.

The Advanced Settings dialog appears.
-
Specify one or more of the configuration options.
Some fields are active or inactive based on other selections you make. If you select Win on Selected Container (Site ID) in the Win on Sites field, another field appears where you can select site IDs one at a time. The IDs you select are shown in a table below the field.
-
Click Save Settings.
- Repeat steps 1 - 3 for each delivery platform you want to configure.


Pausing audience data delivery
You can pause delivery for an audience that is in Active state. You pause delivery for the audience as a whole, so delivery stops for all delivery partners and methods. You can restart delivery at any time that is within the originally configured fulfillment dates.
To pause audience data delivery:
-
On the Audiences page, select an audience and then click the Pause icon in the toolbar.
-
Click Yes in the confirmation dialog.
The platform pauses all data delivery for the audience. The Pause icon in the toolbar changes to a Restart icon. The dot in the audience list changes to gray for the selected audience.
To restart delivery, select the audience again and click the Restart button.
Changing delivery end dates
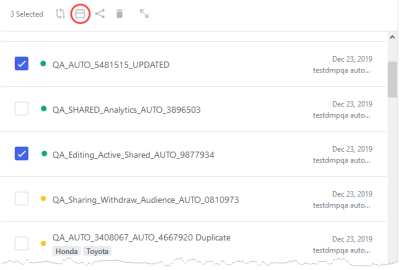
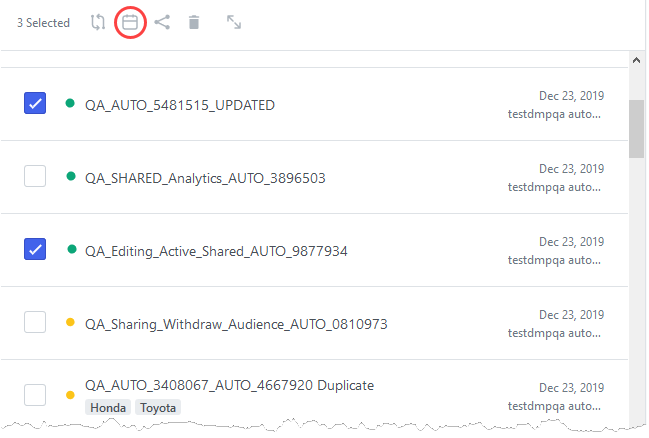
You can change delivery end dates for up to 50 audiences at the same time without having to edit their full delivery details. For example, suppose you originally scheduled delivery for several audiences to end on March 31 but later decide that you want to extend that period. Instead of opening each audience separately, you can select them as a group and then specify a new end date.
You can change delivery end dates only for active audiences. If an audience began delivery in the past, the new end date cannot be more than one year in the future from today. If an audience has not yet started delivery, the new end date cannot be more than one year from the scheduled start date.
To edit delivery dates:
-
On the Audiences page, select one or more active audiences in the list, then click the Edit Delivery Dates button.
-
In the Edit Delivery Dates dialog, enter the new end date, then click Save Delivery Dates.
The platform changes the delivery dates for the selected audiences.
Managing failed deliveries
If an audience delivery fails, you can delete and regenerate the failed pixel. There are two ways to find out if a delivery has failed:
- By consulting the Account Activity log either on the platform home page or on the Account Activity page.
- By checking the audience's delivery status from the Audiences page.
You delete and regenerate pixels by editing the audience, starting from the Audiences page. When you save and update the audience, it is delivered with the new pixel.
To delete a pixel and regenerate a new one:
-
On the Audiences page, select an audience that failed delivery.
-
Click the edit icon in the upper right of the page.
The summary page for the audience opens.
- Select the delivery platform that failed.
-
Click the Delete Failed Pixels icon.
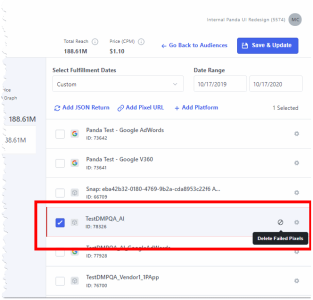
- Click Save & Update.
- Click Go Back to Audiences to return to the Audiences page.
-
Re-select the delivery instance and select Save & Update to generate a new pixel URL.