User Steps
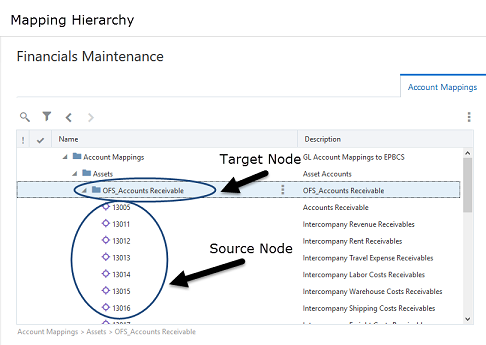
As a user, within the mapping viewpoint add target nodes and then map source nodes to the target nodes. Then you can export the mapping viewpoint back to Planning using Data Management.
User Prerequisites
The administrator registers and imports the applications; creates a maintenance view with three viewpoints for the source account, target account, and mapping viewpoint; and defines the mapping key. Your administrator needs to give you the mapping key location name, MapGLtoPlanning, to export the mapping data. Then from Planning you can import the mapping data.
You must have Data Manager permission to the target application in order to export the mapping data.
User Process
- Update the mapping viewpoint with parents from the target application and children from the source application.
- Export the mapping data.
- Import the mapping data to Planning.
User Detailed Steps
Map bottom level nodes
To map bottom level nodes:
- Review and decide which source Acquired General Ledger account nodes you want to map to planning account nodes.
- Use the side-by-side layout with the planning accounts on the left and the mapping viewpoint on the right.
- Drag and drop planning nodes as parents into the mapping viewpoint.

- Use the side-by-side layout with the Acquired GL Accounts on the left and the mapping viewpoint on the right.
- Drag and drop Acquired General Ledger nodes as children into the mapping
viewpoint.

- Map as many nodes as desired.

Export the mapping data
To export mapping data:
- Validate the mapping viewpoint, see Validating a Viewpoint.
- Export the mapping data to a local file or to the Data Management inbox, see Exporting Mapping Data.
Note:
When you export, use the location name,MapGLtoPlanningyour administrator defined for the mapping key.
Import the mapping data using the Data Management inbox
Within Planning, open the Data Management module and navigate to the inbox, see Importing Member Mappings in Administering Data Management
During the import the negative sign is applied to values in the target node for the selected mapping key which is the location in Data Management
.To import mapping data:
- Open your external application and navigate to the Data Management inbox.
- Click Data Load Mapping.
- At the bottom of the screen, click DelimitedLocation.
- In the Location field, enter
MapGLtoPlanning, which is the Location Name your administrator set up for the mapping key in Oracle Fusion Cloud Enterprise Data Management. - Click Import > Current Dimension.
- Select the mapping data file you exported.