3 Install and Configure the Recipe
On your Oracle Integration instance, install the recipe to deploy and configure the integration and associated resources.
- On the Oracle Integration Home page, in the Get started section, click Browse store.
- Find the recipe you want to install, then click Get.
A message confirms that the recipe was successfully installed, and the recipe card shows In use.
- Click Configure
 on the recipe to configure its resources.
The project workspace opens, displaying all the resources of the recipe. Configure the following resources before you activate and run the recipe.
Configure the Cloud EDM Connection
- In the Connections section, click EDM Connection.
- In Configure a connection, enter the following values:
Field Information to Enter Properties Connection Type Leave REST API Base URL selected Connection URL Enter the REST API endpoint for your service. For example: https://acme-test-epmidm.epm.us-phoenix-1.ocs.oraclecloud.com/epmcloud/rest/v1Security Security Policy Leave Basic Authentication selected. Username Enter your Service Administrator username Password Enter your Service Administrator password Access Type Select the appropriate access type for your Cloud EDM environment. - Click Save to save your connection parameters, and then click Test to verify them.
Configure the Oracle Database Connection
- In the Connections section, click Database Connection.
- In Configure a connection, enter the following values:
Field Information to Enter Properties Host Enter the host for your database Port Enter the port for your database SID Enter your system identifier (if needed) Service Name Enter your database service name Security Security Policy Leave Username Password Token selected Username Enter your Administrator username Password Enter your Administrator password Access Type Select Connectivity agent - Click Associate agent group, and then select the connectivity agent that you configured in the Install and Configure Connectivity Agent procedure, and then click Use.
- Click Save to save your connection parameters, and then click Test to verify them.
Configuring the EDM DB Extract Sync Integration
Next, you configure the integrations themselves to connect to your database table.
- In the Integrations section, click the EDM DB Extract Sync
integration.
The integration is displayed in the integration editor.
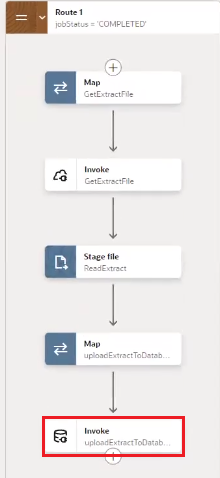
- Scroll down to locate the
InvokeuploadExtracttoDatabasestep.
- Click Actions
 , and then select Edit.
- In Edit Basic Info, leave What operation do you want to perform? set to Perform an Operation On a Table, and leave What operation do you want to perform on table? set to Insert. Click Continue.
- In Edit Operation on Table, click Add to select your table. Use the Schema and Table Name drop down fields to select the schema and table that you created in the Create a Database Table for the Extracted Data procedure. For Table Type, select Table, and then click Search.
- In the Search results, move your table from Available to Selected, and click Continue.
- Click Continue, and then click Finish.
- Click Save.
Optional: Updating the Table Name
The EDM DB Extract Sync integration is coded with the expectation that you
followed the steps in Create a Database Table for the Extracted Data to create a table called
EXTRACT_UPLOAD in your Oracle database. If you are using a
different table name, follow these steps to update the integration with the name of
your table.
- In the Integrations section, click the EDM DB Extract Sync
integration.
The integration is displayed in the integration editor.
- Scroll down to locate the
InvokeDeleteDatabasestep in the Switch section.Note:
This step clears the existing data out of the database table before writing the new data from the extract. This prevents duplicate row errors when running the DB EDM Extract Sync integration. - Click Actions
 , and then select Edit.
- In Edit Basic Info, leave What operation do you want to perform? set to Run a SQL Statement, and click Continue.
- In the SQL Query, replace
EXTRACT_UPLOADwith the name of your table. If you are extracting properties other thanNAMEandDESCRIPTION, update those properties.Note:
Your SQL statement must include aWHEREclause. - Click Validate SQL Query to ensure that your statement is valid.
- Click Continue, and then click Finish.
- Click Save.
Configuring the DB EDM Extract Sync Integration
Configure the database connection:
- In the Integrations section, click the DB EDM Extract Sync
integration.
The integration is displayed in the integration editor.
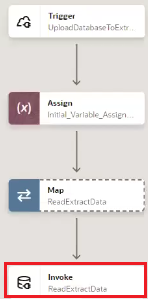
- Scroll down to locate the
InvokeReadExtractDatastep.
- Click Actions
 , and then select Edit.
- In Edit Basic Info, leave What operation do you want to perform? set to Perform an Operation On a Table, and leave What operation do you want to perform on table? set to Select. Click Continue.
- In Edit Operation on Table, click Add to select your table. Use the Schema and Table Name drop down fields to select the schema and table that you created in the Create a Database Table for the Extracted Data procedure. For Table Type, select Table, and then click Search.
- In the Search results, move your table from Available to Selected, and click Continue.
- Click Continue, and then click Finish.
Verify the integration mapping:
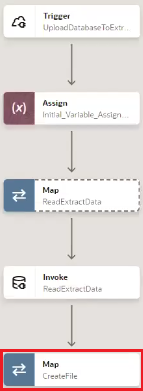
- From the integration editor, scroll down to locate
MapCreateFilestep.
- Click Actions
 , and then select Edit.
- Verify that the mapping has the following information:
Source Target 'Name'text item in the Mapping CanvasExtract 1 of 2: Name (This is the Name header on the file) 'Description'text item in the Mapping CanvasExtract 1 of 2: Description (This is the Description header on the file) ReadExtractData Response, ExtractUploadCollection, ExtractUpload, name Extract 2 of 2 Name (this is the actual name property value) ReadExtractData Response, ExtractUploadCollection, ExtractUpload, description Extract 2 of 2 Description (this is the actual description property value) See for example the screenshot below:

- Click Save.