Integrating BAI, SWIFT MT940, and CAMT.053 Format Bank File Balances

When loading Bank balances, you create a data source associated with a Bank file source system. Data Integration pulls each account’s end of day balance from the BAI, SWIFT MT940, and CAMT.053 file formats so they can be loaded as a sub-system balance in Account Reconciliation.

The source application for a BAI Format Bank File Balance file has the following pre-defined constant columns and headers:

  • Closing Balance
  • Currency
  • Transaction Type
  • Currency
  • Statement Date
  • Account

The source application for a Swift MT940 Format Bank File Balances file has the following pre-defined constant columns and headers:

  • Closing Balance
  • Currency
  • Transaction Type
  • Currency
  • Statement Date
  • Account

The source application for a CAMT.053 Format Bank File Balances file has the following pre-defined constant columns and headers:

  • Account
  • Closing Balance
  • Currency
  • As Of Date
  • CdtDbtInd (Credit Debit Indicator)

To add a BAI Format Bank File, SWIFT MT940, or CAMT.053 Format Bank File Balances source system:
  1. Upload the BAI, SWIFT MT940 or camt.053 bank statement files using the file browser when registering the target application.

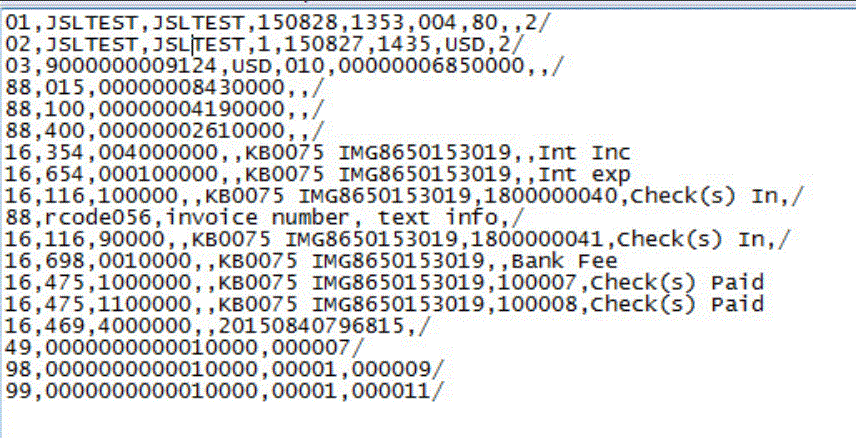
    The following shows a BAI Format Bank File statement file:

    BAI Format Bank File Balances file:

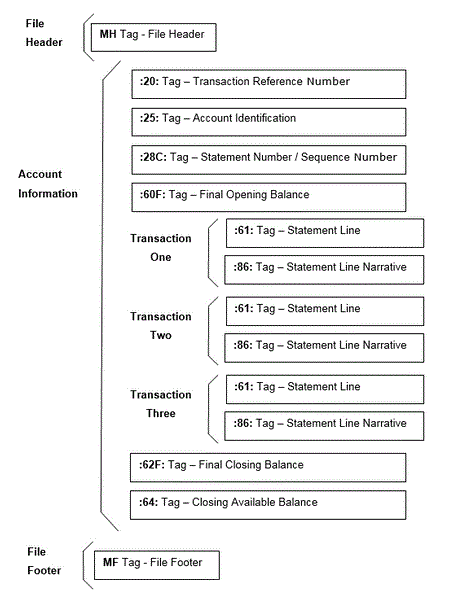
    The following shows the structure of a SWIFT MT940 Format Bank File statement file:

    Image shows SWIFT MT940 Format Bank File statement file.

  2. From the Data Integration home page, and then Actions, select Applications.
  3. On the Applications page, click Image shows the Add icon. (Add icon).
  4. From Category, select Data Source.
  5. From Type, select Bank file.
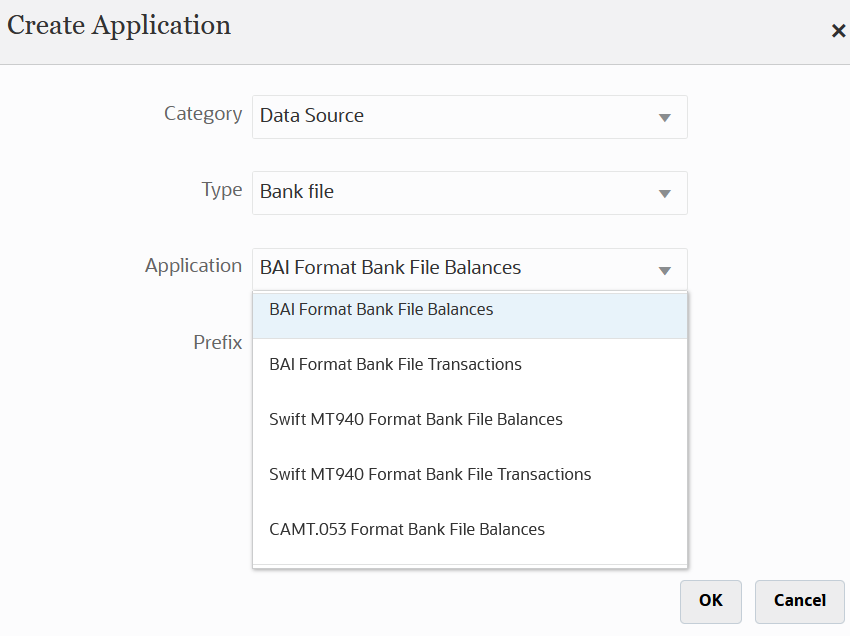
  6. From Application, select an application name from the list of values.

    Available types of applications include:

    • BAI Format Bank File Balances
    • SWIFT MT940 Format Bank File Balances
    • CAMT.053 Format Bank File Balances
    Image shows the Create Application page.

    For a BAI Format Bank File Balances, select BAI Format Bank File Balances.

    For a SWIFT MT940 file, select SWIFT MT940 Format Bank File Balances.

    For a CAMT.053 file, select CAMT.053 Format Bank File Balances.

  7. In Prefix, specify a prefix to make the source system name unique.

    Use a prefix when the source system name you want to add is based on an existing source system name. The prefix is joined to the existing name. For example, if you want to name a Bank file application the same name as the existing one, you might assign your initials as the prefix.

  8. Click OK.
  9. From the Application page, click Image shows Select icon. to the right of the application, and then select Application Details.
  10. Select the Dimensions tab.
  11. To view dimensions in the BAI Format Bank File Balances file source system, select the Dimension Details tab.

    The dimension details for a BAI Format Bank File Balances file application are shown below:

    Image shows dimension details for a BAI Format Bank file.

    The dimension details for a SWIFT MT940 Format Bank File Balances application are shown below:

    Image shows dimension details for a SWIFT MT940 Format Bank File Balances

    The dimension details for a CAMT.053 Format Bank File Balances application are shown below:

    Image shows the dimension details for CAMT.053 Format Bank File Balances

  12. Set up the integration mapping between BAI Format Bank File Balances source system and the Reconciliation Compliance Balances target application by building an import format:
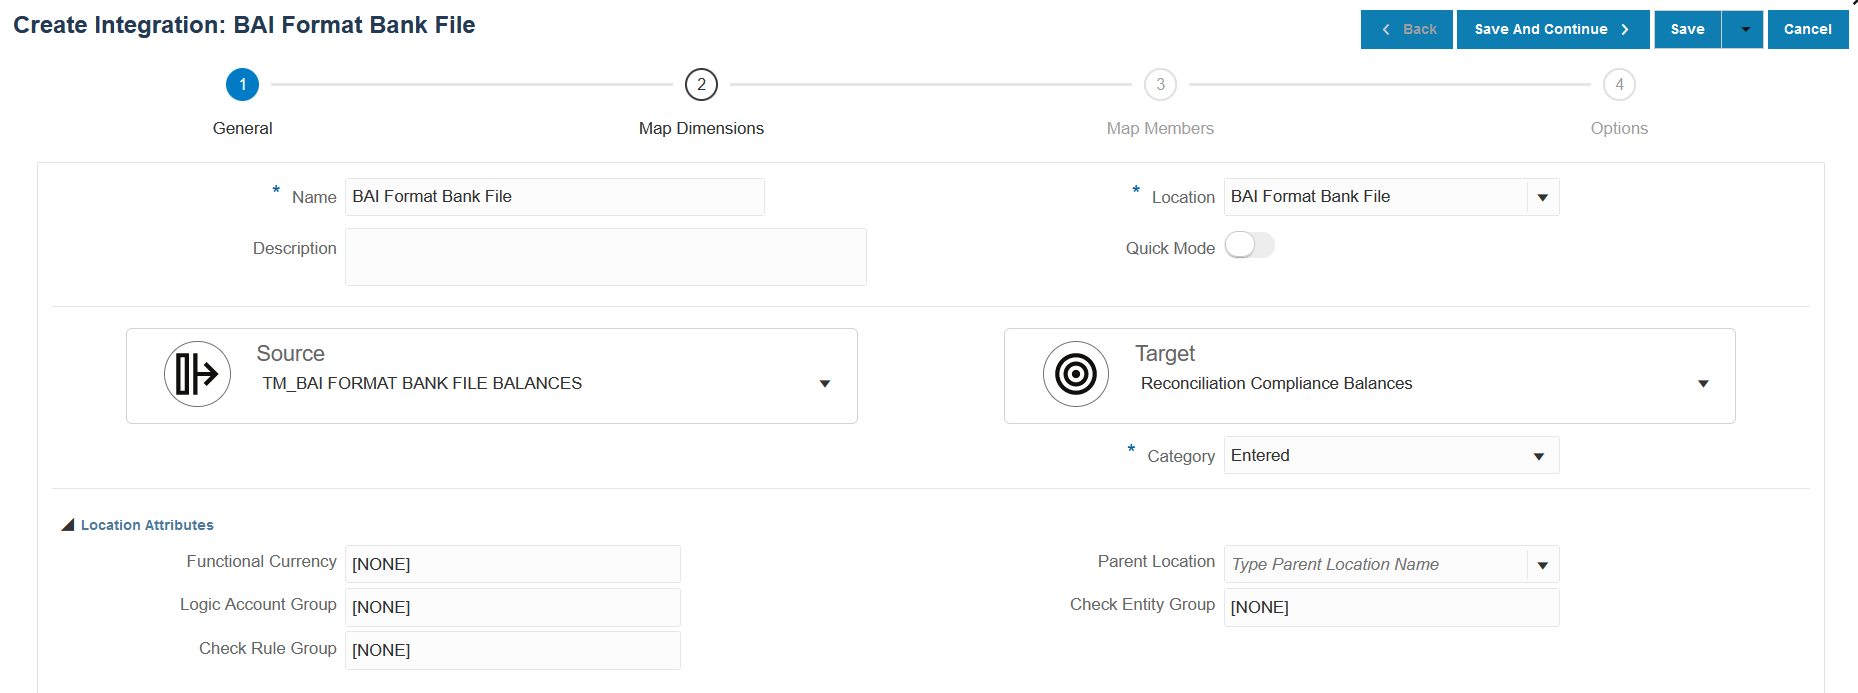
    1. On the Create Integration page, then Name and Description, enter a name and description for the new integration.
    2. In Location, enter a new location name, or pick an existing location to specify where to load data.

    3. From the Source (Image shows the Source icon.) drop-down, select the Bank File source application.

    4. From the Target (Image shows the Target icon.) drop-down, select the target Reconciliation Compliance Balances application.

    5. From Category, select the currency bucket.

    6. Optional: Select any applicable location attributes for the integration. For more information, see Selecting Location Attributes.

    Image shows the Create Integration page.

  13. From the Data Integration home page, click Image shows Select icon. and then select Map Dimensions.
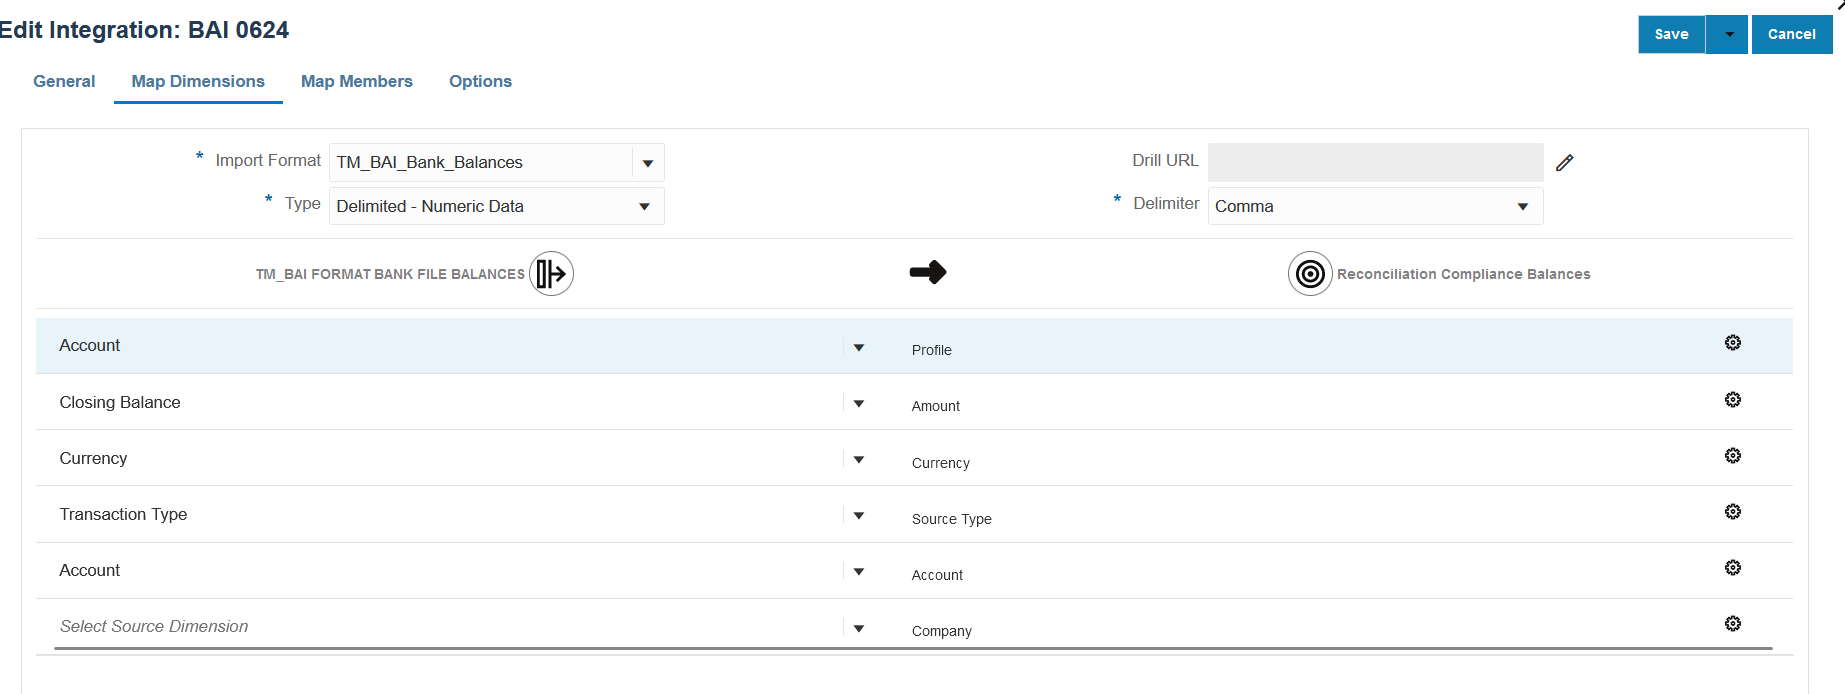
  14. On the Map Dimensions page, set up the integration mapping between BAI Format Bank File Balances source system and the Reconciliation Compliances Balances target application by building an import format.
    1. In Import Format, select the name of the import format to use for the integration.

      You can also add a user-defined import format name.

    2. In the mappings grid, map the source columns in the source to the dimensions in the Reconciliation Compliance Balances Profiles.

      Note:

      All Bank files require that the Profile dimension is mapped to the corresponding Profile in Account Reconciliation.

      The dimensions from the target application are populated automatically.

      If the import format has already been defined for the integration, then the source and target columns are mapped automatically.

      An example of the import format for a BAI Format Bank File Balances application is shown below:

      Image shows Map Dimensions page.

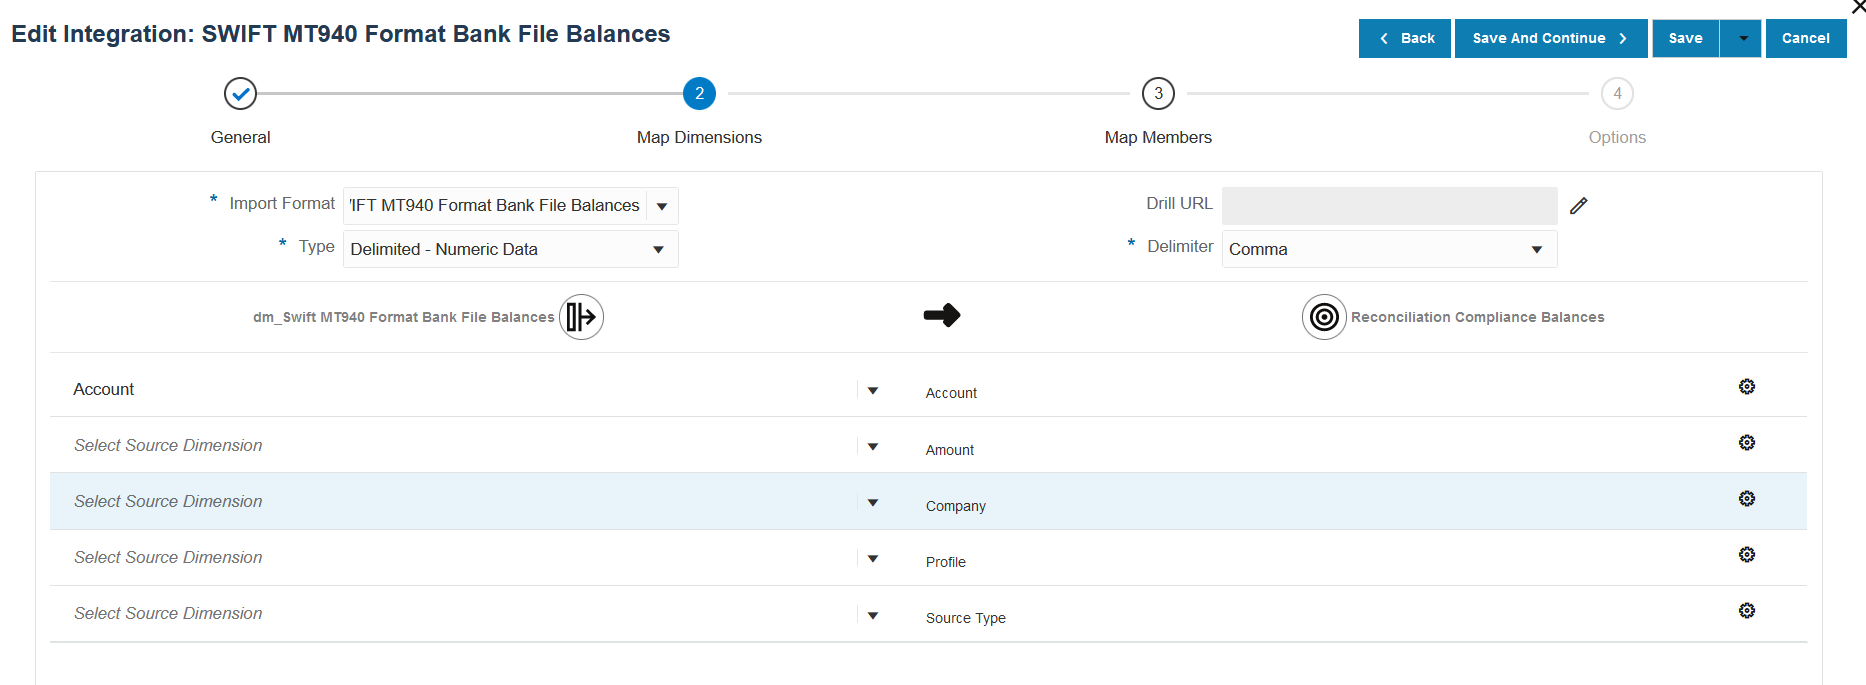
    An example of the import format for a SWIFT MT940 Format Bank File Balances application is shown below:

    Image shows Map Dimensions page.

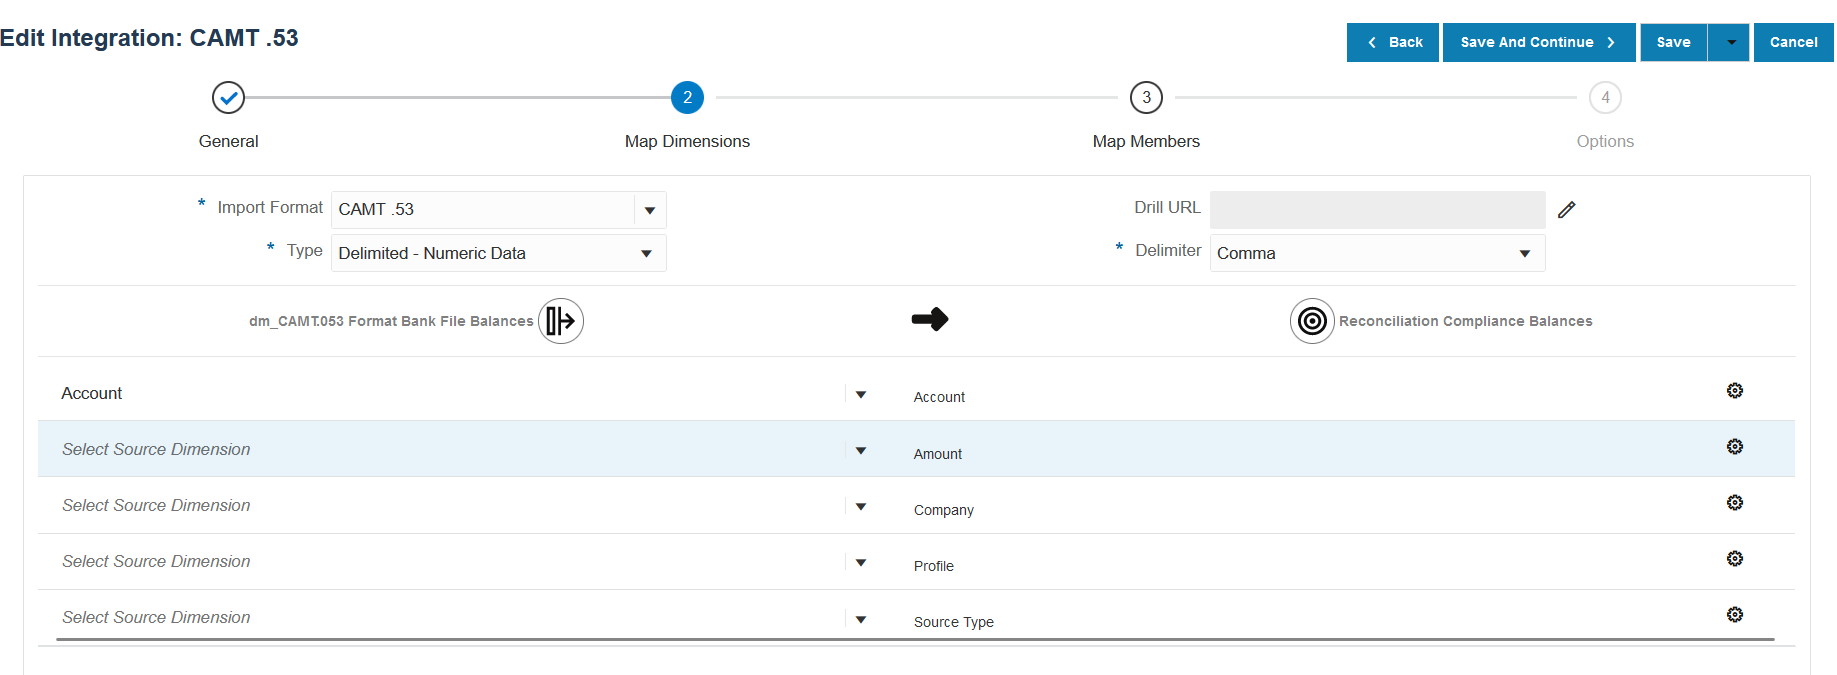
    An example of the import format for a CAMT .053 Format Bank File Balances application is shown below:

    Image shows Map Dimensions page.

  15. From the Data Integration home page, click Image shows Select icon. and then select Map Members.
  16. On the Map Members page, map the account numbers in the file to the appropriate Reconciliation names.
    Image shows the Map Members page.

    Note:

    All Bank files require that the Profile dimension is mapped to the corresponding Profile in Account Reconciliation.

  17. From the Data Integration home page, click Image shows Select icon. to the right of the integration, and then select Options.
  18. Select the Filter tab.
  19. Map the source type dimension Source type * to the hard coded "source system" or "sub-system" target value and then click Save.

    Note:

    Bank Files are usually configured as sub-systems.

    Image shows the Filter tab.

  20. Click the Options tab, in Category, specify the preferred category.
    Default categories include:
    • Reporting
    • Functional
    • Entered

    Typically bank balances would be loaded into "Entered," but depending on your requirements, you can select "Functional" or "Reporting."

  21. In Period Mapping Type, select Default

    When Default is selected, period mappings default to the list of source application periods using the application or global period mappings based on the period key. The list of source periods is added as Year and Period filters.

    Image shows Option tab.

  22. Click Save.
  23. Go to Account Reconciliation home page.
  24. Click Application, then Configuration, and then Data Load.
  25. Create a data load definition.
    For more information, seeDefining and Saving a Data Load Definition in Administering Oracle Account Reconciliation .
  26. Import balances by selecting Application and then Period.
  27. Click Image shows an ellipses. to go to the action menu and then click Import Data.
  28. Click +, then from New Data Load Execution, select Use saved data load, and select the data load created in the previous step.
  29. Click OK to import balances from Bank Files.

    Bank balances are typically loaded as sub-system balances, but can also be loaded as source balances if needed.