Using an Integration with Smart Split Job Type
When importing a large volume of data that exceeds Essbase governor limits, use the Integration with Smart Split job type to split a data load into multiple smaller loads. This job type enables you to define smaller data slices without having to create multiple integrations.
Note:
Smart Split is optimally used for extracting calculated data, which is determined by your data extract option. There are multiple Essbase extract options based on the type of your data extract option you select in .Data Integration. If you select "Stored Data", then this is applicable to BSO and uses the BSO data export method. All data uses "MDX" export method. Level 0 uses "MAXL" (Smart Split is not supported when the Level 0 Data Extract Option is enabled. Level 0 extracts all level 0 data and filters extracted data.) For more information about data extract options, see Defining Direct Integration Options.To perform a Smart Split:
-
Create the base integration definition between the source application and the target Oracle Fusion Cloud Enterprise Performance Management application.
- For information about creating an integration, see: Creating Direct Integrations or Creating File-Based Integrations.
-
Map the dimensions between the Cloud EPM application and the dimensions in the target application.
For more information, see Mapping Dimensions.
-
Map members to translate source values to valid members in each target dimension.
For more information, see Mapping Members.
-
On the Options page, select any filters and application options.
You can apply a filter for a Split Dimension as well as filters for other dimensions in the base integration. When specifying filters for the Split dimension in the base integration, you can simply provide the parent member name for the hierarchy branch to process or provide the member function ILvl0Descendants.
The filter for the Split dimension supports only ILvl0Descendant member functions. If no filters are specified, then the system processes all level 0 members for the Split dimension.
For more information on apply filters and application options, see Defining Filters.
-
Create a new Pipeline by completing steps 1-12 in the Pipeline Process Description.
-
On the Pipeline page, click
 to create a new stage card.
In the Stage Editor, specify the stage definition:
-
Stage Name—Specify the name of the stage.
-
Title—Specify the name of the stage to appear on the stage card.
-
Sequence—Specify a number to define the chronological order in which a stage is executed.
-
Parallel—Toggle Parallel on to run jobs simultaneously.
-
On Success—Select how to process a stage when steps in the Pipeline definition are executed successfully.
-
On Failure—Specify how to process a stage when a step within a stage fails.
-
-
On the stage card, click > to expand the stage.
-
On the stage card, click
 (Create Job icon) to add a
A new job card is displayed in the stage card.
-
In the Job Editor, then from Type drop-down, select Integration with Smart Split.
Note:
Add only one Integration with Smart Split job type per stage when running the Smart Split in parallel mode. -
Complete the following
-
From Name, select the name of the job.
-
In Title, specify the title of job name to appear on the job card.
-
In Sequence, select 1 for the run job order in the stage.
-
-
From Split Dimension, select the dimension from the list of dimensions in the source application on which to split the data loads.
Select only one dimension as the Split Dimension.
For example, select Ledger to run a data load per Ledger.
Split Dimension on Period and Year Considerations:
"Period" and "Year" are special dimensions and require special processing when used as a Split dimension
-
When "Period " is used as the Split Dimension, only Single and Group are supported split methods. If other methods are used, an error occurs.
-
When "Year" is used as the Split Dimension, only Single is the supported split method. Running multiple years in a single integration run is not supported. If other methods are used, an error occurs.
-
For Standard Mode, the Start Period and End Period are used to determine the list of periods to split. Based on the "Period" range, the system determines the source periods and applies the source period filter.
-
For Quick Mode, source filters for the "Period" and "Year" are used to determine the period or year for each child integration and applies the source filter.
-
-
From Split Method, select how members in the dimension are split (separated). The system creates a separate child integration (data rule) for split criteria in the dimension based on the split method.
Each child integration is a copy of the base integration and is available on the Data Integration home page. The child integration is identical to the base integration except for the source filter used for the split dimension. Child integrations are recreated every time the Pipeline is executed, so do not modify the child integrations.
The child integrations can be deleted using the Delete Integration system maintenance task. For more information, see Deleting an Integration.
Available options:
-
Single—System runs a separate process for each member in the dimension. For example, you can run a load per "Ledger" or "Entity."
-
Group—System splits the list of members in dimensions into multiple groups. The size of the group is based on the Number of Groups parameter.
-
Custom (Pattern)—You specify the values of for the split dimension member. A Custom Pattern split method can be specified as a list, range, wild-card in the Label/Value parameter below. The split is processed in the order of filter name.
For example, you might specify the following custom pattern using these expressions:
Like
US*: All members starting with USBetween
100-199: All members in the 100 rangeList
100,200,300: List of individual membersIf a member is picked up by earlier filter, then it is not included the later filters.
-
Custom-Functions—You specify the values of for the split dimension member using member functions. This option enables you to limit members to a specific subset of members.
Custom-Functions can be specified as member functions in the Label/Value parameter below.
If you are using a custom function, then do not define filters for the Split Dimension in the base integration. Only the filter of the custom dimension is applied.
-
-
From Processing Mode, select the mode for processing the jobs in the Pipeline.
Available options:
Parallel—When jobs are run in parallel mode, at runtime, the system runs jobs together in parallel (not sequentially).Serial—When jobs are run in serial mode, at runtime, the system runs the jobs one after another in a specific sequence.
-
From Import Mode, select the import mode for the integration job.
By default, the $IMPORTMODE parameter uses the value of the variable parameter defined in global variables for the import mode (see Editing Runtime Variables). However, you can select different import modes for different jobs. For example, to load metadata in one integration and just data in another, specify different import modes between the two jobs.
Note:
When you run the integration in Replace mode, the system runs the Clear data process by "Entity" and other POV dimensions. If the Split dimension is by "Entity", then there are no issues with default Replace mode behavior.
If the Split Dimension is by Entity and a governor limit exception occurs, and you select a different dimension as the Split Dimension, then there are additional considerations.
For Planning and FreeForm applications, define the Clear Region instead of the default Clear region. In the Clear Region, select the Split Dimension as one of the dimensions using " Derive from Data" as the option. If the Split Dimension used for the source filter does not exist in the target application (for example, Ledger), then define a "Clear Cube" job in the platform and call the Clear Cube job prior to running the integration job. In this case, the Integration job must be run in Merge mode.
-
From Export Mode, select the export mode for the integration job.
By default, the $EXPORTMODE parameter uses the value of the variable parameter defined in global variables for the export mode (see Editing Runtime Variables). However, you can select different export modes for different jobs. For example, to load metadata in one integration and just data in another, specify different export modes between the two jobs.
-
From Start Period drop-down, select the Start Period for the integration job.
By default, the $STARTPERIOD parameter uses the value of the variable parameters defined in global variables for the start period (see Editing Runtime Variables). However, you can select different start periods for different jobs. For example, if you load metadata in a Pipeline, you can set the Start Period to be BegBalance in the job.
-
From End Period drop-down, select the End Period for the integration job.
By default, the $ENDPERIOD parameter uses the value of the variable parameters defined in global variables for the start period (see Editing Runtime Variables). However, you can select different end periods for different jobs. For example, if you load metadata in a Pipeline, you can set the End Period to be EndBalance in the job.
-
In Number of Groups, specify the maximum number of groups for the Group Split method (system splits the list of members in dimensions into multiple groups).
-
In Use Fully Qualified Name, select Yes to include the member name and the names of its ancestors to the level that uniquely defines the member.
Select Yes to show the fully qualified name. If the dimension includes Shared Members, then set it to Yes in the integration, then this parameter must be set to Yes since shared members must have unique parent members.
Select No to show the member name only. If you don't have shared members, then the fully qualified name is not required.
-
In Label/Value, specify the values for the Custom (Pattern) or Custom-Function split methods.
Job type parameters for the Custom (Pattern) or Custom-Function split methods are added as Label and Value pairs (key value pairs) where Label is the name of an attribute, and Value is an assigned value for this attribute.To add a new Label/Value pair, click

To delete a Label/Value pair, click

-
Click Save.
-
Run the integration with Smart Split job.
For more information, see Running the Pipeline.
Integration with Smart Split job type parameters include:
Table 12-29 Integration with Smart Split job type parameters and descriptions
| Integration with Smart Split job type parameters | Description |
|---|---|
| Name |
Enter the name of the base integration to which to apply the split dimension. |
| Split Dimension |
Specify the dimension in the source application on which to split the data loads. Split Dimension on Period and Year Considerations:
|
| Split Method |
Select how members in the dimension are split (separated). The system creates a separate child integration (data rule) for split criteria in the dimension based on the split method. The child integration is identical to the base integration except for the source filter for split dimension. Child integrations are recreated every time the Pipeline is executed so do not modify the child integrations. The child integrations can be deleted using the Delete Integration system maintenance task. Available options:
|
| Import Mode |
Select the import mode for the integration job. By default, the $IMPORTMODE parameter uses the value of the variable parameter defined in global variables for the import mode (see Editing Runtime Variables). However, you can select different import modes for different jobs. For example, to load metadata in one integration and just data in another, specify different import modes between the two jobs. |
| Export Mode |
Select the export mode for the integration job. By default, the $EXPORTMODE parameter uses the value of the variable parameter defined in global variables for the export mode (see Editing Runtime Variables). However, you can select different export modes for different jobs. For example, to load metadata in one integration and just data in another, specify different export modes between the two jobs. |
| Start Period |
Optional From the Start Period drop-down, select the Start Period for the integration job. By default, the $STARTPERIOD parameter uses the value of the variable parameters defined in global variables for the start period (see Editing Runtime Variables). However, you can select different start periods for different jobs. For example, if you load metadata in a Pipeline, you can set the Start Period to be BegBalance in the job. |
| End Period |
Optional From the End Period drop-down, select the End Period for the integration job. By default, the $ENDPERIOD parameter uses the value of the variable parameters defined in global variables for the start period (see Editing Runtime Variables). However, you can select different end periods for different jobs. For example, if you load metadata in a Pipeline, you can set the End Period to be EndBalance in the job. |
| Number of Groups |
Specify the maximum number of groups for the Group Split method. |
| Use Fully Qualified Name |
Select Yes to include the member name and the names of its ancestors to the level that uniquely defines the member. If the dimension includes Shared Members, then set it to Yes in the integration, then this parameter must be set to Yes since shared members must have unique parent members. Select No to show the member name only. |
| Label/Value |
Job type parameters are added as Label and Value pairs (key value pairs) where Label is the name of an attribute, and Value is an assigned value for this attribute. To add a new Label/Value pair, click To delete a Label/Value pair, click |
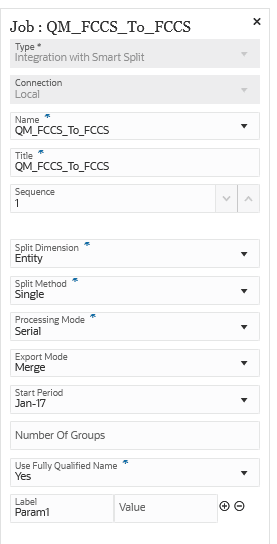
Here are sample parameters for an Integration with Smart Split job type where the Split Dimension is "Entity" and the Split Method is "Single":
Here are the integrations created with Split Dimension on "Entity" and a Split Method of "Single":

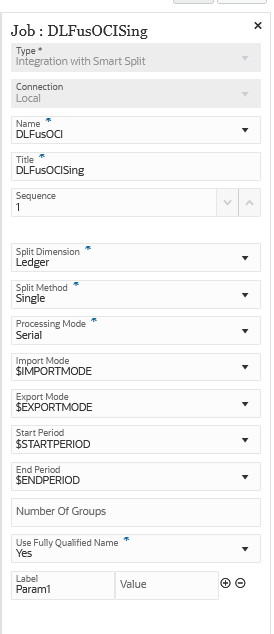
Here are sample parameters for an Integration with Smart Split job type where the Split Dimension is "Ledger" and the Split Method is "Single":
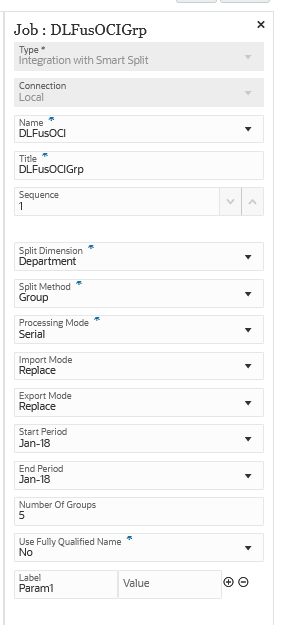
Here are sample parameters for an Integration with Smart Split job type where the Split Dimension is "Department" and the Split Method is "Group" with a maximum number of 5 groups:
Here are the integrations created by the Integration with Smart Split job type above:

Here are sample parameters for an Integration with Smart Split job type where the Split Dimension is "Company" and the Split Method is "Custom":
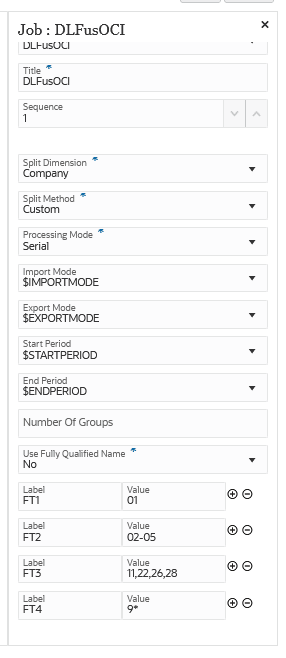
The DLFusOCI-FT1 - DLFusOCI-FT4 integrations below are the results of the Integration Smart Split job type using a Split Method of "Custom":

Here are sample parameters for an Integration with Smart Split job type where the Split Dimension is "Department" and the Split Method is "Custom-Functions":
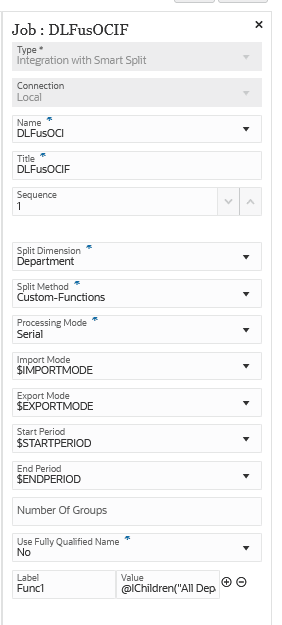
The DLFusOCI-Func1 integration below is the result of the Integration with Smart Split job type using a Split Method of "Custom-Function":
