Pipeline Process Description
The workflow for creating and running a Pipeline process is as follows:
-
From the Data Integration home page, click
 (Create), and then select Pipeline.

-
Optional: To enable non-administrators to view Pipelines on the Data Integration home page, complete the following:
-
From the Data Integration home page, and then from the Actions menu, then from the Configure actions drop-down, select System Settings.
-
From the System Settings page, then in the Enable Pipeline Execution for Non-Admin setting to enable non-administrator users to view Pipelines on the Data Integration home page, select Yes.
-
Click Save.
-
-
From the Create Pipeline page, then Details, in the Pipeline Name, specify a name for the Pipeline.
-
In Pipeline Code, specify a Pipeline code.
The code can contain up to 30 alphanumeric characters with a minimum of 3 characters and a maximum of 30 characters. This code cannot be updated after a Pipeline is created. Use the pipeline code to execute the Pipeline using a REST API.
-
If jobs are run in parallel mode, specify the maximum number of jobs to run in parallel mode in Maximum Parallel Jobs for each stage.
When jobs are run in parallel mode, at runtime, the system runs jobs together in parallel (not sequentially). You can enter between 1 to 25 jobs to run in parallel mode.
When jobs are run in serial mode, at runtime, the system runs the jobs one after another in a specific sequence.
-
In Location, specify or select the location to associate with the Pipeline.
Note:
The name of the location selected for the Pipeline cannot be the same name used in an integration. -
(Optional) : To enable non-administrators to run a Pipeline job, complete the following:
-
In Proxy User, enter the username associated with the service administrator role.
If the user name is different from the current username, then the system prompts the user to enter the password.
For information on how roles are defined in the Oracle Fusion Cloud Enterprise Performance Management, see Overview of Access Control in Administering Access Control for Oracle Enterprise Performance Management Cloud .
If the Proxy User name is the same name as the service administrator, then the system does not prompt for a password.
-
In Proxy Password, enter the password for the proxy user.
For more information about using proxy administrator users, see Allowing Non-Administrators to Execute Jobs in the Pipeline.
-
-
Click Save and Continue.
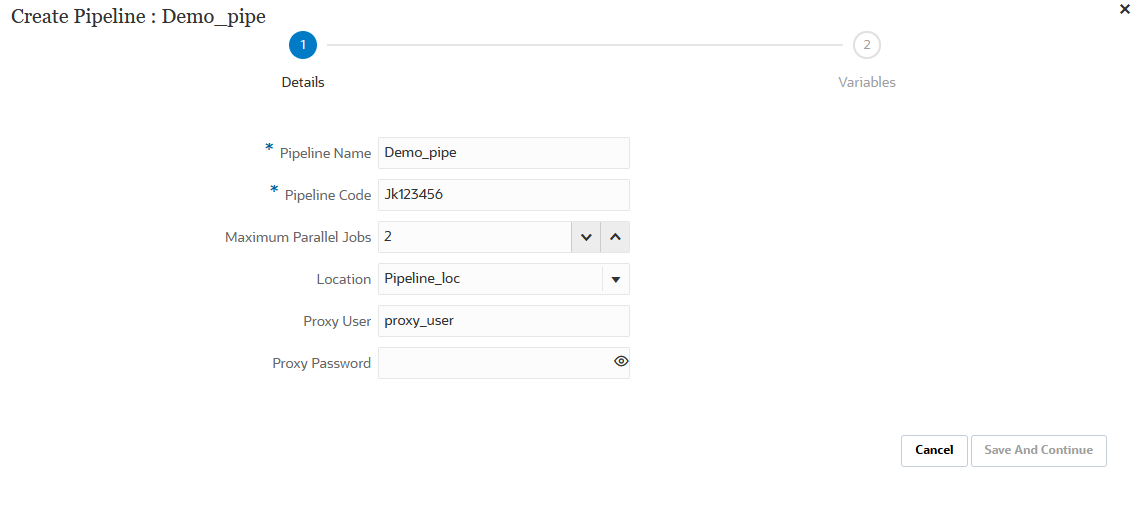
The new Pipeline is added to the Data Integration homepage. Each Pipeline is identified with a
 under the Type header.
Note:
When location security is enabled, non-administrators can view Pipeline jobs in ready-only mode (cannot edit or create a Pipeline) and run individual jobs in the Pipeline based only on the users groups by location to which they have been assigned in Location Security. (The service administrator can create, edit, and run any job type in the Pipeline.)You can search for Pipeline jobs by searching for the word "pipeline" or a part of the word from Search.
You can view or edit an existing Pipeline by clicking
 to the right of the Pipeline and then selecting Pipeline
Details.
-
On the Variables page, a set of out-of-box variables (global values) for the Pipeline are available from which you can set parameters at runtime. Variables can be pre-defined types like: "Period," "Import Mode," "Export Mode," etc., or they can be custom values used as job parameters.
For example, you can set a substitution variable (a user variable name preceded by one or two ampersands (&)) for the Start Period.
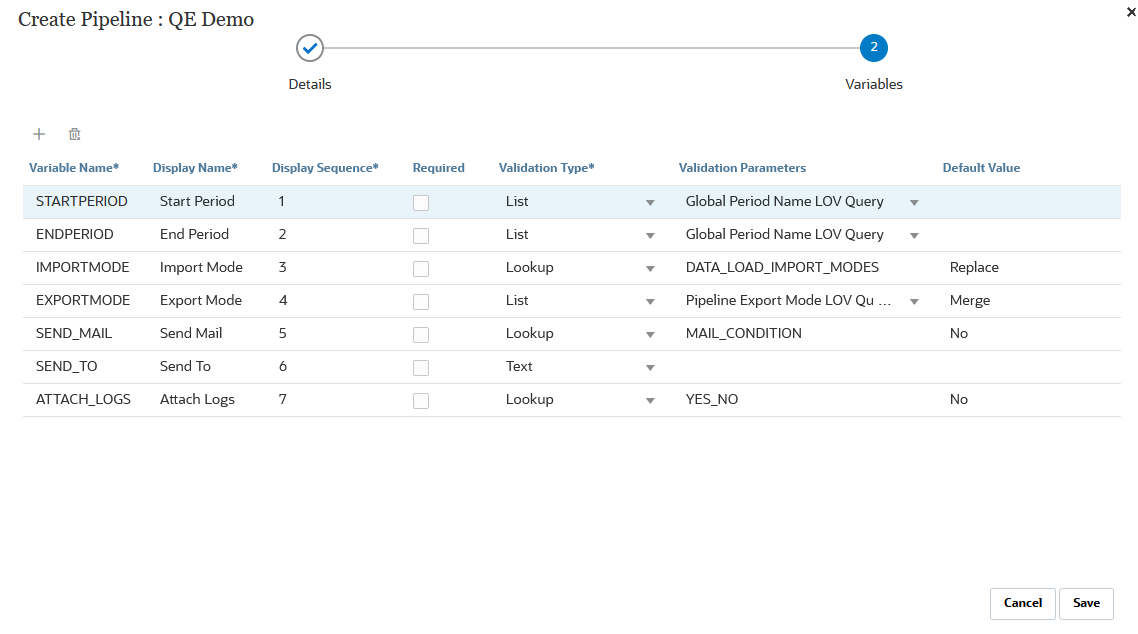
For more information on runtime variables, see Editing Runtime Variables.
-
Click Save.
-
On the Pipeline page, click
 .
.
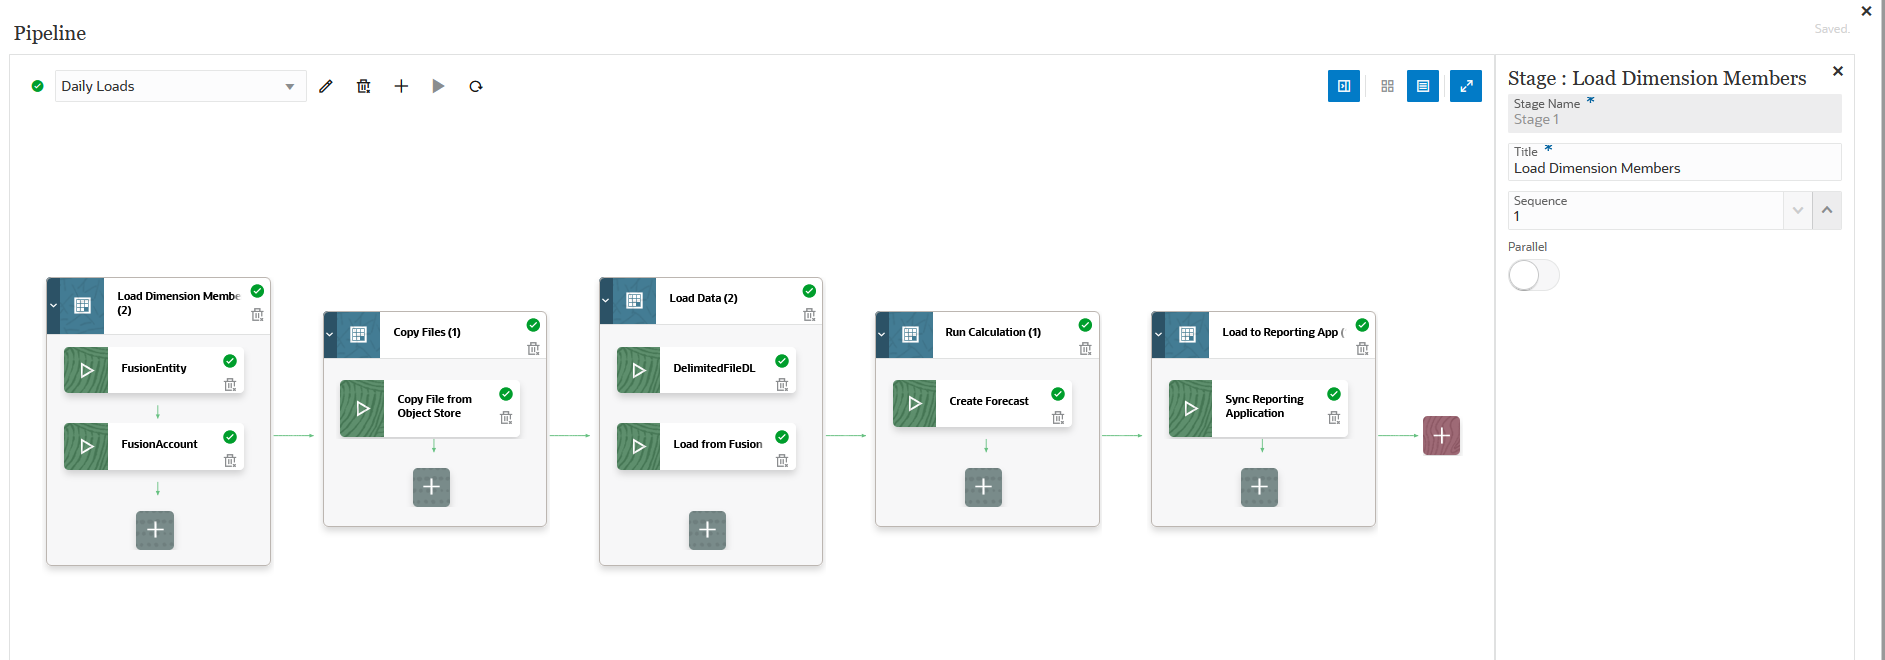
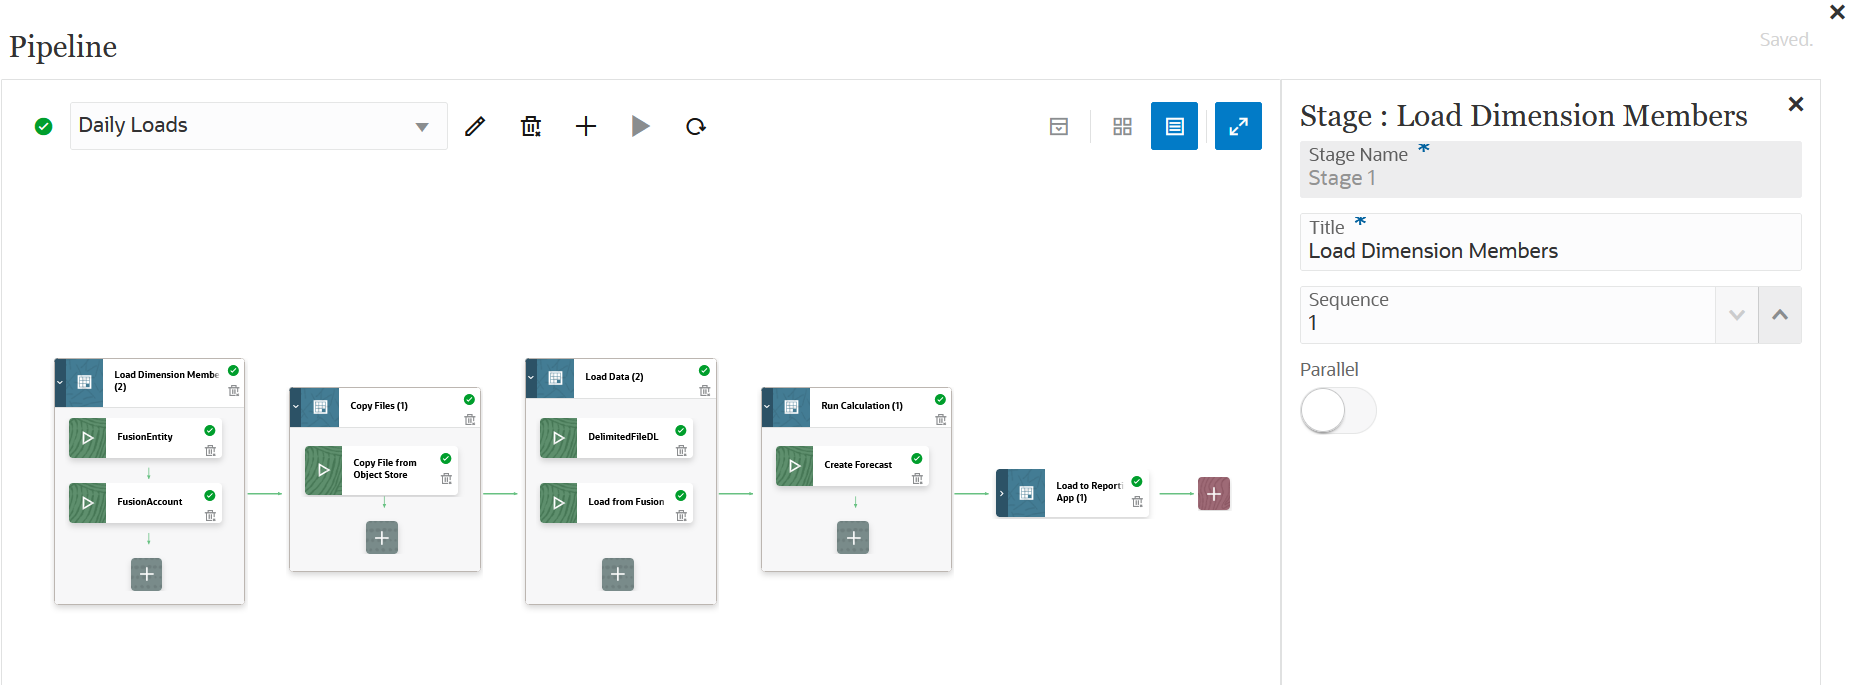
A new stage card is created.

A stage is a container for jobs that you want to run in the Pipeline and can include jobs of any type and for multiple target applications. Use a stage card as an entry point to add, manage, and delete job(s) contained in each stage. Each stage can execute jobs in serial or parallel modes. Stages are only executed serially meaning if you have multiple stages, each stage must complete before the system executes the jobs in the next stage.
A sample Pipeline might include the following stages:
Stage 1: Load Metadata (jobs are run in serial mode)
-
Load Account Dimension.
-
Load Entity Dimension.
Stage 2: (jobs are run in parallel mode)
-
Load Data from Source 1.
-
Load Data from Source 2.
Stage 3: (jobs are run in serial mode)
-
Run Business Rule to perform calculation.
-
Run substitution variables.
-
-
In the Stage Editor, specify the stage definition:
-
Stage Name—Specify the name of the stage.
-
Title—Specify the name of the stage to appear on the stage card.
-
Sequence—Specify a number to define the chronological order in which a stage is executed.
-
Parallel—Toggle Parallel on to run jobs simultaneously.
The number of parallel jobs executed is determined by the maximum parallel jobs specified in the Maximum Parallel Jobs field from the Create Pipeline page.
Note:
The pipeline automatically moves to the next job when the current job is still running after thirty minutes. In this case, the current job and next job run concurrently.
If you have set a maximum time in the Batch Timeout in Minutes option (see System Settings), then the pipeline uses the maximum time value to determine how long a job runs. This setting is based on the sync mode (immediate processing) selection. In sync mode, Data Integration waits for the job to complete before returning control.
-
Note:
The On Success and On Failure options below control the processing of subsequent stages in the Pipeline. That is, when a stage succeeds or fails, do you want the Pipeline process to stop or to continue or skip to another stage. All jobs within a stage are always executed irrespective of success or failure of other jobs. So, if there is only one stage, then this option is not relevant.
For this reason, customers should organize logical job types in a stage. For example, you might include all metadata loads in one stage and if it fails, then the data isn't loaded. Or if a data load stage fails, don't perform calculation jobs in a stage.
On Success—Select how to process a stage when steps in the Pipeline definition are executed successfully.
Drop-down options include:
- Continue—Continue processing a stage when steps in the stage of the Pipeline definition execute successfully.
- Stop—Skip a stage in the case where you want to bypass a stage that is only executed on failure and proceed to the following stage in the Pipeline definition.
On Failure—Specify how to process a stage when a step within a stage fails.
Drop-down options include:
-
Continue—Continue processing subsequent steps in the stage of a Pipeline definition when a step within the stage fails.
-
Stop—Stop processing the current stage of a Pipeline definition when a step fails to process, and skip to perform any cleanup steps.
-
-
On the stage card, click > to add a new job to the stage.

-
On the stage card, click
 (Create Job icon).
A new job card is displayed in the stage card.

-
In the Job Editor, then from Type drop-down, select the type of job to add to the stage card.
Job types include:
-
Business Rule
-
Business Ruleset
-
Clear Cube
-
Copy from Object Storage
-
Copy from SFTP
-
Copy to Object Storage
-
Copy to SFTP
-
Create Reconciliation (ARCS only)
-
EPM Platform Job for Planning
-
EPM Platform Job for Financial Consolidation and Close and Tax Reporting
-
EPM Platform Job for Enterprise Profitability and Cost Management
-
Export Dimension by Name (EDMCS)
-
Export Dimension Mapping by Name (EDMCS)
-
Export Mapping
-
Export Metadata
-
File Operations
-
Generate Report for Account Reconciliation (ARCS only)
-
Import Attribute Values (ARCS only)
-
Import Balances (ARCS only)
-
Import Mapping
-
Import Metadata
-
Import Pre-Mapped Balances (ARCS only)
-
Import Pre-Mapped Transactions (TM) (ARCS only)
-
Import Rates (ARCS only)
-
Integration
-
Integration with Smart Split
-
Open Batch - File
-
Open Batch - Location
-
Open Batch - Name
-
Plan Type Map
-
Run Auto Alert (ARCS only)
-
Run Auto Match (ARCS only)
-
Set Period Status (ARCS only)
-
Set Substitution Variable
-
-
From the Connection drop-down, select the connection name to associate with the job type.
The connection can be either a "local" connection (the connection is on the host server) or "remote" (the connection is on another server). By default, "Local" is the value for a connection. If a job type supports a remote operation, (for example, an integration to move data to a remote business process), then you are prompted for the connection name.
Note the following exceptions:
-
Copy to Object Storage—The Object Storage requires an Other Web Services Provider connection type. You must have access to the Web service to which you're connecting. You must also have the URL for the Web service and any login details, if required. For more information, see Connecting to External Web Services in Administering Planning.
In addition, you must generate an auth token to use as the user password for an Other Web Services Provider connection type. For information on creating an auth token, see To create an auth token.
-
Copy from Object Storage—The Object Storage requires an Other Web Services Provider connection type. You must ensure you have access to the Web service you're connecting. You must also have the URL for the Web service and any login details, if required. For more information, see Connecting to External Web Services in Administering Planning.
In addition, you need to generate an auth token to use as the user password for an Other Web Services Provider connection type. For information on creating an auth token, see To create an auth token.
-
-
From Name, select the name of the job.
The Name job parameter is not applicable for:
- Set Substitution Variable job type
- Copy to and from Object Storage job types
- Open Batch (by file, location, and name) job types
-
In Title, specify the title of job name to appear on the job card.
-
In Sequence, select the order in which to run the job when jobs are in the stage.
-
From Job Parameters, select any job parameters associated with the job.
Job parameter can be a static value assigned to the job or can be assigned from within a Pipeline variable.
Job parameters are based on the job type. See below for the parameters associated by job type:
- Using a Copy from SFTP Job Type
- Using a Copy to SFTP Job Type
- Using an EPM Platform Job Job Type for Enterprise Profitability and Cost Management
-
Using an EPM Platform Job Job Type for Financial Consolidation and Close and Tax Reporting Jobs
- Using a Run Auto Alert Job Type
-
Click
 to run the Pipeline.
-
On the Run Pipeline page, complete any runtime prompts and then click Run.
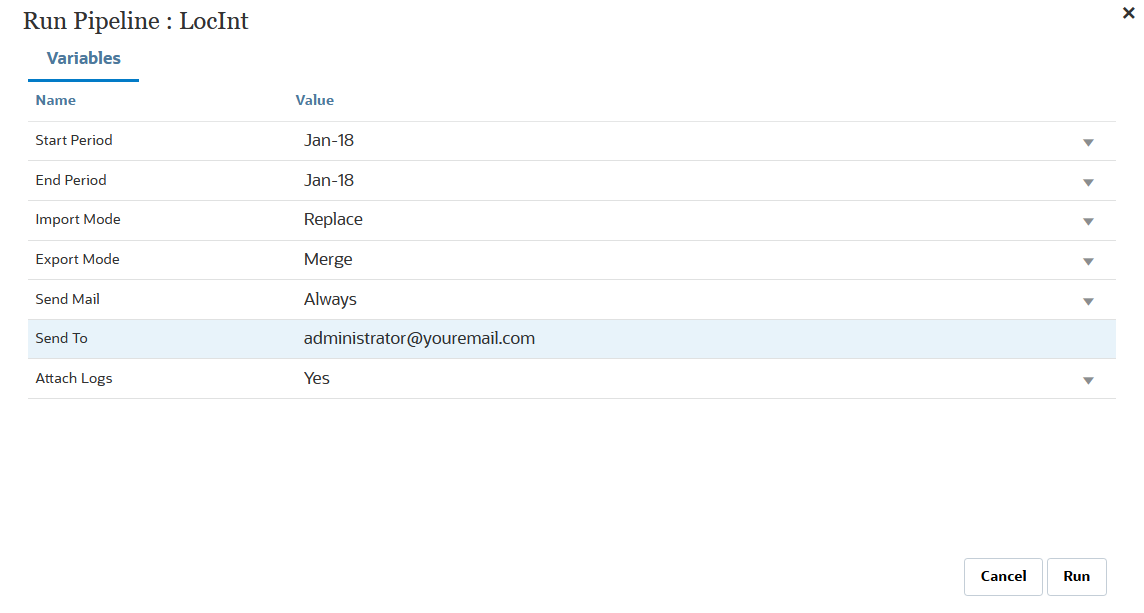
When the Pipeline is running, the system shows the status as:
 .
.
You can click the status icon to download the log. Customers can also see the status of the Pipeline in Process Details. Each individual job in the Pipeline is submitted separately and creates a separate job log in Process Details (for more information, seeViewing Process Details).
-
Optionally, you can schedule a Pipeline definition to run based on the parameters and variables that were defined for the Pipeline in the Data Integration user interface. For more information, see: Scheduling Jobs in Administering Planning.
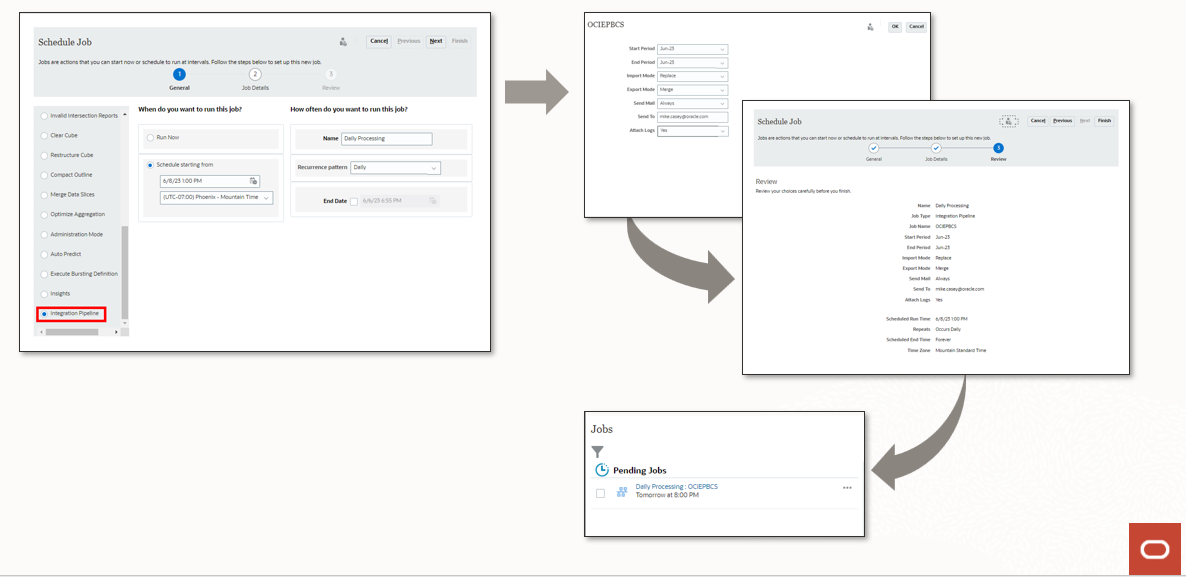
-
Click
 .
.
If there are any unsaved changes in the Pipeline, the message: Unsaved is shown beside the
 When the Pipeline is saved, the unsaved message is changed to
Saved.
Note:
To cancel or undo any changes made in the Pipeline without saving changes, click Cancel or (Reset icon).