Checking Out Doclets

This topic applies to Office-based doclets of all types, including reference and supplemental. Unless otherwise noted, the term doclets refers to all Office-based doclet types.

Only doclets, reference doclets, and Office-based supplemental doclets can be checked out, signified by the following icons in the Report Center.

  • Icon for doclet indicates a doclet

  • Icon for reference doclet indicates a reference doclet

  • Icon for supplemental doclet indicates a supplemental doclet

When you check out a doclet, reference doclet, or Office-based supplemental doclet, it is locked so that nobody else can modify it.

Tip:

To safeguard all of your report content, Oracle strongly recommends that you perform a checkout prior to opening a doclet and making any content modifications. This will ensure that any modifications made by you or other users are not inadvertently overwritten.

Note:

In Oracle Smart View for Office, you can only download PDF doclets and non-Office-based supplemental doclets. To check out PDF doclets and non-Office supplemental doclets, use the Narrative Reporting web interface.

Before you begin this procedure, you should have already launched an Office application, connected to Narrative Reporting, and opened a report package, as described in Connecting to Narrative Reporting in Smart View.

To check out a doclet, reference doclet, or supplemental doclet:
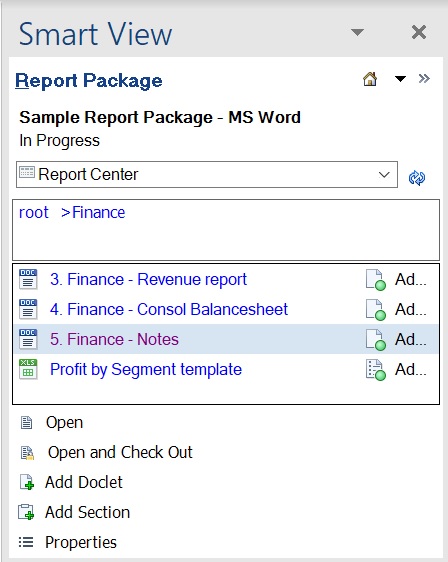
  1. In the Report Center, select the doclet to check out.
    Note the following when selecting doclets:
    • Clicking the doclet name opens the doclet, but does not check it out.

    • Clicking to the right of the doclet name allows you to select the doclet, but not open it.

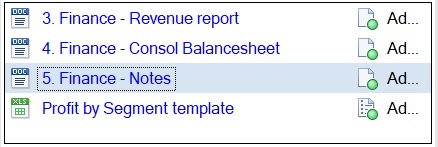
    • If you are using the keyboard to navigate the Report Center, use Ctrl-Tab to navigate to the first doclet icon in the Report Center list, then Tab to the doclet title, and then use the up and down arrow keys to navigate to the doclet to select. Use Ctrl-Tab to move to the Action Panel menu items, then use the up and down arrow keys to navigate to an Action Panel option, and then press the spacebar to select an option.

      When a doclet is selected using keyboard navigation, the selected doclet name has a dotted-line box around it:


      Portion of the Report Center panel showing the highlighting of a selected docet
  2. In the Action Panel, select Open and Check Out.
    The Open and Check Out command is shown in the Action Panel after selecting a doclet in the report package.

    Selecting this option opens the doclet and checks it out in one operation.

    Alternatively, double-click the doclet name to open, then continue with step 3.

    Note:

    When navigating within the doclet panel, the Action Panel menu items listed are relative to—and can change depending on—the item highlighted in the panel. If you are using the keyboard to navigate the doclet panel, note that even though you may have tabbed to a doclet panel item, it is not highlighted, or selected, until you press the space bar. Pressing the space bar highlights the item with a square border meaning that the item is now selected and in focus. Then, the Action Panel menu items will refresh and display relative to the item you’ve selected.

    The Narrative Reporting ribbon is displayed in the Office application when you open:

    • A doclet or linked regular doclet

    • A reference doclet

    • An Office-based supplemental doclet

    Figure 23-14 shows the Narrative Reporting ribbon for the author phase, in the initial state, before the doclet is checked out.

    Figure 23-14 Narrative Reporting Ribbon for Doclet in Author Phase in Initial Unchecked-Out State


    Narrative Reporting ribbon for doclet during the Author phase in the initial, unchecked-out state.

    Note:

    The availability of buttons in the Narrative Reporting ribbon depends on the permissions that are assigned to you; the phase that you are in—authoring, review, or sign off; and the operation you are performing.

    Additionally, if you check out a linked regular doclet, the Replace File button is displayed instead of the Upload button.

  3. In the Narrative Reporting ribbon, click Check Out.

    Note:

    • If an Office-based doclet of any type is already checked out by another user, then the Check Out button is disabled.

    • If you have been are viewing an opened doclet for a while prior to checking it out, and the doclet was updated by another user or had embedded content or variables refreshed while you were viewing the doclet, when you perform your checkout, a message notifies you that a more recent version of the doclet exists. Select an option:

      • Yes – Default. Clicking Yes closes your working copy of the doclet, then downloads the latest version of the doclet from Narrative Reporting, checks it out, and opens it. You will lose your unsaved changes.

      • No – Ignores the warning and checks out the local version that you have been working on; however, you run the risk of overwriting another user’s updates.

    The selected doclet is now locked for your use. You can work with it directly in Smart View while connected to Narrative Reporting.

    In the doclet responsibilities list in the Smart View Panel, a lock icon and the user name are displayed for the doclet or supplemental doclet that is checked out.


    Doclet in a doclet responsibilities list in the Smart View Panel, showing a lock on the doclet icon, and the name of the user who has checked out the doclet.

    In the Narrative Reporting ribbon, the Check Out button is replaced with the Cancel Checkout button, and the Embed button is added.

    Figure 23-15 shows the Narrative Reporting ribbon for the author phase, after the doclet is checked out.

    Figure 23-15 Narrative Reporting Ribbon for Doclet in Author Phase in Checked-Out State


    Narrative Reporting ribbon for doclet during the Author phase in the checked-out state.

    Next steps for working with the checked-out doclets in Narrative Reporting:

    • You can undo, or cancel, the checkout if you want to remove your lock on the doclet. Undoing the checkout allows other users to check out and update the doclet. See Undoing Checkouts.

    • If you must close Office before you are finished with your authoring changes, you do not need to check in the doclet, but you must upload it to retain the changes in progress. See Uploading and Working with Page Attributes and Slide Masters.

    • If you want to perform a health check and refresh a doclet of any Office type (described in Performing a Health Check on Microsoft Office Documents), perform the health check first, and then save the temporary file with the correct doclet name. Next, upload and check in the saved doclet (see Checking In Doclets. Then check out the doclet, perform the refresh, and then upload the doclet and check it in.