Registering Reference Files with a Doclet

There is a two-part process for registering a reference file with a checked-out doclet, and then, separately, embedding the available content as needed throughout a doclet.

The procedure in this topic covers registering content from a reference file with a checked-out doclet. See Embedding Reference File Content in a Doclet for instructions on embedding content from the registered reference file.

Note:

Before you begin, you should have established ranges in the target reference file using Excel's Name Manager feature, as described in Defining Named Ranges in Reference Files. The Excel file should be closed when performing the procedure in this topic.

You can also register available content and then embed the content in one procedure. For more information, see Adding and Embedding Available Content from Reference Files.

To register a reference file with a doclet:
  1. If you have not already done so, open the report package, and then open and check out the doclet to which you want to register a reference file.
  2. Click Inspect in the Narrative Reporting ribbon to open the Properties dialog box.


    Inspect button in the Performance Reporting ribbon

    You can also select the doclet in the report package panel, and then click Properties to open the Properties dialog box.

  3. In Properties , click the Embedded Content tab, Embedded Content tab, and then click the Available Sources link.
  4. On the Available Sources tab of the Embedded Contents dialog, click Add button for registering a reference file to a doclet, looks like a plus sign, and then in the Add Reference File dialog, click The Choose File button.
  5. Navigate to the Excel file to register as a reference file, select it, and click Open to return to the Add Reference File dialog.

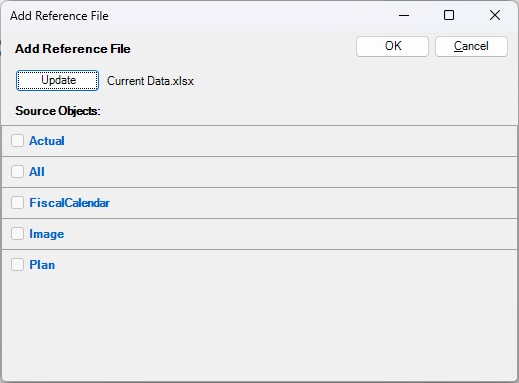
    Under Source Objects, the named ranges in the Excel file are listed. These ranges can be selected as available content, which can later be embedded. For example, in Figure 23-25, the Excel file that was selected, Current Data.xlsx, contains five named ranges; therefore, these named ranges can be selected as available content and later, they can be embedded in the doclet.

    Figure 23-25 The Add Reference File Dialog Box Listing Named Range Source Objects

    The Add Reference File dialog box, showing five named ranges from the selected reference file that can be registered as available content with the doclet.

    Remember, the ranges listed above were specified as named ranges earlier in Defining Named Ranges in Reference Files.

  6. Click the range names (not the check box) that you want to make available for embedding in the doclet.

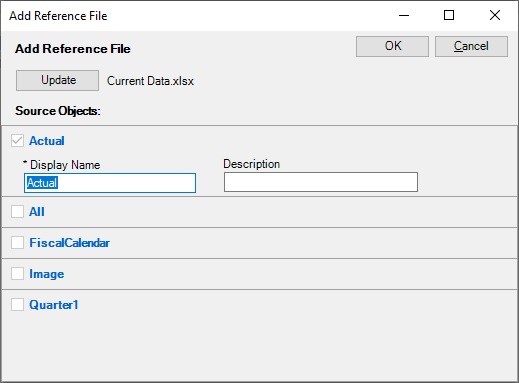
    The check mark that appears next to the range name you click shows that the range is now registered with the doclet. For example, in Figure 23-26, we selected the range named "Actual" to register with the doclet.

    You can choose any number of ranges listed under Source Objects, but in this scenario, we are selecting only one.

    Figure 23-26 The Add Reference File Dialog After Clicking on a Range Name

    The Add Reference File dialog box, showing the available range selected to register with the doclet, with the range named Actual selected
  7. Click OK to close the Add Reference File dialog box.

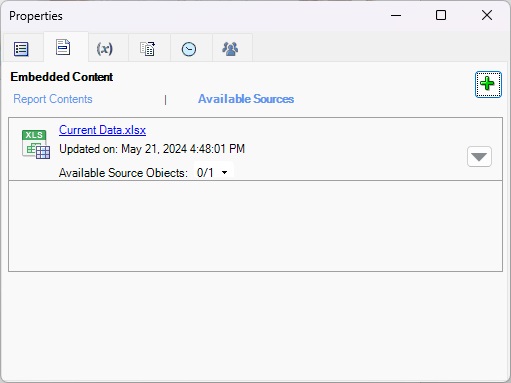
    You are returned to the Embedded Contents tab of the Properties dialog. The reference file is now registered with the doclet, as shown in Figure 23-27.

    Figure 23-27 Properties Dialog, Embedded Content Tab, Showing Registered Reference File

    The Properties dialog, Embedded Content tab, listing the reference file that was just registered with the doclet

    Note that you can choose to embed content in the doclet at this point, from this dialog box. But the procedure in this topic is looking at registering content only. See Embedding Reference File Content in a Doclet for instructions on embedding available content from the registered reference file.

  8. Optional: Repeat the steps starting from step 3 for any other reference files you want to register with the current doclet.
  9. When finished registering Excel files as reference files with the current doclet, click the X in the upper-right corner of the Properties dialog to close it.
  10. Upload the doclet and check it in.
  11. Optional: Repeat this entire procedure to register reference files with other doclets in the report package.