Configure User Type Settings
An administrator can add a user type and define the user settings such as, user type name, access, activity management, resource management, maps, permissions, and field restrictions using the User Types page.
To configure the User Type settings:
- As an administrator, navigate to the Configuration page.
- Click the User Types option. The User Types page appears.
Below is a screenshot of the User Types page:
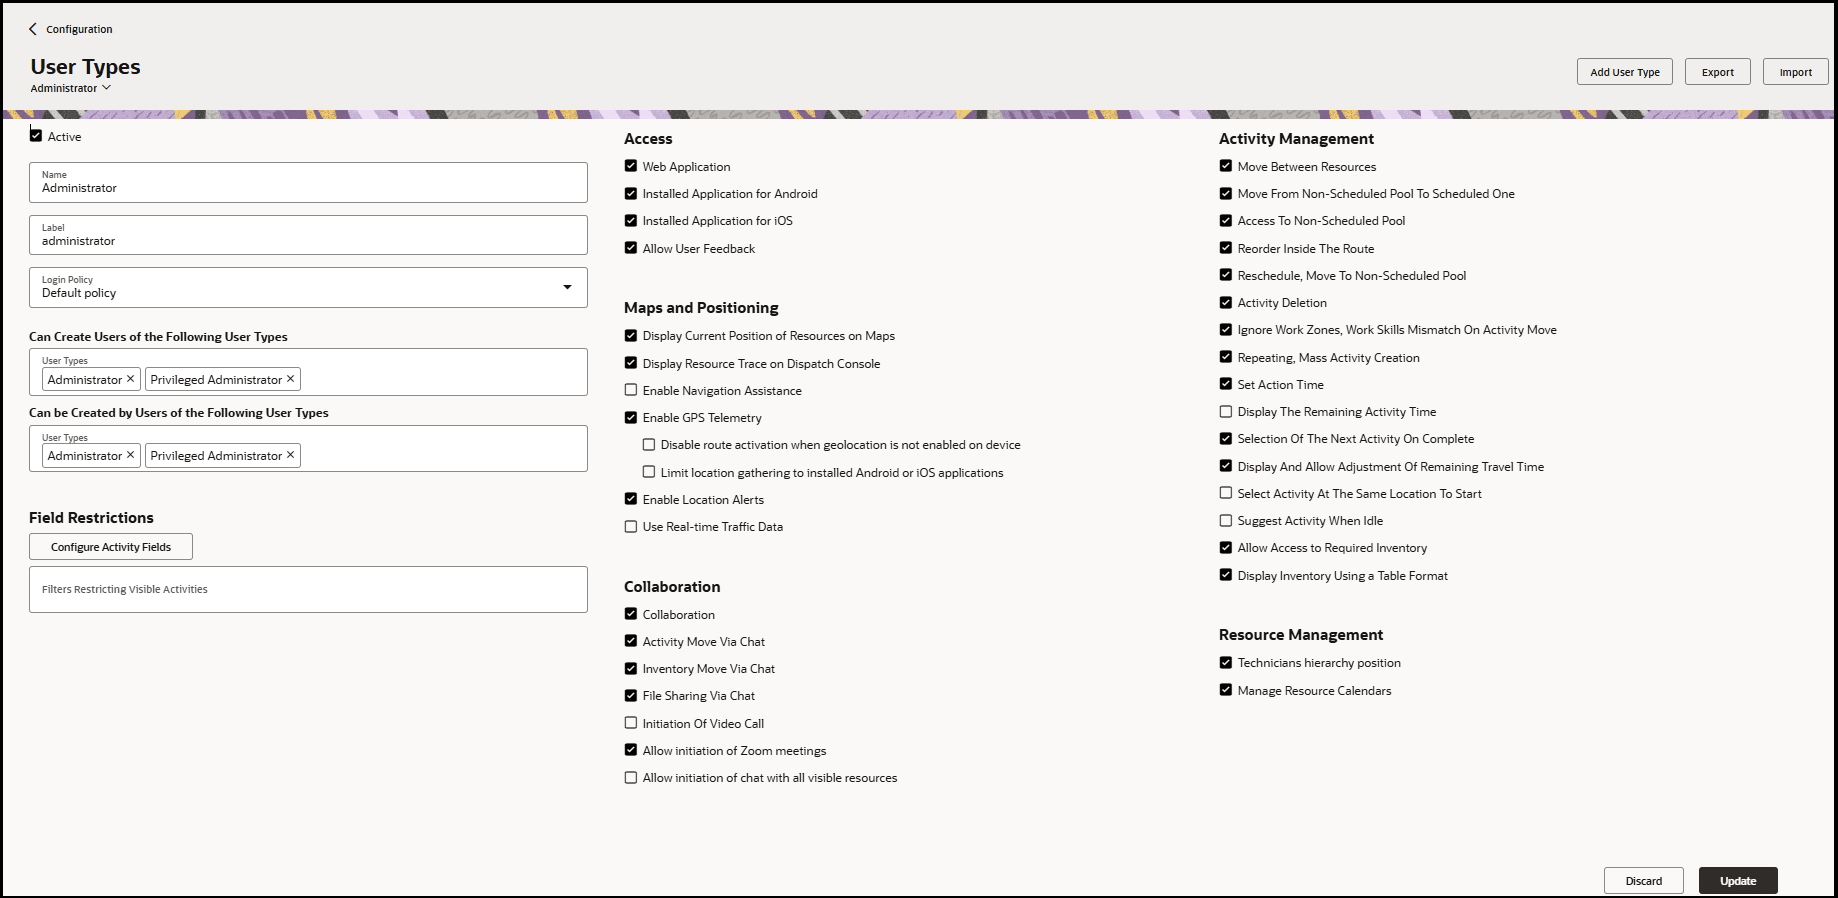
- Select the appropriate user type and specify the following settings as described in the table below:
| Setting | Description | Notes |
|---|---|---|
| User Type Info | ||
| Active | Indicates whether the user type is active. | Activating a user type simply makes it assignable to users. Inactive user types still apply to users that are assigned to them. |
| Name | A user-friendly name that describes the user type. | Required. Spaces are allowed. |
| Label | A unique identifier of the user type. | Required. No spaces are allowed. |
| Associated Resource Role | Drop-down list displaying predefined resource roles and custom roles created through the Manage Resource Roles task in Setup and Maintenance, e.g., "Field Service Mobile Worker" or "Field Service Manager". | Important: This information only applies to Oracle Fusion Field Service
environments. You can verify whether you've Oracle Fusion Field
Service or Oracle Field Service, by signing in and checking on the
About page. |
| Login Policy | Defines the user authentication method to Oracle Fusion Field Service | Important: This information only applies to Oracle Field
Service environments. You can verify whether you've Oracle Field
Service or Oracle Fusion Field Service, by signing in and checking
on the About page. |
| Can Create Users of the Following User Types | Lists the user types that this user type can create. |
Inactive user types are greyed out and cannot be created by this user type. Permission to create user types is reciprocal. For example, if user type Manager can create user type Dispatcher, user type Dispatcher can create user type Manager. To change the user types this user type can create, click the pencil icon. |
| Can be Created by Users of the Following User Types | Lists the user types that can create the current user type. |
Inactive user types are greyed out. Permission to create user types is reciprocal. For example, if user type Manager can create user type Dispatcher, user type Dispatcher can create user type Manager. |
| Field Restrictions | The Field Restrictions section is being deprecated. These controls are hidden during the upgrade to 25D if not in use and remain visible only for users actively using them. | |
| Filters Restricting Visible Activities | Defines whether the users of the current type can view the entire routes or only some activities. | Setting the visibility restrictions requires proper configuration of the applicable filters. |
| Access Settings | ||
| Web Application | When enabled, users of the current type can use the unified Core Application to manage dispatch operations. | None |
| Installed Application for Android | When enabled, users can access the application through the Oracle Fusion Field Service Mobile for Android application. | None |
| Installed Application for iOS | When enabled, users can access the application through the Oracle Fusion Field Service Mobile for iOS application. | None |
| Allow User Feedback | When selected, Oracle Fusion Field Service Android and iOS app users can see the Like and Dislike icons on either the My Route or Activity List page. Using these icons users can provide feedback about the app to Oracle. | None |
| Maps and Positioning | ||
| Display Current Position of Resources on Maps |
The following options are available only when you select Display Current Position of Resources on Maps settings:
|
None |
| Display Resource Trace on Dispatch Console |
The following options are available only when you select Display Resource Trace on Dispatch Console settings:
|
None |
| Enable Navigation Assistance | ||
| Enable GPS Telemetry | When enabled, the user's geo-positioning information can be collected directly from the user's device. | None |
| Disable route activation when geolocation is not enabled on device | When selected, users can't activate the route if they haven't
enabled the location settings on their device. Note: This option is available only when you
enable GPS Telemetry. |
None |
| Limit location gathering to installed Android or IOS applications | When selected, Oracle Fusion Field Service collects the
location details only for the installed applications. If you don’t
select this permission, the application collects the location
details from all the interfaces that the mobile worker has logged in to. Note: This option is available only when
you enable GPS Telemetry.
|
Be aware that even if you select this option, resource positions can still be sent through APIs. |
| Enable Location Alerts | When enabled, the user can receive alerts on their mobile device whenever any compliance issues have occurred and have been identified by the Smart Location module. | None |
| Use Real-Time Traffic Data | When enabled, the check box, Show Traffic is shown on the Map view. Users can select the Show Traffic check box to view the current traffic data in the selected route. |
This feature isn't available for Contingent Workers. Real-time traffic is available to users of Oracle Fusion Field Service and Oracle Field Service Enterprise customers. |
| Collaboration | ||
| Collaboration | Select the check box to view the collaboration settings. | None |
| Activity Move Via Chat | In addition to chat functions, allows the user to transfer activities via chat. | None |
| Inventory Move Via Chat | In addition to chat functions, allows the user to transfer inventory via chat. | None |
| File Sharing Via Chat | In addition to chat functions, allows the user to share files via chat. | If this option is unchecked, users will not be able to view Files/Images shared with them. |
| Initiation Of Video Call | When enabled, the setting allows the user type to access the Video Chat functionality. | None |
| Allow initiation of Zoom meetings |
Select the check box to enable the ability to initiate Zoom calls using Collaboration. |
Zoom meetings can be initiated only from one-to-one chats and group conversations but are not available in broadcast chats. |
| Allow initiation of chat with all visible resources |
Select this check box to initiate chats with anyone you are authorized to see in the system, based on the visible resources assigned. When enabled, you can:
|
None |
| Allow initiation of Microsoft Teams meetings | Select the check box to enable the ability to initiate Microsoft Teams meetings using Collaboration. |
Microsoft Teams meetings can be initiated only from one-to-one chats and conferences and are not available in broadcasts. A valid Microsoft Teams license is required. When users initiate a Microsoft Teams meeting for the first time, they are prompted to authorize access to their Microsoft account. |
| Activity Management | ||
| Move Between Resources | When enabled, the user can move an activity from one resource to another. | None |
| Move From Non-Scheduled Pool To Scheduled One | When enabled, the user can convert a non-scheduled activity to one that's scheduled. | None |
| Access To Non-Scheduled Pool | When enabled, the user can access the pool of non-scheduled activities and perform actions to them. | None |
| Reorder Inside The Route | When enabled, the user can change the position of an activity in the route. | None |
| Reschedule, Move To Non-Scheduled Pool | When enabled, the user can move an activity to a different date or make it non-scheduled. | None |
| Activity Deletion | When enabled, the user can delete an activity together with canceling it. Otherwise, a canceled activity remains in the application. | None |
| Ignore Work Zones, Work Skills Mismatch On Activity Move | When enabled, the user can move activities to resources with work zones and/or work skills not matching those of the activity. | None |
| Repeating, Mass Activity Creation | When enabled, the user can create mass and repeating activities. | None |
| Set Action Time | When enabled, the user can adjust the time for activity actions and route activation manually. When not enabled, the action time is logged as the current time. | None |
| Display The Remaining Activity Time | When enabled, the activity work progress countdown is displayed. | None |
| Selection Of Next Activity On Complete | When enabled, the user completing an activity can select the next activity to start. Otherwise, only the next activity in the route can be started. | None |
| Display And Allow Adjustment Of Remaining Travel Time | When enabled, the Travel Time Countdown is displayed and the user can adjust travel time. Available values are: 5, 10, 15, 30, 45 minutes, 1 hour, 1 hour and 30 minutes, 2, 3, 4 and 8 hours. | None |
| Select Activity At The Same Location To Start | When enabled, displays the number of activities that are assigned in the same location for a mobile worker. This information is displayed above the Start button on the Resource Info page. | The distance within which a location falls is determined by the Resource is considered to be at the activity location if the distance to it is less than X meters setting in the SmartLocation/GPS section on the Business Rules page. |
| Suggest Activity When Idle | Select this checkbox to let Oracle Fusion Field Service suggest an activity to a resource that has idle time between activities. Only those activities that fit the current route are suggested when an activity is marked Complete or Not Done. The suggested activities might include pending and unassigned activities that are close to the resource’s current location. The suggestions are available only in online mode. | None |
| Allow Access To Required Inventory | When enabled, the user can access the Required inventory functionality and perform all related actions. | The Required Inventory permission for Manage is implemented as a visibility setting for the Required Inventory tab in the Add activity or Activity details context. |
| Display Inventory Using A Table Format | When selected, inventory is displayed in a tabular format. When not selected, inventory is displayed as a list, grouped by Inventory Type. | None |
| Resource Management | ||
| Technicians Hierarchy Position | When enabled, the user can move the resources to different organizations in the resource tree. | None |
| Manage Resource Calendars | When enabled, the user can modify the working calendar of the resource. | None |