Creating Targets for Enterprise Journals
Before you work with Enterprise Journals, you create Targets that contain the definition and properties of the target ERP system to which to post the journals.
When you create a journal template, you choose the Target to associate with the template from the list of pre-defined Targets.
To create Targets, you must be a Service Administrator or Power User.
Enterprise Journals provides a seeded Target named Cloud Financials. You can also add your own Targets.
You specify attributes that are required for the export process in a target, and you can define custom attributes specific to your business requirements. The attributes may be constant in nature or available for mapping in the journal template. Enterprise Journals provides seeded Attributes for the Cloud Financials target.
When you create a target, you specify the type of integration to the target ERP system. You can select one of these methods:
- Cloud Financials - Uses Direct Integration, a dedicated posting process to the ERP System
- Other - You can use EPM Automate commands, or third-party API tools to perform the posting
For the Direct Integration method, you can select to enable or disable automatic Posting by the system. Disabling posting is predominantly used in scenarios where the Cloud Financials ERP is down for some reason and the Administrator would like to turn off post actions, while continuing the workflow levels. In this case, the journals would continue to qualify for Ready To Post and once the ERP is ready, the Administrator could Enable posting.
You can import descriptive flexfields as a part of the import journals scheduled process when Direct Integration is enabled. Descriptive Flexfields are used for customized data capture and usage. They can be of any type, from plain text to values from value sets or some values from tables, date fields, and number fields. For more information about descriptive flexfields, see:
To create targets for Enterprise Journals:
-
On the Home page, click Application, and then click Enterprise Journals.
-
Click the Targets tab on the left.
-
Click the New icon.

-
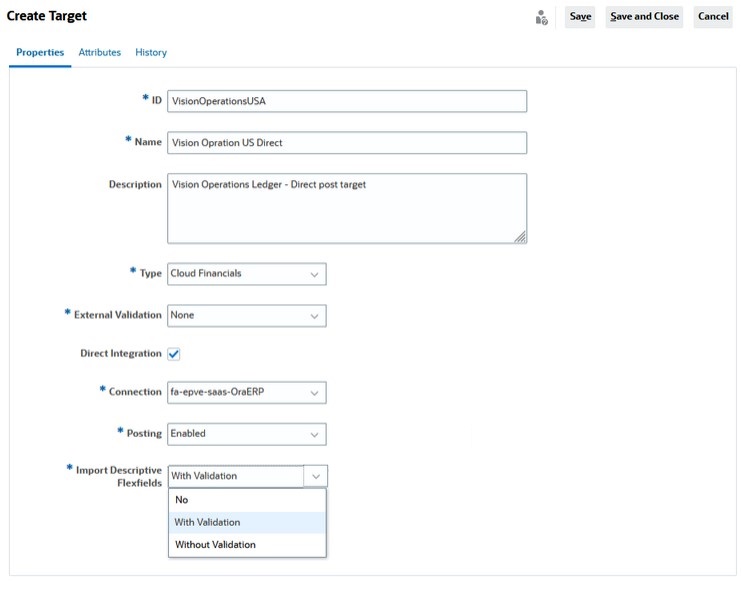
On the Properties tab, specify the following information:
-
ID: You can enter a maximum of 80 characters.
Enter a unique identifier for the Target.
-
Name - Enter a name for the Target. The Target name is required and will be used when you create a journal template. You can enter a maximum of 80 characters.
-
Description - Optional. Enter a Target description. You can enter a maximum of 255 characters.
-
Type - From the drop-down list, select the type of integration to the Target ERP system, for example Cloud Financials or Other.
- External Validation - You can select the following from the drop-down list:
- None - If you select this option, no external validation will be performed. Internal Journal validation will still occur by default.
- Custom - If you select this option, you have to validate the journal data against the Target ERP system by configuring the type of external validation you want.
See also: Working with EPM Automate and REST APIs guides.
-
Direct Integration - If you selected Cloud Financials as the Type of integration, the Direct Integration check box is checked by default. Direct Integration is a dedicated posting process to the ERP system.
Note:
You must create a custom source called EPM EJ at Cloud Financials before performing posting. -
If the Type of integration is Other, the Direct Integration option is not available.
If the Direct Integration check box isn't checked, no job will be triggered after the final workflow stage, and the journal posting status will be Ready to Post. You can use EPM Automate commands, or third-party API tools, to perform the posting. You can use APIs to update the status to Failed or Posted. See Enterprise Journals Posting Process.
See also: Working with EPM Automate and REST APIs guides.
-
Connection - The Connections list is only displayed if Direct Integration is enabled. From the drop-down list, select a connection from the list of Connections predefined by the Administrator responsible for posting.
-
Posting - Select a posting option:
-
Enabled - The system will post the journal if the Type is Cloud Financials and Direct Integration is selected.
-
Disabled - The system will not post the journal if the Type is Cloud Financials and Direct Integration is selected.
-
- Import Descriptive Flexfields – Import journal
attributes to the descriptive flexfields to Cloud Financials when posting
journals. The options available are:
- No - Indicates do not import descriptive flexfields. Value N is passed in the scheduled job parameter during journal direct posting.
- With Validation - Indicates import descriptive flexfields with validation. Value W is passed in scheduled job parameter during journal direct posting.
- Without Validation - Indicates import descriptive flexfields without validation. Value O is passed in the scheduled job parameter during journal direct posting.
Note:
Before importing the descriptive flexfields, they must be configured in the Oracle Cloud Financials application.
-
- Click the Attributes tab to add attributes or click
Save and Close to save the Target.
Attributes:
- Text: You can enter a maximum of 255 characters.
- Integer: You can enter values -2147483648 to 2147483647
- Number:You can enter values xxxxxxxxxxxxxxxxx.xxxxxxxxx (17 digits and 9 decimal places)